Appreciating Light Part II
Rain and storms
With the onset of rain, particularly if it’s heavy, many photographers will pack up their equipment and head for home. This is understandable—it’s no fun getting soaking wet, especially if it’s cold, and rainwater can damage expensive cameras and lenses.
However, if you can find shelter that will keep you and your equipment dry, and which still provides access to a photogenic scene, it’s worth continuing to photograph. Rain can create very evocative images and pleasing alternatives to sundrenched landscapes. Light levels are usually low and a gentle, shadowless light can often bring out certain colors to great advantage, noticeably greens. Plant foliage, for example, will reproduce well in rainy conditions.
If your intention is to capture the essence of rain it’s rarely worth attempting to photograph the rain itself—unless it is strongly backlit against a very dark background the rain won’t be clearly visible. Instead, use a medium-to-long telephoto lens to zoom into a specific object that shows the rain—an overflowing drain, rivulets running down a street, raindrops on the end of a leaf—all these will illustrate the rain much more effectively than a blurry looking scene.

Monsoon haze
In this shot of a typical south Indian day during the monsoon, the rain is heavy yet appears like a dull haze. However, the people sheltering beneath umbrellas underline the reality of a rainstorm.
With rainstorms can often come lightning. If captured well, lightning can add great drama to a landscape or cityscape. It’s easier to capture lightning in dark conditions, so to begin with don’t try photographing lightning during the day or in very bright ambient lighting conditions. The secret to good lightning shots lies in knowing where and when the lightning will strike. Most lightning will center around thunderstorms, and it’s likely that where the first lightning strike occurred, others will follow. Set the camera on a tripod and use a wide-angle lens to cover a good area of the scene in which the first bolts appeared. Set the camera to Manual and turn Autofocus off. Set focus to Infinity, set the aperture to around f/8, and the shutter to Bulb (B). Using a cable release, hold the shutter open until the next lightning strike. If you’re in really dark conditions you can keep the shutter open for a minute or so and you may get a number of strikes recorded in one exposure. Review the images, and change either the aperture or the length of time you keep the shutter open to improve the lighting in your shots.
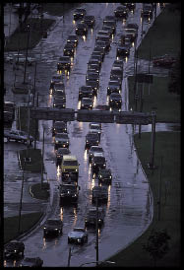
Rain effects
To establish “raininess,” some visual clues can help if you include them deliberately. In this shot, the reflections of car headlights in the wet surface of a Toronto freeway make the point effectively.

Capturing lightning
Distant lightning over Rangoon was shot at dusk with a 30-second exposure—long enough to catch a few cloud-to-cloud strikes and one cloud-to-ground strike. The aperture was f/2.8 and the sensitivity ISO 100.
Stay safe
Lightning can kill. If you’re at all concerned you’re going to get struck:
•Get into a car or building.
•Crouch low to the ground, sitting on your heels.
•DO NOT take shelter under a large isolated tree.
•Avoid tall structures, such as towers, power or telephone lines, and high fences.
•If you feel your hair standing on end, this is a sign that lightning is about to strike.
•Drop any metal objects and crouch down with your hands on your knees.
Sidelighting
Of the three main lighting directions—backlighting, frontal lighting, and sidelighting (all of which we are going to discuss in the following pages), it is the latter that is widely considered the most dramatic. The drama inherent to sidelighting lies in the close relationship between highlights and shadows.
In sidelit scenes, when the light strikes the subject or scene at right angles in relation to the position of the camera, areas of shadow and highlights are more or less evenly distributed—think of a person’s face lit purely from one side, half is in shade and half is lit. In this way sidelighting creates powerful, high-contrast images. This can be most effective if the background is in shade, as in the image of the two women below.
The distinctive shadows common to sidelighting have two further effects. First, they help to create a sense of depth to an image. Any object is represented twice in the photograph, first by itself and second by its shadow. This helps to create and reinforce a three-dimensional appearance within the photograph. Second, shadows cast by sidelighting tend to be long, and this helps to emphasize subject texture, as shown in the photograph of the Chinese lantern on the next page.

Sharp outline
One of the most effective uses of sidelighting to outline a subject depends almost entirely on the camera viewpoint. In this shot, taken in a Montreal park, the sun is at right angles to the view, and the background is in shadow.
Getting the exposure right
In the vast majority of sidelighting situations it’s much better to expose for the highlights. Use the spot or center-weighted metering mode if your camera has either, and recompose the photograph as necessary. The image won’t be successful if any of the highlight areas are blown out (and these are likely to comprise at least some of the subject). If, however, detail is lost in some of the shadow areas, (which is only likely to happen under the brightest conditions), the effect has a much smaller impact on the viewer, and in many cases will only add to the drama of the image.

Light and texture
The angle of this Japanese lantern’s paper surface changes gradually from left to right, and this affects the amount and distribution of shadow. The strongest impression of textural detail is when the sunlight grazes the surface at a very acute angle. Broadly speaking, there are three areas of texture detail, with light readings as follows: left = f/16; center = f/11; right = f/4. The area of maximum texture detail is in the center.

Raking light
In this shot of a yoghurt dish, photographed from directly above, sidelighting establishes the texture—an essential quality in food photography, where any tactile sensation helps to stimulate taste.
Frontal lighting
With the sun behind the photographer, and the light falling directly onto the subject, the subject is said to be front lit. As with the other varieties of lighting, frontal lighting has positive and negative points, so it’s important to know what to look for when photographing front-lit scenes in order to capture a successful image.
The biggest drawback to frontally lit scenes is that, with the sun directly behind the photographer, shadows are thrown away from the camera, and, depending on the viewpoint, may not be visible at all. While on the one hand the lack of shadows is likely to ensure that the scene is evenly lit, making it easy to capture the image without fear of blowing out highlights, it does have one major drawback. Without shadows to emphasize texture, help with perspective, and enhance modeling, front-lit subjects can appear flat and two-dimensional.
For this reason, successful frontally lit images, rather than relying on subtlety of texture or far-reaching perspective and depth, instead need subjects that have strong color and tone, and/or interesting outline form. Furthermore, if the sun is low in the sky the color temperature will also be low, imbuing everything with a warm yellow-orange tone, which can add contrast to color and tone. Look out, also, for reflective surfaces (although not so brightly reflective that they are in danger of blowing out). Such surfaces will leap out of the scene, particularly if surrounded by dark, non-reflective colors. The image of the Japanese woman shown here is a good example.
Flat graphics
The lack of shadows when the sun is directly on the camera axis can work well with strongly colored or contrasting subjects if you treat the composition as two-dimensional, ignoring perspective and depth.

Mirrored contrast
Shooting straight into a highly reflecting surface, such as this mosaic of mirrors, will give extremely high contrast, so that any matt surfaces appear almost as silhouettes.

Richness of color
The contrast between the black silk and gold embroidery is already strong. Frontal lighting enhances this by illuminating the glossy embroidery as strongly as possible.

Shadow shapes
Narrow but hard shadows from a setting sun almost behind the camera play an important part in a view of a Shaker cemetery near Albany, New York. It was necessary to position the camera carefully to prevent its shadow from appearing in the photograph.
Your shadow
The closer the sun sinks to the horizon, the longer shadows become—provided of course that the sun remains relatively bright. Although this can help create dramatic landscapes strewn with interesting and eye-catching shadowy forms, if you’re shooting with the sun behind you it may be that one of those eye-catching shadows is the one cast by you and your tripod—a shadow that you could really do without in your photo. If this happens try to alter the shape of your body by tucking in your head and arms and covering the legs of your tripod with a coat or blanket.

Front-lit reflections
Shiny surfaces such as the gilding of this northern Thai temple, which faces east toward the sunrise, leap out of the picture thanks to their being lit directly from the front.
Backlighting
Perhaps the last thing an inexperienced photographer would consider is shooting directly into the sun—it just sounds counterintuitive. However, experienced photographers know that backlighting—the name given to lighting that emanates from the sun (or a reflection of the sun) directly into the camera—can produce intensely dramatic images.
The best-known example of a backlit shot is the silhouette. The key to a successful silhouette is choosing a subject that has an interesting, evocative, and easily recognizable shape, and ensuring the background is uncluttered—a clear, uniform sky is ideal. With the subject placed in front of the sun, set the camera to expose for the bright sky and not the subject. Don’t expose for the sun itself or the entire image will be rendered too dark. All but the very brightest elements of the sky should show any detail (but becoming darker towards the edges of the photo), while the subject should be a uniform black, but with a well-defined outline. Silhouettes can also be successfully captured by shooting into a reflection of the sun (off water for example) instead of the sun itself.
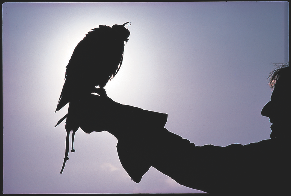
A clean silhouette
A simple dark-on-light, two-tone silhouette of a hawk. Here, the sun is entirely concealed by the bird.
Undulating landscapes, or landscapes with distinctive objects set a good distance apart from one another, such as hedgerows or stands of trees, also make good back-lit images. Exposing for the sky will render the undulations or trees in silhouette, which then form horizontal layers in the final image as they recede into the distance—an effect known as “aerial perspective.” This is often most successfully achieved with the sun very low in the sky, just after sunrise or just before sunset.
Another dramatic way of exploiting backlighting is to include a colorful, translucent object between you and the light source, such as a stained-glass window, some material, or even leaves or petals. As long as you avoid overexposure, the colors (and intricate structure, in the case of the leaf) will be brightly and delicately rendered.

Intense color
Backlighting through anything translucent brings out richness of color—as in the case of this monk’s saffron robe—as long as you avoid overexposure. The brightly lit edges around the monk’s head are a good example of rim lighting.
One final example of backlighting involves capturing the brightly lit edges of the subject against a dark background, resulting in a phenomenon known as “edge” or “rim lighting.” This slightly specialized form of backlighting is covered more fully on the next pages.
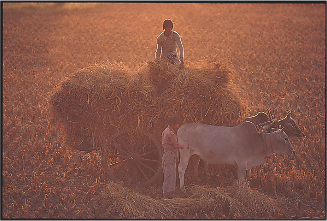
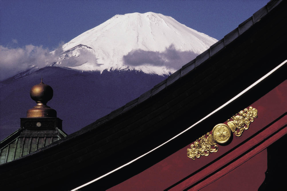
Burma
As the dry season progresses, temperatures rise and haze increases, which gives opportunities for attractive backlighting early and late, as in this scene of farmers loading hay near Mandalay.
Rim lighting
Earlier, we looked at the various types of backlighting, and in particular the more straightforward example of the silhouette. As dramatic as silhouettes can be, they should be used sparingly in any collection of travel photos—as a photographic device they have today lost a great deal of their novelty factor. Of greater interest, to my mind at least, is the backlighting effect known as edge or rim lighting.
Rim lighting occurs when the light strikes the subject from the back but also off to one side or from higher up—this why this type of lighting is sometimes referred to as “off-axis” lighting. The resulting image will show the subject, or part of the subject, outlined in a bright highlight. The thickness and overall appearance of the rim depends on the physical characteristics of the outer layer of the subject. A smooth, hard surface, such as glass or metal, will produce a very thin, smooth rim light, while a soft, fibrous object, such as wool, will capture more light and produce a much thicker outline. Rim lighting is often used in portrait photography to outline the model’s hair, and is usually most effective with a dark or fairly dark background.
Being an off-axis form of lighting, there is less contrast in a rim-lit shot than a silhouette. This is apparent when you compare the amount of color and detail visible in the subject of each type of shot—the subject of a silhouette is black and featureless, whereas that of a rim-lit shot will often show relatively good detail and a certain amount of color.
Getting the exposure right for rim lighting is complex and depends on the specific lighting conditions and the subject. The best bet is to use evaluative or matrix mode to meter the scene, then check the result and experiment with the exposure if necessary to get the effect you want.
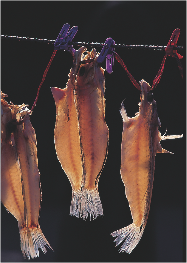
Translucent fish
These dried fish are lit at their edges by the sun, which also shines through them to silhouette their bones. The camera was placed so they appeared against a background in shadow.

Rim lighting
At a very low angle, almost into the picture frame, the sun creates a rim-lighting effect. How brightly the edges appear depends strongly on the texture of the subject—here, cloth uniforms.
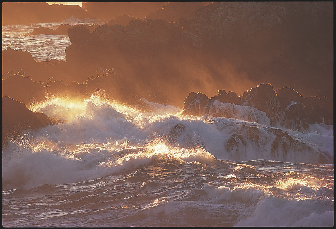
Overall backlighting flare
The less-cearly defined edges of these waves breaking at Point Lobos, near Carmel, California, exhibit a much looser form of rim lighting, but the unmistakable glow is still very much apparent.
Soft light
While the position of the light source in relation to the subject or scene plays a crucial role in determining appearance, it’s important to remember that the significance of the direction of the light is, itself, determined by how strong it is. Up to now we’ve been assuming the light is more or less direct and undiffused, such as the sun in a clear, cloudless sky—a quality often referred to as “hard” light. Here we’re going to look at diffused, or “soft” light.
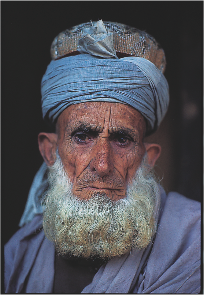
Naturally diffused light is the result of specific atmospheric conditions. Clouds, for example, are a principal cause of soft light—their abundance and type determining exactly how soft the light is. Thin, high-level cloud will diffuse sunlight, softening a high-contrast scene thanks to less dense and clearly defined shadow regions. A scene such as this, with a lower dynamic range between highlights and shadows, is easier to photograph without fear of over- or underexposure, while the absence of strong shadows and bright highlights can make complex shapes and scenes easier to “read.” However, the continued presence of shadows, albeit in a less dominant form, still provides the desirable modeling effect for certain scenes, notably landscapes. In these softer lighting conditions colors also may appear less vibrant, but this lack of vibrancy will often make them appear more natural. For portraits, diffuse light will often be more flattering, resulting in softer features and more even skin tones.
Portrait lighting
One of soft light’s better qualities is that it does away with harsh shadows, making it useful for portraits.
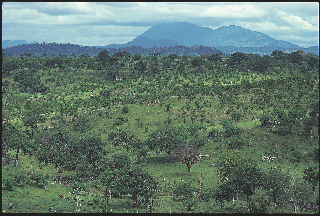
At ground level, haze can also be helpful to the photographer as it will emphasize the distance between objects and bring a sense of depth to a long-distance view.
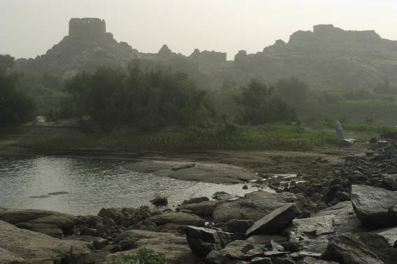
Haze
This image of a ruined medieval stone fort overlooking the Nile in Nubia shows how haze creates aerial perspective, adding a sense of depth to a photograph.
If the cloud cover is too heavy, on the other hand, the sunlight becomes so diffused that clouds become nonexistent. In this case, without the modeling effect of shadows landscapes become flat and dull, objects can lose their form and texture, and all sense of light and shade is lost.
Image clarity
Soft light is good for certain subjects, particularly those with intricate shapes. One of the main characteristics of this kind of lighting is that it is clear and uncomplicated, so is good for giving distinct, legible images of complex subjects. Reflective surfaces also make for more legible images under diffuse lighting: the reflection of a broad, even light source will cover all or most of any shiny surface.
Pastel Greens
Soft, shadowless light and a delicacy of color characterize landscapes under the diffuse, soft light of continuous cloud.
Daylight indoors
Not all of your time traveling and taking photos will necessarily be spent outdoors. There will undoubtedly be many occasions when you’ll want to photograph the interiors of buildings or perhaps even the people who live or work there. The initial concerns about photographing indoors—primarily the lack of light and high contrast—are valid ones, so let’s look at what you can hope to achieve with daylight indoors.
Shooting indoors with available light has much to recommend it—not least of all the natural quality it affords your images. However, what about low light levels? Of course, much will depend on the size and number of the windows in the room and in which direction they face. In order to get as much of the room as possible in focus (using a small aperture) you’ll have to use relatively long shutter speeds—perhaps around ½ sec (at ISO 200). If you can, use a tripod or at least something sturdy on which to rest the camera, rather than increasing the ISO setting or using flash. Increasing the ISO setting may add noise to your images, while using flash is likely to upset the subtle natural lighting balance of the room and may impact on the “architecture” of the room.
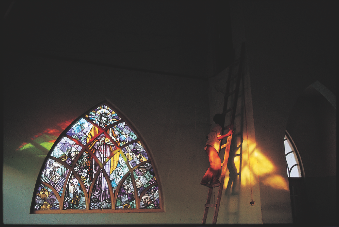
Unexpected effects
When the sun is low enough to shine through a window and across a room, the light will pick out objects—though not for long, as the sun’s position moves relatively quickly at these times. Here, in a Catholic church, it shone directly onto the ladder used each evening by the bell-ringer.
Light levels fall drastically as you move further away from a window, which is why shots of interiors are usually high contrast. This is not necessarily a bad thing. Think about your composition and position the camera in such a way that it makes the most of the rise and fall in light levels.
The rapid fall-off of natural light from a window is an important consideration when photographing people indoors. They need to be very close to the window to get a sufficient amount of light to illuminate them. The most dramatic indoor portraits shot with available light are when the light source is to one side of the subject. The side of the face closest to the window will be well lit, while the other will be cast in shadow, creating a dramatic shot.

Frank Lloyd Wright
To avoid window highlights blowing out, choose the camera position carefully. In this room, designed by U.S. architect Frank Lloyd Wright, the viewpoint ensures that most of the sky is hidden—further back would cause too much flare, further forward would lose the shape of the awning.
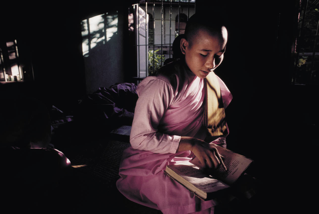
The value of reflection
Bright sunlight falling on a patch of floor in front of this young novice nun illuminates the shadowed area of her face and pink robes—an effect that not only makes the details visible, but is beautiful in its own right.
Emphasizing texture
Successfully capturing the texture of an object in a photograph can make it appear more real to the viewer. The texture reinforces the tactile nature of the object, which triggers physical memories—rough or smooth—in the viewer.
As you visit new locations with your camera, be on the lookout for artifacts and objects that reveal strong texture. More often than not you’ll need to get in close to the subject to capture this texture, which may result in an abstract, nonrepresentational image. Don’t worry if the viewer is unable to make out the subject in these particular photographs—as long as you have overview shots that reveal the true identity of the items—as you’re trying to engage the viewer’s tactile sense. Markets, woodlands, architecture (both interior and exterior)—just about everywhere you visit should be able to offer suitable subjects.
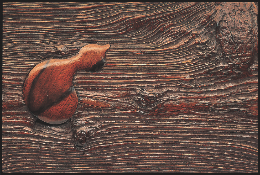
Acute lighting angle
The polished surface of this partially carved wood was brought out by light shining at an acute angle. This gives a pleasant edge to the gourd-like carved shape, and accentuates the natural grain.
As we discussed earlier in this chapter, generally the best time of day to record texture is early morning or late afternoon, when the light strikes the object at a low, raking angle. However, this does depend somewhat on the texture itself. If it is very coarse, with deep troughs and tall peaks, then the lower the angle of the light, the more the texture will be obscured by shadow.
Finally, also experiment with depth of field if you are shooting from a low angle. Selectively focusing on part of the object to reveal the texture may have greater impact than the entire frame being sharp.

Adding folds to textiles
Textiles, and in particular silk, with its shot appearance, can easily be given character and volume simply by pushing them into folds. A moderately angled light will then bring out the varying texture.
Learning about texture
The best way to learn what lighting works best with which texture is to assemble a variety of objects, each of which has its own unique surface quality—a ceramic tile, some silk, bark from a tree, a metal grille, for example—it’s not important as long as they exhibit strong variety between rough and smooth.

Toward the window
Shooting at an oblique angle toward a large light source is one way of giving a broad highlight to rounded surfaces, in this case an old Shaker milk bucket. The light source is a north-facing window.
Now set up a light source, the angle of which you can easily control, such as a standard desk lamp with a bright, halogen bulb. Photograph the objects in turn at various angles, first with the bulb uncovered so that it provides direct light. Repeat the exercise but put a sheet of paper in front of the bulb to diffuse the light. Assess the images to see which combination of angle and diffuse or direct light works best with each material.

Raking light
For this selection of Indian breads, a low sun was ideal. The rough, matt, appetizing texture of the breads is brought out more strongly by undiffused light.
City lights
Photographing cities at night, particularly those of foreign countries, is one of the highlights for any traveling photographer. Many cities today feature commercial centers with high-rise modern architecture, which at night can make for spectacular lighting displays. Other cities that straddle a river often feature a well-lit bridge (or even a succession of bridges), while yet more cities have large entertainment and shopping districts with acres of flashing neon signage. Images of such scenes are essential to your photo collection if you want to recreate a real sense of the excitement of traveling abroad.
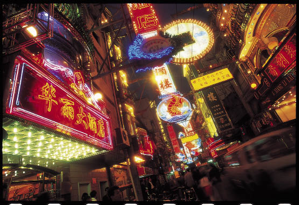
Keeping it bright
A Shanghai street packed with seafood restaurants has a lighting level to match the buzz of nighttime business. Slightly overexposed images are often most successful.
As tempting as it might be simply to go exploring with your camera the first night you’re there, it makes sense to find out in advance what a city has to offer with a view to nighttime photography. Look in guidebooks and on postcard stands to find out where the various districts are, what they have to offer in terms of lighting, and how to get there. Give yourself plenty of time to find a good spot from which to photograph once you arrive at your chosen destination.
The best time to shoot cities at night is actually at dusk, when there is still a little residual light left in the sky. This helps to balance the natural and artificial light sources, making the lighting less harsh than when the sky is entirely black.
As you’ll be using exposures of several seconds, carry a tripod with you, or at least find something to place the camera on. You’ll also need a shutter release cable (or set the camera to self-timer) and ideally use the camera’s mirror lock-up setting to stop vibration when the shutter fires. With the camera on a tripod, you can use the lowest ISO setting to avoid the risk of introducing noise to the image. In addition, use the camera’s noise reduction facility if it has one. Set the camera to Aperture priority (A/Av) and begin with a setting of f/8. The camera will then work out how long the exposure needs to be. Review the results using the camera’s LCD display and experiment with different aperture settings. You may find, when it gets very dark, that you’ll have to use the camera’s Bulb (B) setting for really long exposures.

Light reflections
To get the most out of the fairly low lighting on a canal in London, I shot with a long telephoto at an acute angle to the moored canal boats (to catch reflections in their side panels) and from very low, for maximum reflections in the water. Without these two kinds of reflection, the shot would have been hardly readable—as it is, the effect is atmospheric and slightly mysterious.
Modern DSLR cameras, with their quick access to a wide variety of white balance settings, make photographing cities at night much more straightforward. Even using the Auto white balance setting, the mixed lighting is unlikely to result in a biased color cast—and if you’re shooting in Raw you’ll have no problem correcting any unwanted color cast in your shot in post-production.

City at dusk
Twilight (just after sunset) is here an important element in an elevated view of a Caribbean city. Its muted, but general illumination helps to give definition to buildings and streets, in what would otherwise be a picture composed solely of dots and streaks of light.
Lighting displays
One of the highlights of photographing a city during the evening is capturing the brightly colored signs found in many of the entertainment districts. Fluorescent and LED lighting has, in many places, replaced neon signage as they are easier to assemble and require no potentially expensive glass-bending skills. Fluorescent lights don’t have quite the same look and feel of a true neon sign, but in terms of the technique required to photograph them they are very similar.
Photographing a specific lighting display is quite different to capturing a wider cityscape view. The two major differences are, first, the best time to photograph and second, the focal lengths you need. In terms of timing, to get images of lighting displays at their best, shoot when there is no residual light left in the sky, in other words later than photographing a general cityscape. The lights tend to show up more clearly against a black sky. The second difference is an image of a specific display will have much greater impact if it fills the frame. To do this you’ll need to use a telephoto lens—a telephoto zoom such as 70–200mm should give you the variety of focal lengths you’ll need. Unsurprisingly, with long focal lengths it’s wise to use a tripod to avoid camera shake; and even if, by zooming right into the brightly lit display, you achieve shutter speeds that allow you to hand hold the camera, the pulsating nature of fluorescent lights in particular mean that to capture the display accurately you’ll need to shoot at around 1/30 sec.
In terms of metering, evaluative or matrix metering will usually work well with lighting displays. Take a shot with the metered reading and review it. Increasing the exposure will result in the display appearing thicker, but with less vibrant colors, while reducing the exposure will provide more vibrant colors, but the display tubes will appear thinner.
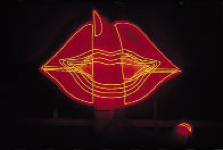
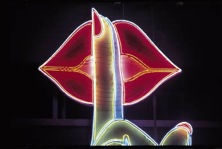
Display cycles
Some neon displays cycle through changes as striplights switch on and off in sequence. Try different moments in the cycle, and also vary the exposure. Neither of the exposures above is right or wrong—simply a different effect. Color is stronger with shorter exposures, but a luminous glow needs longer.

Colored neon
The green color-cast issues of shooting by fluorescent lighting are irrelevant with strongly colored displays such as this. The greenish cast remains, and you would still probably want to set the white balance accordingly, but this is largely overwhelmed by the coloring.
If you’re lucky enough to be in a city at the time of a large celebration, you may be treated to a spectacular fireworks display. Photographing fireworks is a lot easier than you think, and can produce really breathtaking results.
Again, try to do as much planning as you can before the display begins. Consider your foregrounds and backgrounds, and make sure your view isn’t going to be obscured by people moving in front of the camera. Set the camera on a tripod, and using a wide-angle lens or zoom setting, make sure you’re framing the right part of the sky. You may need to wait for the display to begin to make sure you’re pointing in the right place. Set the camera to manual, the shutter to Bulb (B), and focus to infinity. Begin with an aperture setting of around f/8, and when the first firework explodes, use a shutter release cable to hold the shutter open for as long as the firework is alight. Review the results and make any necessary alterations to the framing. Experiment with different aperture settings to see how that affects the results. Finally, be wary of which direction the wind is blowing. Fireworks produce a lot of smoke, and you don’t want your images spoiled by clouds of billowing smoke obscuring parts of the display.
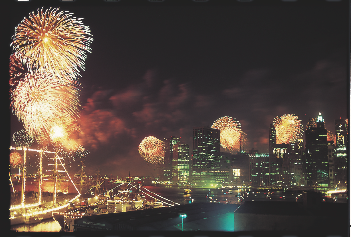
Fireworks
To take a wide-angle photograph of fireworks in a setting, use the start of the display to judge the height and position of the bursts, and frame the shot accordingly. With the camera locked on a tripod, vary the exposure times to include single and multiple bursts. This shot was taken in New York at the centenary celebrations of the Statue of Liberty. The lens’s focal length was 35mm equivalent (slightly wider than standard), and ISO set to 100 for a noise-free image.
Using flash
Whether built-in or as a unit attached to the camera’s hot-shoe (not all cameras have this connection), on-camera flash units are designed for compactness and ease of use; with these as priorities, quality and variety of lighting take second place. However, having said that, some form of light is essential in all forms of photography, and if nothing else is available then on-camera flash at least enables the photographer to record an image, albeit often producing a somewhat unsubtle result. A typical, purely flash-lit photograph tends to feature flat illumination on the main subject and a dark background. The result is clear, sharp, and with good color separation, but is generally lacking in ambience. Typical good uses of full-on flash are close-ups of colorful subjects, as these can benefit from the crisp precision and strong colors afforded by flash illumination.
To help avoid the flat, often harsh, results of built-in flash, you really need to invest in a detachable flash unit that has a swiveling head. Fortunately, such units are relatively compact and lightweight, and so shouldn’t add too much bulk to your equipment. The significance of the swiveling head is that it allows you to point the flash away from the subject, toward a pale ceiling or wall. In this way, the subject is lit from the light reflecting off a much larger surface, creating a softer illumination and less harsh shadows. This technique is known as “bounce” flash. Another alternative is to fit a translucent plastic attachment to the flash head, which will help diffuse the light from the flash, again creating a softer result. Finally, most DSLRs will allow you to adjust the output of either the built-in flash or a flash unit. While this means colors are not as vibrant, it will provide you with a less brightly lit image, which can help soften a person’s features.

Fill flash
On-camera flash enables you to add to the ambient light of a scene, improving the overall exposure of an image. In this scene of fire prayers in a Japanese Buddhist monastery, the soaring flames were the key subject, but fill flash was needed to make the monk visible.
Another benefit of having on-camera flash is that in certain daylight situations, notably when the subject is back-lit, it can be difficult to expose for the subject without overexposing the background. Using on-camera flash to light the subject allows you to expose for both subject and background.
Finally, try using on-camera flash for creative effect. With the camera set to shutter priority (or manual), select a slow shutter speed (begin with 1/15 sec). Set the camera to fire the flash. Now when you take a photo, the flash will fire, capturing part of the subject sharply, but because the shutter remains open for a fraction of a second after the flash has fired, any camera movement will result in part of the image appearing blurred. Known as slow-sync flash, some cameras can be set to fire the flash at the beginning of the exposure (front or 1st curtain sync) or at the end (rear or 2nd curtain sync).
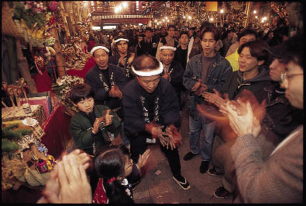
Flash plus ambient
Use a slower shutter speed to capture the ambient lighting—especially with a digital SLR that allows rear-curtain flash. Used at the Tori no Ichi Festival, Tokyo.

Intense color
The great value of portable flash is that it makes it possible to take at least some kind of photograph in situations where there is insufficient light. Direct, on-camera flash pictures usually work best when the subject has strong tones and colors, as here.