Subjects Part I
Most of you will be combining a vacation with family or friends with the opportunity to photograph breathtaking scenery, a diversity of natural and manmade landmarks, perhaps new cultural experiences, and even some wildlife. This chapter covers popular holiday activities, generic destinations, and potential subjects, and provides practical advice on equipment, together with shooting tips and hints so that you’ll be able to make the most of the time you spend behind the camera and return home with photographs that really capture the essence of your time away.
Walking vacations
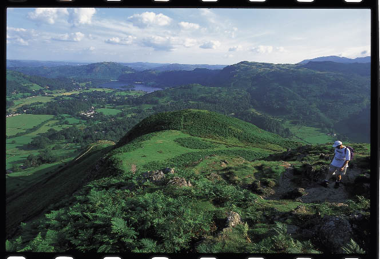
Walking or trekking vacations are ideal for photography.The scenery is likely to be outstanding, and you move at a pace that allows you to savor your surroundings. This part of England’s Lake District, near the town of Grasmere, is known for its spectacular rolling green hills.
Perhaps the most important thing to remember when traveling with your camera is that, on a personal level at least, your subjects are out of the ordinary. Rather than trying to show insights into what you know best, the essence of travel photography is to get across the enthusiasm of seeing new places, people, and things. What may be unremarkable to the jaded eye of someone who sees it every day can be made into an exciting image by a photographer who comes across it for the first time. It’s easy to become overfamiliar with your everyday surroundings, and forget that to a fresh eye they may be remarkable.
Wildlife
Photographing animals in the wild can result in magnificent and poignant images. Yet capturing such images requires a certain amount of skill, a good helping of luck, and a great deal of patience.
For successful wildlife photography you need to be able to fill the frame with your subject, and to do this you’ll need a long focal length lens or zoom lens—an effective focal length of 500–600mm is often required. Alternatively you could consider a 2x teleconverter combined with a medium telephoto lens, such as 100–400mm. While a teleconverter will cut down on the amount of equipment you have to carry around with you, remember that you’ll lose valuable light—by up to two stops—making a fast shutter speed of 1/500 sec a relatively sluggish 1/125 sec. Although you can always increase the ISO setting to get faster speeds, be wary of introducing noise to the image. Ideally, use a tripod and cable release to ensure really sharp images. If you’re in a vehicle, as is often the case on many safaris for example, use a window ledge for support with a thick cloth, towel, or beanbag under the lens for support and to dampen any vibration.
Another advantage of long focal length lenses is that they have a narrow depth of field. By setting a large aperture, it is easier to blur the foreground and background, so the subject of the photo stands out in sharp focus. Aim to specifically focus on the eyes of your subject if at all possible as people automatically look for the eyes of a portrait—whether a person or an animal—and if they are slightly out of focus it detracts from the image.
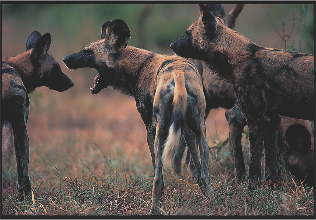
Hunting dogs
This pack of hunting dogs in Tanzania’s Mikumi National Park was photographed from about 65 feet (20 meters) away with a 600mm lens, from the side window of a jeep.
If you don’t have a long lens all is not lost—a wider view that shows an animal, or a group of animals, in its natural habitat can make a strong image by setting the scene and context. However, avoid the temptation to place the subject of the image in the middle of the frame, as this can emphasize the empty space around the animal. Use the rule of thirds compositional technique and place the subject off-center by about one-third from the top or bottom and from either side. As well as creating a more dynamic image, this off-centered placement also reduces the impression that the animal appears smaller than you would like.
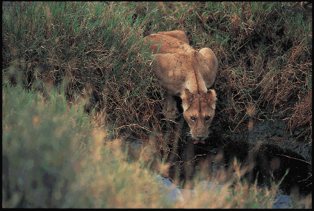
Lioness
Try to make sure that your subject’s eyes are sharply in focus as these are a key element of any wildlife shot. Using a wide aperture (small f number) has also helped to blur a potentially distracting foreground.
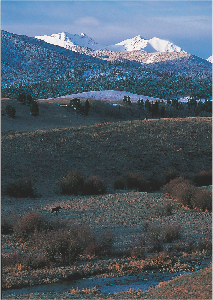
Figure for scale
It’s still possible to capture successful wildlife images without a long telephoto lens. The small figure of a moose crossing a meadow in Montana in the spring gives action to this landscape and a sense of its vast scale.
Birds
Of all wildlife subjects, birds are among the most popular subjects for photographers, and shots of birds in flight are often the most rewarding. However, photographing flying birds is not easy, and is something that requires a great deal of practice. Fortunately practicing with digital equipment is much less expensive as it is with conventional film cameras, and you have the added benefit of being able to instantly review your shots.
As with most wildlife photography, photographing birds requires a long telephoto lens so that the subject fills the frame, or at least a good portion of it. However, you may find it easier to practice tracking birds in flight with a medium telephoto lens such as a 70–200mm zoom, before moving to a focal length of 500mm or longer.
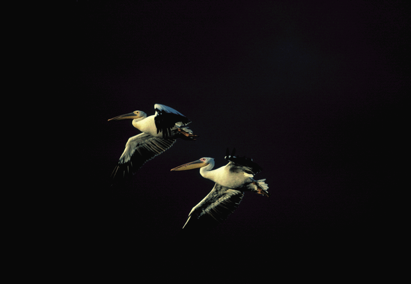
In flight
Late afternoon sunlight catches a pair of white pelicans flying against approaching stormclouds over Lake Manyara, Tanzania. Large birds such as these fly slowly, and as they were moving across the field of view, there was only a slight change in distance. Continuous automatic focusing dealt with this easily, even with a 600mm lens.
As well as filling the frame with your subject, you should also aim to use shutter speeds that are sufficiently fast to freeze all movement, that is the wing beats as well as the bird itself. Shutter speeds of 1/500 sec and upward are standard. With most modern digital SLRs you should be able to set the ISO sensitivity to 400 without introducing too much noise to the image, and this should help you get the required shutter speed—of course bright lighting conditions are also helpful.
Start by photographing large birds, such as herons and storks. These are ideal species to begin with as they are large and move relatively slowly. Aim to position yourself with the sun behind you and so that you are photographing the bird as it approaches. Track it using the viewfinder, and keep panning with a smooth movement even after you have taken your shots.
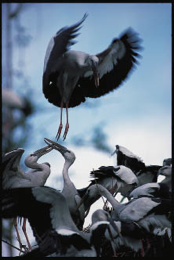
Nesting colony
Seasonal nesting sites for birds that live in colonies, like these Openbill Storks, offer opportunities for great shots.
Utilize the camera’s continuous auto focus mode if it has one. In this mode the camera will continually refocus the lens automatically while you are tracking the bird, as long as the shutter release is depressed half way and the selected auto focus point is over the bird. With more advanced digital SLRs you can select any one of a number of points as the auto focus point, but the central point is usually the easiest for beginners (and often the fastest). Also experiment with the camera’s continuous shooting, or burst, mode as this will increase the chances of capturing the shot you want. However, don’t despair if your camera doesn’t have these options. There are superb examples of bird-in-flight photographs taken with one-shot auto focus—it’s just a matter of more practice.
As with all wildlife shots, aim to focus on the bird’s eye (if you can get close enough to distinguish it!). If you’re using the central focus point, this will ensure the subject is off-center and will also create “space” into which the bird can fly—two important compositional rules.
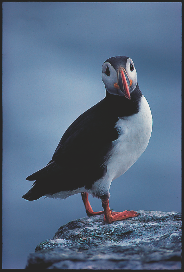
Puffin
This single-bird, frame-filling shot of a puffin was taken on a North Sea island colony off the coast of northeastern England. Some species, such as this one, are extremely approachable, and their obvious lack of fear of humans is enhanced by the monitored and strictly restricted access to the colony.
Winter scenes and sports
Snow scenes can make for powerfully evocative landscape photographs—sometimes subtly graphic as a thick blanket of white is punctuated with the dark, intriguing shapes of leafless trees, other times they dwell on the majesty of snowcapped mountains. Whatever the subject, however, if there is a large expanse of snow in the image it’s essential that you consider carefully both white balance and exposure settings as your camera’s metering system is likely to be tricked by the lighting conditions.
If left to its own devices a digital camera will underexpose snow scenes and produce distinctly gray-looking snow. This is because it will perceive the snow as the midtone in the image. To counter this, increase the exposure by one or two stops, either by setting the exposure compensation (EV) to between +1 and +2, or by selecting your camera’s Manual (M) setting and manually increasing the exposure. Snow needs to be exposed accurately in order to capture its unique luminous quality and texture. However, be wary of overexposing as you’ll lose texture in “blown” highlights. It’s often a case of trial and error, so remember to review your images carefully and check the histogram for large overexposed areas.
In terms of white balance, snow will reflect the color of its surroundings, especially the blue of a clear sky. Shadows in snow on a bright sunny day are often rendered blue. Most cameras will allow you to manually adjust the white balance setting to allow for this.
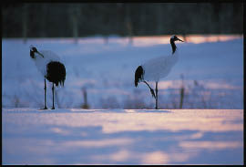
Cranes
Japanese cranes at the crane sanctuary near Tsurui. Like many snow-dwellers, the cranes have partly white plumage. This makes exposure critical, both to keep the white white, without blowing out, and to separate the plumage from snow.
Winter sports photography provides the same challenges as normal sports photography, but with the added issue of tricky exposure due to the snow. As with most sports photography you need a long focal length lens or zoom lens (500–600mm) to get close to the action. Use the camera’s continuous or predictive autofocus setting if it has one. In this mode you can track the action through the viewfinder, and while your finger is half-pressing the shutter release, the camera will continually autofocus on the subject by predicting its movement. When the subject reaches a point that makes a good composition, fully depress the shutter release and the camera will take the photo—and with a sufficiently fast shutter speed, the subject will be sharply in focus. Fast shutter speeds are essential for any sports photography, anything less than 1/250 sec is likely to result in a blurred image; and if you’re using a long lens, you’ll want to use such speeds to avoid camera shake.
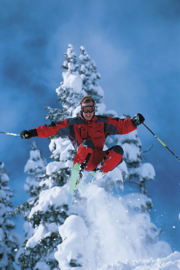
Skiing
The best moments are those where the skier is moving at speed or, as here, up in the air with the powder spraying out behind. The difficulty is in getting close enough to the action without becoming part of it. The photographer took this from a safe vantage point using a long lens with a fast shutter speed. The reflective snow and bright sun helped, giving plenty of light to work with.
Although most of the time you’re trying to freeze the action with a fast shutter speed, now and again experiment with slower speeds to capture an image with creative blur. This can add a sense of movement to the photo. Alternatively try panning as you take the shot so that while the subject is captured in focus the background is blurred, again creating a sense of movement.
Effective sports shots can be achieved with wide-angle lenses, but it’s important to get as close to the action as possible. Knowing where the best action will occur is paramount. Position yourself as close as possible without running the risk of endangering either yourself or the person you’re photographing.
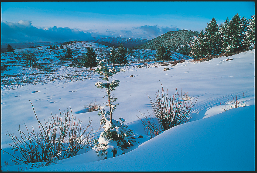
Fresh snow
As with sand dunes, you need to plan your view of fresh snowdrifts a little in advance, particularly if you are using a wide-angle lens from close to capture foreground detail. Footprints usually spoil shots like this when they are visible.
City break
A city break is an excellent way to get away from your normal routine, enjoy new sights, perhaps experience a different culture, and get some great images. Planning a walking route (or series of routes) is one of the most effective ways of covering the important locations, and to save time research these in advance. Most city breaks give you three or four days to explore, and within that time you should be able to see the main sights, as well as having a relaxing break, which may be paramount for your traveling companion!
Set aside day one for familiarization, getting accustomed to the city, and relaxing. Whatever the preparations and research, every photographer has a different eye for things, and nothing beats an on-the-ground assessment of the most effective viewpoint and its timing. Sunlight, weather, and the daily round of activity all help determine the best time for shooting, which can be left to the days ahead.
Cities have such a concentration of activity and sights—all of it easy to research—that they benefit from a plan of action. How detailed the planning is depends on the type of person you are and how much time you want to devote to photography. One approach is to simply photograph the sights you see as you come across them. The opposite approach is a self-assigned shot list, in which case the plan will aim to cover every location with economy of time while paying attention to the light and timing of certain events. In the example here, one day of a trip to the heart of London, the Changing of the Guard at Buckingham Palace takes place at precisely 11:30 in the morning, and much of the rest of the day hinges on this. It is important to allow room for the unexpected, so a plan such as the one shown here is divided into zones, and the idea is to wander around the back streets as well as the main roads, alert for whatever may happen. And if something of special interest turns up, the entire plan may simply be jettisoned.
City lights
For a night-time shot, consider the floodlighting and window lights. Cities are more brightly lit after sunset than before sunrise, and more so in winter than summer. Different types of light—street lighting, neon displays, and building floodlights—are switched on at different times. Few people locally know these times, although for a specific building staff may be able to tell you. Otherwise, make a recce the evening before. Timing is important as the best time is usually dusk, when there is still sufficient natural light to reveal the building’s outline.
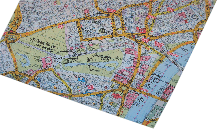 Mapping the schedule
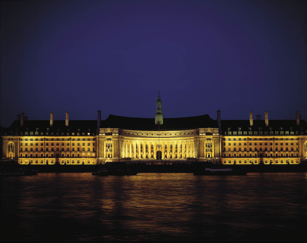
A marked-up street map shows the plan for part of one day in central London. The aims are specific—in this case including details of traditional signs and shops around Piccadilly, and a formal photograph of County Hall. The timing is keyed by the daily Changing of the Guard and by sunset.

Changing of the Guard
Weather permitting, this takes place at 11:30am, and the short route is always the same. The viewpoint has been chosen in advance, and because the event attracts crowds of tourists,plan to be in position at least half an hour beforehand.
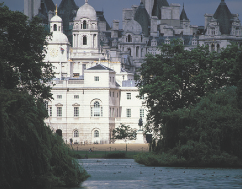
Whitehall from the Park
St. James’s Park is the oldest of London’s several royal parks, founded by Henry VIII, and is definitely worth photographing.It is also a convenient location for when the Changing of theGuard has finished. There are classic views of Whitehall and Horse Guards’ Parade.
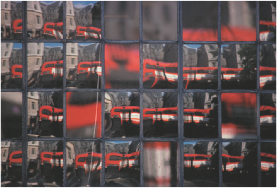
London bus
Piccadilly is just ten minutes’ walk north of St. James’s Park. The photographer had in mind an alternate approach—concentrating on details. Here, the bottle-glass of an old window offered repeated, distorted reflections, and a different take on the red double-decker bus, one of London’s symbols.

Wine merchants
The small streets around Piccadilly are crammed with traditional shops, some dating back two centuries and more. The plan was to hunt out obscure details, such as this hand-painted gilded lettering on a door that has been endlessly repainted.
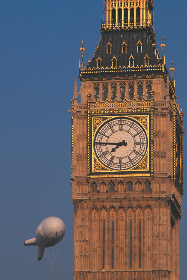
Big Ben
Some city sights are so well-known as to offer almost nothing new to the photographer. Nevertheless, they may simply have to be done—in this case, Big Ben, probably the most recognizable part of the famous Houses of Parliament. Fortunately, it had two things going for it on this day—good weather, and a tethered blimp, which at least added something unusual.

New York subway
For the commuters that use this station every day, this is a scene that will be familiar to the point that they may no longer appreciate the distinctive architecture. But to someone seeing it for the first time it makes an exciting subject.
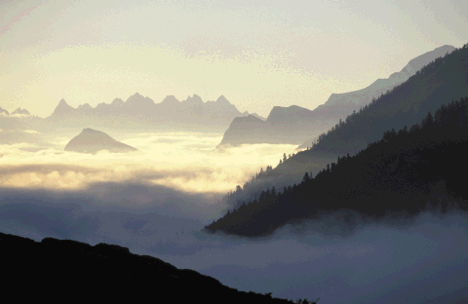
Mountain trekking
As well as being an exhilarating experience in its own right, mountain trekking is also really the only way of getting a true sense of mountain landscapes. While roadside lookouts can offer good views, only trekking gives the opportunity for in-depth coverage. As this means carrying everything you need, weight and bulk are issues; packing needs careful consideration.
In the trekking example shown here—across the trans-Himalaya from northwestern Nepal into western Tibet and around Mount Kailash—the camping gear was carried by Sherpas and yaks. One unavoidable problem is that whatever equipment is in the backpack takes time to unload. This slows down the photography, but is a better option than carrying the camera loose and risking an accident. Some backpacks are designed to rotate easily from back to front, giving you relatively quick access to your equipment.
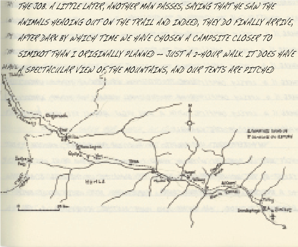
Trekking - week one
Planning a route in advance is the best way of ensuring you get to all the places you want to see.
Mountain areas vary in their picture possibilities, and it is important to cover all aspects. Dramatic landscapes figure strongly, and these depend mainly on two things—viewpoint and light. Mountain weather can be variable, so be prepared for a change in the light; early mornings and late afternoons are, as anywhere, often very good. This trek, however, offered much more in cultural material, as pilgrims from all over Tibet converge on the sacred mountain Kailash to circumnambulate it.
Vertical framing
Mountains and hill country afford good opportunities for framing vertical shots. There are often plenty of foregrounds to choose from, particularly when taking downward-looking shots.
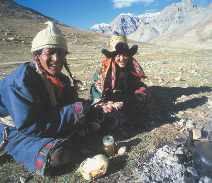
Pilgrims
Language is not a barrier under these circumstances, as everyone is in a cheerful mood. For this shot of a couple brewing yak-butter tea, the photographer sat down and made attempts at sign language.
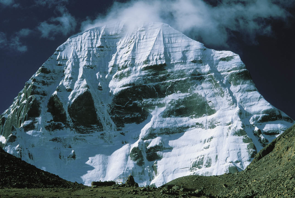
Thin air
With half the density of atmosphere as at sea level, views at 16,500 feet (5,000 m) are stunningly clear, even with a telephoto lens, as shown in this shot of the north face of Mount Kailash in western Tibet.
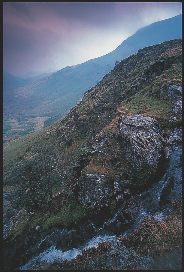
Mountain light
Lighting effects are unpredictable, but it is worth getting up before dawn for whatever the light offers—in this case a view down the Karnali Valley toward Kanjirobe. This shot calls for a long telephoto; review the shot on the LCD monitor.