Now that we have discussed some basic theory around dependencies and coupling, we are ready to dive into some more practical concepts. In this section, in fact, we are going to present the main module wiring patterns. Our focus will be mainly pointed towards the wiring of stateful instances, which are, without any doubts, the most important type of dependencies in an application.
We start our analysis by looking at the most conventional relationship between two modules, which is the
hardcoded dependency. In Node.js, this is obtained when a client module explicitly loads another module using require(). As we will see in this section, this way of establishing module dependencies is simple and effective, but we have to pay additional attention to hardcoding dependencies with stateful instances, as this would limit the reusability of our modules.
Let's start our analysis by looking at the structure represented by the following figure:

The preceding figure shows a typical example of layered architecture; it describes the structure of a simple authentication system. AuthController accepts the input from the client, extracts the login information from the request, and performs some preliminary validation. It then relies on AuthService to check whether the provided credentials match with the information stored in the database; this is done by executing some specific queries using a DB handle as a means to communicate with the database. The way these three components are connected together will determine their level of reusability, testability, and maintainability.
The most natural way to wire these components together is requiring the DB module from AuthService and then requiring AuthService from AuthController. This is the hardcoded dependency that we are talking about.
Let's demonstrate this in practice by actually implementing the system that we just described. Let's then design a simple authentication server, which exposes the following two HTTP APIs:
POST '/login': This receives a JSON object that contains ausernameandpasswordpair to authenticate. On success, it returns a JSON Web Token (JWT), which can be used in subsequent requests to verify the identity of the user.Note
JSON Web Token is a format for representing and sharing claims between parties. Its popularity is growing with the explosion of Single Page Applications and Cross-origin resource sharing (CORS), as a more flexible alternative to cookie-based authentication. To know more about JWT, you can refer to its specification (currently in draft) at http://self-issued.info/docs/draft-ietf-oauth-json-web-token.html.
GET '/checkToken': This reads a token from aGETquery parameter and verifies its validity.
For this example, we are going to use several technologies; some of them are not new to us. In particular, we are going to use express (https://npmjs.org/package/express) to implement the Web API, and levelup (https://npmjs.org/package/levelup) to store the user's data.
Let's start by building our application from the bottom up; the very first thing we need is a module that exposes a levelUp database instance. Let's do this by creating a new file named lib/db.js and including the following content:
var level = require('level');
var sublevel = require('level-sublevel');

module.exports = sublevel(
  level('example-db', {valueEncoding: 'json'})
);
The preceding module simply creates a connection to a LevelDB database stored in the ./example-db directory, then it decorates the instance using the sublevel plugin (https://npmjs.org/package/level-sublevel), which adds the support to create and query separate sections of the database (it can be compared to a SQL table or MongoDB collection). The object exported by the module is the database handle itself, which is a stateful instance, therefore, we are creating a singleton.
Now that we have the db singleton, we can use it to implement the lib/authService.js module, which is the component responsible for checking a user's credentials against the information in the database. The code is as follows (only the relevant parts are shown):
[...]
var db = require('./db');
var users = db.sublevel('users');

var tokenSecret = 'SHHH!';

exports.login = function(username, password, callback) {
  users.get(username, function(err, user) {
    [...]
  });
};

exports.checkToken = function(token, callback) {
  [...]
  users.get(userData.username, function(err, user) {
    [...]
  });
};
The authService module implements the login() service, which is responsible for checking a username/password pair against the information in the database, and the checkToken() service, which takes in a token and verifies its validity.
The preceding code also shows the first example of a hardcoded dependency with a stateful module. We are talking about the db module, which we load by simply requiring it. The resulting db variable contains an already initialized database handle that we can use straightaway to perform our queries.
At this point, we can see that all the code that we created for the authService module does not really necessitate one particular instance of the db module—any instance will simply work. However, we hardcoded the dependency to one particular db instance, and this means that we will be unable to reuse authService in combination with another database instance without touching its code.
Continuing to go up in the layers of the application, we are now going to see what the lib/authController.js module looks like. This module is responsible for handling the HTTP requests and it's essentially a collection of the express routes; the module's code is the following:
var authService = require('./authService');

exports.login = function (req, res, next) {
  authService.login(req.body.username, req.body.password,
    function(err, result) {
      [...]
    }
  );
};

exports.checkToken = function (req, res, next) {
  authService.checkToken(req.query.token,
    function(err, result) {
      [...]
    }
  );
};
The authController module implements two express routes: one for performing the login and returning the corresponding authentication token (login()), and another for checking the validity of the token (checkToken()). Both the routes delegate most of their logic to authService, so their only job is to deal with the HTTP request and response.
We can see that, in this case too, we are hardcoding the dependency with a stateful module, authService. Yes, the authService module is stateful by transitivity, because it depends directly on the db module. With this, we should start to understand how a hardcoded dependency can easily propagate across the structure of the entire application: the authController module depends on the authService module, which in turn depends on the db module; transitively, this means that the authService module itself is indirectly linked to one particular db instance.
Finally, we can put all the pieces together by implementing the entry point of the application. Following the convention, we will place this logic in a module named app.js sitting in the root of our project, as follows:
var express = require('express');
var bodyParser = require('body-parser');
var errorHandler = require('errorhandler');
var http = require('http');

var authController = require('./lib/authController');

var app = module.exports = express();
app.use(bodyParser.json());

app.post('/login', authController.login);
app.get('/checkToken', authController.checkToken);
app.use(errorHandler());
http.createServer(app).listen(3000, function () {
  console.log('Express server started');
});
As we can see, our app module is really basic; it contains a simple express server, which registers some middleware and the two routes exported by authController. Of course, the most important line of code for us is where we require authController to create a hardcoded dependency with its stateful instance.
Before we can try the authentication server that we just implemented, we advise you to populate the database with some sample data using the populate_db.js script, which is provided in the code samples. After doing this, we can fire up the server by running the following command:
node app
We can then try to invoke the two web services that we created; we can use a REST client to do this or alternatively the good old curl command. For example, to execute a login, we can run the following command:
curl -X POST -d '{"username": "alice", "password":"secret"}' http://localhost:3000/login -H "Content-Type: application/json"
The preceding command should return a token that we can use to test the /checkLogin web service (just replace <TOKEN> in the following command):
curl -X GET -H "Accept: application/json" http://localhost:3000/checkToken?token=<TOKEN HERE>
The preceding command should return a string such as the following, which confirms that our server is working as expected:
{"ok":"true","user":{"username":"alice"
}}
The sample we just implemented, demonstrated the conventional way of wiring modules in Node.js, leveraging the full power of its module system to manage the dependencies between the various components of the application. We exported stateful instances from our modules, letting Node.js manage their life cycle, and then we required them directly from other parts of the application. The result is an immediately intuitive organization, easy to understand and debug, where each module initializes and wires itself without any external intervention.
On the other side, however, hardcoding the dependency on a stateful instance limits the possibility of wiring the module against other instances, which makes it less reusable and harder to unit test. For example, reusing authService in combination with another database instance would be close to impossible, as its dependency is hardcoded with one particular instance. Similarly, testing authService in isolation can be a difficult task, because we cannot easily mock the database used by the module.
As a last consideration, it's important to see that most of the disadvantages of using hardcoded dependencies are associated with stateful instances. This means that if we use require() to load a stateless module, for example, a factory, constructor, or a set of stateless functions, we don't incur the same kind of problems. We will still have a tight coupling with a specific implementation, but in Node.js, this usually does not impact the reusability of a component, as it does not introduce a coupling with a particular state.
The dependency injection (DI) pattern is probably one of the most misunderstood concepts in software design. Many associate the term with frameworks and dependency injection containers such as Spring (for Java and C#) or Pimple (for PHP), but in reality it is a much simpler concept. The main idea behind the dependency injection pattern is the dependencies of a component being provided as input by an external entity.
Such an entity can be a client component or a global container, which centralizes the wiring of all the modules of the system. The main advantage of this approach is an improved decoupling, especially for modules depending on stateful instances. Using DI, each dependency, instead of being hardcoded into the module, is received from the outside. This means that the module can be configured to use any dependency and therefore can be reused in different contexts.
To demonstrate this pattern in practice, we are now going to refactor the authentication server that we built in the previous section, using dependency injection to wire its modules.
Refactoring our modules to use dependency injection involves the use of a very simple recipe: instead of hardcoding the dependency to a stateful instance, we will instead create a factory, which takes a set of dependencies as arguments.
Let's start immediately with this refactoring; let's work on the lib/db.js module given as follows:
var level = require('level');
var sublevel = require('level-sublevel');

module.exports = function(dbName) {
  return sublevel(
    level(dbName, {valueEncoding: 'json'})
  );
};
The first step in our refactoring process is to transform the db module into a factory. The result is that we can now use it to create as many database instances as we want; this means that the entire module is now reusable and stateless.
Let's move on and implement the new version of the lib/authService.js module:
var jwt = require('jwt-simple');
var bcrypt = require('bcrypt');

module.exports = function(db, tokenSecret) {
  var users = db.sublevel('users');
  var authService = {};

  authService.login = function(username, password, callback) {
    //...same as in the previous version
  };

  authService.checkToken = function(token, callback) {
    //...same as in the previous version
  };

  return authService;
};
Also, the authService module is now stateless; it doesn't export any particular instance anymore, just a simple factory. The most important detail though is that we made the db dependency injectable as an argument of the factory function, removing what previously was a hardcoded dependency. This simple change enables us to create a new authService module by wiring it to any database instance.
We can refactor the lib/authController.js module in a similar way as follows:
module.exports = function(authService) {
  var authController = {};

  authController.login = function (req, res, next) {
    //...same as in the previous version
  };

  authController.checkToken = function (req, res, next) {
    //...same as in the previous version
  };

  return authController;
};
The authController module does not have any hardcoded dependency at all, not even stateless! The only dependency, the authService module, is provided as input to the factory at the moment of its invocation.
Okay, now it's time to see where all these modules are actually created and wired together; the answer lies in the app.js module, which represents the topmost layer in our application; its code is the following:
[...]
var dbFactory = require('./lib/db');         //[1]
var authServiceFactory = require('./lib/authService');
var authControllerFactory = require('./lib/authController');

var db = dbFactory('example-db');         //[2]
var authService = authServiceFactory(db, 'SHHH!');
var authController = authControllerFactory(authService);

app.post('/login', authController.login);       //[3]
app.get('/checkToken', authController.checkToken);
[...]
The previous code can be summed up as follows:
- Firstly, we load the factories of our services; at this point, they are still stateless objects.
- Next, we instantiate each service by providing the dependencies it requires. This is the phase where all the modules are created and wired.
- Finally, we register the routes of the
authControllermodule with theexpressserver as we would normally do.
Our authentication server is now wired using dependency injection and ready to be used again.
The example we just presented demonstrated only one type of dependency injection (factory injection), but there are a couple more worth mentioning:
- Constructor injection: In this type of DI, the dependencies are passed to a constructor at the moment of its creation; one possible example can be the following:
var service = new Service(dependencyA, dependencyB);
- Property injection: In this type of DI, the dependencies are attached to an object after its creation, as demonstrated by the following code:
var service = new Service();  //works also with a factory
service.dependencyA = anInstanceOfDependencyA;
Property injection implies that an object is created in an inconsistent state, because it's not wired to its dependencies, so it's the least robust, but sometimes it might be useful when there are cycles between the dependencies. For example, if we have two components, A and B, both using factory or constructor injection and both depending on each other, we cannot instantiate either of them because both would require the other to exist in order to be created. Let's consider a simple example, as follows:
function Afactory(b) {
  return {
    foo: function() {
      b.say();
    },
    what: function() {
      return 'Hello!';
    }
  }
}

function Bfactory(a) {
  return {
    a: a,
    say: function() {
      console.log('I say: ' + a.what);
    }
  }
}
The dependency deadlock between the two preceding factories can be resolved only using property injection, for example, by first creating an incomplete instance of B, which then can be used to create A. Finally, we will inject A into B by setting the relative property as follows:
var b = Bfactory(null);
var a = Afactory(b);
a.b = b;
In the authentication server example, using dependency injection we were able to decouple our modules from a particular dependency instance. The result is that we can now reuse each module with minimal effort and without any change in their code. Testing a module that uses the dependency injection pattern is also greatly simplified; we can easily provide mocked dependencies and test our modules in isolation from the state of the rest of the system.
Another important aspect to be highlighted from the example we presented earlier is that we shifted the dependency wiring responsibility from the bottom to the top of our architecture. The idea is that high-level components are by nature less reusable than low-level components, and that's because the more we go up in the layers of an application the more a component becomes specific.
Starting from this assumption we can then understand that the conventional way to see an application architecture, where high-level components own their lower-level dependencies, can be inverted, so that the lower-level components depend only on an interface (in JavaScript, it's just the interface that we expect from a dependency), while the ownership of defining the implementation of a dependency is given to the higher-level components. In our authentication server, in fact, all the dependencies are instantiated and wired in the topmost component, the app module, which is also the less reusable and so is the most expendable in terms of coupling.
All these advantages in terms of decoupling and reusability, though, come with a price to pay. In general, the inability to resolve a dependency at coding time makes it more difficult to understand the relationship between the various components of a system. Also, if we look at the way we instantiated all the dependencies in the app module, we can see that we had to follow a specific order; we practically had to manually build the dependency graph of the entire application. This can become unmanageable when the number of modules to wire becomes high.
A viable solution to this problem is to split the dependency ownership between multiple components, instead of having it centralized all in one place. This can reduce the complexity involved in managing the dependencies exponentially, as each component would be responsible only for its particular dependency subgraph. Of course, we can also choose to use dependency injection only locally, just when necessary, instead of building the entire application on top of it.
We will see later in the chapter that, another possible solution to simplify the wiring of modules in complex architectures is to use a dependency injection container, a component exclusively responsible for instantiating and wiring all the dependencies of an application.
Using dependency injection surely increases the complexity and verbosity of our modules, but as we saw earlier, there are many good reasons for doing this. It is up to us to choose the right approach, depending on the balance between simplicity and reusability that we want to obtain.
In the previous section, we learned how dependency injection can literally transform the way we wire our dependencies, obtaining reusable and decoupled modules. Another pattern with a very similar intent is Service Locator. Its core principle is to have a central registry in order to manage the components of the system and to act as a mediator whenever a module needs to load a dependency. The idea is to ask the service locator for the dependency, instead of hardcoding it, as shown in the following image:
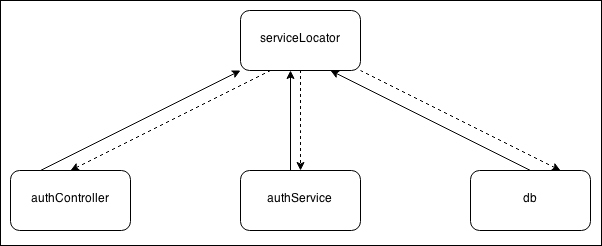
It is important to understand that by using a service locator we are introducing a dependency on it, so the way we wire it to our modules determines their level of coupling and therefore their reusability. In Node.js, we can identify three types of service locators, depending on the way they are wired to the various components of the system:
- Hardcoded dependency on service locator
- Injected service locator
- Global service locator
The first is definitely the one offering the least advantages in terms of decoupling, as it consists of directly referencing the instance of the service locator using require(). In Node.js, this can be considered an anti-pattern because it introduces a tight coupling with the component supposedly meant to provide a better decoupling. In this context, a service locator clearly does not provide any value in terms of reusability, but it only adds another level of indirection and complexity.
On the other side, an injected service locator is referenced by a component through dependency injection. This can be considered a more convenient way for injecting an entire set of dependencies at once, instead of providing them one by one, but as we will see, its advantages do not end here.
The third way of referencing a service locator is directly from the global scope. This has the same disadvantages as that of the hardcoded service locator, but since it is global, it is a real singleton and therefore it can be easily used as a pattern for sharing instances between packages. We will see how this works later in the chapter, but for now we can certainly say that there are very few reasons for using a global service locator.
All the considerations discussed here will be more clear once we start using the service locator pattern in a real example. Let's then refactor the authentication server again to apply what we learned.
We are now going to convert the authentication server to use an injected service locator. To do this, the first step is to implement the service locator itself; we will use a new module, 'lib/serviceLocator.js':
module.exports = function() {
  var dependencies = {};
  var factories = {};
  var serviceLocator = {};

  serviceLocator.factory = function(name, factory) {   //[1]
    factories[name] = factory;
  };

  serviceLocator.register = function(name, instance) {   //[2]
    dependencies[name] = instance;
  };

  serviceLocator.get = function(name) {       //[3]
    if(!dependencies[name]) {
      var factory = factories[name];
      dependencies[name] = factory && factory(serviceLocator);
      if(!dependencies[name]) {
        throw new Error('Cannot find module: ' + name);
      }
    }
    return dependencies[name];
  };

  return serviceLocator;
};
Our serviceLocator module is a factory returning an object with three methods:
factory()is used to associate a component name against a factory.register()is used to associate a component name directly with an instance.get()retrieves a component by its name. If an instance is already available, it simply returns it; otherwise, it tries to invoke the registered factory to obtain a new instance. It is very important to observe that the module factories are invoked by injecting the current instance of the service locator (serviceLocator). This is the core mechanism of the pattern that allows the dependency graph for our system to be built automatically and on-demand. We will see how this works in a moment.
Let's now convert the 'lib/db.js' module straightaway to demonstrate how our serviceLocator works:
var level = require('level');
var sublevel = require('level-sublevel');

module.exports = function(serviceLocator) {
  var dbName = serviceLocator.get('dbName');

  return sublevel(
    level(dbName, {valueEncoding: 'json'})
  );
}
The db module uses the service locator received in input to retrieve the name of the database to instantiate. This is an interesting point to highlight; a service locator can be used not only to return component instances but also to provide configuration parameters that define the behavior of the entire dependency graph that we want to create.
The next step is to convert the 'lib/authService.js' module:
[...]
module.exports = function(serviceLocator) {
  var db = serviceLocator.get('db');
  var tokenSecret = serviceLocator.get('tokenSecret');

  var users = db.sublevel('users');
  var authService = {};

  authService.login = function(username, password, callback) {
    //...same as in the previous version
  }

  authService.checkToken = function(token, callback) {
    //...same as in the previous version
  }

  return authService;
};
Also, the authService module is a factory that takes the service locator as the input. The two dependencies of the module, the db handle and tokenSecret (which is another configuration parameter) are retrieved using the get() method of the service locator.
In a similar way, we can convert the 'lib/authController.js' module:
module.exports = function(serviceLocator) {
  var authService = serviceLocator.get('authService');
  var authController = {};

  authController.login = function (req, res, next) {
    //...same as in the previous version
  };

  authController.checkToken = function (req, res, next) {
    //...same as in the previous version
  };

  return authController;
}
Now we are ready to see how the service locator is instantiated and configured. This happens of course, in the 'app.js' module:
[...]
var svcLoc = require('./lib/serviceLocator')();     //[1]

svcLoc.register('dbName', 'example-db');       //[2]
svcLoc.register('tokenSecret', 'SHHH!');
svcLoc.factory('db', require('./lib/db'));
svcLoc.factory('authService', require('./lib/authService'));
svcLoc.factory('authController', require('./lib/authController'));

var authController = svcLoc.get('authController');   //[3]

app.post('/login', authController.login);
app.all('/checkToken', authController.checkToken);
[...]
This is how the wiring works using our new service locator:
- We instantiate a new service locator by invoking its factory.
- We register the configuration parameters and module factories against the service locator. At this point, all our dependencies are not instantiated yet; we just registered their factories.
- We load
authControllerfrom the service locator; this is the entry point that triggers the instantiation of the entire dependency graph of our application. When we ask for the instance of theauthControllercomponent, the service locator invokes the associated factory by injecting an instance of itself, then theauthControllerfactory will try to load theauthServicemodule, which in turn instantiates thedbmodule.
It's interesting to see the lazy nature of the service locator; each instance is created only when needed. But there is another important implication; we can see, in fact, that every dependency is automatically wired without the need to manually do it in advance. The advantage is that we don't have to know in advance what the right order for instantiating and wiring the modules is, it all happens automatically and on-demand. This is much more convenient compared to the simple dependency injection pattern.
Tip
Another common pattern is to use an express server instance as a simple service locator. This can be achieved using expressApp.set(name, instance) to register a service and expressApp.get(name) to then retrieve it. The convenient part of this pattern is that the server instance, which acts as a service locator, is already injected into each middleware and is accessible through the request.app property. You can find an example of this pattern in the samples distributed with the book.
Service locator and dependency injection have a lot in common; both shift the dependency ownership to an entity external to the component. But the way we wire the service locator determines the flexibility of our entire architecture. It is not by chance that we chose an injected service locator to implement our example, as opposed to a hardcoded or global service locator. These last two variations almost nullify the advantages of this pattern. In fact, the result would be that, instead of coupling a component directly to its dependencies using require(), we would be coupling it to one particular instance of the service locator. It's also true that a hardcoded service locator will still give more flexibility in configuring what component to associate with a particular name, but this does still not give any big advantage in terms of reusability.
Also, like dependency injection, using a service locator makes it harder to identify the relationship between the components, as they are resolved at runtime. But in addition it also makes it more difficult to know exactly what dependency a particular component is going to require. With dependency injection this is expressed in a much clearer way, by declaring the dependencies in the factory or constructor arguments. With a service locator, this is much less clear and would require a code inspection or an explicit statement in the documentation explaining what dependencies a particular component will try to load.
As a final note, it is important to know that often a service locator is incorrectly mistaken for a dependency injection container because it shares the same role of service registry with it; however, there is a big difference between the two. With a service locator, each component loads its dependencies explicitly from the service locator itself, when using a DI container instead, the component has no knowledge of the container.
The difference between these two approaches is noticeable for two reasons:
In terms of reusability, we can say that the service locator pattern sits in between hardcoded dependencies and DI. In terms of convenience and simplicity, it is definitely better than manual dependency injection, as we don't have to manually take care of building the entire dependency graph.
Under these assumptions, a DI container definitely offers the best compromise in terms of reusability of the components and convenience. We are going to better analyze this pattern in the next section.
The step to transform a service locator into a Dependency Injection container is not big, but as we already mentioned, it makes a huge difference in terms of decoupling. With this pattern, in fact, each module doesn't have to depend on the service locator anymore, but it can simply express its need in terms of dependencies and the DI container will do the rest seamlessly. As we will see, the big leap forward of this mechanism is that every module can be reused even without the container.
A DI container is essentially a service locator with the addition of one feature: it identifies the dependency requirements of a module before instantiating it. For this to be possible, a module has to declare its dependencies in some way, and as we will see, we have multiple options for doing this.
The first and probably the most popular technique consists of injecting a set of dependencies based on the arguments' names used in a factory or constructor. Let's take, for example, the authService module:
module.exports = function(db, tokenSecret) {
  //...
}
As we defined it, the preceding module will be instantiated by our DI container using the dependencies with names db and tokenSecret, a very simple and intuitive mechanism. However, to be able to read the names of the arguments of a function, it's necessary to use a little trick. In JavaScript, we have the possibility to serialize a function, obtaining at runtime its source code; this is as easy as invoking toString() on the function reference. Then, with some regular expressions, obtaining the arguments list is certainly not black magic.
Tip
This technique of injecting a set of dependencies using the names of the arguments of a function was popularized by AngularJS (http://angularjs.org), a client-side JavaScript framework developed by Google and entirely built on top of a DI container.
The biggest problem of this approach is that it doesn't play well with minification, a practice used extensively in client-side JavaScript, which consists of applying particular code transformations to reduce to the minimum the size of the source code. Many minificators apply a technique known as name mangling, which essentially renames any local variable to reduce its length, usually to a single character. The bad news is that function arguments are local variables and are usually affected by this process, causing the mechanism that we described for declaring dependencies to fall apart. Even though minification is not really necessary in server-side code, it's important to consider that often Node.js modules are shared with the browser, and this is an important factor to consider in our analysis.
Luckily, a DI container might use other techniques to know which dependencies to inject. These techniques are given as follows:
- We can use a special property attached to the factory function, for example, an array explicitly listing all the dependencies to inject:
module.exports = function(a, b) {}; module.exports._inject = ['db', 'another/dependency']; - We can specify a module as an array of dependency names followed by the factory function:
module.exports = ['db', 'another/depencency', function(a, b) {}]; - We can use a comment annotation that is appended to each argument of a function (however, this also doesn't play well with minification):
module.exports = function(a /*db*/,
                          b /*another/depencency*/) {};
All these techniques are quite opinionated, so for our example, we are going to use the most simple and popular, which is to obtain the dependency names using the arguments of a function.
To demonstrate how a DI container is much less invasive than a service locator, we are now going to refactor again our authentication server, and to do so we are going to use as starting point the version in which we were using the plain dependency injection pattern. In fact, what we are going to do is just leave untouched all the components of the application except for the app.js module, which is going to be the module responsible for initializing the container.
But first, we need to implement our DI container. Let's do that by creating a new module called diContainer.js under the lib/ directory. This is its initial part:
var argsList = require('args-list');

module.exports = function() {
  var dependencies = {};
  var factories = {};
  var diContainer = {};

  diContainer.factory = function(name, factory) {
    factories[name] = factory;
  };

  diContainer.register = function(name, dep) {
    dependencies[name] = dep;
  };

  diContainer.get = function(name) {
    if(!dependencies[name]) {
      var factory = factories[name];
      dependencies[name] = factory &&
          diContainer.inject(factory);
      if(!dependencies[name]) {
        throw new Error('Cannot find module: ' + name);
      }
    }
    return dependencies[name];
  };
  //...to be continued
The first part of the diContainer module is functionally identical to the service locator we have seen previously. The only notable differences are:
- We require a new
npmmodule calledargs-list(https://npmjs.org/package/args-list), which we will use to extract the names of the arguments of a function. - This time, instead of directly invoking the module factory, we rely on another method of the
diContainermodule calledinject(), which will resolve the dependencies of a module, and use them to invoke the factory.
Let's see how the diContainer.inject() method looks like:
  diContainer.inject = function(factory) {
    var args = argsList(factory)
      .map(function(dependency) {
        return diContainer.get(dependency);
      });
    return factory.apply(null, args);
  };

}; //end of module.exports = function() {
The preceding method is what makes the DI container different from a service locator. Its logic is very straightforward:
- We extract the arguments list from the factory function we receive as the input, using the
args-listlibrary. - We then map each argument name to the correspondent dependency instance retrieved using the
get()method. - At the end, all we have to do is just invoke the factory by providing the dependency list that we just generated.
That's really it for our diContainer. As we saw it's not that much different from a service locator, but the simple step of instantiating a module by injecting its dependencies makes a dramatic difference (as compared to injecting the entire service locator).
To complete the refactoring of the authentication server, we also need to tweak the 'app.js' module:
[...]
var diContainer = require('./lib/diContainer')();

diContainer.register('dbName', 'example-db');
diContainer.register('tokenSecret', 'SHHH!');
diContainer.factory('db', require('./lib/db'));
diContainer.factory('authService', require('./lib/authService'));
diContainer.factory('authController', require('./lib/authController'));

var authController = diContainer.get('authController');

app.post('/login', authController.login);
app.get('/checkToken', authController.checkToken);
[...]
As we can see, the code of the app module is identical to the one that we used to initialize the service locator in the previous section. We can also notice that to bootstrap the DI container, and therefore trigger the loading of the entire dependency graph, we still have to use it as a service locator by invoking diContainer.get('authController'). From that point on, every module registered with the DI container will be instantiated and wired automatically.
A DI container assumes that our modules use the dependency injection pattern and therefore it inherits most of its pros and cons. In particular, we have an improved decoupling and testability but on the other side more complexity because our dependencies are resolved at runtime. A DI container also shares many properties with the service locator pattern, but it has on its side the fact that it doesn't force the modules to depend on any extra service except its actual dependencies. This is a huge advantage because it allows each module to be used even without the DI container, using a simple manual injection.
That's essentially what we demonstrated in this section: we took the version of the authentication server where we used the plain dependency injection pattern and then, without modifying any of its components (except for the app module), we were able to automatize the injection of every dependency.
Tip
On npm, you can find a lot of DI containers to reuse or take inspiration from at https://www.npmjs.org/search?q=dependency%20injection.