Dealing with a messaging system often means using a one-way asynchronous communication; publish/subscribe is a perfect example.
One-way communications can give us great advantages in terms of parallelism and efficiency, but alone they are not able to solve all our integration and communication problems. Sometimes, a good old request/reply pattern might just be the perfect tool for the job. Therefore, in all those situations where an asynchronous one-way channel is all that we have, it's important to know how to build an abstraction that allows us to exchange messages in a request/reply fashion. That's exactly what we are going to learn next.
The first request/reply pattern we are going to learn is called correlation identifier and it represents the basic block for building a request/reply abstraction on top of a one-way channel.
The pattern consists in marking each request with an identifier, which is then attached to the response by the receiver; this way the sender of the request can correlate the two messages and return the response to the right handler. This elegantly solves the problem in presence of a one-way asynchronous channel where messages can travel in any direction at any time. Let's take a look at the example in the following figure:

The preceding scenario shows how using a correlation ID allows us to match each response with the right request, even if those are sent and then received in a different order.
Let's now start working on an example by choosing the most simple type of the one-way channels, one that is point-to-point (which directly connects two nodes of the system) and full-duplex (messages can travel in both directions).
In the simple channel category, we can find, for example, WebSockets: they establish a point-to-point connection between the server and browser, and the messages can travel in any direction. Another example, is the communication channel that is created when a child process is spawned using child_process.fork(), we should already know about it, we saw this API in Chapter 6, Recipes. This channel too is asynchronous, it connects the parent only with the child process and it allows messages to travel in any direction. This is probably the most basic channel of this category, so that's what we are going to use in our next example.
The plan for the next application is to build an abstraction in order to wrap the channel created between the parent and child processes. This abstraction should provide a request/reply communication by automatically marking each request with a correlation identifier and then matching the ID of any incoming reply against the list of request handlers awaiting a response.
From Chapter 6, Recipes, we should remember that the parent process can access the channel with the child using two primitives:
child.send(message)child.on('message', callback)
In a similar way, the child can access the channel to the parent process using:
process.send(message)process.on('message', callback)
This means that the interface of the channel available in the parent is identical to the one available in the child; this will allow us to build a common abstraction, so that the requests can be sent from both the ends of the channel.
Let's start building this abstraction by considering the part responsible for sending new requests, let's create a new file called request.js:
var uuid = require('node-uuid');

module.exports  = function(channel) {
  var idToCallbackMap = {};           //[1]

  channel.on('message', function(message) {       //[2]
    var handler = idToCallbackMap[message.inReplyTo];
    if(handler) {
      handler(message.data);
    }
  });

  return function sendRequest(req, callback) {     //[3]
    var correlationId = uuid.v4();
    idToCallbackMap[correlationId] = callback;
    channel.send({
      type: 'request',
      data: req,
      id: correlationId
    });
  };
}
This is how our request abstraction works:
- The one that follows is a closure created around our request function. The magic of the pattern lies in the
idToCallbackMapvariable, which stores the association between the outgoing requests and their reply handlers. - As soon as the factory is invoked, the first thing we do is start listening for incoming messages. If the correlation ID of the message (contained in the
inReplyToproperty) matches any of the IDs contained in theidToCallbackMapvariable, we know that we just received a reply, so we obtain the reference to the associated response handler and we invoke it with the data contained in the message. - Finally, we return the function we will use to send new requests. Its job is to generate a correlation ID using the
node-uuidpackage (https://npmjs.org/package/node-uuid) and then wrap the request data in an envelope that allows us to specify the correlation ID and the type of the message.
That's it for the request module; let's move to the next part.
We are just a step away from implementing the full pattern, so let's see how the counterpart of the request.js module works. Let's create another file called reply.js, which will contain the abstraction for wrapping the reply handler:
module.exports = function(channel) {

  return function registerHandler(handler) {
    channel.on('message', function(message) {     //[1]
      if(message.type !== 'request') return;

      handler(message.data, function(reply) {
        channel.send({             //[2]
          type: 'response',
          data: reply,
          inReplyTo: message.id
        });
      });
    });
  };

}
Our reply module is again a factory that returns a function to register new reply handlers. This is what happens when a new handler is registered:
- We start listening for incoming requests and when we receive one, we immediately invoke
handlerby passing the data of the message and a callback function to collect the reply from the handler. - Once the handler has done its work, it will invoke the callback that we provided returning back its
reply. We then build an envelope by attaching the correlation ID of the request (theinReplyToproperty), then we put everything back into the channel.
The amazing thing of this pattern is that in Node.js it comes very easy, everything for us is already asynchronous, so an asynchronous request/reply communication built on top of a one-way channel is not very different from any other asynchronous operation, especially if we build an abstraction to hide its implementation details.
Now, we are ready to try our new asynchronous request/reply abstraction. Let's create a sample replier in a file named replier.js:
var reply = require('./reply')(process);

reply(function(req, callback) {
  setTimeout(function() {
    callback({sum: req.a + req.b});
  }, req.delay);
});
Our replier simply calculates the sum between the two numbers received and returns the result after a certain delay (which is also specified in the request). This will allow us to verify that the order of the responses can also be different from the order in which we sent the requests, to confirm that our pattern is working.
The final step to complete the sample is to create the requestor in a file named requestor.js, which also has the task of starting the replier using child_process.fork() :
var replier = require('child_process')
                .fork(__dirname + '/replier.js');
var request = require('./request')(replier);

request({a: 1, b: 2, delay: 500}, function(res) {
  console.log('1 + 2 = ', res.sum);
  replier.disconnect();
});

request({a: 6, b: 1, delay: 100}, function(res) {
  console.log('6 + 1 = ', res.sum);
});
The requestor starts the replier and then passes its reference to our request abstraction. We then run a couple of sample requests and verify that the correlation with the response they receive is right.
To try out the sample, simply launch the requestor.js module, the output should be something similar to the following:
6 + 1 =  7
1 + 2 =  3
This confirms that our pattern works perfectly fine and that the replies are correctly associated with their own requests, no matter in what order they are sent or received.
The correlation identifier is the fundamental pattern for creating a request/reply communication on top of a one-way channel; however, it's not enough when our messaging architecture has more than one channel or queue, or when there can be potentially more than one requestor. In these situations, in addition to a correlation ID, we also need to know the return address, a piece of information which allows the replier to send the response back to the original sender of the request.
In AMQP, the return address is the queue where the requestor is listening for incoming replies. Because the response is meant to be received by only one requestor, it's important that the queue is private and not shared across different consumers. From these properties, we can infer that we are going to need a transient queue, scoped to the connection of the requestor and that the replier has to establish a point-to-point communication with the return queue , to be able to deliver its responses.
The following image gives us an example of this scenario:
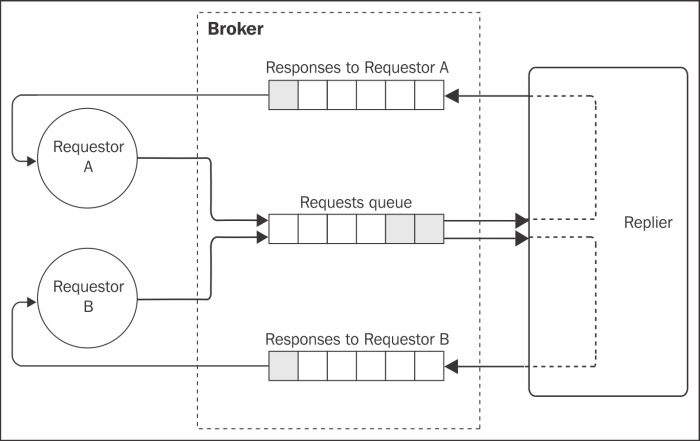
To create a request/reply pattern on top of AMQP, all that we need to do is to specify the name of the response queue in the message properties, this way the replier knows where the response message has to be delivered. The theory seems very straightforward, so let's see how to implement this in a real application.
Let's now build a request/reply abstraction on top of AMQP. We will use RabbitMQ as a broker, but any compatible AMQP broker should do the job. Let's start with the request abstraction (implemented in the amqpRequest.js module), we will show here only the relevant parts.
The first interesting thing to observe, is how we create the queue to hold the responses; this is the code responsible for that:
channel.assertQueue('', {exclusive: true});When we create the queue, we don't specify any name, which means that a random one will be chosen for us; in addition to this, the queue is exclusive, which means that it's bound to the active AMQP connection and it will be destroyed when the connection closes. There is no need to bind the queue to an exchange, as we don't need any routing or distribution to the multiple queues, this means that the messages have to be delivered straight into our response queue.
Next, let's see how we can generate a new request:
AMQPRequest.prototype.request = function(queue, message, callback) {
  var id = uuid.v4();
  this.idToCallbackMap[id] = callback;
  this.channel.sendToQueue(queue,
    new Buffer(JSON.stringify(message)),
    {correlationId: id, replyTo: this.replyQueue}
  );
}
The request() method accepts as input the name of the requests queue and the message to send. As we learned in the previous section, we need to generate a correlation ID and associate it to the callback function. Finally, we send the message, specifying the correlationId and the replyTo property as metadata.
It's interesting to see that for sending the message we are using the channel.sentToQueue() API instead of channel.publish(); this is because we are not interested in implementing any publish/subscribe distribution using exchanges, but a more basic point-to-point delivery straight into the destination queue.
The last important piece of our amqpRequest prototype is where we listen for incoming responses:
AMQPRequest.prototype._listenForResponses = function() {
  var self = this;
  return this.channel.consume(this.replyQueue, function(msg) {
    var correlationId = msg.properties.correlationId;
    var handler = self.idToCallbackMap[correlationId];
    if(handler) {
      handler(JSON.parse(msg.content.toString()));
    }
  });
}
In the preceding code, we listen for messages on the queue we created explicitly for receiving responses, then for each incoming message we read the correlation ID and we match it against the list of handlers awaiting a reply. Once we have the handler, we only need to invoke it by passing the reply message.
That's it for the amqpRequest module, now it's time to implement the response abstraction in a new module named amqpReply.js.
Here, we have to create the queue that will receive the incoming requests; we can use a simple durable queue for this purpose. We won't show this part, since it's again all AMQP boilerplate. What we are interested in seeing instead, is how we handle a request and then send it back to the right queue:
AMQPReply.prototype.handleRequest = function(handler) {
  var self = this;
  return self.channel.consume(self.queue, function(msg) {
    var content = JSON.parse(msg.content.toString());
    handler(content, function(reply) {
      self.channel.sendToQueue(
        msg.properties.replyTo,
        new Buffer(JSON.stringify(reply)),
        {correlationId: msg.properties.correlationId}
      );
      self.channel.ack(msg);
    });
  });
}
When sending back a reply, we use channel.sendToQueue() to publish the message straight into the queue specified in the replyTo property of the message (our return address). Another important task of our amqpReply object is to set a correlationId in the reply, so that the receiver can match the message with the list of pending requests.
Everything is now ready to give our system a try, but first, let's build a sample requestor and replier to see how to use our new abstraction.
Let's start from the module replier.js:
var Reply = require('./amqpReply');
var reply = Reply('requests_queue');

reply.initialize().then(function() {
  reply.handleRequest(function(req, callback) {
    console.log('Request received', req);
    callback({sum: req.a + req.b});
  });
});
It's nice to see how the abstraction we built allows us to hide all the mechanisms that handle the correlation ID and the return address; all we need to do is to initialize a new reply object, specifying the name of the queue where we want to receive our requests ('requests_queue'). The rest of the code is just trivial; our sample replier simply calculates the sum of the two numbers received as input and sends back the result using the provided callback.
On the other side, we have a sample requestor implemented in the requestor.js file:
var req = require('./amqpRequest')();

req.initialize().then(function() {
  for(var i = 100; i > 0; i--) {
    sendRandomRequest();
  }
});

function sendRandomRequest() {
  var a = Math.round(Math.random() * 100);
  var b = Math.round(Math.random() * 100);
  req.request('requests_queue', {a: a, b: b},
    function(res) {
      console.log(a + ' + ' + b + ' = ' + res.sum);
    }
  );
}
Our sample requestor sends 100 random requests to the 'requests_queue' queue. In this case too, it's interesting to see that our abstraction is doing its job perfectly, hiding all the details of the asynchronous request/reply pattern.
Now, to try out the system, simply run the replier module followed by requestor module:
node replier
node requestor
We will see a set of operations published by the requestor and then received by the replier, which in turn will send back the responses.
Now, we can try other experiments. Once the replier is started for the first time, it creates a durable queue; this means that, if we now stop it and then run the requestor again, then no request will be lost. All the messages will be stored in the queue until the replier is started again!
Another nice feature that we get for free using AMQP is the fact that our replier is scalable out-of-the-box. To test this assumption, we can try to start two or more instances of the replier, and watch the requests being load balanced between them. This works because, every time a requestor starts, it attaches itself as a listener to the same durable queue, and as a result, the broker will load balance the messages across all the consumers of the queue (competing consumers pattern). Sweet!
Tip
ØMQ has a pair of sockets specifically meant for implementing request/reply patterns (REQ/REP), however they are synchronous (only one request/response at a time). More complex request/reply patterns are possible with more sophisticated techniques. For more information, you can read the official guide at http://zguide.zeromq.org/page:all#advanced-request-reply.