
Spalted birch burl bowl by Mark Lindquist, 1987 Collection of Arthur and Jane Mason
Creating beauty from natural decay
Spalted birch burl bowl by Mark Lindquist, 1987 Collection of Arthur and Jane Mason
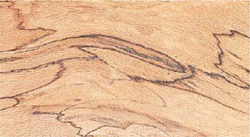
When wood is captured somewhere between the extremes of being completely sound and fully rotten, it can display magnificent beauty. The discoloration, prominent black lines and changes in texture that occur during the decaying process are known to woodworkers as spalting.
Spalting is a by-product of the rotting process that is carried out by a vast army of stain, mold and decay fungi. They are abundantly present in the air and soil, waiting for favorable conditions and a suitable host. Generally, wood moisture content of at least 25 percent, temperatures from about 40°–90°F, air and food (especially abundant in sap wood) are what the fungi need. A tree or branch freshly fallen onto a damp forest floor in warm weather is asking for it. Lighter colored woods offer the best canvas for nature’s graphic work. Hard maple is viewed as the king of spalted woods, although sycamore, persimmon, red and white oak, elm, pecan, birch, buckeye, apple, magnolia, beech, holly, hackberry, box elder and the sapwoods of walnut and cocobolo are favored by woodworkers as well.

Sugar maple Homage Pot #1 by David Elsworth, 1999
You can purchase spalted wood—usually maple—from specialty lumber and mail order suppliers (see Sources, p. 62). Turning blocks are most easily found, but a few suppliers offer boards when they can get them.
Hunting spalted wood is like panning for gold—lots of searching for that one precious nugget. Logs rotting on the forest floor, dead limbs and entire dead standing trees are excellent sources. You can also hunt for hidden treasure at a community bone yard of removed trees, and don’t overlook the bottom of your old firewood pile.
Woodworkers commonly use these methods to cause wood to spalt. They will work most effectively if the temperature is kept where the fungi will thrive, between 60° and 80°F. Monitor the spalting progress monthly—the optimal conditions you’ve created can make it happen fast.

Spalted Soft Maple
Spalted Sycamore
Spalted Holly (end-grain view)

Cabinet on Stand English oak with spalted bigleaf maple panels by Tim Patterson, student, College of the Redwoods, 1996
Remove those things the fungi need to grow, and you’ll stop its progress. One method is to lower the wood’s moisture content. Wood below 25-percent moisture content, when kept in low relative humidity, is not likely to decay or even stain. Accomplish this by air or kiln drying, placing smaller pieces in a microwave or finish turning if the piece was a rough-turned bowl. You can also raise or lower the wood’s temperature. Spalting rarely occurs above 90°F and stops below 32°F. Some turners store blanks in a freezer prior to finish turning. Finally, you can restrict the air—no air, no decay. Logs submerged in water, for example, do not decompose from fungi. Tightly wrapping the wood in several layers of plastic will restrict the air and slow the growth of the fungi.

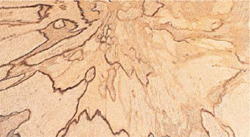
An active fungus colony surrounds itself with a chemical and physical barrier that defines its outer boundaries. Filaments of the fungus pack and swell in these regions and exude generous amounts of pigmented material that usually appear as black lines. The material in these “zone lines” protects the colony from attack by bacteria, insects, and other fungi, and assists in maintaining a desirably moist atmosphere. Inset: Electron microscope view of a fungus zone line in front of wood cell structures.
If you’re lucky, you’ll catch the spalting at the right time, before the cellular structure of the wood deteriorates, and you’ll be able to work the piece without any trouble. Sometimes, however, the material will have areas that have become soft and punky. These areas have no strength and defy normal woodworking strategies. They will crumble, tear out in chunks or leave a wrinkled appearance when you try to cut or plane them. They refuse to be glued together, and leave you with a cratered, uneven surface when you try to sand. Though not suitable for joinery, these soft areas can often be stiffened enough to finish so the piece of wood can still be used decoratively.
You can saturate soft areas with a liquid hardener. Where the wood is only marginally soft, a spot coat or two of clear shellac or nitrocellulose sanding sealer may harden it sufficiently. A really punky spot will require cyanoacrylate (CA) glue (the thin, watery type) or a product made to stabilize rotten wood. There are a number of them sold as wood hardeners at hardware stores. It may take several generous applications to treat each bad spot. These hardeners are effective, but they have side effects. They fill the wood cells, so surfaces treated with them can’t be glued and oil finishes don’t take well because they can’t penetrate. Solvent-based hardeners and CA glues darken the wood considerably. I like Protective Coatings Petrifier (see Sources, p. 62). It’s a water-based hardener that doesn’t discolor the wood, yet seals and stiffens effectively. It’s an excellent choice for troublesome soft spots.
You should be able to work the stiffened surface with edge tools—make very light cuts—or with abrasives, taking care to provide a firm, flat backing for the sandpaper. Some turners use body grinders or stiffbacked sanding discs and work the piece while it’s spinning on the lathe. For flat lumber, an abrasive planer is an excellent option, followed by a random orbit or pad sander. If you sand by hand, use a sanding block to give firm support to the paper.

Claro walnut box inlaid with spalted end-grain sycamore, bookmatched to form a bird image by Del Stubbs, 1982

MORRIS CHAIR BY RICH GOTZ, 1998
You are likely to encounter three problems when you finish spalted wood: Splotching, yellowing and excessive darkening. The whiter woods—which usually have the most dramatic examples of spalting—can turn quite yellow with certain finishes, and because the soft areas act like end-grain or even a sponge, splotching or excessive darkening can result unless the piece is sealed first.
An effective weapon against splotching is clear, dewaxed shellac used as a sealer. (Spray cans of shellac are thinned and dewaxed.) Cover the entire piece with a thin coat and let it dry. Then recoat dull-looking areas until all surfaces have a uniform sheen. You can use almost any finish as a topcoat over dewaxed shellac after it’s been sanded.
To minimize yellowing and darkening, use a surface film finish like clear shellac or lacquer. Waterborne finishes dry clear and don’t yellow with age. If the piece is primarily decorative and has few, if any, soft areas, clear wax is appropriate.
If you don’t mind the yellowing and darkening, use your favorite oil finish, but be prepared to make many applications to the softer areas. Experience has taught me that an oil-finished spalted piece will appear rather muddy and uneven at first, but will look better as the finish cures, which can take weeks or even months. Some oil finishes (such as General Finishes Sealacell Step 1, see Sources, below) are essentially a thinned, light-colored varnish, and will not yellow as much.
If you are looking for a challenge, and effects that often surpass the wildest woods from the tropics, spalted wood may be your ticket. Each block of wood has its own unique properties that must be judged and worked on its own terms. Use spalted wood and your work will never go unnoticed. Use it well, and you’ll produce a real showstopper.
There is anecdotal and some medical evidence that substances from decaying wood are a health threat. Allergic reactions and some serious lung diseases have been traced to spores and fungi that inhabit rotting wood. The effect on an individual woodworker depends on his or her tolerance to the spores and fungi, the concentration of them in the environment and the length of exposure. Persons with weakened immune systems, lung illnesses or who show signs of allergic reactions to the spalted wood should avoid the material altogether. One must err on the side of caution when working spalted wood. Freshly sawn green material with active spores and fungi, or even air-dried material, is potentially the most hazardous. Kiln drying, by turning up the heat and driving out the moisture, will actually kill both fungi and spores. To avoid breathing spalted wood dust, I strongly recommend that you wear a respirator—not a nuisance mask—and have an effective point-of-origin dust collection system or a self-contained air filtration helmet. Avoid prolonged contact with your skin, and clean your work area thoroughly following any work with spalted wood.

Worm-spalted red maple bowl by Alan Lacer, 1998
Typical spalting differs from worm spalt, where the worm hole allows the fungus to enter and work from the inside out.
SOURCES Flat material suppliers: Search the web for sources of spalted wood for sale.
A number of products for rotting wood are readily found in building centers, hardware stores and on the internet. Products such as P.C. Petrifier and Minwax's Wood Hardener work well on soft areas of spalted wood, as does a thin CA glue. For further reading: “Sculpting Wood” by Mark Lindquist, 1986, Worcester, Mass.; Davis Publications; $32.50; (800) 533-2847. Mark and his father Mel have been pioneers in working spalted wood and in popularizing its use as a decorative material. “Understanding Wood” by Bruce Hoadley, 1980, Newtown, Conn.; Taunton Press; $34.95; (800) 888- 8286.