
This gorgeous little dress is cute enough for parties, but hard-wearing enough for everyday play. My daughter loves telling her friends that her mummy made it – while spinning around with delight.
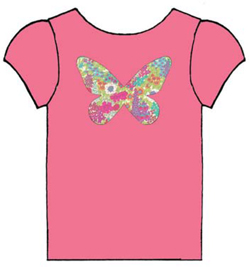
Find a plain t-shirt in a fun colour, add a skirt made from one rectangular piece of fabric, and a matching butterfly appliqué if you feel so inclined... remember, using a light cotton lawn will give the skirt the all-important twirl factor.
And voilà, you have a gorgeous little dress, perfect for days in or days out.
Plain t-shirt
Cotton lawn or lightweight fabric 137cm (54in) wide, measure from child’s waist to desired hem length of skirt (above or below knee, you choose!) then add 7.5cm (3in)
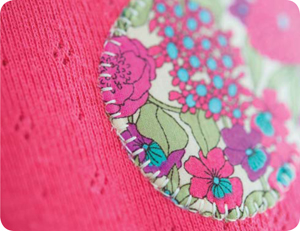
Scrap of matching fabric for appliqué, about 15 x 10cm (6 x 4in)
Medium or lightweight fusible interfacing, 15 x 10cm (6 x 4in)
I wanted a bright fun look for this skirt. I actually had more choice of fabric than with the t-shirt colour, so in this case the t-shirt came first. I picked a fabric with quite a few colours that didn’t actually feature the exact shade of the t-shirt but went well with the overall theme of the fabric. If I’d started out with the fabric I could have picked out the pink, the turquoise or the green for the t-shirt.

1 To prepare the appliqué fabric, follow the manufacturer’s instructions and fuse the interfacing to the wrong side of the fabric scrap.
2 Cut out a butterfly from this fabric using the butterfly template (see Templates).
3 Position the butterfly centrally on the front of the t-shirt. Fix in place by tacking (basting), pinning or using washable glue. Hand stitch the butterfly to the t-shirt all around the edge using blanket stitch (see Hand sewing stitches in the Techniques section) or use machine zigzag stitch.
4 Finish the long top edge of the skirt fabric with zigzag stitch.
5 To form the skirt loop, with right sides together, stitch the ends together with a 1cm (3⁄8in) seam. Finish the seam and press to one side. This is the back seam of the skirt.

6 Hem the bottom edge of the skirt by folding up 1.25cm (1⁄2in), and press. Fold another 2.5cm (1in) over, and press again. Stitch all around the hem, 2mm (1⁄16in) from the top fold.
7 Next gather the top edge of the skirt. To do this, sew two rows of long tacking (basting) stitches 1cm (3⁄8in) apart. The top row needs to be 1cm (3⁄8in) from the top finished edge of the skirt. You can do this on your sewing machine by setting the stitch length to about 4.5, or sew by hand. Leave long thread ends at both ends. Take hold of a set of long threads (one each from the same end, same side of both rows of stitches) and pull to create a gather.

8 Ease the fabric along the stitches to even out the gather, until the length is reduced to match the circumference of the t-shirt.
For an average height 6–7 year old, the measurement from the shoulder to the waist seam will be about 36cm (14in).
9 Measure from the child’s shoulder to just below the waist. Mark this distance, measured from the shoulder seam on the t-shirt, with a pin.
10 With right sides together, insert the t-shirt into the upside-down skirt. Line the finished edge of the skirt up with the pin from step 9. Adjust the gather to fit the t-shirt if necessary. Ensure the skirt top edge is parallel with the bottom of the t-shirt. Pin or tack in place. Stitch the skirt to the t-shirt all around the circumference in the middle of the gather tacking (basting) stitches. Remove the tacking (basting) stitches.

11 Turn the skirt right side out and you’re done.