Chapter 5
Queening pawns
When one pawn strives to become a queen, that is dangerous, but when several become queens, it is terrible! So as to promote such pawns, the attacking side is usually prepared to consider almost any sacrifice, since the appearance of a queen on the board will radically change the material balance and justify all previous losses. Because pawns advance slowly, such positions rarely arise, and there are not so many examples from practice.
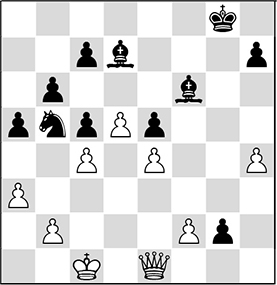
21 *
Anatoly Karpov
2700
Jan Timman
2645
Brussels 1986 (2)
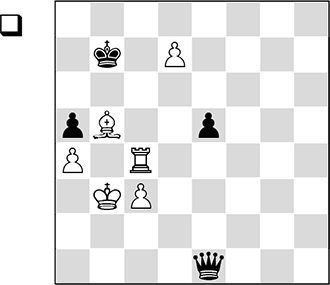
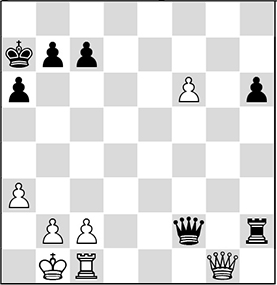
Black threatens perpetual check, so White must seek a way to advance his pawn with tempo.
87.d8♘+!
Promoting to a queen is no good, so we promote to a knight! The white forces are sufficient to cope with the lone black queen.
87…♔a7 88.♖c7+ ♔b8 89.♖d7 ♕b1+ 90.♔c4 ♕f1+ 91.♔d5 ♕f3+ 92.♔d6 ♕f8+ 93.♔e6 ♕h6+ 94.♔xe5 ♕e3+ 95.♔d6 ♕f4+ 96.♔c5 ♕e3+ 97.♔c4 ♔c8 98.♘f7 ♕e4+ 99.♔c5 ♕e3+ 100.♔c6 ♕xc3+ 101.♔b6 ♕e3+ 102.♔a6 ♕e6+ 103.♘d6+ ♔b8 104.♖d8+ ♔c7 105.♖c8+
1-0
22 **
Vasily Smyslov
Mikhail Botvinnik
Moscow ch-URS 1941 (15)
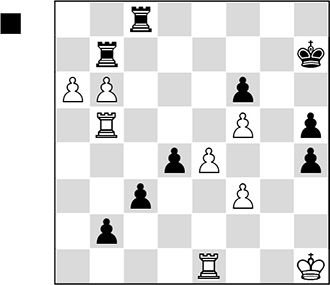
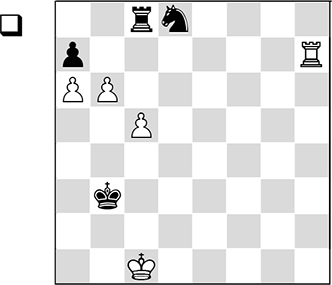
Both sides’ passed pawns are very far advanced, and each is a potential queen. Therefore, to gain a tempo, Black sacrifices a rook:
56…♖xb6! 57.♖xb6 d3!
The armada of black pawns marches unstoppably to the promotion squares.
58.♖g1
58.a7 d2 59.♖g1 c2 60.♖b8 c1♕ 61.a8♕ ♕xg1+ 62.♔xg1 d1♕+ 63.♔g2 ♖c2+–+.
58…d2 59.♖xf6 ♖c7
Careful! After 59…c2?, White manages to create threats against the black king: 60.♖f7+ ♔h8 61.♖f6=.
Black could also win with 59…d1♕ 60.♖xd1 c2–+.
60.♖fg6
60…d1♕
White resigned, since after 61.♖xd1 c2, Black makes a queen with tempo. Incidentally, Black avoided a cunning trap: after 60…c2 61.♖6g5, Black cannot avoid move repetition.
23 **
Lev Psakhis
Alexei Vyzmanavin
Moscow 1981 (5)
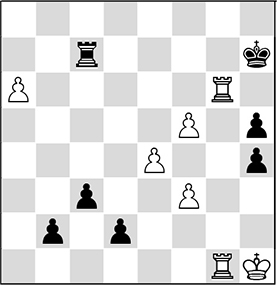
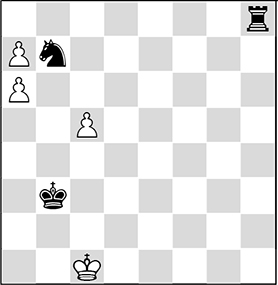
It is obvious that in the current pawn battle, White has the better chances. However, after an exchange of one pair of pawns on the queenside and the appearance there of the black knight, the win would be problematical. White’s solution is elegant and convincing:
49.b6! ♔g5 50.♘xb7! ♖xb7 51.♖xg4+!
The pawn on b6 is defended, the ♖b7 passive, and the only other blockader of the white pawns is eliminated on g4. There is no way to stop the white pawns, so Black resigned.
24 **
Pikanen
Study 2005

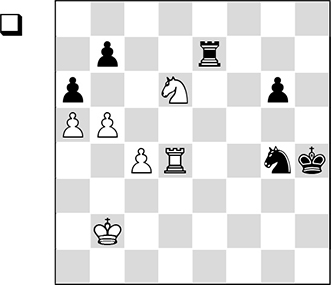
It is hard to call this position an endgame study, and it is more of a ‘textbook position’. But this takes nothing away from the beauty of the solution.
1.e6 ♘xe6
On 1…♖d2, White wins with 2.f7 ♘xf7 3.exf7 ♖d8 4.♖g1 b5 5.♕e6+ ♔b7 6.♖g8+–.
2.♕xe6+ ♔b8
It seems that all danger is behind Black, but White finds a miraculous manoeuvre, forcing Black to resign.
3.♕g8+ ♔a7 4.♕g1+ ♕f2
5.♕f1!
The whole point of White’s play – Black is unable to prevent the f-pawn queening, because of the bad position of the ♖h2.
5…♕c5 6.b4!
The black queen is overloaded…
After 6.f7? ♖f2 7.♕g1 b6, Black is fine!
6…♕d6 7.f7
Winning.
25 ***
Boyman
Study 2008
We have before us a position, in which the main active units are the white passed pawns. Such a position could very easily arise in a game.
1.♖c7
1.♖xa7? ♖xc5+ 2.♔d2 ♖b5 3.b7 ♖b6 4.♖a8 ♘xb7, with a draw.
1…♖b8
Black loses quickly after 1…♖a8 2.♖xa7 ♖c8 (2…♖b8 3.b7 ♔c4 4.♖a8+–) 3.♖c7 ♖b8 (3…♖a8 4.b7) 4.b7 ♔c4 5.a7+–.
2.♖b7!
The key move, and the only one that wins.
2.b7? ♔a4! 3.♖c8 ♘xb7! 4.♖xb8 (4.c6? ♖xc8 5.axb7 ♖xc6+–+) 4…♘xc5 5.♖b6 ♔a5=.
The direct 2.♖xa7? does not win: Black manages to draw, albeit with difficulty, after 2…♔c4 3.♖c7 (3.♖b7 ♘xb7 4.c6 ♘c5 5.c7 (he loses unexpectedly after 5.a7?? ♖e8! 6.b7 ♔c3!) 5…♘xa6=; 3.♖d7 ♘c6! 4.a7 ♖a8 5.♖c7 ♔b5 6.♔b2 ♖d8 7.♔c3 ♔xc5 8.b7 ♔b6 9.a8♕ ♔xc7 10.♔c4 ♖b8 11.♔c5 ♖xb7=) 3…♔b5 4.a7 ♖a8 5.♔d2 ♘c6 6.♔e3 (6.b7 ♖xa7 7.b8♕+ ♘xb8 8.♖xa7 ♔xc5=) 6…♖d8 (6…♔xc5? 7.b7 ♖xa7 8.b8♕+–) 7.♔e4 ♔xc5 8.b7 ♔b6 9.a8♕ (9.♖c8 ♔xa7) 9…♔xc7=.
2…♘xb7
2…♖c8 3.bxa7+ ♔a4 4.♖b8+–;
2…♖a8 3.♖xa7+–.
3.bxa7 ♖h8
4.a8♕!
A sacrifice to gain time.
The slow 4.axb7? would be a grievous mistake – pawns are only pawns, and the white king turns out to be in danger after 4…♔c3! 5.♔d1 (5.♔b1 ♖h1+ 6.♔a2 ♖h2+ 7.♔a3 ♖h1! 8.♔a4 ♔c4 9.♔a5 ♔xc5 10.♔a4 ♔c4=) 5…♔d3 6.♔e1 ♔e3 7.♔f1 ♔f3 8.♔g1 ♖g8+! 9.♔h2 ♖h8+ 10.♔g1 ♖g8+ 11.♔f1 ♖h8=.
4…♖xa8 5.axb7 ♖h8
5…♖b8 6.c6 ♔c3 7.c7 ♖h8 8.c8♕++–, check!
6.♔d2!
White wins.
With the capture on b7, White won a tempo, so his king could get off the back rank! The sacrifices of the rook on b7 and the pawn on a8 were not in vain – other continuations do not win: 6.c6? ♔c3=; 6.♔d1? ♔c4 7.c6 ♔d3!=.
26 ***
Jeroen Piket
John Nunn
Wijk aan Zee 1990 (8)
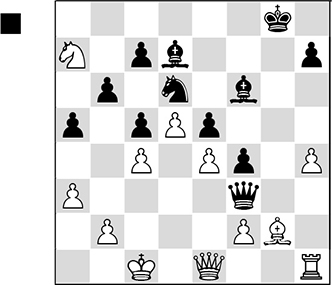
The motif of advancing the pawns closer to queen strikes one at first glance. And certainly, with his knight so far away, the white queen has trouble coping with the excellently-coordinated black pieces, supporting their passed pawn.
30…♕xg2!
If 30…♕b3 31.♕c3 ♕xc3+ 32.bxc3 ♘xc4 33.♗f1 ♘d6 34.f3, it will be White who plays for a win.
31.♖g1 f3 32.♘b5 ♘xb5 33.♖xg2+ fxg2
34.cxb5?
Now, the black bishop can support the passed pawn from f1 rather than h3, which facilitates the bringing up of additional help in the form of the h-pawn.
It was essential to play 34.♕g1! ♗h3 (34…♘d4 35.♕xg2+ ♔f7 36.f3 h5 leads to something close to a positional draw – it is hard for either side to strengthen his position) 35.cxb5 ♗xh4 36.a4 ♗g5+ 37.♔c2 ♗f4 38.b3. White simply manoeuvres his king on the squares c2-d3-c3, and Black seems not to be able to strengthen the pressure. But if White errs, and plays at some moment the move f2-f3, Black has a clear plan, involving the advance of the pawn to h4, and the transfer of his king to b7 and bishop to e7. Because of the threat of …c5-c4, followed by …♗e7-c5, White is defenceless. With the position of the king on c4, White is in zugzwang – in the event of the queen moving along the first rank, the bishop comes to h3, and his place is taken by the pawn, whilst after ♕g1-h2, there follows …♗e7-g5, and the bishop gets into White’s position via c1 or d2, onto the desired diagonal g1-a7.
34…♗xb5 35.♕g1 ♗f1 36.♕h2 ♗xh4 37.♕xh4 g1♕ 38.♕d8+ ♔g7 39.♕xc7+ ♔h6 40.♕xb6+ ♔h5 41.b4 ♗d3+ 42.♔d2 ♕xf2+
White resigned, since after 43.♔d3, there follows 43…c4+.
Additional material
Nikolac-Nunn, Dortmund 1979 – Black’s 48th move