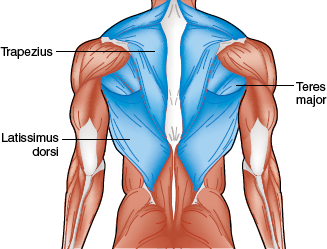
The bent-over row using free weights, the machine row that uses a cam machine, and the seated row and *lat pulldown (both of which require a multi- or single-unit machine) are excellent exercises to develop the upper back. These muscles—the rhomboids, trapezius, latissimus dorsi, and teres major—work in opposition to the chest muscles. The exercises in this step also develop the back of the shoulder (posterior deltoid, infraspinatus, teres minor), the front of the upper arm (biceps brachii), and the forearm (brachioradialis). Back exercises should be performed as often as chest exercises to keep the anterior and posterior upper-body musculature in balance.

If you have access to free weights, you are encouraged to select the bent-over row to develop your back. If you have access to either a cam or multi- or single-unit machine, select the machine row, the seated row, or the *lat pulldown exercise.
Begin with your feet shoulder-width apart and your shoulders slightly higher—10 to 30 degrees—than your hips (figure 5.1a). Your back should be flat, abdominal muscles contracted, elbows straight, knees slightly flexed, and eyes looking at the floor about 2 feet (61 cm) ahead of the bar. Grasp the bar in a palms-down overhand grip with thumbs around the bar. Your hands should be evenly spaced 4 to 6 inches (10-15 cm) wider than shoulder width.
Pull the bar upward in a straight line (figure 5.1b). Exhale as the bar nears your chest during the upward movement. Pull in a slow, controlled manner until the bar touches your chest near the nipples (or, for women, just below your breasts). Your torso should remain rigid throughout the exercise, with no bouncing or jerking.

MISSTEP
The bar does not touch your chest.
CORRECTION
Reduce the weight on the bar and concentrate on touching your chest with the bar.
When the bar touches your chest, pause momentarily before beginning the downward movement (figure 5.1a ). Inhale during the downward movement. Slowly lower the bar in a straight line to the starting position without letting the weight touch or bounce off the floor.
Be sure to keep your knees slightly flexed during the upward and downward movements to avoid placing excessive stress on your low back.

MISSTEP
Your upper back is rounded.
CORRECTION
Lift your head, slightly arch your back, and focus on a spot on the floor about 2 feet (61 cm) ahead of the bar.

MISSTEP
Your knees are locked.
CORRECTION
Flex your knees slightly to reduce stress on your low back.

MISSTEP
Your upper torso is not stable and moves up and down.
CORRECTION
Have someone place a hand on your upper back to help remind you of the proper position.
Although the bent-over row is considered to be one of the best exercises for the upper back, it is also frequently performed with bad technique or modified more than usual. Do not be tempted to use a heavier weight, thinking that it will increase your strength faster. Attempting to lift too much weight leads to bad technique and possible injury. Another mistake is to pull upward, simultaneously lifting with your legs and low back, and then quickly leaning forward to make contact with the bar. Too much forward lean combined with nearly or fully extended knees results in a significant amount of stress on the low back and increases your risk of injury.

Figure 5.1 BENT-OVER ROW (FREE WEIGHT)
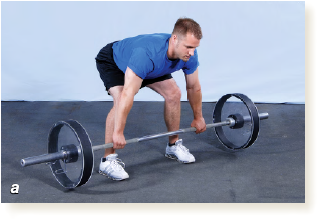
Preparation
1. Use overhand grip, hands 4 to 6 inches (10-15 cm) wider than shoulder-width apart
2. Keep shoulders higher than hips
3. Keep low back flat
4. Keep elbows straight
5. Slightly flex knees
6. Hold head up, look at floor ahead of bar
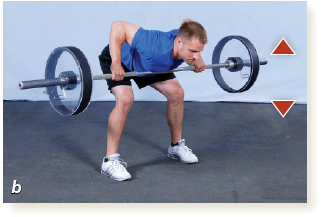
Movement
1. Slowly pull bar straight up
2. Pause momentarily as bar touches chest
3. Touch chest near nipples (below breasts for women)
4. Keep torso rigid
5. Exhale as bar nears chest
6. Pause in highest position
7. Return to starting position while inhaling
8. Continue upward and downward movements until set is complete
Equipment designs for the machine row vary. Your exercise facility may not have the type of machine shown in figure 5.2. If not, ask for assistance and learn the proper technique from a qualified professional.
Sit in the cam rowing machine with your chest and abdomen pressed against the chest pad. Sit erect, look straight ahead, and grasp the handles with a closed, neutral, or overhand grip (figure 5.2a). Adjust the seat height to position the arms parallel to the floor when they are holding the handles. Both feet should be flat on the floor or on the foot supports if the machine has them.
While maintaining the preparatory body position, pull your arms as far back as possible (figure 5.2b) and exhale through the sticking point. Pause and then return slowly to the starting position while inhaling (figure 5.2a). Keep your feet flat on the floor at all times.

MISSTEP
You do not complete the full range of motion.
CORRECTION
Bring your elbows back until they form a straight line with each other behind your back.

MISSTEP
Erect posture is not maintained.
CORRECTION
Maintain firm and continuous contact with chest pad. Be sure not to lean backward when you pull on the handles.

MISSTEP
You attempt to “throw” the handles backward.
CORRECTION
Use slow, controlled backward motion.

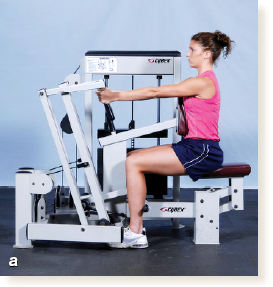
Preparation
1. Sit erect with chest and abdomen pressed against pad
2. Grasp handles with closed grip
3. Position arms parallel to the floor
4. Place feet flat on floor
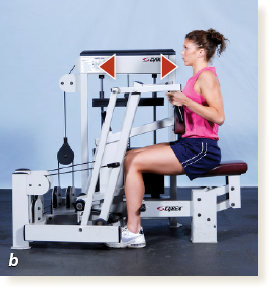
Movement
1. Pull arms in a rowing movement as far back as possible
2. Keep firm contact with chest pad at all times
3. Exhale while pulling
4. Pause at handles’ position nearest to torso
5. Return to starting position while inhaling
6. Continue backward and forward movements until set is complete
At the low-pulley station, get into a seated position with your knees slightly flexed and feet on the foot supports (figure 5.3a). Keep your torso erect with your low back and abdominal muscles contracted. Grasp the handles with a closed grip and your palms facing inward (depending on the type of handle that is available). Your elbows should be fully extended with the weight plates you are lifting suspended above the rest of the weight stack.
Maintain this position as you pull the handles slowly and smoothly to your abdomen (figure 5.3b). Exhale as the bar nears your abdomen. Pause, then return to the starting position while inhaling (figure 5.3a). Your upper torso should not move back and forth; keep it rigid and, if necessary, lighten the weight.
MISSTEP
You allow the weight plates to drop quickly and hit the rest of the stack.
CORRECTION
Pause at your chest and then slowly return the handles to the starting position. Maintain control of the weight throughout the exercise.

MISSTEP
Your knees are straight rather than flexed slightly.
CORRECTION
Make sure your knees are slightly flexed to decrease pressure on your low back.

MISSTEP
Your torso and upper back is rounded rather than erect and flat.
CORRECTION
Keep your torso erect by contracting your abdominal and upper and low back muscles.
The most common error committed during the seated row exercise is allowing the upper body to move forward and backward instead of remaining erect and motionless throughout the exercise. When this happens, the low back muscles become involved in extending the back and reduce the pulling action of the upper back muscles. Thus the forward and backward movement compromises the benefit to the upper back muscles for which this exercise was designed.

Figure 5.3 SEATED ROW (MULTI- OR SINGLE-UNIT MACHINE)
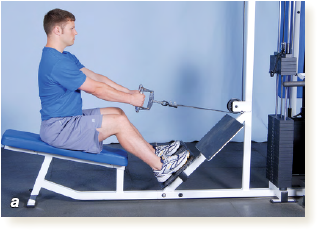
Preparation
1. Get into a seated position with feet on supports
2. Slightly flex knees
3. Keep torso erect
4. Fully extend elbows
5. Grasp handles with closed grip
Movement
1. Pull handles slowly and smoothly toward torso
2. Do not use torso movement to pull weight
3. Exhale as handles near abdomen
4. Pause at handles’ position nearest to torso
5. Return to starting position while inhaling
6. Continue backward and forward movements until set is complete
 Lat Pulldown
A common additional exercise for the upper back is the *lat pulldown. It is similar to the pull-up, but it is performed in a multi- or single-unit machine.
This pulling exercise develops the upper back (latissimus dorsi, rhomboids, trapezius) and involves some anterior upper-arm (biceps) muscles. It can be performed sitting in a machine (as shown in figure 5.4) or kneeling on the floor.
Begin by getting into an upright, seated position facing the weight stack with your legs straddling the thigh support post and your feet flat on the floor. Grasp the bar in an overhand grip, with hands slightly wider than shoulder width (figure 5.4a). Slightly tilt the torso back and fully extend the elbows.
Smoothly pull the bar down in front of your face, past your chin, and then toward the upper chest (figure 5.4b). Keep your elbows out and away from your body. Touch your upper chest with the bar while exhaling.
To return the bar to the starting position, slowly extend the elbows to allow the bar to move upward (figure 5.4a). Control the weight; do not allow the weight plates to hit the rest of the stack. Inhale as you fully extend your elbows.

MISSTEP
You quickly move your torso backward to pull the bar down.
CORRECTION
Keep your torso stationary during the exercise. Use your upper back, arm, and shoulder muscles to pull the bar down.

MISSTEP
You allow the weight plates to fall quickly and hit the rest of the stack.
CORRECTION
Pause when the bar touches your chest and then slowly return the bar to the starting position. Maintain full control of the weight plates.

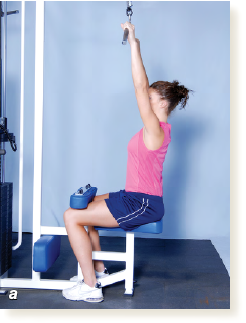
Preparation
1. Use an overhand grip slightly wider than shoulder-width apart
2. Get into a kneeling or seated position
3. Lean torso back slightly
4. Fully extend elbows
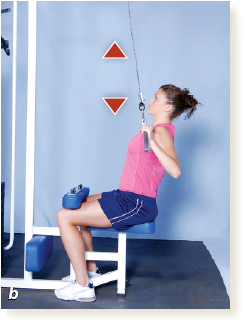
Movement
1. Pull bar down in front of face
2. Keep elbows out and away from body
3. Keep torso stationary
4. Pull bar past chin and then toward upper chest
5. Exhale as bar touches chest
6. Return to starting position while inhaling
7. Continue downward and upward movements until set is complete
Back Drill 1. Choose One Exercise
After reading about the characteristics and techniques of the exercises and the type of equipment required for each, you are ready to put to use what you have learned. Consider the availability of equipment in your situation; then select one of the following exercises to use in your program:
Bent-over row (free weight)
Machine row (cam machine)
Seated row (multi- or single-unit machine)
Write in “Back” in the “Muscle group” column on the workout chart and fill in the name of the exercise you selected in the “Exercise” column (see figure 11.1 on page 146). If you intend to include the machine *lat pulldown exercise, record it on the workout chart immediately after the previously selected back exercise.
Success Check
Consider availability of equipment.
Consider time available.
Choose a back exercise and write it on the workout chart.
Back Drill 2.
Warm-Up and Trial Loads for Basic Exercises
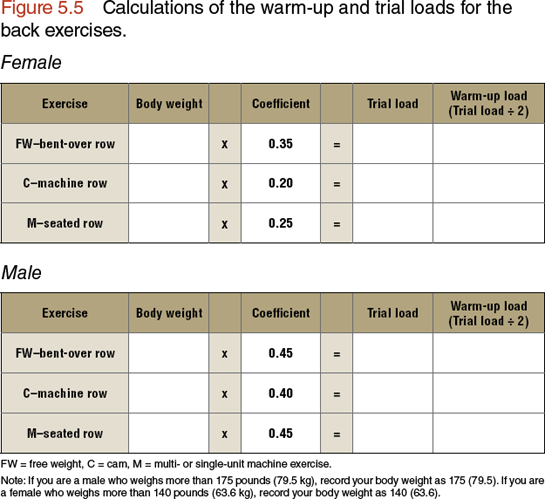
This practice procedure answers the question “How much weight or load should I use?” Using the coefficient associated with the back exercise you selected and the formula shown in figure 5.5, determine the trial load. (See step 3, pages 33-34, for more information on using this formula.) Round your results down to the nearest 5-pound (2.3 kg) increment or to the closest weight-stack plate. Be sure to use the coefficient assigned to the exercise you selected. Use half of the amount determined for the trial load for your warm-up load in the exercise. These loads will be used in drills 4 and 5.
Success Check
Determine your trial load by multiplying your body weight by the correct coefficient.
Determine your warm-up load by dividing your trial load by two.
Round down your trial and warm-up loads to the nearest 5-pound (2.3 kg) increment or to the closest weight-stack plate.
Back Drill 3.
Determine Trial Load for *Lat Pulldown
If you are an experienced lifter who decided to add the *lat pulldown, follow the directions to determine the trial load. (See step 3, pages 34-35 for more information.)
Based on your previous experience and knowledge of the weight that you can lift, select a weight that will allow you to perform 12 to 15 repetitions. Calculate the warm-up load by multiplying the trial load by 0.6 and round down to the closest weight-stack plate (figure 5.6). These loads will be used in drill 4.
Success Check
Select a weight that will allow 12 to 15 repetitions.
Determine the warm-up load by multiplying the trial load by 0.6.
Round down the warm-up load to the closest weight-stack plate.

Back Drill 4. Practice Proper Technique
In this procedure, you are to perform 15 repetitions with the warm-up load determined in drill 2 (bent-over row, machine row, or seated row) or drill 3 (*lat pulldown). If you are an experienced lifter who decided to add the *lat pulldown, practice it last.
Review the photos and instructions for the exercise, focusing on proper grip and body positioning. Visualize the movement pattern through the full range of motion. Perform the movement with a slow, controlled velocity, remembering to exhale through the sticking point. Ask a qualified professional to observe and assess your technique.
Success Check
Check movement pattern.
Check velocity.
Check breathing.
Back Drill 5. Determine Training Load
This practice procedure will help you determine an appropriate training load designed to produce 12 to 15 repetitions. For basic exercises, perform as many repetitions as possible with the calculated trial load from drill 2. Make sure that you perform the repetitions correctly. If you are doing the free-weight bent-over row, also check that your hips are lower than your back and that the bar touches at or near the nipples.
If you performed 12 to 15 repetitions with the trial load, then your trial load is your training load. Record this weight as your training load for this exercise in the workout chart (see page 146). If you did not perform 12 to 15 repetitions, go to drill 6 to make adjustments to the load.
Success Check
Check that you are using the correct load.
Maintain proper and safe technique during each repetition.
Back Drill 6. Make Needed Load Adjustments
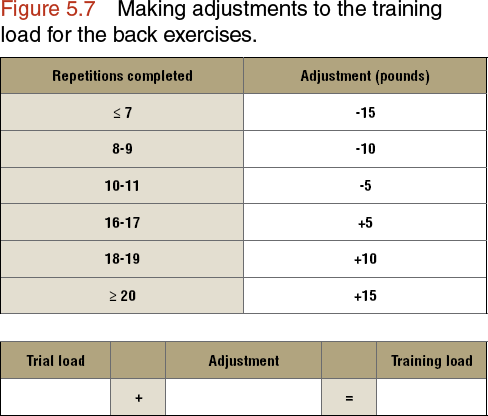
If you performed fewer than 12 repetitions with your trial load, the load is too heavy, and you need to lighten it. On the other hand, if you performed more than 15 repetitions, the trial load is too light, and you need to increase it. Use figure 5.7 to determine the adjustment you need to make and the formula for making load adjustments.
Success Check
Check correct use of load adjustment chart (figure 5.7).
Write in your training load on the workout chart (see page 146).
This step involved selecting one back exercise for which you have the needed equipment and perhaps one more if you have already been training. Using a proper grip, the correct body position, movement, and breathing patterns, and accurate warm-up and training loads will maximize your success.
After you have determined your training load and recorded it on your workout chart, you are ready to move on to step 6. In this step you will select exercises that develop the shoulder muscles. It includes three exercises and one *additional exercise, each with specific instructions on how they should be performed.
Before Taking the Next Step
Honestly answer each of the following questions. If you answer yes to all of the questions relevant to your level and exercise selection, you are ready to move on to step 6.
1. Have you selected a basic back exercise? If you are an experienced lifter, do you want to add the *lat pulldown?
2. Have you recorded your exercise selection (or selections) on the workout chart?
3. Have you determined a warm-up and training load for the exercise(s) you selected?
4. Have you recorded the training load(s) on the workout chart?
5. Have you learned the proper technique for performing the exercise(s) you selected?