Fixing Your Mistakes
Learning to knit is so much fun—until you make a mistake and you don’t know how to fix it! In this chapter, I’ll take you through a few of the most common mistakes new knitters make and show you how to fix them step-by-step. The more you knit, the easier it gets to notice your mistakes and to then fix them. Be patient while you are learning, and remember that making mistakes happens to everyone. Don’t give up, take a deep breath, and know that there isn’t any kind of mistake in knitting that can’t be fixed.
Tinking Back
Tinking back is a funny expression in knitting. “Tink” is “knit” spelled backward, which makes sense because tinking back means going back one stitch at a time on your needles. You are basically knitting backward to undo your work until you get back to the spot where you’ve made a mistake. Maybe you dropped a stitch off your needle, or split a stitch (accidentally poked the needle through the yarn, making it split), or just noticed something that you need to redo.
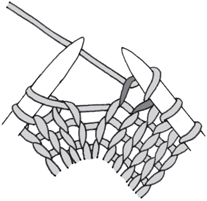
Step 1: Pull the yarn that is coming out of the stitch on the right needle taut. This opens up the hole in the stitch in the row below the stitches you just worked.
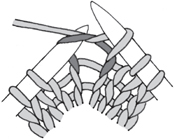
Step 2: Insert the tip of the left needle into the center of the stitch in the row below the one you just knit on the right needle.
Step 3: When the stitch is all of the way on the left needle, drop the stitch you just knit off the right needle and pull the yarn out of the stitch. You have now un-knit or tinked back 1 stitch.
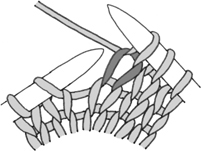
Step 4: Keep repeating Steps 1 to 3 until you get back to your intended spot.
TIP
When you make a mistake, try to figure out how to fix it on your own first. If you just can’t figure it out, the next best thing is to go to a friend or family member who knits or go to your local yarn shop to get some help. If someone is helping you, make sure she shows you how to fix the mistake and that she doesn’t just fix it herself and hand it back to you. You won’t learn unless you do it yourself!
Ripping Back
Ripping back means taking the needles out of your work and pulling out lots of stitches at a time and then putting your needles back in to continue. Sometimes you need to go way back to a certain spot, or sometimes you have to pull your work all of the way out and start again. This might seem a little scary when you just start knitting, but once you get more practice, you will feel more comfortable ripping back to correct mistakes.
New knitters often feel like they want to leave in their mistakes instead of pulling back and redoing all of their hard work. But being able to “rip back” is actually one of the greatest things about knitting: even if you make a mistake, your yarn doesn’t get used up, so you can try over and over again. There aren’t many mistakes in knitting that can’t be fixed this way.
NOTE
Ripping back is sometimes referred to as frogging in the knitting world. This is because if you repeat “rip it, rip it, rip it” over and over, it sounds like a frog’s “ribbit, ribbit, ribbit.”
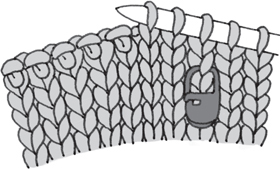
Step 1: If you are pulling back to a certain spot, put a stitch marker on the fabric marking this spot so you’ll know when to stop. Pull the needles out of the stitches.
Step 2: Grab the end of the yarn you were just knitting with and pull the yarn out of the stitches. If you get going fast, you’ll see why it’s called ripping: you are ripping out the fabric. Either rip the stitches all the way out so there is nothing left or stop at the desired spot to pick up and carry on with the project.
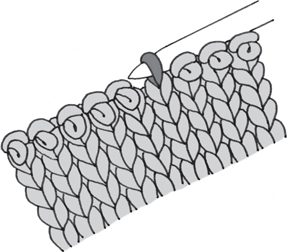
Step 3: Start putting the stitches back on the needle by inserting the tip of the needle from back to front in each stitch.
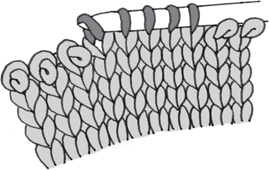
Step 4: Continue putting the stitches back on the needle, inserting the tip from back to front and working all the way around the stitches until you get back to the first stitch.
If you are working in the round, once you are all the way around and all of the stitches are back on the circular needle, make sure the working yarn is coming from the first stitch on the right needle. For working back and forth, the yarn should be coming from the first stitch on the left needle.
Now you can start knitting on your project again, knowing you have pulled out your mistake and can start fresh. That’s a good feeling.
Picking Up a Dropped Stitch
Every once in a while, a stitch will jump off your needle unexpectedly and run down your knitted fabric. This is called a dropped stitch. A crochet hook is helpful for picking up dropped stitches. Follow these steps and you’ll be back on track very quickly.
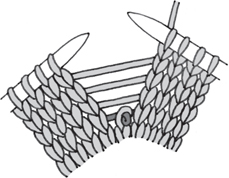
Step 1: Knit to the place where you see the dropped stitch in your knitting and stop. The dropped stitch should be in between your needles.
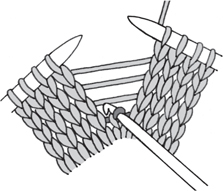
Step 2: Slip a crochet hook into the loop of the dropped stitch, which may be only one row or round down from where you’re knitting, or a bunch of rows or rounds down.
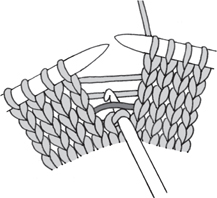
Step 3: You will see strands of yarn going in between the stitches of the knit fabric, one on each row or round above where your dropped stitch is. Place the crochet hook under the strand that is closest to the stitch on the crochet hook.
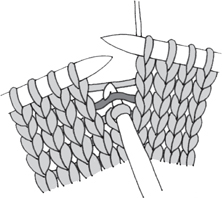
Step 5: Repeat going under the strand running between the stitches and pulling it through the stitch on the crochet hook until all of the strands are pulled through, and you are back up to the knitting needles.
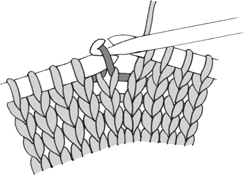
Step 6: Place the stitch on the crochet hook on the left needle.
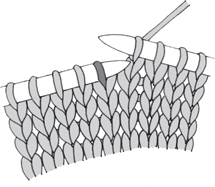
Step 7: Now you are ready to continue on with your knitting as usual!
TIP
To pick up a purl stitch, turn the fabric around so the knit side is facing you, and then pick up the stitch following the steps above.
Sewing Up a Hole
If you notice a hole in your knit fabric after your project is done, don’t panic! Sometimes new knitters accidentally pick up the strand that runs in between the right and left needles, and this becomes a hole in the fabric. All you need is a yarn needle and the matching yarn. The hole can be fixed quickly, and the fabric will look as good as new!
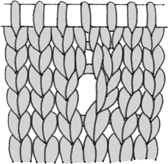
Step 1: Figure out exactly where the hole is on the right side of the fabric.
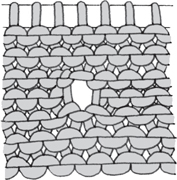
Step 2: Turn the fabric around so the wrong (purl) side of the fabric is facing you.
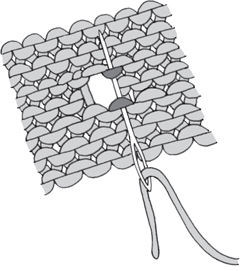
Step 3: Place a cut length of the same yarn that is about 6 inches long on a yarn needle. Insert the yarn needle through 2 of the purl bumps alongside the hole on one side. Pull the yarn through, leaving an end of a few inches hanging out (you’ll weave this end in later).
Step 4: Now, going down the other side of the hole, insert the yarn needle through 2 of the purl bumps along the hole. Pull the needle and yarn all of the way through, and pull gently to close the hole in the fabric.
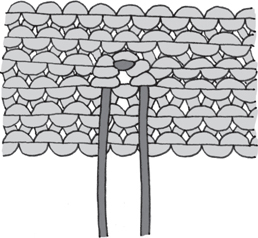
Step 5: Give an extra tug on the two ends of the yarn. Place each of the ends on the yarn needle, one at a time, and weave in the ends, going under a few of the purl bumps. Trim the ends to a ¼ inch.
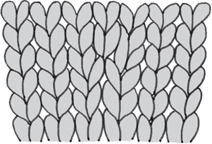
Step 6: Turn the fabric back to the right side and admire how the hole in the fabric has disappeared!