Pressure Canning
A pressure canner is required for canning low-acid foods. Always follow recipes precisely and follow these basic steps for success.
A pressure canner is required for most nonpickled vegetables and other low-acid foods. It’s also used to process some foods that contain low-acid ingredients, such as most soups and sauces containing meat.
The pressurized steam the canner produces is hotter than boiling water, so it can heat foods to 240°F, which is hot enough to kill the tougher microorganisms found in low-acid foods. Unlike a boiling-water canner, add only 2 to 3 inches of water into the bottom—don’t fill it—because you’re creating steam, not a bath of boiling water.

1. Fill with Produce: Fill one hot sterilized jar (Step 1, page 462) at a time; do not fill a cooled jar. Pack the food in the jar as tightly as you can without crushing it. Use a funnel as needed to keep jar rims clean (A).
2. Add Hot Liquid: If recipe directs, top with the hot liquid (B). Measure headspace (Step 4, page 462) and adjust as needed.
3. Remove Air Bubbles: Use a thin, flexible spatula to remove air bubbles (C). Add more water if needed for correct headspace.
4. Put on Lid: Wipe the jar rim and threads with a clean cloth. Set lid in place and screw band on fingertip tight, just ¼ to ½ inch from very tight. This is important so air can escape the jar for a proper seal. Place the jar back in the canner before filling the next jar.
5. Fill the Canner: Set the last jar in place (D). The water in the canner should come up only a few inches and should not cover the jars. Only enough water to create steam is needed.
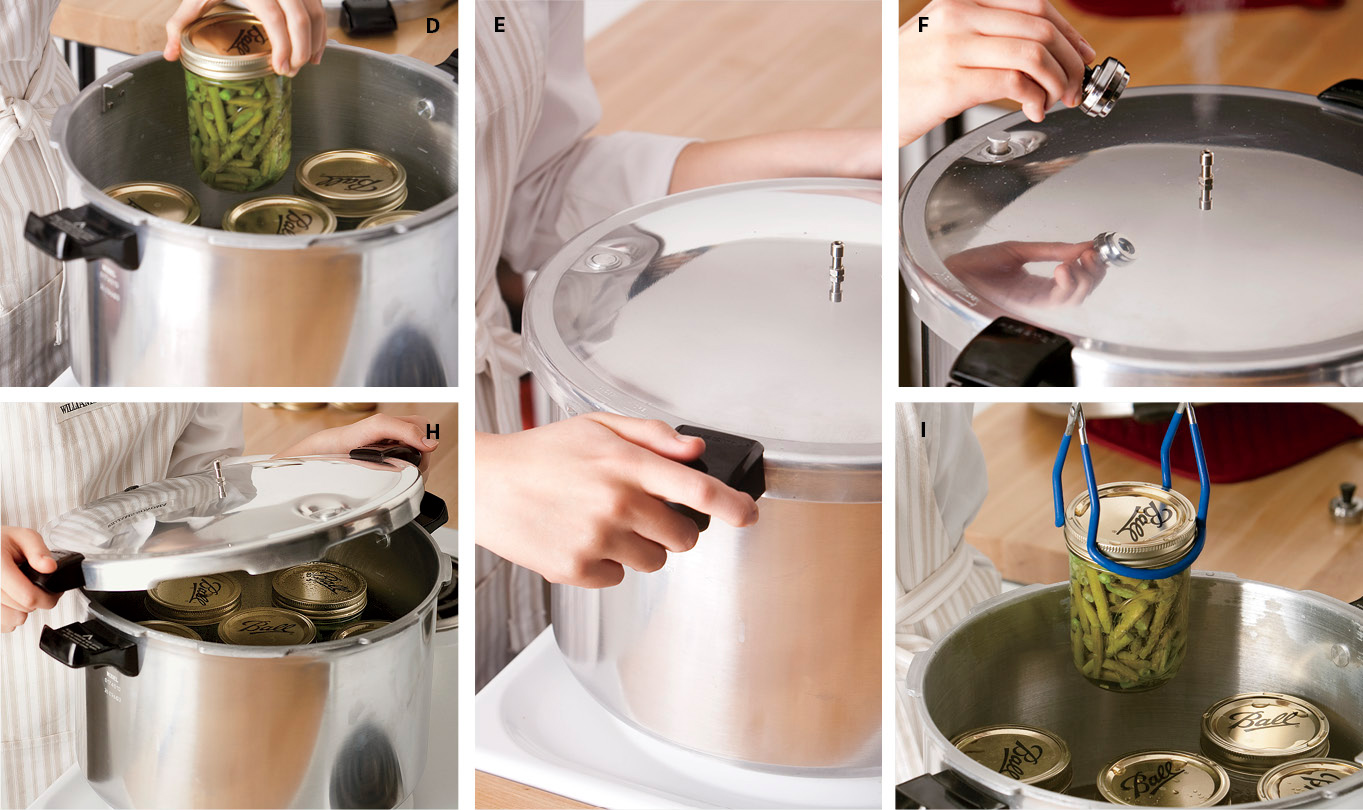
6. Lock the Lid: Set the lid in place and twist so the handles lock it in place (E). Do not put on the pressure regulator yet.
7. Vent the Canner: Turn heat to high and allow a full head of steam to come out of the vent pipe. Allow to vent 10 minutes. For a weighted-gauge canner, adjust weights on the pressure regulator, if needed, and set the pressure regulator on the vent pipe to plug it (F).
8. Achieve the Correct Pressure: If the canner has a safety valve, it will pop from the down to the up position (G), showing that the canner is pressurized. Do not open the canner. When the pressure regulator starts to rock, adjust heat so it makes a steady rattling sound. Set the timer for the time specified in the recipe, adjusting for altitude. For a dial-gauge canner, start timing when the gauge reads 11 pounds.
9. Depressurize: When the timer goes off, turn off the heat. Do not open the lid. Wait until the safety valve drops back down or the dial returns to zero. This shows that the canner is no longer pressurized and is safe to open. Do not force-cool the canner by running it under water; allow the pressure to come down naturally.
10. Open the Canner: Remove the pressure regulator. Unlock the handles and open the canner away from you (H) so that any steam is directed away from you.
11. Cool the Jars: Allow the jars to stand in the canner 10 minutes to cool slightly. Remove them from the canner (I) and set on wire racks or kitchen towels placed on the counter. Do not tighten lids. Let cool 4 to 5 hours. Test seals by pressing on the lid (tip, page 463). Refrigerate any improperly sealed food; eat within 3 days. Store sealed jars in a cool, dry place.
Check the Gauge: Process foods in a dial-gauge canner at 11 pounds pressure. Dial gauges should be checked annually for accuracy and replaced if necessary. Check with your county extension office or manufacturer for where to have the gauge checked.