
Having the right equipment to hand makes baking the best thing since sliced bread! Special items needed in the recipes such as a loaf tin (pan) or stand mixer are listed alongside ingredients. Kitchen essentials needed for every recipe such as scales, bowls, dish towels and cling film (plastic wrap) are not listed as most kitchens will have these items available.
• Flour shaker
• Digital kitchen scales
• Pastry brush
• Measuring spoons
• Cling film (plastic wrap)
• Blades
• Serrated bread knife
• Plastic dough scraper
• Sharp knife
• Oven thermometer
• Baking (parchment) paper
• Metal dough blade
• Reusable silicone sheet (Bake-o-glide)
• 900g (2lb) loaf tin (pan)
• Cooling rack
• Baking sheet
• Mixing bowl
• Dish towel
• Measuring jug
• Stand mixer
Bread should be sliced with a sharp serrated bread knife in a sawing motion – this stops the bread becoming compacted when it is cut.
Good quality tins (pans) will always stand you in good stead: they distribute heat evenly and will give you a better bake. Look after them and they’ll look after you! They should be hand washed in warm soapy water – don’t go sticking them in the dishwasher. They will build up a patina over time that makes their performance better.
The main ingredient in bread making, bread flour is higher in protein than plain (all-purpose) flour and therefore produces the high gluten level needed for bread making. Flours for bread making will vary in protein content but are generally over 11 per cent and often up to 15 per cent.
It’s worth sticking with one type of strong white bread flour as different brands will vary in their absorbency of liquid. That way you’ll get to know your flour and can note down any recipe adjustments you need to make for next time.
A mix of strong wholemeal (whole wheat) bread flour, malted wheat flakes and grains for sweeter, nuttier loaves.
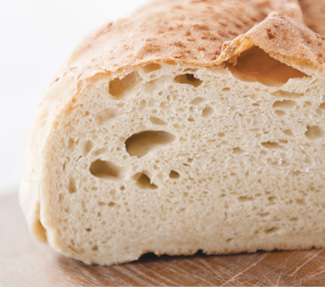
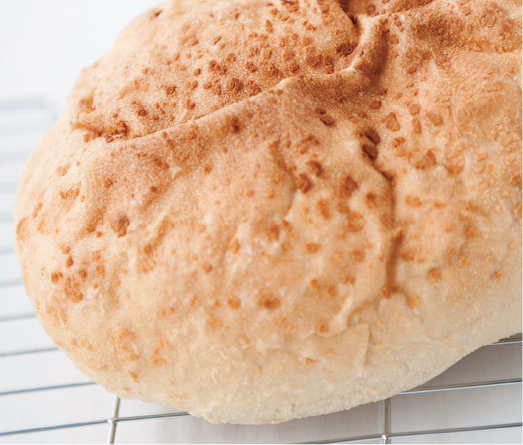
This has slightly lower gluten than white bread flour, which is why it is often mixed with white bread flour in recipes, rather than used on its own. It will absorb much more liquid than white bread flour. It has a nutty taste, and as it contains wheat germ and bran it’s good for you. The bran content will inhibit the rise in the dough so it will need longer to prove and bake, and will produce a denser, coarser loaf.
Yeast is used to make the dough rise by aerating it, which gives it a light, open texture. The yeast needs warmth, moisture and nutrients (starch from the flour plus sugar and salt) to multiply and grow. Too much of any of these and it will be killed, resulting in a failed loaf.
All of the recipes in this book can be made using any type of yeast. Both fresh and dried yeast will need to be soaked in a little of the liquid from the recipe until the mixture starts to bubble and froth. Calculate the amounts needed using the following conversion:
1 tsp fast action yeast = 6.5g (1⁄4 oz) fresh yeast = 3.5g (11⁄2 tsp) dried yeast
Also referred to as quick, instant, fast dried and easy blend yeast, this is often sold in sachets to help keep its freshness. It is my preferred choice for yeast and the recipes here all use it. It doesn’t need reconstituting with water first and can be added directly to the bowl with the other ingredients. Be sure to check your yeast is within its use-by date.
This yeast is in a pellet form, which needs to be soaked in water before using.
This can be difficult to get hold of, but try health food or wholefood shops – they will often have it in the chiller cabinet. It comes in a block and is beige in colour with a creamy texture and yeasty smell. It keeps for approximately 1 week in the fridge but will quickly discolour, dry out and lose efficacy so buy it as you need it.
This enhances the flavour of bread, helps to strengthen the gluten, and acts as a preservative. Too much will kill the yeast. It won’t harm fast action yeast if it comes into contact with it in the mixing bowl but be careful with fresh and reconstituted dried yeast, placing them away from salt in the bowl prior to mixing. Sea salt can be used instead of table salt but it should be finely ground first.
Caster (superfine) or granulated sugar in savoury doughs acts as source of food for the yeast. It can be used in a greater quantity to sweeten doughs and darken a crust. It is sometimes added in the form of honey, treacle (molasses) or malt extract which will not only add sweetness but also flavour and colour.
Some doughs are more hydrated than others and liquid can be added in all sorts of forms; water, milk, apple juice and so on. Liquids should be warmed to blood temperature so that the temperature of your finished dough is warm enough for the yeast to be activated. Too hot and the yeast will be killed, too cold and the dough will be slow to rise. One part boiling water to two parts cold water gives the correct temperature. For a pre-ferment cold liquid is fine. Milk will provide a finer textured crumb than water due to the fat content. The liquid measurements in the recipes should be used as a guide – as you get to know your flour you may need to make little adjustments. Just make sure you note them down for next time.
Weighing is the most accurate method for measuring your liquid content. Some kitchen scales will have settings for measuring water and milk in millilitres or fluid ounces. Cold water weighs the same as it measures in volume, for example 100ml = 100g; 4fl oz = 4oz. Other liquids such as milk have different volume to weight ratios.
Fat in a dough will produce a loaf with a finer texture and will help with the keeping quality when baked. It can be added as butter, eggs, vegetable, sunflower or olive oil. Recipes in this book use salted butter. Eggs are free-range and always large, and when used in high proportions, such as in Brioche, the dough will need longer to rise.
Dry ingredients are placed in a large mixing bowl, and any ingredients added with a measuring spoon should be level spoonfuls. Wet ingredients are measured out as per the recipe (which is best done by weight for accuracy), warmed as necessary and then added to the dry ingredients in the bowl. Mixing by hand is the easiest (but stickiest!) way to combine the ingredients to form a rough dough. Spread out and then bend your fingers to make your hand into a claw shape and start to work together the wet and dry ingredients until they form a shaggy dough which is then ready to be kneaded. A rough dough can also be mixed with a wooden spoon or strong silicone spatula if preferred.
Liquid for a pre-ferment doesn’t need to be warm as the yeast is allowed to develop over a longer period of time. Stir together the ingredients for a pre-ferment in a bowl large enough to allow for some expansion in size. The mixture will still be a little lumpy but make sure there are no pockets of flour. Cover and set aside in a cool position to develop for a minimum of 4 hours, or overnight in the fridge. After developing, the pre-ferment is mixed with more flour and other ingredients to form the final dough. Most recipes can be changed to benefit from a pre-ferment: simply mix together half of the flour needed in the recipe with the full amount of yeast and liquid to make the pre-ferment. Once developed, mix the pre-ferment with the other half of the flour and any other ingredients listed to form your dough.
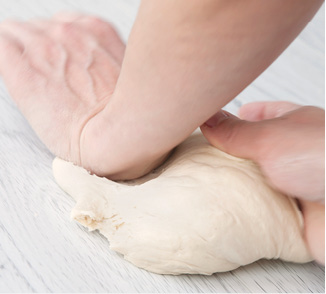
This is the process of working the dough to distribute the yeast evenly and develop the essential gluten. Kneading stretches out the gluten into long strands until the dough is smooth and much more elastic. The more it is worked, the stretchier it becomes.
Allow yourself enough space on the work surface; clear any clutter out of the way so you have room to work. Avoid putting any flour on the work surface as this extra flour will be incorporated into the dough and cause it to tighten, making your finished loaf dense. Don’t be afraid of a sticky dough: some of the very best loaves are made with a sticky dough and as you knead you will soon find it gets easier and less sticky.
Place the ball of rough dough onto your work surface. Using the heel of your right hand push the dough out and forward diagonally to the right (1), flip the stretched part back onto the ball of dough (2), and repeat the action with the heel of your left hand, stretching it diagonally out to the left (3). To begin with the dough won’t move very far without breaking as you stretch. The more you knead the further it will begin to stretch. As the dough becomes smoother and more elastic turn the ball of dough slightly after every right and left push.
Kneaded dough will become smooth, satiny and more elastic in an average of 10 minutes. If your technique is a little lacklustre you will need to knead for longer. When you think it is ready you can test it by forming a ball and prodding with a fingertip: if it springs back into position it’s ready for the first prove.
For extremely soft and sticky doughs which will barely form a ball, kneading can be done by grasping and lifting with fingertips, flicking back down onto the main portion of dough and continuing until it becomes smooth. Lift the dough higher and higher as the elasticity grows. If the thought of this puts you off bread making consider mixing it in the machine.

1

2
3
By all means use a stand mixer, or a bread machine on the dough setting to mix and knead your dough if that’s what you’d prefer. It is very satisfying working, kneading and creating your own dough but if you have your hands full already then use a machine. I am a mixer Mummy through and through. In a stand mixer work the ingredients together into a rough dough on speed setting 1. Then allow the machine to knead the dough for a full 10 minutes on setting 2. As it kneads, the dough hook should be slapping the dough around the bowl. If you are using a bread machine refer to the manufacturer’s instructions. Be sure to keep an eye on your mixer as it kneads the dough: it could start to move across the work surface and you don’t want it to take a tumble. If you’re not able to watch it set it on the floor.
When the dough has been fully kneaded it is ready for the first proving or rising. Place 1 tsp sunflower or vegetable oil in the bottom of a bowl large enough to hold the dough when it has doubled in size. I prefer not to use a huge bowl as it can be difficult to judge when the dough has risen sufficiently.
Gather the dough together into a ball and place it in the bowl, turning it to coat the dough fully in the oil. Doing this means that it won’t stick to the dish towel or cling film (plastic wrap) that is used to cover it.

The bowl should then be covered with a clean dish towel, cling film or, if you have a one, a clean, dry, disposable shower cap – the elasticated edge holds on to the bowl and they are big enough to stretch over most rims.
The dough should then be set somewhere at normal room temperature, away from any draughts, and be left to rise until doubled in volume. The yeast multiplies and as it does so releases carbon dioxide, which causes the rise. Warmth from a pre-heating oven or in an airing cupboard will encourage the dough to rise more quickly but it is not essential. Dough can be left to rise overnight in the fridge for a slow, cool rise.
You will know when the dough is ready not only by sight – when it is touched with a finger it won’t instantly spring back. Some doughs will take longer to reach this point and being patient is the key: don’t rush your dough to the next stage before it is ready. Certain dough ingredients such as seeds, spices, malt extract and cocoa powder will slow down the speed at which a dough doubles in size at this stage.
After doubling in size the dough should be knocked back. This smoothes out any large air pockets and will give your bread an even texture. Simply punch the dough in the bowl to deflate it, turn it out onto the work surface and knead briefly, 1–2 minutes is usually sufficient.
If the recipe calls for them, any additions to the dough should be done at this point – you can easily do the working in and knocking back at the same time. Turn the dough out onto the work surface and stretch it out, scatter over the additions, gather up the dough and knead lightly to knock it back and incorporate the extra ingredients simultaneously. Now the dough is ready for shaping.
Shaping creates the finished look of your loaf and is important for achieving an even rise.
Dough needs a ‘spine’ so that the loaf will rise upwards rather than flowing outwards. This is especially important for free-form loaves. Flatten out the dough on the work surface into a rough round, for a round free-form loaf, or rectangle for a tin (pan) loaf (1).
Take the edge of the dough and fold it in to the centre.(2) Continue all the way around the edge of the dough, folding in to the centre (3). Repeat the process again, working around the dough, folding in to the middle until the dough is tightened and you can’t fold in any more.
Flip the dough over on the work surface so that the seam sits underneath. Gently cup your hands around the ball of dough (4) (or either side of the loaf shape) and start to tighten the dough again, moving your hands down and underneath it (5), repeating until the dough feels tightened like a coiled spring. Use your hands to shape the tightened dough into the required shape for a loaf tin (pan) or for a tapered free-form loaf. Your shaped dough now needs to be transferred to a greased loaf tin (pan) or a lined or well-greased baking sheet for its second proving.

1

2

3

4

5
Portion the dough evenly, flatten each portion and form a spine as described previously. Turn the dough over so that the seam sits underneath. Use your hand to form a cage around the ball of dough, with your fingertips firmly in contact with the work surface. Use your fingers to spin the dough, keeping your wrist elevated and allowing the dough to turn and tighten below your palm. Lift away your hand and there – a perfect roll!
For long rolls, form the spine and then a ball. Roll the ball between the palm of your hand and the work surface, applying an even pressure to create a sausage shape. To lengthen further, use two hands meeting together in the middle, and as you roll move your hands outwards to make the dough shape even longer. To taper the ends apply a greater pressure to the outside edge of both hands.
Loaves shaped this way still need a spine. They are then placed into a well-floured proving basket (which can be expensive and only available from specialist shops). Lining a colander or large sieve with a cotton dish towel will provide the same result. Dust the dish towel well with flour before adding the shaped dough with the base facing upwards. When the loaf has doubled in size invert it onto a lined or greased baking sheet and remove the basket/colander and dish towel.
After shaping your loaf the dough should be allowed to prove or rise for a second time. It needs to be covered to prevent the dough from drying out, either with a clean dish towel or a sheet of thin plastic. An opened-out freezer bag is useful for covering baking sheets; loaves in tins (pans) can be loosely covered with cling film (plastic wrap) or a clean disposable shower cap. Shaped dough should be allowed to get to 85–90 per cent increased in size, which is why it’s referred to in recipes as ‘almost doubled in size’. The heat from the oven gives some final oomph and makes the dough rise upwards in a last satisfying burst. The second proving is quicker than the first rise and (for regular doughs) should take 30–60 minutes. Getting this second rise is an important stage. Take care not to over-prove your dough or the loaf may collapse on baking. Under-proving can cause the top crust to balloon up and away from the bread leaving you with a gaping hole when sliced.

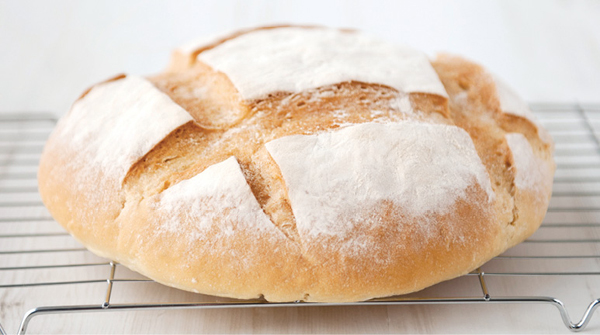
Not only does slashing a loaf look attractive, it helps the dough to expand on baking. It needs to be done with a confident hand and a very sharp knife or razor blade. Hold the knife at a 45-degree angle to the surface of the dough, and don’t press down but draw the blade across the dough instead. Loaves can be slashed prior to the second rise or just before baking. The earlier it’s done then the wider the split will be. Just remember: super sharp and a swift, smooth, confident action. Flour the top of a loaf before slashing for more distinctive changes in appearance.

This will change the finished look of your bread and can be done with beaten egg (egg wash), milk, water, melted butter or warmed honey – to name but a few. For the best effect glaze should be gently brushed on just before baking. It also serves to give any sprinkled additions such as oats, chopped nuts or malted wheat flakes something to stick to.
Getting to know how your oven bakes bread is just as important as your bread making technique. If you’re in any doubt use a separate oven thermometer to test the accuracy of your oven’s in-built thermometer. Preheat the oven with the thermometer on the shelf you will bake on, then adjust the oven temperature dial until the thermometer reads the correct temperature for your recipe. You should then be guaranteed correct baking times.
Every oven will bake good bread for you, but a fan oven can often darken the crust too much, so if you have the option
I would recommend setting your fan oven to the top and bottom heat only with no fan assistance and using the non-fan temperatures in the recipes. Be aware of the hot spots in your oven and consider positioning a shelf at the very top of the oven and adding an empty baking sheet to it at the same time as you put your loaf in to bake. The sheet will conduct the heat evenly over the top of your loaf and prevent it from scorching on the top.
Loaves get the last oomph of rising in the oven before the yeast is killed – which happens usually 10 minutes in to the baking time, so avoid opening the oven in this first stage of baking.
A falling temperature is most suitable for baking bread, using the initial burst of heat for the last rise and then a lower temperature to prevent browning too much before the bread is baked through. Adding the loaf to the oven will of course cause the temperature to fall a little – but in some recipes the oven temperature must be turned down after a certain amount of initial baking time.
The sugar in sweet doughs will create a darker crust and you should keep an eye on these from half way through baking onwards so that you can cover them with baking (parchment) paper if they appear to be browning too much.
Baking several loaves at the same time will increase the baking time as the load on the oven will increase and you will need to put your testing skills into action.
A fully baked loaf should sound hollow when tapped on the base. If the loaf is in a tin (pan) you will need to turn it out carefully to test it. If the sound is dull return the loaf to the oven for a further five minutes and test again.
A thermometer probe (used for testing the temperature of meat and other cooked foods) is extremely useful for checking whether bread is fully baked. If you have one put it into use and insert the probe, through the side, into the centre of the loaf – a fully baked loaf should read between 92–95°C/198–203°F.
Bread should be turned out of the tin (pan) or transferred from the tray to a wire rack to cool straight away to prevent it from sweating.
Bread will always be best eaten freshly baked, on the day it has been made. It should be consumed within 1–2 days (2–3 days for breads with a high sugar or fat content) as it quickly goes stale without the preservatives that factories put into commercially produced bread.
You can refresh a whole loaf in the oven at 170°C/150°C (fan)/300°F/Gas mark 2 for 15 minutes to restore it almost to the quality of ‘just baked’.
Loaves should be stored in a cool, dry bread bin, not the fridge. Wrap in a plastic bag for a soft crust and baking (parchment) paper or a paper bag for crusty bread.
Home-baked bread freezes well for up to a month in a freezer bag, but consider slicing/portioning the loaf so you can defrost just as much as you need. Defrost at room temperature and then refresh in the oven as above.

If you like it super crusty, preheat a roasting tin (pan) in the base of the oven. As soon as you add your loaf to the oven to bake add a cup of cold water to the hot tin and close the oven door. This creates a hot, steamy oven that will give you an even crisper crust.
First of all did you add the yeast? It’s an obvious suggestion but it does happen! If the dough is cold then the yeast will take longer to create the rise, so you need to allow more time. If you don’t have time to wait for the required rise then you can warm up the dough to get it going. Try a warmer position – maybe next to a preheating oven or in an airing cupboard. You could set the dough on a tray over a large bowl filled with a little hot water: the dough will absorb the warmth which should get it springing into action.
The problem here is that the loaf has not baked through fully, and the moisture still in the loaf will cause it to have a doughy texture. Under baking can also cause the crust to soften and the loaf to sag. Double check the oven for temperature accuracy with an oven thermometer.
If dough is over-proved it can collapse in the oven while baking as it doesn’t have the structure to hold itself up. On second proving only allow your loaf to rise to 85–90 per cent, leaving the last small percentage of rise to happen in the oven.
These problems are caused by under proving a loaf before baking. Make sure that the dough has swelled to 85–90 per cent of its original size before baking otherwise the crust can fly upwards in a balloon effect, separating from the dough, and leaving a gaping hole between the crust and the loaf. It is also the cause of a seam of what looks like uncooked dough in the bottom 5mm (1⁄4 in) of a loaf and will leave you with dense-textured bread.
This is down to the dough having an insufficient spine to give it enough structure to rise upwards. Work at creating a strong spine on the next loaf you make which will stop it from flowing outwards.
This can be down to two things – under proving or the oven being too hot. Be sure to preheat the oven to the right temperature and position the loaf in the centre of the oven, away from the door and sides which will conduct heat and create hot spots.

Sweet bread may need covering with baking (parchment) paper after half the baking time if it appears to be browning too much on top – the sugar in the dough will create a darker crust. If the top of the oven is creating uneven hot spots position a shelf in the very top of the oven and add a baking sheet to it at the same time as adding your loaf to bake. It will heat up gradually with the loaf and conduct heat evenly onto the top of the loaf, helping to prevent it from burning.
The base of an oven can also conduct heat unevenly and scorch the base of a loaf. Try setting the loaf tin, or baking sheet that a free-form loaf is sitting on, on top of another baking sheet before placing onto the oven shelf to bake. This will help to stop the base from burning.
If a loaf is deeply wrinkled then the dough has been underproved before baking. If the crust is a little wrinkled but was smooth when it first came out of the oven then this is due to it cooling too quickly on the rack in a draught. Loaves with a thin, fine crust will often be prone to this as the bread contracts as it cools.
A cakey texture is produced when dough hasn’t been kneaded enough. The gluten hasn’t been developed and stretched enough to create the proper bread texture you expect in a loaf.