
These recipes are the straightforward ones, and if you’re new to bread making this is where you need to be. They are a great introduction and practising them will mean you get to know the techniques involved and consistencies needed to produce a great loaf. Highly satisfying too – there’ll be bread on your table in next to no time.
Makes one 900g (2lb) loaf
Prep 30 minutes plus 11⁄2 hours proving
Bake 35 minutes|Oven 190°C (fan)/210°C/425°F/Gas Mark 7
A straightforward white loaf is up first, and probably the best place to start if you’re new to bread making. Perfect for sandwiches, popping in the toaster or dunking in a bowl of soup.
400g (14oz) strong white bread flour
2 tsp fast action yeast
1 tsp caster (superfine) sugar
1 tsp salt
170ml/170g (6fl oz/6oz) water
83 ml/85g (23⁄4fl oz/3oz) milk
1 First measure the flour into a large mixing bowl. Add in the yeast, sugar and salt, placing each in a different part of the flour. It’s best to avoid the salt touching the yeast at this stage as it can inhibit its effectiveness.

2 Now for the water and milk. The liquid for dough shouldn’t be cold, but lukewarm – this springs the yeast straight into action. You can warm the liquid through in the microwave but it also works well to measure the water hot from the kettle and then add the milk cold from the fridge. Set to one side.
3 Stir together the dry ingredients: you’re going to have to get your hands in at some point so it might as well be now! Once the yeast, salt and sugar are fairly evenly distributed make a well in the centre and pour in the water/ milk mixture.

4 Using your fingers start to work the dry ingredients into the wet. Keep working until it forms a shaggy dough with everything incorporated.

5 Turn the dough out onto the work surface. Don’t be tempted to add any extra flour to the surface as this would be incorporated into the dough as you knead and toughen the finished bread. It may seem sticky to begin with but persevere. Using both hands knead the dough for ten minutes. Stretch the dough away from you then pull it back onto itself, repeating the action with both hands and allowing the dough to turn as you knead it.
6 After five minutes of kneading the dough will be much more elastic and will look a lot less shaggy.

7 After 10 minutes the dough will be far smoother, non-sticky and ready to prove. 10 minutes of kneading is fairly hard work, certainly for your arms, but it is essential. Set a timer and be strict with yourself not to be distracted. You can reward yourself with a cup of tea when the timer goes off!
8 Now prepare a bowl for the dough to rest in. Not so large that it’s rattling around on its lonesome; a smaller bowl will keep the dough snug and draught free – a 1.5l (11⁄2 US quart) capacity is ideal. Grease the base and sides of the bowl with a teaspoon of sunflower or vegetable oil and pop the dough in, then turn it to give it a very light coating of the oil.

9 Cover with cling film (plastic wrap) or a clean dish towel and set somewhere at room temperature away from draughts and direct sunlight. Leave to rise for 1 hour or until doubled in size. If it’s kept somewhere cool it will take longer to double: be patient, this stage is important. Using a smaller bowl makes it easier to see when the dough has doubled – in a large bowl this can be deceiving.

10 Once doubled in size, tip the dough out onto your work surface. Again, no flour is needed. Gently knead the dough for a couple of minutes; this knocks it back and deflates it. It should be much, much softer and more elastic than before.
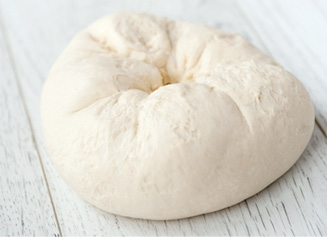
11 Flatten the dough out into a rough rectangle. Take hold of the edge of the dough and fold it in to the centre. Work your way all around the dough folding in to the centre leaving you with a smaller-shaped piece of dough. Repeat the folding in to the centre again, tightening the dough until you can fold into the middle no more – this creates a spine for the loaf and will ensure an even rise.
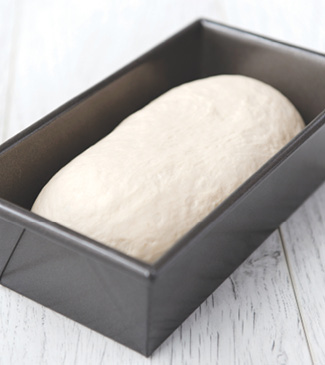
12 Flip the dough over so that the seam is underneath. Cup your hands with thumbs touching around the top of the dough, then slide your hands down the sides and underneath the dough in a tightening action. Repeat the tightening action, gently encouraging the dough to shape into the rough length of your tin, all the time keeping the seam underneath.

13 Grease the loaf tin and pop in the shaped dough. Give it a light dusting of flour if you like. Cover it again loosely with cling film (plastic wrap) or clean dish towel and put it in the same draught-free spot as the first proving for its final rise. 30 minutes should be sufficient, so preheat the oven to 190°C (fan)/210°C/425°F/Gas Mark 7.
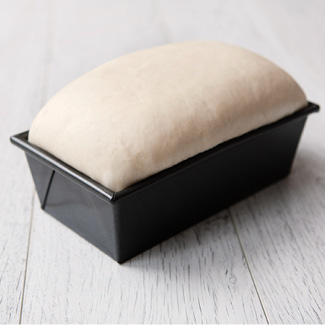
14 The dough will have almost doubled in size. Almost is the key here: it should be domed over the top of the tin. You need to leave some room for oven spring – the last burst of rise when the loaf goes into the oven. If the dough is left too long at this stage the dough becomes over-proved – the yeast loses its power and can leave you with a very wrinkled crust. Remove the cling film (plastic wrap) or dish towel and put the loaf straight into the middle of the oven, quickly, and shut the door, to keep in as much of the heat as possible. Bake for 35 minutes.
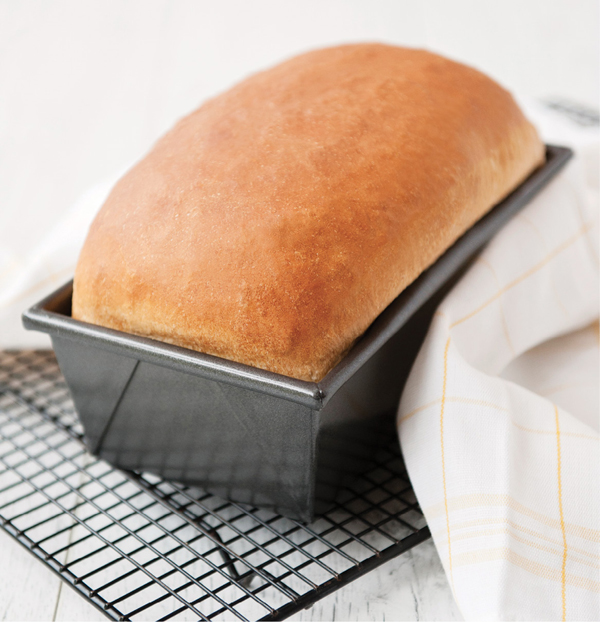
15 When removing from the oven, turn the loaf out of the tin (pan) as soon as possible. If left in it will sweat and the moisture will be reabsorbed by the loaf leaving you with soggy bread! When fully baked the base of the loaf when tapped should sound hollow. If there is a dull sound then it needs more time in the oven to bake through fully. If it sounds nice and hollow transfer it to a wire rack to cool.

It’s great to have a basic wholemeal (whole wheat) bread recipe in your repertoire but it’s not just as simple as replacing white flour with brown. Wholemeal (whole wheat) flour absorbs much more liquid than white and can produce a very dense loaf. This basic loaf is made with a combination of flours to give a much nicer texture.
Makes one 900g (2lb) loaf
Prep 30 minutes plus 11⁄2 hours proving
Bake 35 minutes
Oven 190°C (fan)/210°C/425°F/Gas Mark 7
Plastic dough scrapers are a great investment if you’re making bread often, but a silicone spatula will work in much the same way for scraping dough from bowls.
160g (53⁄4oz) strong white bread flour
240g (81⁄2oz) strong wholemeal (whole-wheat) bread flour
2 tsp fast action yeast
1 tsp caster (superfine) sugar
1 tsp salt
220ml/220g (73⁄4fl oz /73⁄4oz) water
49ml/50g (13⁄4fl oz/13⁄4oz) milk
900g (2lb) loaf tin
1 Follow the same method as the Basic White Loaf but use a combination of wholemeal (whole wheat) and white flours and a slightly increased amount of liquid.

Makes 8 rolls
Prep 20 minutes plus 30 minutes proving
Bake 15 minutes|Oven 190°C (fan)/210°C/425°F/Gas Mark 7
This is a quick-fix bread recipe, perfect when you’ve run out of bread and need some on the double! Defying all the long, slow rules of bread making, these are similar in texture to traditional English oven-bottom muffins and are just as good for a lunchtime sandwich as they are for dunking in a bowl of steaming hearty soup. You can easily go from no bread to freshly baked rolls in just about an hour.
425g (15oz) strong white bread flour
1 tsp caster (superfine) sugar
1 tsp salt
3 tsp fast action yeast
50g (13⁄4oz) butter, diced and softened
240ml/240g (9oz/9fl oz) water, lukewarm
Oil for greasing
Rolling pin
Baking sheet
1 Preheat the oven to 190°C (fan)/210°C/425°F/Gas Mark 7: this will start to warm up the kitchen and get these super quick rolls jumping into action. Place all the dry ingredients into a large mixing bowl and add the diced, softened butter.
The butter should be room temperature so that it can be easily incorporated into the dough. Too cold and it will be difficult to mix in and will also lower the temperature of the dough. Speed is of the essence so maintaining a warm dough temperature is important.
2 Warm the water so it is lukewarm. The warmth is needed to spring the yeast into action and get these rolls on the go as soon as possible. Pour the warm water into the bowl and mix everything together to form a rough dough.
3 Knead the dough for ten minutes until smooth and elastic. Add a teaspoon of vegetable or sunflower oil to a clean mixing bowl. Transfer the ball of dough to the bowl and turn to coat in the oil.

4 Cover the bowl with cling film (plastic wrap) or a clean dish towel and place in a warm spot, ideally near to the preheating oven, and allow to rest for 15 minutes. After resting the dough will have already started to puff up a little.

5 Instead of knocking back the dough as you would with a regular loaf simply turn it out onto your work surface and divide it into 8 equal portions of approximately 90g (31⁄4oz) each. The dividing and shaping will knock back the dough. Taking one portion of dough at a time, use your hand to form a cage around each ball of dough, with your fingertips in contact with the work surface. Use your fingers to gently spin the dough, keeping your wrist elevated and allowing the dough to turn and tighten below your palm until the dough forms a nice neat ball.

6 Gently press out each ball with a rolling pin, just a couple of light rolls forwards and backwards and then left to right will do the trick. Your finished roll should be about 8cm (31⁄4in) in diameter. Transfer the rolls to a well greased or lined baking sheet, spaced well enough apart to allow for a little spreading. Dust the tops of the rolls with flour and cover with a clean dish towel. Now back into the warm spot to rise for 15 minutes.
Using a rolling pin helps to keep an even round shape, but for speed the rolls could be pressed out lightly with the palm of your hand.

7 After 15 minutes they should be a little puffy – far from the usual second rise but these are good to go! Straight into the preheated oven with them for 15 minutes.

8 Once baked remove from the oven and transfer gently to a wire rack to cool completely. The tops will feel like they have a hard crust but will soon soften up on cooling. Now go dunk them in your soup!

Just as super quick as the white rolls, you’ll be toasting and buttering these delicious teacakes in next to no time.
Makes 8 large teacakes
Prep 25 minutes plus 30 minutes proving
Bake 15 minutes
Oven 190°C (fan)/210°C/425° F/Gas Mark 7
When it comes to dividing the dough into 8, the individual weight of each teacake is approximately 105g (33⁄4oz).
425g (15oz) strong white bread flour
30g (1oz) caster (superfine) sugar
1 tsp salt
3 tsp fast action yeast
100g (31⁄2oz) raisins
50g (13⁄4oz) butter, diced and softened
240ml/240g (9oz/9fl oz) water, lukewarm
Oil for greasing
Rolling pin
Baking sheet
1 Use exactly the same method for the quick white rolls but increase the caster (superfine) sugar to 30g (1oz) and add 100g (31⁄2oz) raisins to the dry ingredients when mixing up the dough.

Makes 1 large tin (pan) loaf
Prep 25 minutes plus 2 hours 10 minutes proving
Bake 30 minutes|Oven 190°C (fan)/210°C/425°F/Gas Mark 7
A twisted white loaf hiding tangy BBQ swirls inside. It’s extremely easy to do and certainly has the wow factor when you slice it open! It’s important not to under-prove this loaf and to ensure you roll tightly otherwise the swirls won’t be tight and the bread will have lots of holes between the swirls.
300g (101⁄2oz) strong white bread flour
3⁄4 tsp salt
3⁄4 tsp caster (superfine) sugar
11⁄2 tsp fast action yeast
185ml/190g (61⁄2fl oz/63⁄4oz) milk
4 tsp vegetable or sunflower oil
Oil for greasing
3 tbsp BBQ marinade
Milk to glaze
900g (2lb) loaf tin (pan)
Pastry brush
1 To make the dough combine the flour, salt, sugar and yeast. Warm the milk to a lukewarm temperature and add to the dry ingredients along with 4 tsp vegetable oil. Mix together to form a rough dough.
2 Turn the dough out onto the work surface and knead for 10 minutes until smooth. Place the dough in a lightly oiled bowl, turn it to coat and cover the bowl with cling film (plastic wrap). Place in a warm spot to rise for 1 hour or until doubled in size.
3 Turn the dough out onto your work surface and knead very lightly. Now using your hands gently stretch out the dough into a large rectangle, approximately 40 x 30cm (16 x 12in). The dough should be nice and elastic and stretch easily without tearing. If it’s tearing it’s not quite ready yet; leave it a little longer to rise before trying again.

4 Arrange the dough rectangle so that the longest edges are horizontal. Spread the BBQ marinade over the surface of the dough, aiming for an even covering and keeping it 2cm (3⁄4in) away from the shorter sides and the long edge of the dough furthest from you.

Twist and swirl loaves can be filled with all sorts of flavourings: red or green pesto, curry pastes, even sundried tomatoes and fresh basil. Make up your own variations – there’s only one way to find out if it will work and that’s to give it a go!
5 From the long edge nearest to you start to roll up the dough, nice and tightly, avoiding any air pockets if possible.

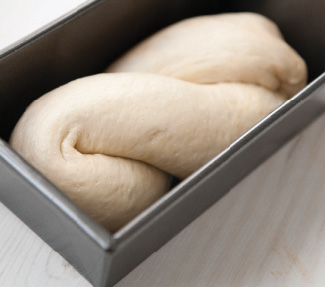
6 When you get to the end, pinch together the dough, along the length, to seal. Turn the roll so that the seam sits underneath. Pinch the ends together to seal in the swirl.

7 Fold the sausage of dough in the middle and wrap the two lengths around each other twice to create the twist. Tuck the ends underneath the loaf neatly and place it into a greased loaf tin (pan).
8 Cover and allow to rise for 30 minutes or until doubled in size. This is important: if the loaf goes into the oven under-proved then the top will balloon up leaving you with a hole just below the crust and holes through the uppermost swirls. Preheat the oven to 190°C (fan)/210°C/425°F/Gas Mark 7.
9 Brush the top with a little milk to glaze then bake in the preheated oven for 30 minutes. Transfer to a wire rack and allow to cool completely.
If there’s any left over this bread is fantastic for cheese on toast!

A sweet variation of the Twist & Swirl loaf with a warming injection of cinnamon.
Makes 1 large tin (pan) loaf
Prep 25 minutes plus 2 hours 10 minutes proving
Bake: 30 minutes
Oven 190°C (fan)/210°C/425°F/Gas Mark 7
Scatter over 100g (31⁄2oz) raisins or sultanas (golden raisins) when adding the sugar/cinnamon mix to the stretched out dough to create a fruited version.
300g (101⁄2oz) strong white bread flour
1⁄2 tsp salt
20g (3⁄4oz) caster (superfine) sugar
11⁄2 tsp fast action yeast
11/2 tsp cinnamon
185ml/190g (61⁄2fl oz/63⁄4oz) milk, lukewarm
4 tsp vegetable or sunflower oil
Oil for greasing
40g (11⁄2oz) dark muscovado sugar
11⁄2 tsp cinnamon
Milk to glaze
900g (2lb) loaf tin
1 Follow the recipe for the BBQ Twist & Swirl Loaf but increase the sugar in this dough to 20g (3⁄4oz) and decrease the salt to just 1/2tsp to create a sweet dough. Add the ground cinnamon to the dry mixture and then mix as before.
2 When it comes to the filling, combine 40g dark muscovado sugar with 11⁄2 tsp ground cinnamon and sprinkle over the stretched out dough.
3 Roll and twist as per the BBQ version, leave to rise until almost doubled in size, glaze with milk and bake in the preheated oven for 30 minutes.

Makes 1 large free-form loaf
Prep 20 minutes plus 2 hours 15 minutes proving
Bake 30 minutes|Oven 190°C (fan)/210°C/425°F/Gas Mark 7
A dark, grainy, malted bread – hearty and tasty. With a crisp crust and speckled with malted wheat flakes, this is definitely a show-stopper of a loaf.
450g (1lb) strong malted grain bread flour
1 tsp salt
1 tsp caster (superfine) sugar
2 tsp fast action yeast
2 tbsp malt extract
235ml/235g (81⁄2fl oz/81/2oz) water, lukewarm
1 tbsp wheat flakes
Pastry brush
Baking sheet
1 To make the dough place the flour, salt, sugar and yeast in a large mixing bowl and stir to combine. Make a well in the centre and add first the malt extract and then the water.
Greasing the tablespoon with a little vegetable oil will stop malt extract, treacle (molasses) or honey from sticking and the full measured amount will slide straight out into the recipe.
2 Mix together in the bowl to form a rough dough. Turn out onto the work surface and knead for 10 minutes until smooth. It will be a little sticky to begin with but will become less so when worked so keep going! Don’t be tempted to add any extra flour to the work surface as this will toughen the dough and the finished loaf. If you really can’t stand the stickiness grease your hands with a little vegetable oil.
3 Place the dough in a lightly oiled bowl, turn it to coat and cover with cling film (plastic wrap). Transfer to a warm, draught-free spot to rise for 11⁄2 hours or until doubled in size.

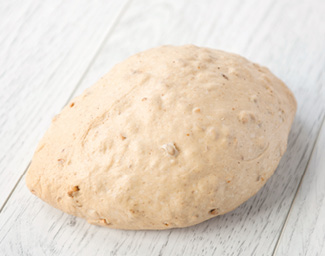
4 Once doubled in size turn the dough out onto your work surface and knead briefly. Flatten out the dough and start to turn the edges in to the centre, working all the way around. Repeat the folding in until the dough is tightened into a rough ball.

5 Flip the ball of dough over so that the seam is underneath. Shape the ball into an oval, gently tapering the ends.
For any additions to stick to the top of a loaf it will need to be brushed with a little water or milk to give the wheat flakes/oats/seeds something to stick to. Additions or flour should be in place before slashing a loaf with a sharp knife so that the distinctive split is created.
6 Transfer the loaf to a lined or well greased baking sheet, gently brush the top of the loaf with a little water and scatter on the wheat flakes. Using a sharp knife or blade slash the top of the loaf from one tapered end to the other.

7 Cover with a clean dish towel and set back in the warm spot to rise for 45 minutes or until almost doubled in size. Preheat the oven to 190°C (fan)/210°C/425°F/Gas Mark 7.
For the second rise the loaf should be allowed to get to almost doubled in size, you’re aiming for 90 per cent – allowing for a 10 per cent burst once the loaf goes into the oven in the first hit of heat.
8 Bake in the preheated oven for 30 minutes. Transfer to a wire rack and allow to cool completely.


A lighter version of the Malthouse Loaf with a hint of sweetness, but still packed with all the goodness of malthouse flour and rolled oats.
Makes 8 rolls
Prep 25 minutes plus 1 hour 50 minutes proving
Bake 15 minutes
Oven 190°C (fan)/210°C/425°F/Gas Mark 7
425g (15oz) strong malted grain bread flour
55g (2oz) rolled oats
1 tsp salt
1 tsp caster (superfine) sugar
2 tsp fast action yeast
2 tbsp runny honey
235ml/235g (81⁄2fl oz/81/2oz) water, lukewarm
2 tbsps rolled oats
Pastry brush
Baking sheet
1 Follow the method in the Malthouse Loaf but decrease the flour to 425g (15oz) and add 55g (2oz) rolled oats. Combine with the salt, sugar and yeast before adding 2 tbsp honey and the water, mixing to form a dough.
2 After the first rising divide the dough into 8 equal-sized portions (approximately 92g (31⁄4oz) each) and roll into rough balls.
3 To shape the tapered rolls take a ball of dough and roll it back and forth across the work surface applying pressure with both hands – slightly more pressure to the outside edge of each hand will taper the ends to points. Each shaped roll should be approximately 14cm (51⁄2in) in length.
4 Transfer to a lined baking sheet, brush the top of each with a little water and scatter over the additional rolled oats. Using a sharp knife slash the tops of the rolls from one tapered end to the other.
5 Cover with a dish towel to rise for 20 minutes or until nearly doubled in size, then bake in the preheated oven for 15 minutes.

Makes 1 round loaf
Prep 30 minutes plus 2 hours 15 minutes proving
Bake 35 minutes
Oven 190°C (fan)/210°C/425°F/Gas Mark 7
A soft, squidgy and delicious loaf, made superbly tender by the addition of cooked potato and sour cream. It may seem a faff getting everything together but this loaf tops my favourites list!
110g (4oz) potato, boiled and cooled (approximately 1 medium potato)
375g (13oz) strong white bread flour
1 tsp salt
11⁄2 tsp fast action yeast
150ml/120g (5fl oz/4oz) soured cream
90ml/90g (31⁄4fl oz/31/4oz) water, lukewarm
Oil for greasing
125g (41⁄2oz) smoked bacon lardons
50g (13⁄4oz) mature cheddar cheese, grated
Oil for greasing
Frying pan
Colander
Dish towel
Baking sheet
1 Grate the potato or mash roughly and combine in a large bowl with the flour, salt and yeast. Make a well in the centre and add the soured cream and water. This dough takes slightly longer to get going and rise than others because the dough temperature is lowered by the cold soured cream. If you can’t wait, the water can be a little warmer than lukewarm – aim for hand hot. Mix together to form a rough dough.
This is a fairly sticky dough to begin with – if that puts you off make the dough in the machine.
2 Knead for 10 minutes until the dough turns smooth and elastic. There will still be lumps of potato in there so it isn’t supposed to get completely smooth, don’t worry! Transfer to a lightly oiled bowl, cover and allow to rise for 11⁄2 hours or until doubled in size.
3 While the dough rises add the smoked bacon lardons to a frying pan and cook until lightly golden. Transfer to a bowl and allow to cool.

4 Turn the risen dough out onto the work surface and pat it with your hands to knock it back and spread it out a little. Scatter over the cooked bacon lardons and the grated cheese. Gather the dough together and knead gently for a couple of minutes to incorporate the cheese and bacon evenly. Place it back in the bowl to rest for 5 minutes – this will make the shaping easier.

5 Line a colander with a cotton dish towel and dust liberally with flour.
Special baskets can be bought for shaping loaves but they can be expensive – a colander or large sieve lined with a cotton dish towel and dusted with flour will do exactly the same job.
6 Take the dough out of the bowl and pat it out once again. Fold each outside edge in to the centre, repeating all the way round. Repeat again, folding the outside to the middle until the dough is tightened up into a rough ball. Pop the ball of dough into the lined colander with the seam upwards.

The folding in technique after a first rise should successfully create a spine for a free form loaf which will enable the loaf to rise upwards rather than flowing outwards.
7 Fold the overhanging edges of the dish towel over the exposed dough and place in a warm position to rise until almost doubled in size, approximately 45 minutes. Preheat the oven to 190°C (fan)/210°C/425°F/Gas Mark 7.
8 Line a baking sheet with baking (parchment) paper or grease well. Unfold the dish towel and place the tray over the top of the colander. Invert the tray and colander together then remove the colander and dish towel. Dust the loaf with a little more flour and slash the top in a square pattern using a very sharp knife.

9 Bake in the preheated oven for 35 minutes. When it’s baked through remove from the oven and transfer to a wire rack to cool completely. The crust will be firm as soon as it comes out of the oven but will soften on cooling to leave you with a tender loaf and crust.

Here’s a potato loaf with a kick! Gloriously tender bread hiding chunks of chorizo and a good sizzle of chilli.
Makes 1 round loaf
Prep 30 minutes plus 2 hours 15 minutes proving
Bake 35 minutes
Oven 190°C (fan)/210°C/425°F/Gas Mark 7
If you prefer things a little less spicy deseed the chilli before finely dicing.
110g (4oz) potato, boiled and cooled (approximately 1 medium potato)
375g (13oz) strong white bread flour
1 tsp salt
11⁄2 tsp fast action yeast
150ml/120g (5fl oz/4oz) soured cream
90ml/90g (31⁄4fl oz/31⁄4oz) water, lukewarm
100g (31⁄2oz) diced chorizo
1 red chilli, finely diced
Oil for greasing
Baking sheet
Frying pan
Colander
Dish towel
1 Make the dough as for the Bacon & Cheese Potato Bread and set aside to rise.
2 Lightly fry the chorizo in a pan until golden. Transfer to a small bowl along with any oils released in the frying and allow to cool.
3 Once the dough has doubled in size gently knead in the chorizo and diced chilli until evenly combined, then proceed as for the Bacon & Cheese Potato Bread, shaping and proving in a cloth-lined colander, then turning onto a baking sheet. Slash the top and bake in the oven for 35 minutes. Transfer to a wire rack to cool.
Makes 8 finger rolls
Prep 30 minutes plus 11⁄2 hours proving
Bake 12 minutes
Oven 190°C (fan)/210°C/425°F/Gas Mark 7
Gently spiced orange-scented rolls topped with chocolate glaze – who could resist one of these? Ingredients
250g (9oz) strong white bread flour
25g (1oz) caster (superfine) sugar
1⁄2 tsp salt
11⁄2 tsp fast action yeast
Zest of 1 orange
1 tsp ground cinnamon
1 tsp ground cloves
Pinch of cayenne pepper
30g (1oz) softened butter
1 egg, large
100ml/103g (31⁄2fl oz/33⁄4oz) milk, lukewarm
Oil for greasing
35g (11⁄4oz) grated dark (bittersweet) chocolate
120g (4oz) icing (confectioners’) sugar, sifted
30g (1oz) cocoa powder
1 tbsp glucose
2–3 tbsp water
Zester
Grater
Baking sheet
1 In a large bowl combine the strong white bread flour, caster (superfine) sugar, salt, yeast, orange zest and spices. Make a well in the centre and add the softened butter, egg and milk.
2 Work the wet and dry ingredients together to form a rough dough, then knead for 10 minutes until smooth and elastic. Transfer to a lightly oiled bowl, cover with cling film (plastic wrap) and allow to rise for 1 hour or until doubled in size.
3 Tip the dough out onto the work surface and knead very lightly for 1 minute. Flatten the dough out into a rectangle shape and scatter over the grated chocolate.

4 Fold the dough over, enclosing the chocolate. Knead again until the grated chocolate is dispersed evenly.

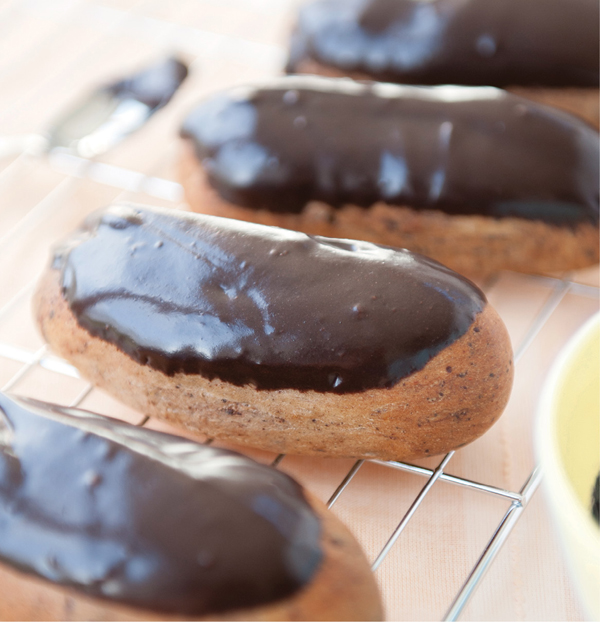
5 Split the dough into 8 equal portions and roll each into a ball. Take each ball and use the palm of your hand to roll it back and forth across the work surface to create the finger roll shape. Using an even pressure will create an evenly shaped roll. You’re aiming for rolls approximately 10cm (4in) long and 2.5cm (1in) thick.

6 Transfer the shaped rolls to a lined or well greased baking sheet, spaced apart to allow for spreading. Cover with cling film (plastic wrap) and allow to rise for 30 minutes or until nearly doubled in size. Preheat the oven to 200°C (fan)/220°C/425°F/Gas Mark 7.

7 Bake in the preheated oven for 12 minutes. When baked transfer to a wire rack and allow to cool completely.
8 To make the glaze, sift together the icing sugar and cocoa powder into a wide, shallow bowl, then add the liquid glucose. Add the water 1 tablespoon at a time and mix well to form a glossy icing – the consistency should be fairly thick but not so thick that you can’t dip the tops of the rolls in.
The glucose in the icing can easily be found in the baking aisle of most supermarkets. The glaze can be made without it using a little extra water in its place if you prefer – it just won’t be as glossy.
9 Dip the top of each roll into the glaze in a pendulum type motion, moving the roll steadily through and out of the glaze. As you move the roll out of the glaze wipe any excess from the end on the edge of your bowl or with a finger. Set on a wire rack, glaze-side up, and allow the glaze to set.


The simple flavour of a lemon finger will be a hit with whoever you decide to share these with.
Makes 8 finger rolls
Prep 25 minutes plus 11⁄2 hours proving
Bake 12 minutes
Oven 190°C (fan)/210°C/425°F/Gas Mark 7
If there is not enough lemon juice to get to the right consistency for the glaze use a little water.
250g (9oz) strong white bread flour
25g (1oz) caster (superfine) sugar
1⁄2 tsp salt
11⁄2 tsp fast action yeast
100ml/103g (31⁄2fl oz/33⁄4oz) milk, lukewarm
30g (1oz) softened butter
1 egg, large
Zest of 1 lemon
150g (51⁄2oz) icing (confectioners’) sugar
1 tbsp glucose
2-3 tbsp lemon juice
Zester
Grater
Baking sheet
1 Make the dough for the rolls as for the Spiced Chocolate Orange Fingers, simply omitting the spices and replacing the orange zest with lemon zest. There’s nothing to work in when lightly kneading the dough before shaping into finger rolls.
2 Once baked, glaze in the same way, making up the glaze with freshly squeezed lemon juice instead of water and omitting the cocoa powder.