Over the years, malicious attackers have found various ways to penetrate a system. They gather information about the target, identify vulnerabilities, and then unleash an attack. Once inside the target, they try to hide their tracks and remain hidden for a longer period. The attacker may not necessarily follow the same sequence, but as a penetration tester following the suggested approach will help you conduct the assessment in a structured way and the data collected at each stage helps in preparing a report that is of value to your client. An attacker's aim is to ultimately own the system, so they might not follow any sequential methodology. As a penetration tester, your aim is to identify as many bugs as you can and following a methodology is really useful. However, you also need to be creative and think out of the box.
Here are the different stages of a penetration test:
- Reconnaissance: This involves investigating publicly available information
- Scanning: This involves finding openings in the target
- Exploitation: This involves compromising the target and gaining access
- Maintaining access: This involves installing backdoors to maintain alternative access methods
- Covering tracks: This involves removing evidence of their existence
Reconnaissance and scanning are the initial stages of a penetration test. The success of the penetration test depends on the quality of information gathered during these phases. In this chapter, we will work as a penetration tester and extract information using both passive and active reconnaissance techniques. We would then probe the target using different tools provided with Kali Linux to extract further information and find out vulnerabilities using automated tools.
Reconnaissance is a term and a technique used by defence forces to obtain information about the enemy in a way that does not alert the other side. The same method is applied by a malicious user to obtain information related to the target. Information gathering is the main aim of reconnaissance. Any information gathered at this initial stage is to be considered important. The attacker working with a malicious content builds on the information learned during the reconnaissance stage and gradually moves ahead with the exploitation. A small bit of information that looks innocuous may help you in highlighting a severe flaw in the later stages of the test. A good penetration tester is the one who knows how to identify low risk vulnerabilities that have a potential of causing huge damage under some conditions. An attacker would be eyeing a single vulnerability to exploit, and your task is to make the system hack-proof by identifying even the smallest vulnerability that the attacker can exploit to gain access.
The aim of reconnaissance in a web application penetration test includes the following tasks:
- Identifying the IP address, subdomains, and related information using Whois records, search engines, and DNS servers.
- Accumulating information about the target website from publicly available resources such as Google, Bing, Yahoo!, and Shodan. Archive.org, a website that acts as a digital archive for all the web pages on the Internet, could reveal some really useful information in the reconnaissance phase. The website has been archiving cached pages since 1996. If the target website is created recently, it would take some time for Archive.org to cache it.
- Identifying people related to the target with the help of social networking sites such as Facebook, Flick, Instagram, or Twitter and tools such as Maltego.
- Determining the physical location of the target using Geo IP database, satellite images from Google Maps and Bing Maps.
- Spidering the web application and creating sitemaps to understand the flow of the application using tools such as Burp Suite, HTTP Track, and ZAP Proxy.
Reconnaissance in the real sense should always be passive. But in practical implementation, while doing a reconnaissance of a web application, you would often interact with the target to obtain the most recent changes. Passive reconnaissance depends on cached information and may not include the recent changes made on the target. Although you could learn a lot by using the publicly available information related to the target, interacting with the website in a way that does not alert the firewalls and intrusion prevention devices should always be included in the scope of the test.
Some penetration testers will have the opinion that passive reconnaissance could include browsing the target URL and navigating through the publicly available content, but others would state that it should not involve any network packets targeted to the actual website. At times confusing, passive and active reconnaissance are both sometimes referred to as passive methods because the penetration tester is only seeking information rather than actively exploiting the target as an malicious attacker would do. If you are using the Tor anonymizer for reconnaissance, you can hide the origin of the traffic and remain passive. It might alert the IPS and firewall devices when you actively spider the website and run fuzzers against the target, as these activities generate a large amount of traffic.
As stated earlier, the main aim of reconnaissance is to avoid detection. Passive reconnaissance is used to extract information related to the target from publicly available resources. In a web application penetration test, you would be given a URL to start with. We would then scope the entire website and try to connect the different pieces. Passive reconnaissance is also known as open source intelligence (OSINT) gathering.
In a Black box penetration test, where you have no previous information about the target and would have to rely on the approach of an uninformed attacker, reconnaissance plays a major role. A URL of a website is the only thing we have to expand our knowledge about the target.
Every time you register a domain, you have to provide details about your company or business, such as name, phone number, postal address, and specific e-mail addresses for technical and billing purpose. The domain registrar will also store the IP address of your authoritative DNS servers.
An attacker who retrieves this information can use it with a malicious intent. Contact names and numbers provided during the registration can be used for social engineering attacks such as duping users via telephone. Postal addresses can help the attacker for war driving and finding unsecured wireless access points. New York Times was attacked in 2013 when its DNS records were altered by a malicious attacker using a phishing attack against the domain reseller for the registrar that managed the domain. Altering DNS records has a serious effect on the functioning of the website as an attacker can use it to redirect web traffic to a different server, and rectified changes can take up to 72 hours to reach all the public DNS servers spread across the entire globe.
Whois records are used to retrieve the registration details provided by the domain owner to the domain registrar. It is a protocol that is used to extract information about the domain and the associated contact information. You can view the name, address, phone number, and e-mail address of the person/entity who registered the domain. Whois servers are operated by
Regional Internet Registrars (RIR) and can be queried directly over port 43. In the early days, there was only one Whois server on the Internet, but the number of Whois servers has increased with the expansion of the Internet. If the information for the requested domain is not present with the queried server, the request is then forwarded to the Whois server of domain registrar and the results returned to the end client. The Whois tool is built into Kali Linux and can be run from a terminal. The information retrieved by the tool is only as accurate as the information updated by the domain owner and can be misleading at times if the details updated on the registrar website are incorrect. You can block sensitive information related to your domain by subscribing to additional services provided by the domain registrar, after which the registrar would display their details instead of the contact details of your domain.
The whois command followed by the target domain name should display some valuable information. The output will contain the registrar name and the Whois server that returned the information. It will also display when the domain was registered and the expiration date, as shown in the following screenshot:
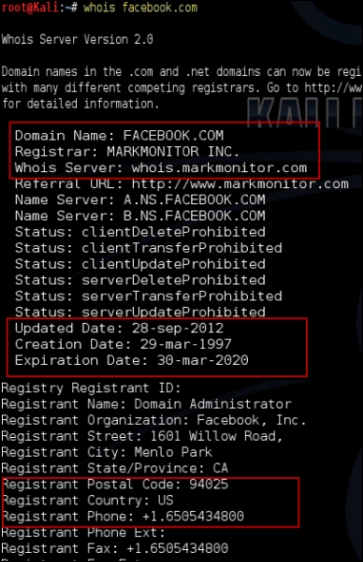
If the domain administrator fails to renew the domain before the expiration date, the domain registrar releases the domain that can then be bought by anyone.
The output also points out the DNS server for the domain, which can be further queried to find additional hosts in the domain:
Once you have the name of the authoritative DNS server, you can use it to identify additional hosts in the domain. A DNS zone may not necessarily contain only entries for web servers. On the Internet, every technology that requires hostnames to identify services uses DNS. Mail server and FTP server use DNS to resolve hosts to IP addresses. By querying the DNS server, we can identify additional hosts in the target organization and it will also help in identifying additional applications accessible from the Internet. The records of citrix.example.com or webmail.exchange.com can lead you to additional applications accessible from the Internet.
Using the
Domain Internet Groper (dig) command-line tool in Linux, you can try to execute a zone transfer to identify additional hosts in the domain. A poorly configured DNS server might allow zone transfer to any server, which makes the task of the penetration tester much easier because you won't have to identify hosts in the domain using the time consuming brute force technique. Zone transfers are done over TCP port 53 and not UDP port 53.
The dig command-line tool is mainly used for querying DNS servers for hostnames. A simple command such as dig google.com reveals the IP address of the domain and the name of the DNS server that hosts the DNS zone for it (also known as the name server). There are multiple types of DNS records, such as Mail exchanger (MX), SRV records, and PTR records. The dig google.com mx command displays information for the mail exchanger record.
In addition to the usual DNS tasks, the dig command can also be used to perform a DNS zone transfer. Typically, a zone transfer is only possible between two trusted DNS servers such as a primary and secondary server, but a misconfigured server can allow the zone transfer to work with any other server.
As shown in the following screenshot, if zone transfer is enabled, the dig tool dumps all the entries in the zone at the terminal:
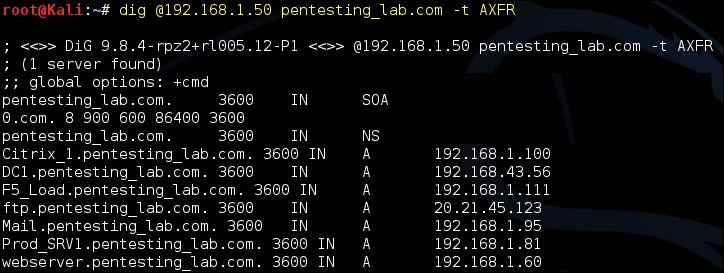
Let's request a zone transfer from the DNS server at IP address 192.168.1.50, which hosts the DNS zone for the domain pentesting_lab.com:
Dig @192.168.1.50 pentesting_lab.com –t AXFR
You would often find that even though the primary DNS server blocks the zone transfer, a secondary server for that domain might allow the zone transfer to work. The dig google.com NS +noall +answer command would display all the name servers for that domain.
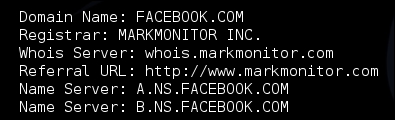
The attempt to transfer zone from the DNS server of facebook.com failed as they have correctly locked down their DNS servers:

Performing a DNS lookup to search for an IP address is passive reconnaissance, but the moment you do a zone transfer using a tool such as dig or nslookup, it turns into active reconnaissance.
Nmap comes along with a script to query the DNS server for additional hosts using brute forcing technique. It makes use of the dictionary files vhosts-defaults.lst and vhosts-full.lst, which contain a large list of common hostnames that have been collected over the years by the Nmap development team. The files can be located at /usr/share/nmap/nselib/data/. Nmap sends a query to the DNS server for each entry in that file to check whether there are any A records available for that hostname in the DNS zone.
As shown in the following screenshot, the brute-force script returned with a positive result. It identified a few hosts in the DNS zone by querying for their A records:

Open source intelligence collection is a time-consuming, manual process. Information related to the target organization may be spread across several public resources, and accumulating and pulling the information that is relevant to the target is a difficult and time-consuming task. IT budgets of most organizations do not permit spending much time on such activities.
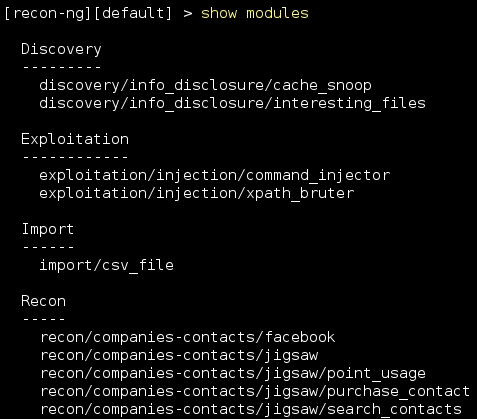
Recon-ng is the tool that penetration testers always needed. It's an information gathering tool that is working on steroids. A very interactive tool that is similar to the Metasploit framework. The framework uses many different sources to gather data, for example, Google, Twitter, and Shodan. Some modules require an API key before querying the website; the key can be generated by registering for it on the search engine's website. A few of these modules use paid API keys.
To start Recon-ng in Kali Linux, navigate to the Applications menu and click on the Information gathering sub menu. You will see Recon-ng listed on the right side pane. Similar to Metasploit, when the framework is up and running, you can type in show modules to check out the different modules that come along with it. Some modules are passive, while some actively probe the target to extract the needed information.
Although Recon-ng has a few exploitation modules, the main task of the tool is to assist in the reconnaissance activity and there are a large number of modules to do so:
When querying search engines using automated tools, the search engine may require an API key to identify who is sending those requests and apply a quota. The tool works faster than a human and by assigning an API, and the usage can be tracked and can prevent you from abusing the service. So make sure you don't overwhelm the search engine or you will be shunned out.
You can generate your API key for Bing from the following link:
https://datamarket.azure.com/dataset/bing/search
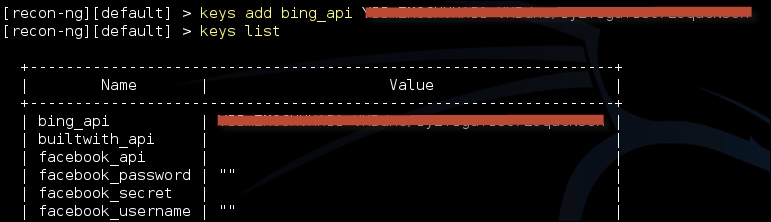
The free subscription provides you with 5000 queries per month. Once the key is generated, it needs to be added to the keys table in the Recon-ng tool using the following command:
keys add bing_api <api key generated>
To display all the API keys that you have stored in Recon-ng, type in the following command:
keys list
Following screenshot displays the output of the preceding command:
Gathering information about the subdomains of the target website will help you identify different contents and features of the website. Each product or service provided by the target organisation may have a subdomain dedicated for it. This helps to organize diverse contents in a coherent manner. By identifying different subdomains, you can create a site map and a flowchart interconnecting the various pieces and understand the flow of the website.
Using the Bing API hostname enumerator module, we will try to find additional sub domains under the facebook.com website:
- You need to first load the module by the
load recon/domains-hosts/bing_domain_apicommand. Next, type in theshow infocommand that will display information describing the module. - The next step would be to set the target domain in the
SOURCEoption; we will set it tofacebook.com:
- When you are ready, use the
runcommand to kick-off the module. The tool first queries for a few domains, then uses the (-) directive to remove the already queried domains, and then searches for additional domains again. The biggest advantage is speed. In addition to speed, the output is also stored in a database in plain text can be used as an input to others tools such as Nmap, Metasploit, and Nessus, as shown in the following screenshot: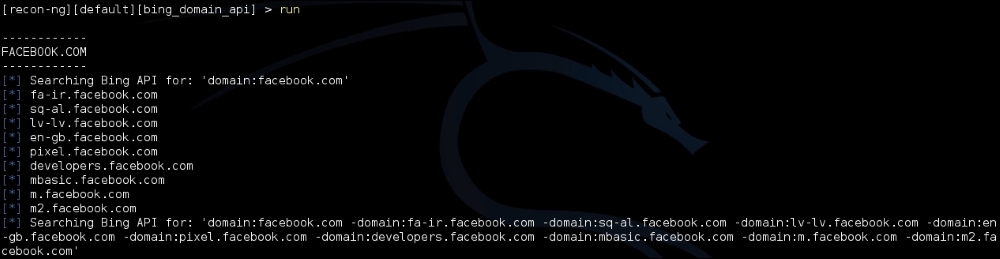
The DNS public suffix brute forcer module can be used to identify top-level domains (TLDs) and
second-level domains (SLDs). Many product-based and service-based businesses have separate websites for each geographical region; you can use this brute forcing module to identify them. It uses the wordlist file from /usr/share/recon-ng/data/suffixes.txt to enumerate additional domains.
Each reconnaissance module that you run will store the output into separate tables. You can export these tables in several formats such as CSV, HTML, and XML files. To view the different tables that the Recon-ng tool uses, you need to type in show and press Tab twice:

To export a table into a CSV file, load the CSV reporting module by typing in load /reporting/csv. After loading the module, set the filename and the table to be exported and type run:

Here are some additional reconnaissance modules in Recon-ng that can be of great help to a penetration tester:
- Netcraft hostname enumerator: Recon-ng will harvest the Netcraft website and accumulate all the hosts related to the target and stores them in the hosts table.
- SSL SAN lookup: Many SSL-enabled websites have a single certificate that works across multiple domains by using the subject alternative names (SAN) feature. This module uses the ssltools.com website to retrieve the domains listed in the SAN attribute of the certificate.
- LinkedIn authenticated contact enumerator: This will retrieve the contacts from a LinkedIn profile and store it in the
contactstable. - IPInfoDB GeoIP: This will display the geolocation of a host by using the
IPinfoDBdatabase (requires an API). - Yahoo! hostname enumerator: This uses the Yahoo! search engine to locate hosts in the domains. Having modules for multiple search engines at your disposal can help you locate hosts and subdomains that may have not been indexed by other search engines.
- Geocoder and reverse geocoder: These modules obtain the address using the provided coordinates by using the Google Map API and also retrieve the coordinates if an address is given. The information then gets stored in the
locationstable. - Pushin modules: Using the Recon-ng pushpin modules you can pull data from popular social-networking websites and correlate it with geo-location coordinates and create maps. Two widely used modules are listed as follows:
- Twitter geolocation search: This searches Twitter for media (images, tweets) uploaded from a specific radius of the given coordinates.
- Flickr geolocation search: This tries to locate photos uploaded from the area around the given coordinates.
These pushpin modules can be used to map people to physical locations and to determine who was at the given co-ordinates at a specific time. The information accumulated and converted to a HTML file can be mapped on to a satellite image at the exact co-ordinates. Using Recon-ng, you can create a huge database of hosts, IP addresses, physical locations, and humans just by using publicly available resources.
Reconnaissance should always be done with the aim of extracting information from various public resources and to identify sensitive data from it which an attacker can use to directly or indirectly target the organization.