Kali Linux has various tools that can be used to automate the testing of the XSS flaws. The more tedious but accurate method is by using the manual testing method, where you intercept the HTTP request using a proxy, manipulate each field, and replace it with your payload.
Applications are becoming more complex every day, with an increasing number of user editable fields that make manual testing very difficult as a vulnerable parameter may be overlooked by the tester. Manual testing is useful when you want to extensively test a specific parameter. From an attacker's point of view, automating the task of identifying vulnerable parameters could reduce the time of developing the final exploit. Kali Linux has several tools to automate the scanning of XSS flaws and we will discuss them in this section:
- OWASP Zed Attack Proxy
- XSSer
- W3Af
Zed Attack Proxy (ZAP) is an open source web application penetration testing tool maintained by OWASP. It's a fork of the Paros proxy. The version that comes with Kali Linux 2.0 is 2.4.1. The main features of ZAP are as follows:
- Intercepting proxy
- Active and passive scanner
- Brute forcing
- Fuzzing
- Support for wide range of security languages
ZAP works by default as a passive proxy; it won't actively intercept traffic unless you set a breakpoint on the URL for which you want to intercept the request and response. ZAP is located at Applications | Web Application Analysis
Our aim behind using ZAP is to identify XSS flaws in a web application. Similar to any other proxy, you need to first configure the web browser to tunnel the traffic through it. You could configure the browser manually or install a proxy add-on tool called FoxyProxy for Firefox, which requires an initial configuration. Once the add-on is configured, you only need to select the proxy settings from a drop-down menu, as shown in the following screenshot:

ZAP is a versatile web application penetration testing tool. In the sites window, on the top-left corner, all the websites you visit are recorded. When you surf the website, a passive scan is performed by ZAP in the background and it tries to identify vulnerabilities by spidering the website.
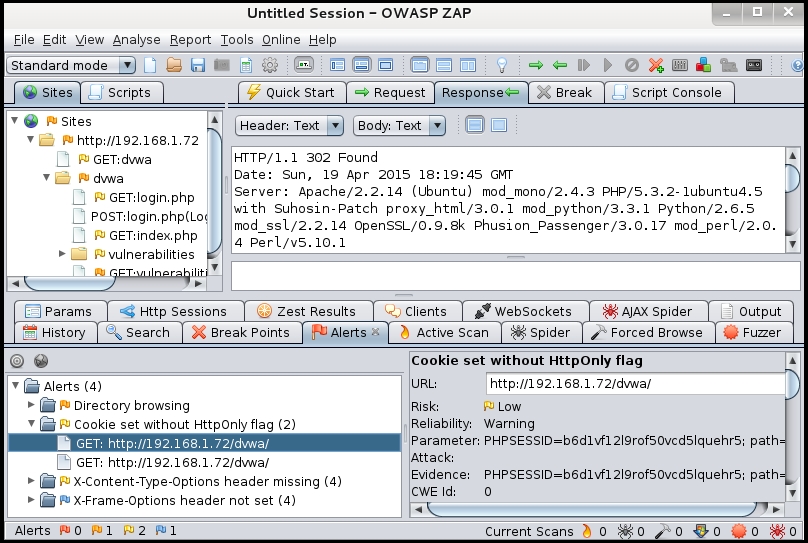
It checks the HTTP request and response, and determines if there is a possibility of a flaw. Detected vulnerabilities are displayed in the Alerts tab in the bottom window. As shown in the following image, it found cookies that were set without the HTTPOnly flag:
Once the browser is configured with ZAP, it will display all the websites in the site's window on the left. During a penetration test, it becomes important to identify specific targets and therefore you need to define what sites are in scope. Right-click on the URL of your interest, click on Include in Context, and select New context to create a new scope for this URL. The URLs that are scoped will show a target icon:

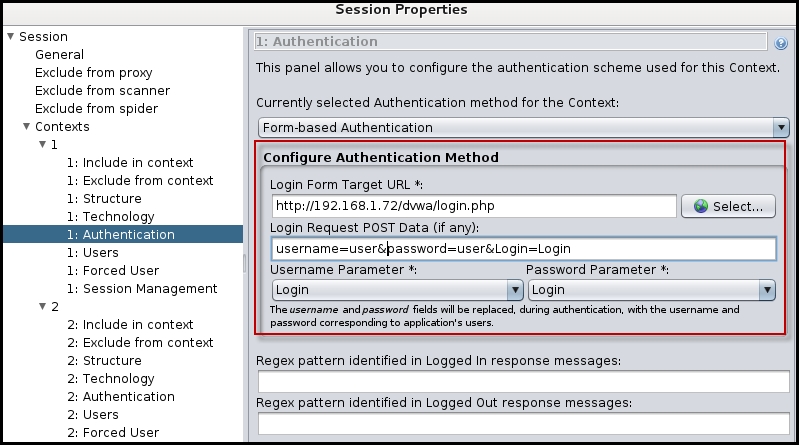
If a website is using form-based authentication and requires the user to log in before viewing the contents, you would have to flag the URL that performs the authentication as Form-based Auth Login request, as shown in the following screenshot:

In the configuration window, select the Authentication option and configure the username and password parameters. In the Users option, define the username and password and select that user in the Forced User option:
Once you have configured the three options, the Forced User Mode option will be enabled on the main window:

When the Forced User Mode option is enabled, every request sent through ZAP is authenticated automatically. If the user is logged out during the scanning, it would reauthenticate the user without your intervention.
There are several modes under which you can configure ZAP. On the top-left corner of the window, you would see a drop-down box that has three modes:
- Safe mode: In Safe Mode, ZAP does not performs any intrusive scan and would only work like a passive scanner trying to identify low-hanging fruits such as directory browsing and information leakage flaws. It would not actively interact with the application, so it would not be able to identify serious vulnerabilities, such as an XSS flaw.
- Protected mode: When the Protected Mode is selected, you can use the aggressive scanning techniques on the URL defined in the scope.
- Standard mode: In this mode, you can perform all the aggressive scans irrespective of whether the URL is in scope or not.
ZAP can be used to test for all the major vulnerabilities, but we would be using it specifically to test an application for XSS. In order to do this, we would have to define a scan policy to configure the XSS rules as part of the active scan.
At the top, you would see a menu named Analyse and select the Scan Policy under it. This will open the configuration window. For every test name, you would find a Threshold and Strength option:

The following explains these options in detail
- Threshold: The Threshold option controls the reliability of the vulnerabilities identified by test. If you select Low, the number of false positives will increase. If High is selected, fewer vulnerabilities will be identified. There will be fewer false positives, but it may also miss out some flaw. You need to maintain a balance in between and select the medium option.
- Strength: This controls the number of tests that ZAP will perform to confirm the existence of the flaw. Selecting Low will make ZAP test the flaw with less number of payloads and the test will finish faster. If High is selected, more attack methods would be used. This would also increase the time taken to complete the test. The Insane option, as the name suggests, sends a very high number of attacks and should be used in labs or in a controlled environment.
To configure the policy for XSS, give the policy a name and disable all the test on the left-hand side, except the cross-site scripting (persistent) and cross-site scripting (reflected) under injection. Click on Save Policy if you want to reuse it later. Then, right-click on the target URL and go to Attack | Active scan all in scope.
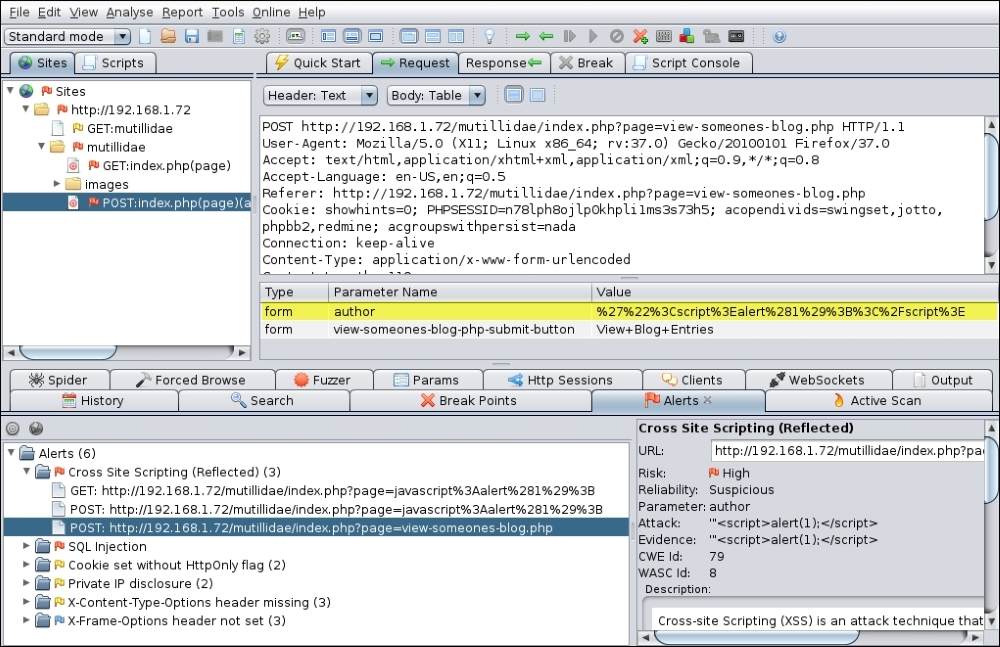
ZAP will then run the magic and will notify any XSS vulnerability (if identified) under the Alerts tab in the bottom window. If you select the alert, ZAP will display the exact HTTP request sent across to the server that triggered the flaw. As shown in the following screenshot, a script was injected in the author parameter:
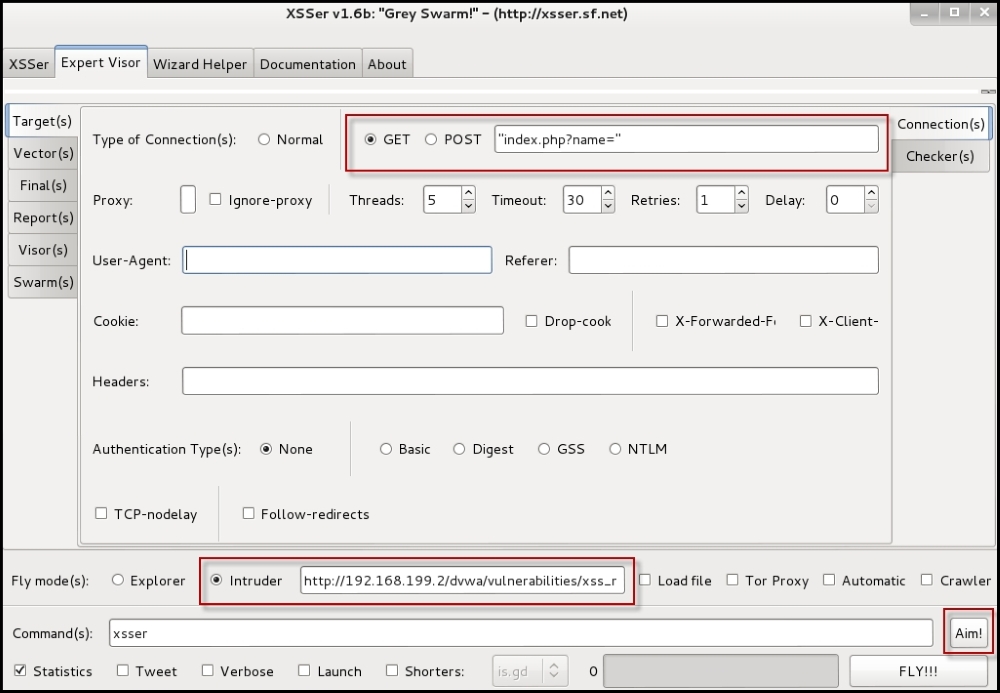
Cross-site scripter (Xsser) is a tool to automate the detection and exploitation of XSS vulnerabilities. The version that comes with Kali Linux is 1.6 (beta). Xsser also consist several options to circumvent the input validation filters implemented by the developer.
Some of the important features of Xsser are listed here:
- Command-line tool and graphical interface
- Displays detailed statistics of the attack
- Injection using both
GETandPOSTmethods - Option to include cookie for sites requiring authentication
- Customization of various HTTP header fields such as Referrer and User agent
- Includes various filter bypassing techniques such as using decimal and hexadecimal encoding and making use of
unescape()function
The graphical user interface (GUI) of xsser can be started directly from the shell with the –gtk option. The GUI also includes a wizard for new users that asks for a few questions and creates a template. Once you have selected the various options as per your testing needs, click on Aim and let the tool do the rest:
The more experienced hackers would be comfortable with the command-line interface. Run xsser –help to view the different option the tool supports. The important command line options are shown in the following table:
|
Option |
Use |
|---|---|
|
|
This is used specify a target URL |
|
|
This is used to inject script in the |
|
|
This is used to inject script in the |
|
|
This tries to identify which characters are filtered by the application |
|
|
This sets a cookie to the HTTP request |
|
|
These options will display statistical information and verbose output. |
Xsser is an advance tool and includes many other options besides the ones listed in the table, but these should be good to get you started with the tool.
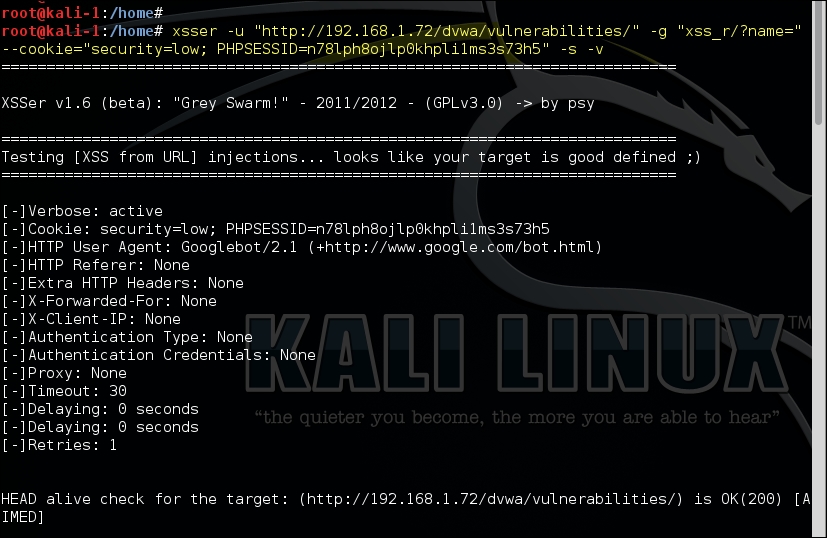
In the following example, we will test the vulnerable web application for a cross-site scripting flaw. The application requires authentication, and once authenticated, it sets a cookie to identify the user on further interactions. The cookie is passed in the request using the –cookie option. The parameter to be tested is passed using the –g option, as it is in the GET method:
xsser -u "http://192.168.1.72/dvwa/vulnerabilities/" -g "xss_r/?name=" --cookie="security=low; PHPSESSID=n78lph8ojlp0khpli1ms3s73h5" -s –v
The various default options set by xsser are also shown in the output, since we selected the Version option. Xsser then injects the parameter and tries to indentify whether it is vulnerable to XSS as shown in the following screenshot:
Another interesting tool in Kali Linux is the web application audit and attack framework tool that is abbreviated as w3af. It is called a framework because it is very feature rich. It is a menu-driven tool; it includes time-saving and useful features such as the autocomplete functionality similar to Metasploit and is packed with various plugins.
The web application payload feature of w3af is the one that needs special mention. Exploiting a web application flaw and gaining access to the target machine by uploading a payload has always been a difficult task. W3af includes plugins that make the exploitation phase easier and also integrate with Metasploit, which allows it to upload a Metasploit payload on the target machine and use it for post exploitation.
Plugins in w3af are divided into several categories, and the major ones are listed as follows:
- Crawl: These plugins are used for spidering purpose and are tasked to identify new URLs. They identify new injection points that can be used by other plugins.
- Audit: The audit plugins use the injection points identified by the crawl plugins and test them for vulnerabilities.
- Grep: The grep plugins are used to identify low-hanging fruits such as error pages, comments, HTTP headers, and other information leakage flaws. This information is sniffed by analyzing the request and response.
- Infrastructure: Plugins used to fingerprint the target server and identify the OS, database version, and DNS-related information is categorized as information plugins.
- Output: These plugins define the output format of the results.
- Auth: For web applications that require authentication, this plugin provides a predefined username and password to automatically authenticate to the application.
The w3af tool is located at Applications | Web Application Analysis. Alternately, you can start the command-line tool by typing w3af_console in the shell prompt. When the prompt returns, type in help to check out the commands available:

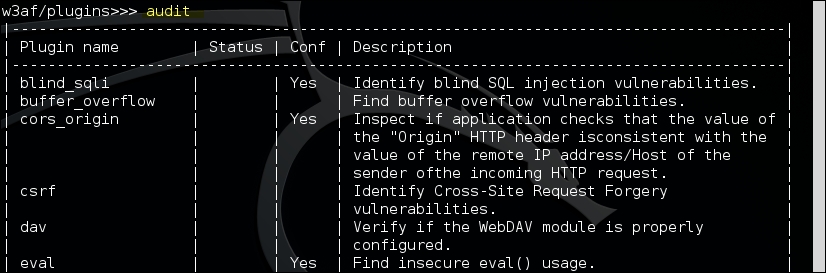
To find all the different categories of plugins, type in plugins and then help. To explore the various plugins available under each category, type in the plugin category, for example, audit, as shown in the following screenshot:
To configure each plugin for use, type in the category name and the first few characters of the plugin you are interested in and press the Tab key.
To demonstrate the testing of the XSS vulnerability, we will use the w3af GUI. W3af includes several predefined profiles that are created by selecting individual plugins and combining them into a package. For example, the OWASP_TOP10 profile can be selected if you want to test the URL against the top 10 web application vulnerabilities listed by OWASP:

To test the URL for XSS flaw, we need to select the XSS plugin under the audit category. If you are testing for a persistent XSS flaw, select the persistent_xss option at the bottom of the screen. Next, specify the target URL and click on Start:

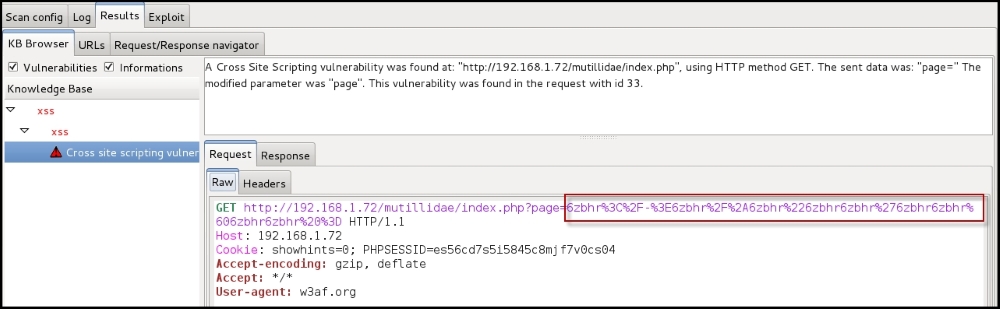
The Log window will display the detected XSS flaw and also identifies it with a request ID that is mapped to individual requests sent to the target application. The status of the scan is also displayed here:

If you want to check the actual request and response that triggered the flaw, navigate to the Results window. The header and the body of both request and response are displayed in this window. In this example, the page parameter was found to be vulnerable: