fall leaf picture frame


Fall leaves are far too gorgeous to be just trodden under foot. How about saving some of your favourite leaf specimens to create this lovely seasonal picture frame instead?
You will need

Step 1
Draw around the plastic bowl with the pen to create a circle in the center of the large paper plate. Use scissors to carefully cut out the central circle.

Step 2
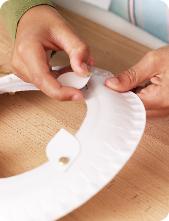
Cut out three leaf-shaped retainers from a piece of card and make holes in the bottom of each leaf by pushing through the sharp pencil into a ball of modeling clay to stop it damaging the table. In the same way, make three holes around the inside edge of the picture frame.

Step 3
Push a split pin through each of the retainers and the paper plate, and open out the pin on the front side of the frame.

Step 4
Using the pencil and modeling clay, make another two holes at the top of the frame and thread through a piece of string before tying it to form a picture hanger.

Step 5
Use white (PVA) glue to stick your selection of leaves to the front of the plate frame.

Step 6
To make sure it bonds well, sandwich the picture frame between two large plates, weigh down with something heavy, and leave to dry for an hour.

Try this... You can put a thin coat of white (pva) glue over all of the leaves on the frame to make them nice and shiny. This will also help stop the leaves crumbling as they dry.
Step 7
Draw a circle on a piece of card which is just larger than the hole in the frame and draw your picture for framing on this card. Then, slide the finished picture under the leaf retainers to hold it in place.
