CHAPTER 2
For the Garden
If you enjoy vegetable and fruit gardening, you’ve got plenty of company. A recent survey by the National Gardening Association (see Recommended Reading) shows that more than 40 million households, or about 38 percent of all folks in the United States, maintain some sort of food garden. The average garden size is about 600 square feet, and the average amount of time spent in that garden comes to about five hours per week. The most commonly grown vegetable is the good old tomato; grown in 85 percent of all gardens, it wins over the second-place finisher (cucumbers) by a landslide. Your backyard garden will help keep dollars in your pocket, too: on average, the $70 spent for seeds and other supplies yields about $600 worth of produce.
Whether or not you fall within the statistical norms doesn’t really matter. Nor does it matter if your garden consists of a fenced-in acre or a few plants sitting in a pot on the back porch. What matters is the fresh produce you get out of your garden and the satisfaction you get from growing it.
The projects in this chapter are aimed at making your time in your garden more enjoyable and more productive. You’ll find garden carts for hauling compost, cold frames for getting a head start on the growing season, and plenty of other projects for helping you grow more food with less hassle. Bon appétit.
Two-Wheel Garden Cart
A one-sheet wonder for hauling, planting, and cleaning up
Sure, you can throw 50 pounds of bone meal over one shoulder, tuck a hoe under another, and wrestle with a tray of seedlings as you teeter out to the garden — or you can build this all-purpose garden cart to make the journey way more convenient.
The bicycle wheels make negotiating rough terrain easy, and the plywood construction makes it sturdy, lightweight, and simple to build. The cart is well balanced, so it will stay put in both horizontal and tilt-down positions, allowing for easy loading or unloading of materials.
You can build your cart from treated plywood for greater longevity, but that material is harder to work with than standard plywood. I suggest using exterior-grade plywood, which is lighter, smoother, flatter, easier to glue, and easier to work with than treated plywood. To protect the plywood, give it a coat of primer, followed by two or three coats of exterior paint. You’ll also increase longevity by storing the cart inside or covering it with a tarp when not in use.
Notes from the Test Track
Cart Smarts
I’ve always been a wheelbarrow guy. But after using the prototype I built to haul dirt, brush, mulch, and firewood, I’ve become a garden cart guy.
Why? The cart is stable in any position, even when fully loaded. I can push it with one hand. I can pivot the front down for loading and unloading everything from mulch to four neighborhood kids. (Yup, we tried it.) The large-diameter wheels make it easy to negotiate rough terrain and low steps. And because of the balance, there’s much less strain on the arms and back than with a wheelbarrow.
When hauling concrete, rocks, and other superheavy rough stuff, I’ll revert to my wheelbarrow. But for everything else, I’ll grab my two-wheeled wonder.
Materials
- One 4 × 8-foot sheet 3⁄4" exterior-grade plywood
- Two strips 1⁄2" exterior-grade plywood, 11⁄2" × 311⁄2" minimum (from sheet above)
- One piece 1" × 4" × 311⁄2" pine lumber
- One 11⁄4" × 33" closet rod (wood dowel)
- 1⁄2" × 48"-long threaded rod
- Four 1⁄2" fender washers
- Two 20" spoked wheels
- Two 1⁄2" lock nuts
- Two 1⁄2" cap nuts
- 11⁄4" exterior screws
- 2" exterior screws
- Construction adhesive
- 8d finish nails
Instructions
- 1. Lay out the plywood parts as shown in Plywood cutting diagram, and cut them to size using a circular saw. Cut the side axle braces (J) from 1⁄2" plywood. (See page 29 for information on using a straight-cutting jig for accurate cuts.)
Take Note: To make the 45-degree bevel cuts on both ends of the front panel (D) and on one end of the bottom panel (E), you’ll have to make a separate straight-cutting jig or make the cuts without one.
- 2. Drill 1⁄8" holes through the edges of side pieces (A, B) for the screws used to secure the back, front, and bottom.
- 3. Stand the side pieces facing each other (a helper comes in handy here), and install the back panel (C) using construction adhesive and 2" screws. Next, position the front panel (D), making sure the 45-degree end cuts of the panel and the 45-degree cuts on the sides are even, then install that panel using construction adhesive and 2" screws.
- 4. Set the box you’ve created on a flat surface and test-fit the bottom (E). It should be a snug fit, but trim the square end if it’s too long. Apply construction adhesive on all four sides and secure the bottom to the sides, front, and back with 2" screws.
- 5. Flip your cart bin upside-down. Add the three 3⁄4" bottom braces (F, G, H) as shown using construction adhesive and 11⁄4" screws. The location of the middle brace (G) is critical since it determines the location of the axle and affects the balance of the cart.
Take Note: If you have chosen wheels that aren’t 20", experiment with the position of the middle brace and axle location to make sure your cart tilts correctly and feels well-balanced.
- 6. Center the axle (I) on the middle brace (G). Install the side axle braces (J) tightly on either side of the axle, and secure them with construction adhesive and 11⁄4" screws. Install a washer (K), wheel (L), washer (K), lock nut (M), and axle cap (N) on one end of the axle and push the wheel assembly over until it makes solid contact with the side of the cart. Determine how far the axle will extend past the other side of the cart once the wheels and hardware on that side are installed; then use a hacksaw to cut the axle to its final length. Reinstall the axle, along with all the wheels and hardware. Make sure everything fits tightly; then install the outer axle brace (O) using construction adhesive and 2" screws. For added strength, use an oak board, instead of pine, for the axle brace.
Take Note: Before cutting the threaded rod to length, install a standard 1⁄2" nut on the threaded rod to the inside of your cutting point. After the cut is made, twist this nut off; it will reshape the threads on the rod so your lock nut will go on easier.
- 7. Cut out the leg/handle assemblies (P) shown in Plywood cutting diagram (page 38). Use a couple of screws to temporarily hold the assemblies in the position shown. Take the cart for a test spin, and see how the legs and handles feel in terms of length and angle. Adjust the angle, or cut the legs or handles shorter, based on your height and a comfortable wheeling angle. Once you find the right position, install the leg/handle pieces using screws only; after using the cart a few times to make certain it feels right, permanently install the leg/handle pieces using construction adhesive and screws.
- 8. Drill holes through the ends of the leg/handle to match the diameter of your closet rod, and insert the cross handle (Q). Pin each end of the dowel to the handle with 8d finish nails.
Leg/handle detail
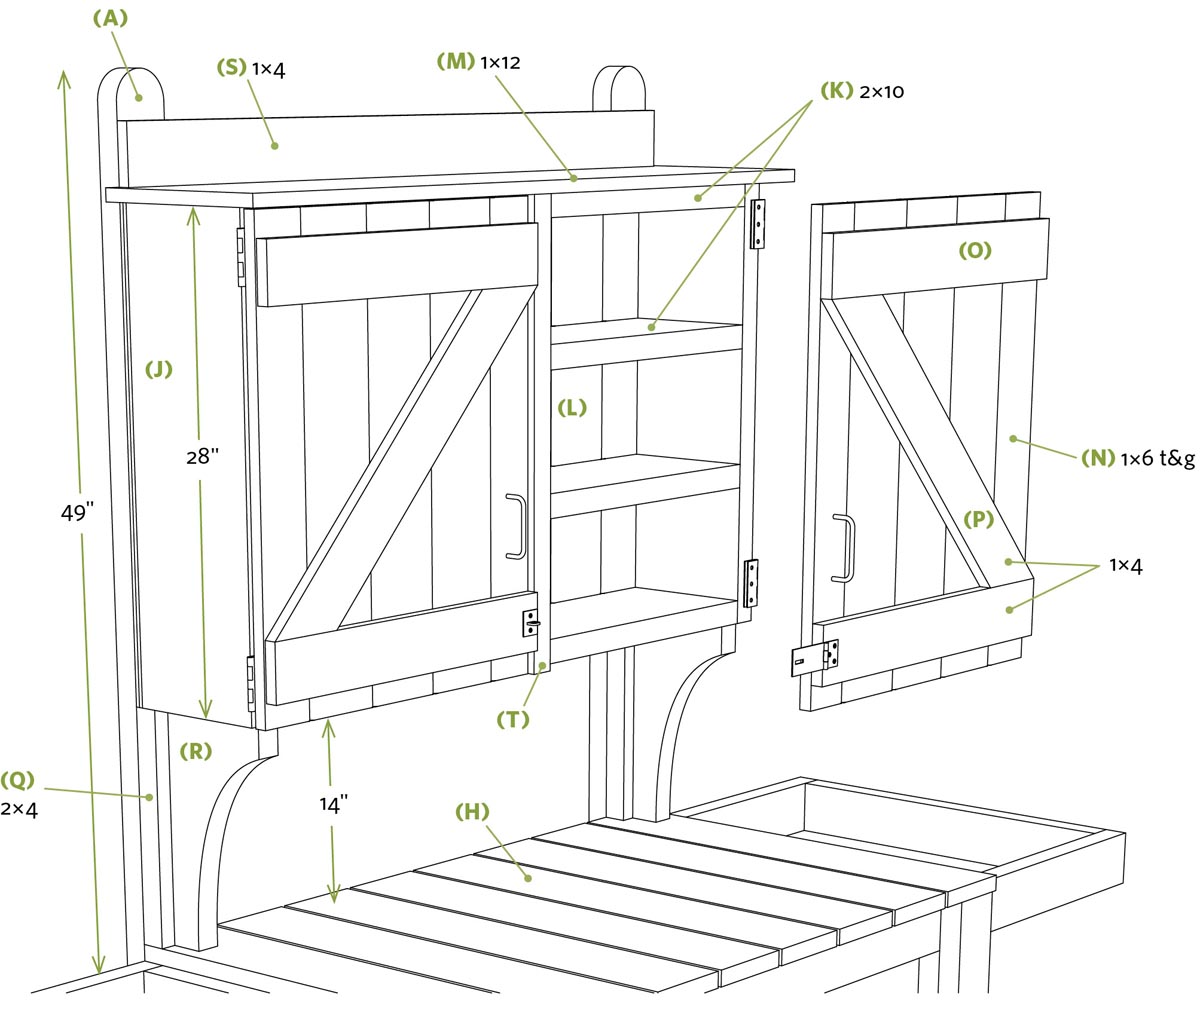
Cold Frame
Big, simple, and cheap
One complaint you often hear about cold frames is “Mine’s not big enough.” Well, you can’t say that about this one. It utilizes a cast-off storm door for the glazing and provides nearly 20 square feet of planting room.
This design is based around a standard aluminum storm door — the type that’s mounted in a frame — but the details are easy to modify to accommodate other types of doors or casement, slide-by, double-hung, or storm windows.
Most storm doors are made to fit 32" × 80" or 36" × 80" entry doors. Since sizes can vary, I don’t provide exact dimensions here. Measure your storm door frame — outside edge to outside edge in both directions — and build your cold frame based on those measurements. Your goal is to have the outside edges of the storm door frame flush, or even, with the outside edges of the cold frame box.
Cold Frame Whens, Wheres, Hows, and Whys
When you use your cold frame, as well as where you position it and how long you use it, are all based on growing zone, what you plant, and what your goals are:
- In most areas, you’ll gain four to eight weeks of growing time by using a cold frame to start plants and harden off seedlings.
- The ideal temperature in a cold frame is 65 to 75°F during the day and 55 to 65°F in the evening. Keep a cheap thermometer in the box (preferably out of direct sunlight) so you can monitor temperature. To release heat on a sunny day, prop open the door slightly (or open one of the sliding windows). If a freeze is forecast, cover the box with a quilt, leaves, or hay.
- Some plants thrive in a cold frame environment; others dive. For more information, look online or consult a good guide on the subject, such as Building & Using Cold Frames (see Recommended Reading).
- For maximum sun exposure, orient your cold frame facing south. Some people paint the inside of the cold frame white to reflect more sun and prevent seedlings from overreaching in one direction.
- A cold frame helps keep moisture within the confines of the box, but it also prevents rain from getting in. Monitor the moisture content.
Materials
All lumber should be pressure-treated material rated for ground contact.
- Three 10-foot pressure-treated 2×10s
- One 6-foot pressure-treated 2×10
- Three 8-foot pressure-treated 2×2s
- 32" or 36" storm door
- 16d galvanized nails
- 3" and 4" galvanized screws
Instructions
- 1. To create the sloped sides (A) of the box, start by marking a diagonal line that equals the width of the storm door frame, on a 2×10 (see drawing detail). Cut the angle using a circular saw and straight-cutting jig (see page 29).
- 2. Cut the lower side pieces (B) to length. Use a few nails to tack parts A and B together; you’ll make more secure connections using 2×2 cleats later on.
- 3. Set your circular saw to cut a 15-degree bevel. Rip the edge from a 2×10 for the top board for the back of the box (C). Use the straight-cutting jig or table saw for a straight, accurate cut. Cut the lower back piece (D) to length and tack it to C with a few nails. With your saw set at 15 degrees, rip the angle on the top of the front board (E).
- 4. Use 4" galvanized screws to assemble the box as shown in Box construction (page 23). Take care to align the tops of angled ends (A) with the tops of the beveled front (E) and back (C) to create a flat plane for your storm door frame. It’s okay for your frame to be uneven at the bottom, but not on the top where the storm door frame rests.
- 5. Cut the 2×2 cleats (F, G, H) to the lengths needed for them to join the boards they connect. Secure them to the corners and all sides of the box with 3" screws as shown. Space the cleats along the front and back so they’re directly across from one another.
- 6. Cut the intermediate dividers (I) to fit snugly between the front and back of the box, using the 6-foot 2×10. Install the dividers by fastening them to the sides of the 2×2 cleats.
- 7. Position and level the cold frame box. You can dig it into the ground a few inches or let it sit directly on the ground. Measure the diagonals to make sure the box is square, and adjust the box as needed. With the assistance of a helper, set the storm door (J) in place. Make any necessary adjustments to ensure that the door opens and closes properly; then screw the door frame to the frame of the cold frame box.
Take Note: The top and sides of the door are supported by the door frame, but the bottom is not; screw a pair of 2×2s (K) to the cold frame box to support it.
Safety, Safety, Safety
Whenever you use something like a storm door in a novel way, safety becomes a concern. Storm doors were created to stand upright, not lie horizontally, so keep the following safety issues in mind.
Glazing. The glass in most storm doors is single strength (to keep the weight down) and untempered (to keep the cost down). If you live in an area subject to hail, if the cold frame is near trees that drop branches or nuts, or if it’s in an area where there’s lots of activity, consider replacing the glass with Plexiglas. You may also want to cut a piece of Styrofoam and keep it on hand to secure over the door in the event of an impending hailstorm or hard freeze.
Door stability. A gust of wind can catch a partially open door and swing it back with great force. Use limiting chains to prevent this. Make sure they’re long enough to allow you to open the door far enough to work comfortably and safely. And use a pair of stout 2×2s (one on each end) to keep the door propped open while you’re working.
Pinched fingers. The door is heavy and the edges are sharp. Prop the door up solidly when working in the cold frame. You can also install a pair of piston closers (one on each end) and use the opening clips on the closer rods to hold the door open.
Curious kids. Teach your kids that a cold frame isn’t a playhouse, doghouse, or plaything. Unless they’re working alongside you, kids should stay clear of cold frames.
Lessons from the Homestead
Cold Frame and Careful Moments
By Michael Perry
Adapted from Coop: A Family, a Farm, and the Pursuit of One Good Egg
Unseasonably warm weather arrives and the bare ground reminds me that I have promised my wife, Anneliese, I will make a cold frame for the garden. I wander around the sheds rustling up scrap lumber and an old storm window, a box of drywall screws, and two rusty hinges. In about 20 minutes I clatter together what could pass for the junior high shop project of a three-fingered monkey, but then I cut myself some slack and declare it evocative of a sculpture I once stumbled across in a stairwell in New York City. My 8-year-old daughter, Amy, and I scratch up a patch of ground near the spot where Anneliese’s mother had last year’s garden, and then we plant lettuce, radishes, carrots, and some parsley.
A few days later I find the glass lid of the cold frame smashed. I suspect Fritz the Dog. He was nosing around earlier. Fortunately I have a fair collection of old storm windows, so I gather the broken glass, install a replacement, and prop it open again. When I see him lurking in the same spot again later, this time with a chewy dog treat in his jaws, I holler at him and shoo him away. But when the day cools and I go to lower the lid, all the dirt and most of the seedlings have been scraped into a mound in one corner. I realize now he’s been looking for a soft patch of dirt to bury his treasures — I’ll lay odds there’s a dog treat under that mound of dirt. The dog is nowhere to be found, so I can do him no harm, but I’m ashamed to say I storm into the house and slam the door and say something very loud and forbidden. I can’t defend my rage, but it is tied to the fact that in the midst of all that has been going on, and all my absences, that little plot of dirt with its sprouts was a tangible manifestation of some careful moments spent with Amy. I don’t care about the stupid plants, but I care what it meant to kneel down there with my daughter. Later, when I have cooled down some, I go back out and notice the dog has missed about six radish sprouts. I lower the lid and figure maybe they’ve got a shot.
Michael Perry — author, humorist, singer/songwriter, and amateur pig farmer — lives in northern Wisconsin. He is the author of Population: 485 — Meeting Your Neighbors One Siren at a Time and Truck: A Love Story. His most recent book, Visiting Tom, features Mike’s 82-year-old cannon-shooting neighbor (see Resources for more information).
Compost Bin Trio
Three projects for turning trash into treasure — or at least good, rich soil
Compost is one of those win-win scenarios Mother Nature hands us; it allows us to get rid of kitchen, yard, and garden waste while creating rich organic matter for the garden.
Here we’ll show you three different compost bins for three different situations. Feel free to modify these designs as needed, but bear in mind that the optimum size for a compost pile is somewhere between 3 × 3 feet and 5 × 5 feet. Smaller, and your pile may not heat up adequately for efficient de-composition; larger, and not only will your pile be harder to turn, but air will have difficulty reaching the center material, resulting in less-efficient composting.
Bin #1: Simple and Portable
This compost bin can be built to be portable or staked to the ground for a more permanent installation. You can adjust the suggested dimensions; just keep in mind the optimum size for compost bins mentioned earlier.
Materials
- Four 14-foot pressure-treated 2×4s
- One 5-foot pressure-treated 2×4
- Sixteen linear feet 1⁄2" galvanized hardware cloth, 36" wide
- Two 3" hinges with screws
- Two hook-and-eye latches
- 11⁄4" exterior screws
- 3" exterior screws
- 11⁄4" fence staples
Instructions
- 1. Cut each 14-foot 2×4 into two 36" pieces and two 48" pieces; you’ll have 16 boards total.
- 2. Make a mark 31⁄2" in from each end of each board. (That means 32 ends!) Set your circular saw to cut at a depth of 3⁄4", and then make a series of cuts about 1⁄2" apart on both ends of all the boards. Use a chisel to remove the material to create half-lap joints on each end.
Take Note: Speed things up by positioning several boards side by side, lining up the ends, and then making your series of cuts across the ends of all the boards at the same time.
- 3. Build each of the 3×4-foot side panels. Apply construction adhesive to the half-lap joints, overlap the ends of the boards to assemble the joints, and fasten the joints with 11⁄4" screws. Make sure each panel is square before driving the screws.
- 4. Cut the hardware cloth to size, and then use fence staples to secure it to one side of each panel.
- 5. To create the sides of the bin, secure three of the panels together at the corners using 3" screws. Install the door using the two hinges, and then install the two hook-and-eye latches.
Take Note: For a more permanent installation, pound stakes into the ground at the corners.
- 6. Cut the spreader bar. Notch the 5-foot 2×4 so it fits over the tops of the side panels. This piece prevents the sides from spreading apart when the door is open.
Bin #2: Rock-Solid and Maintenance-Free
If you want a compost bin that’s solid and easy to maintain, build this version out of modular concrete block (standard “cinder” blocks used for building walls and so on). It’ll never rot, and you can even plant flowers, herbs, or veggies in the open cores on the tops of the blocks.
Materials
Instructions
- 1. Dig a U-shaped trench about 12" deep and about 60" long on each side of the bin area. Fill the trench with 8" of compactable base material (such as Class 5 gravel). Use a hand tamper to pack down the material, checking with a 4-foot level as you work to create a flat, level base.
- 2. Install the first row of blocks, leaving gaps as shown. Add about 4" of soil to the trench to help lock the first row of blocks in place.
- 3. Apply concrete block adhesive to the tops of the first row of blocks, and then install the second row of blocks as shown.
- 4. Install the third row of blocks with construction adhesive, using the same spacing you used for row 1.
- 5. Install the fourth and final row with adhesive, following the same spacing you used for row 2. Let the adhesive cure as directed.
Compost Yeas, Maybes, and Nays
Anything organic will eventually decompose, but that doesn’t mean anything and everything is fodder for your compost bin. Some items take too long to decompose, others contain harmful pathogens, and still others can smell bad or attract pests. Here’s a list of yeas, maybes, and nays (see Resources for more information):
YEA
You can add the following material to your compost bins in unlimited quantities. Alternate layers of different materials for efficient composting:
- straw
- shredded paper (nonglossy)
- fruit
- fresh and dried garden debris
- fresh and dried leaves and grass clippings
- coffee grounds
- crushed eggshells
- manure
- blood and bone meal
MAYBE
Most of these items are slow to decompose or can negatively alter the balance of the compost. In most cases they can be used if chopped into small pieces, applied in thin layers, or mixed with other materials:
- wood chips
- wood ash
- sawdust
- corncobs and stalks
- lime
- pinecones and pine needles
- walnut and rhubarb leaves
NAY
These items are slow to decompose, create odors, attract pests, or throw off the balance of the compost pile:
- bones
- dairy products
- meat and fish scraps
- oils and oily foods
- pet and human waste
- pernicious weeds and weeds that have gone to seed
Bin #3: Expandable and Flexible
If you want a compost bin that will last for years and provide flexibility, build this three-bin model. It will allow you to keep three batches of compost brewing at various stages of readiness. Once you have your eight posts in place, you can fill in the blanks with either screen panels or slats. Screen panels allow for more air circulation, while slats provide better side support for heavier compost.
The bins are constructed to allow you to deposit or withdraw materials from any side by sliding the panels or slats up and out of the way. This feature also helps you move compost material from one bin to the other. Each bin measures about 4 × 4 × 3 feet. Adjust the size and number of bins according to your needs. Follow the given dimensions exactly if you want all your screen panels and slats to be the same size and thus easily interchangeable.
Materials
- Eight 6-foot pressure-treated 4×4s
- Two 8-foot pressure-treated 2×2s (per screen panel section)
- Six 5⁄4 × 6 × 41" pressure-treated decking boards (per slat section)
- Forty 1" × 1" × 36" pressure-treated lumber
- Eight 60-pound bags concrete mix
- Four linear feet 1⁄2" galvanized hardware cloth, 36" wide (per screen panel)
- 6d galvanized nails
- 11⁄4" fence staples
- 10d galvanized nails
Take Note: Before doing anything, call 811, the “Call Before You Dig” hotline, to have all utility lines marked on your property (see page 26).
Instructions
- 1. Use string or rope to lay out the grid work for the postholes. For accuracy, use the batter board system shown on page 31. Dig a 2- to 3-foot-deep hole for each 4×4 post.
- 2. Position each 4×4 in a hole and use stakes and scraps of lumber to brace them vertically. When all the posts are positioned, measure the spacing and adjust the posts in the holes as necessary. Mix one bag of concrete per post and dump it into the hole. Remove the braces once the concrete has set. Backfill the holes with dirt.
- 3. Use a table saw or straight-cutting jig to cut 1"-wide strips from 5/4 ×6 decking materials (they’ll be approximately 1" square). Nail pairs of these strips on two sides of each corner post and to three sides of each intermediate post to create channels as shown. Make sure the channels are over 11⁄2" wide so the screen panels or slats will easily slide in and out.
- 4. Build the screen panels from 2×2s and hardware cloth as shown, or cut the slats and slide them into the channels. Cut the small spacers from scrap material and insert them between the slats; they can be glued to the tops of the slats or simply left loose.
Location, Location, Location
One thing that can make or break the success of a compost bin is location. If your bin is located too far from the action, you’ll be less likely to make deposits and withdrawals, so select an area that’s close enough for convenience but doesn’t interfere with day-to-day activities. When scouting for a good location, look for:
- A level area that has soil with good drainage
- An area out of the path of direct sunlight and strong winds; both can dry the pile too quickly (a half-day of direct sun is ideal)
- An area away from direct contact with wood buildings, fences, and trees (compost will accelerate decay)
Critter-Proof Fence
Tall, sturdy, and attractive
You’re not the only one who enjoys the fruits and vegetables of your labor. Deer, rabbits, raccoons, and other critters love to share in the bounty, too.
This critter-proof fence is tall enough to prevent deer from jumping over it, deep enough to keep rabbits and other burrowers from digging under it, and sturdy enough to handle most anything nature throws at it. If you don’t need all the modes of protection, just use the parts that make sense. You can also customize this project by adding a shadow box fence panel or two (see page 54).
Materials (per 8-foot fence section)
Wood should be cedar, pressure-treated pine, or other rot-resistant wood. The polypropylene fencing shown has an expected life span of 8 to 10 years. You can also used fixed-knot, woven wire fence with a life span of up to 30 years, but it’s more expensive.
Fence Materials (per 8-foot fence section)
- One or two 12-foot 4×4
- Three 8-foot 2×4s
- One 8-foot 2×6
- Twenty-four 3" × 42" fence pickets
- Two or three 60-pound bags concrete mix
- 4" exterior screws
- 11⁄4" exterior screws
- Two inverted-flange hangers with fasteners (optional)
- Eight linear feet 90" to 96" “deer-proof” fencing
- 3⁄4" fence staples
- 11⁄4" fence staples
- Eight linear feet 24" woven wire mesh (for base guard)
Gate Materials
- Six 10-foot 1×4s
- Three linear feet 76" “deer-proof” fencing
- Three exterior hinges with screws
- Gate latch with screws
- Corrugated fasteners
- Construction adhesive
- 11⁄4" exterior screws
- 3⁄4" fence staples
Fence
Take Note: Before doing anything, call 811, the “Call Before You Dig” hotline, to have all utility lines marked on your property (see page 26).
- 1. Lay out the perimeter of your fence using stakes and string. You’ll make best use of materials by working in increments of 8 feet.
- 2. Use a shovel to remove a divot of dirt where each post will be located. Then remove the string and use a posthole digger to dig all the holes. A 3-foot–deep hole will offer good stability. (See Digging Holes and Setting Posts, page 26, for more information and options.)
- 3. Set each of the four corner posts in place, hold them plumb, and brace them by using scrap lumber secured to stakes driven into the ground. Reset the strings to make sure the posts are positioned correctly. Then pour concrete in the holes and allow it to harden.
- 4. Reset your string once again, running it from corner post to corner post. Use this string as a guide for installing the intermediate posts and your door post.
- 5. Determine the overall height of one post, mark it, and then use a level and a long 2×4 (or other leveling device) to transfer this measurement to the other posts. (See Measuring, Leveling, and Squaring, page 30, for information on leveling over long distances.) Use a circular saw to cut the posts so the tops are all level with one another.
- 6. Cut the 2×4 and 2×6 rails to fit; then secure them to the posts using 4" screws as shown. Position the bottom, intermediate, and top rails on edge and the top cap flat. Keep the outer edges of these rails flush with the outer edges of the posts.
Take Note: For added strength, use inverted flange hangers for securing the rails to the posts.
- 7. Use a jigsaw and 2×8 or 2×10 scrap lumber to create the arched braces that connect the posts to the top rails. Secure them in place using long galvanized screws. These are partly decorative, but they also help wiggle-proof the posts.
- 8. Bend 24"-wide strips of wire mesh into the L-shaped base guard. Dig a trench at least 6" deep and secure the base guard to the bottom rail as shown, using fence staples. Cover the underground horizontal leg of the guard with dirt, and compact the area.
- 9. Install the deer fencing using fence staples. This is a two-person job. One person should roll out the fencing and keep it taut, while the other installs the staples. Wrap it continuously around the perimeter of your fenced area.
- 10. Install the 1×3 pickets as shown, spacing them 1" apart, and fastening them to the bottom and intermediate rails with 11⁄4" exterior screws. Increase or decrease picket spacing based on the kinds of critters you’re trying to keep out. Once they’re installed, use staples to secure the deer fencing to the backs of the pickets for added strength.
Door
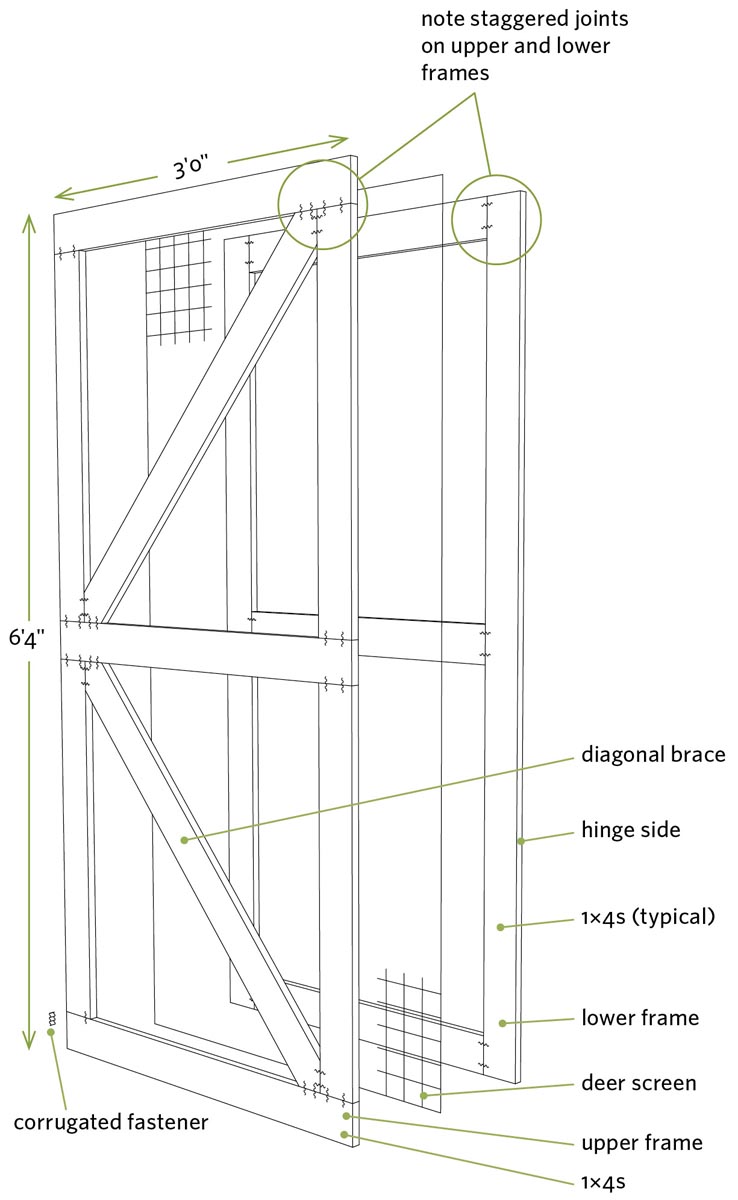
The door consists of two 1×4 frames with deer fencing sandwiched in between. You can make it any height or width you want, to accommodate wheelbarrows, carts, or garden tractors. For openings exceeding 40", build double doors.
- 1. Cut the members for the top and bottom frames. Note that the members of the upper frame overlap those of the lower frame at the corners and center crossbar to provide rigidity and strength. Lay out the pieces of the lower frame on a flat, solid surface; check to make sure the frame is square; and then fasten the corner joints with corrugated fasteners.
- 2. Secure deer fencing to the lower frame using 3⁄4" fence staples.
- 3. Apply construction adhesive to the face of the lower frame. Then install the members of the top frame, securing them with 11⁄4" exterior screws. The joints should overlap at the corners and at the crossbar.
- 4. Position a 1×4 diagonally from the bottom corner of the door to the center crosspiece. Mark the angles on the ends, cut the piece to the right length and angles, and then secure it in place with corrugated fasteners or metal nailing plates.
- 5. Mount the door to the door post using strap or T-hinges. Orient the door so the lower diagonal brace points toward the lowest hinge. Install the gate latch of your choice.
Deer Deterring Options
There are other fence designs and tricks you can use for keeping deer at bay. Here are a few of them.
Double fence. Install two parallel 4-foot-high fences spaced 40" to 48" apart. This visually confuses deer and instills wariness since deer don’t want to get stuck between two fences.
Baited electric fences. These fences attract deer with a scented solution and then give them a startling, yet safe shock when their noses contact the electric fence. Most consist of two or three strands of wire. They shouldn’t be used in situations where kids or pets might come in contact with them. See Resources for more information.
Slant fence. These 4- to 6-foot-tall fences slant outward at a 45-degree angle, visually confusing deer and making them less likely to attempt jumping over it.
Motion-detector devices. These deterrents are triggered by movement and set off an ultrasonic siren or sprinkler to drive away deer. People using these devices report mixed results.
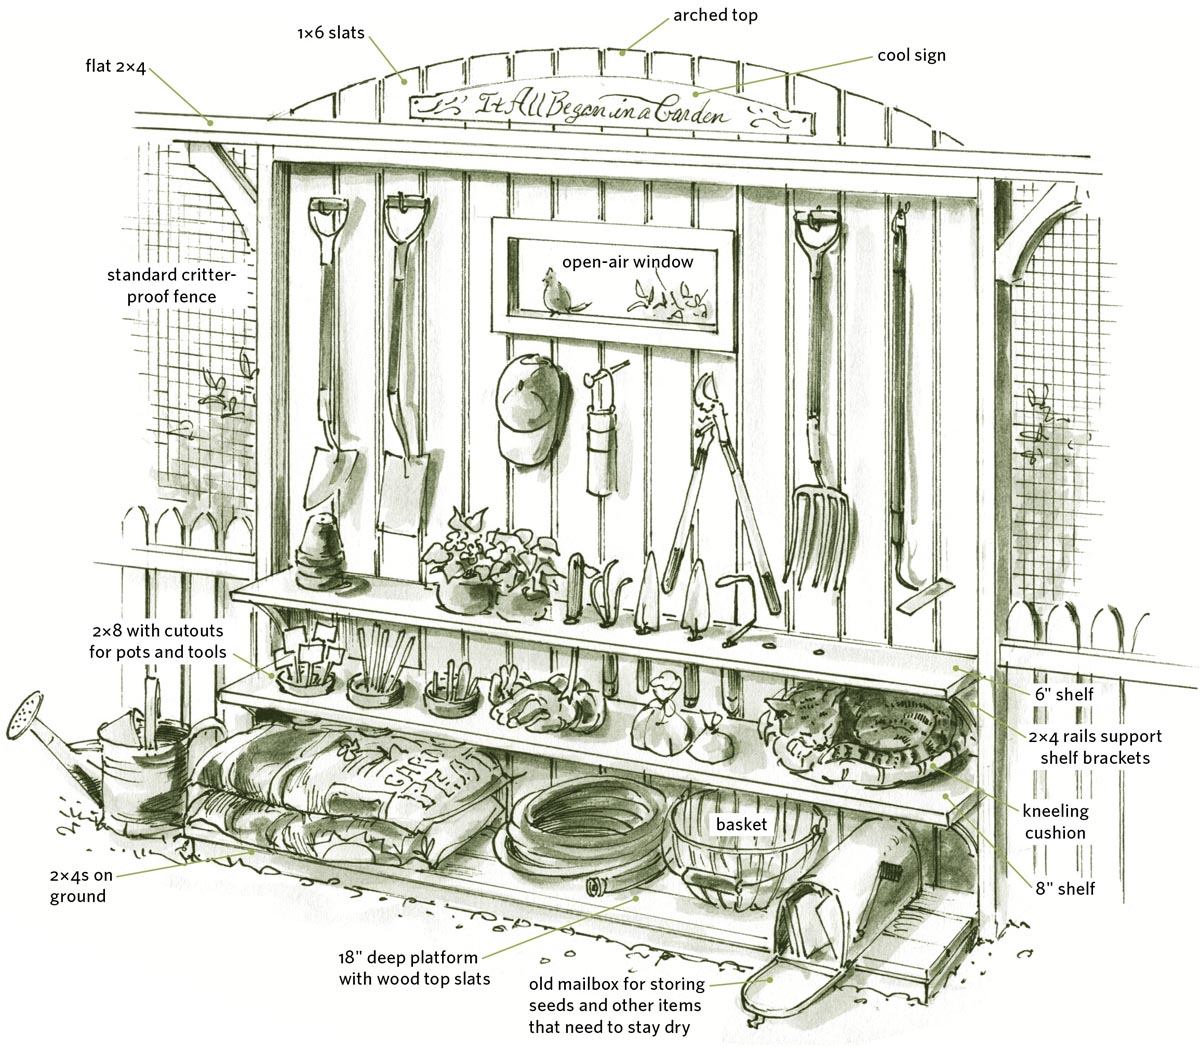
Shadow Box Fence Panel
A place for your gardening stuff (and imagination)
This shadow box fence panel is a smart, creative way to store and organize your most often used garden tools and materials. You can incorporate the panel (or panels) into the Critter-Proof Fence (page 50) or any other fence design. You can even build it as a stand-alone structure in a fenceless garden.
Here we present how to construct a basic panel, but you can use your imagination to accessorize it to fit your needs. Since the panel has to withstand the extra weight and jostling of a storage center, make certain to bury the posts at least 3 feet in the ground for stability. If you’re going to use it for hanging heavier items, increase the post size to 6×6 and horizontal rail size to 2×6 or larger.
Materials (per 8-foot fence section)
Materials will vary according to your design.
- Two 12-foot pressure-treated 4×4s
- Six to eight 8-foot pressure-treated 2×4s (or 2×6s or 2×8s)
- Eighteen 8-foot 1×6 fence pickets
- Deck boards (as needed)
- Four to six 60-pound bags of concrete
- Optional accessories and shelves (see steps 3 and 5)
- 4" exterior screws
- 2" exterior screws
Instructions
- 1. Dig two holes no more than 8 feet apart, and at least 3 feet deep. Set the posts in the holes, brace them vertically, and then pour concrete in the holes. Let the concrete cure overnight.
- 2. Install at least three horizontal rails (top, middle, bottom), and then secure the pickets to them. To create the arched top, flex a thin piece of wood from post to post, trace along it, and then use a jigsaw to cut the pickets in place.
- 3. Create shelves by securing flat 2×6s and 2×8s to the tops of the horizontal rails. If you’re going to include holes for flowerpots, cut them out before installing the shelves. Add homemade or store-bought brackets as needed to support the shelves.
- 4. Build the lower platform using 2×4s for the framework. Cover the frame with deck boards, spacing them at least 1⁄4" apart.
- 5. Add hooks, clips, and other storage doodads. A rural mailbox provides a moisture-proof enclosure for seeds, gloves, and other items you want to keep dry. If you cut in an open-air window or peephole, “picture-frame” it with wood trim on both sides to hold the pickets in place at the perimeter.
Lessons from the Homestead
Fences: Closing in the New Frontier
By Susan Waughtal
Fencing has been one of our biggest challenges as new farmers and probably one of our greatest expenses. When we moved to our farm with its vintage chain link fence along the perimeter of the property we naively thought it was “fenced.” We got in pretty good shape that first year chasing escaped cows!
We have since had many adventures with all kinds of fencing and gate projects — to keep cows in the pasture, dogs on the property, chickens in the yard, chickens out of the garden, turkeys off the patio, cows out of the orchard and the garden, and livestock safe from hungry wildlife. We now use a repertoire of chain link, cattle panel, garden mesh, buried electric dog fence, cedar picket fence, hardware cloth, and electric fencing strategies.
Fencing animals has made us advocates of the belt-and-suspenders “fence within a fence” approach — and we’ve grown to appreciate the simplicity of electric fencing. For example, in some areas we’ve run two electric wires inside the chain link pasture fence. If the electric fence loses power, at least the outer fence delays the escape.
We rotate our cows between pastures and use movable electric fences with step-in posts to divide the pasture or move the cows to our front yard. Braided nylon electric wire is easier to handle and more visible than aluminum or steel wire, but not nearly as easy to find the bad spot when the electric fence fails.
We’ve also used two strands of electric wire to contain pigs in a large area. Just one experience touching a moist snout to the wire was a lesson well-remembered for the pigs, and they never tried to get out again. The cows, however, always seem to know when the fence is not working and take advantage of it.
In a nutshell, good fences make good neighbors — and for a heck of a lot of less chasing around.
Susan Waughtal (see Resources) and her husband, Roger, left the big city six years ago to establish Squash Blossom Farm near Rochester, Minnesota. Today, they raise chickens, bees, cattle, and most of their own food. (For their hoop greenhouse adventures, see page 95.)
Drip Irrigation Basics
Save time, conserve water, grow healthier plants
Drip irrigation, also called micro-irrigation or trickle irrigation, puts water where you want it, when you want it, at the rate you want. It does this through a system of tubes, Ts, and emitters that apply water directly to the plants and their roots. The results are less water waste, more efficient watering, and less hassle, especially if you use a timer. You can use the system to water vegetable and flower gardens, fruit trees, ornamental shrubs, and even hanging plants.
Since soil and weather conditions, types of plants, and layout differ from homestead to homestead, every drip irrigation system is different. Here are the basics to get you started.
The Overall Plan
If you’re new to drip irrigation, install a system in one area of your yard, and then expand it once you learn how the system works.
Begin by making a sketch of your yard and garden on graph paper. Make it roughly to scale so you can use it to help order materials when the time comes. Include all the plants, shrubs, and trees you want to water. Figure out where you want to install the main 1⁄2" supply lines, the smaller 1⁄4" feeder lines, and the emitters. You can control the amount of water delivered to each plant or planting area via the emitter you select.
A Few Basics Guidelines:
- Each emitter has a gallons per hour (gph) rating. When you add up the gph of all the emitters on a 1⁄2" line, the total should be somewhere between 150 and 200 gph.
- When you add up the gph on the smaller 1⁄4" branch feeder lines, the total shouldn’t exceed 30 gph.
- The maximum length of your 1⁄2" tubing should be 200 feet.
- Add another zone when your system begins pushing the limits of the guidelines above.
- The more clayey your soil, the less water you should apply. For example, in heavy clay you may want to select emitters that disperse only 1⁄2 gph, while in sandy or quick-draining soils your devices may disperse 2 gph.
Faucet Setup
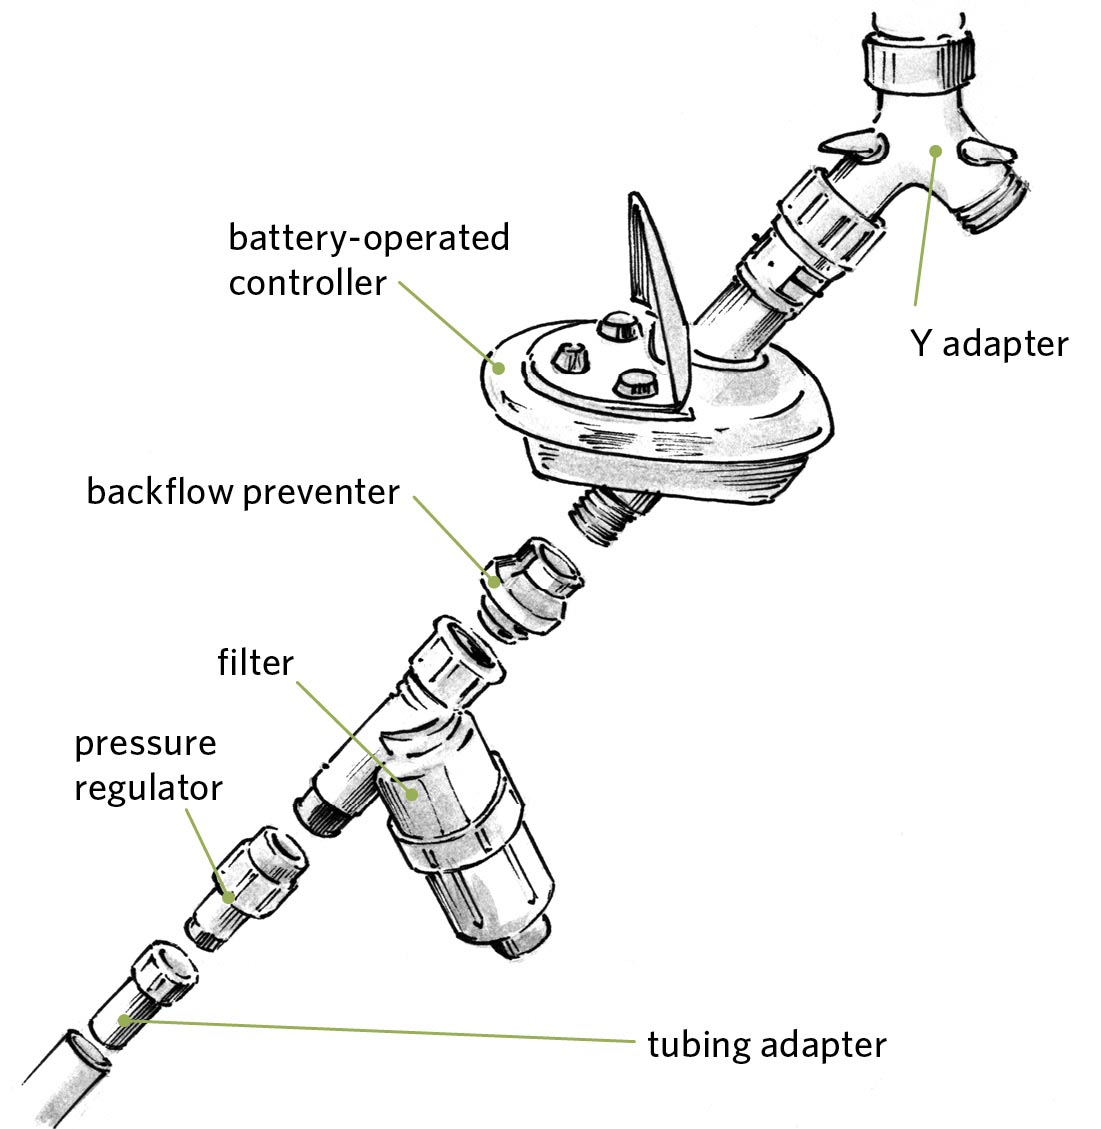
It all starts with the water source, and the most common source is the standard outside faucet. The following are the main components you need to install.
Y adapter with shutoff valves (optional). This adapter screws directly into your faucet and allows you to run your drip irrigation system off one leg and a standard hose or a second drip irrigation system off the other.
Timer (optional). The simplest timers automatically turn the water off 2 hours after you turn it on. More sophisticated versions have programs that completely automate the watering system and/or run two systems at once.
Backflow preventer. This device prevents water and possible contaminants in the irrigation lines from inadvertently backing up into your domestic water supply. They’re inexpensive, easy to install, and mandatory (according to regulations in most areas).
Filter (optional). A filter removes small particles that might block the small outlets and hoses of your system. This may not be a factor if you’re on municipal water, but it’s cheap insurance against potential problems.
Pressure regulator. This reduces the relatively high water pressure of the house supply to the lower pressure required by the irrigation system.
Hose adapter. This little device allows you to connect the 1⁄2" plastic tubing to the threaded connections of the other devices.
Tubing and Emitters
You can’t vary the amount of time individual plants on a single zone receive water, but you can determine the amount of water they receive based on the emitters you select. The following are the most commonly available emitters and watering devices.
Drippers. As the name implies, drippers dispense water at a slow, steady rate. Most systems offer multiple drippers with gallons per hour ratings ranging from 1⁄2 gph to 4 gph. Many are color-coded to indicate flow rate.
Bubblers. These stick up out of the ground and disperse water through multiple outlets. Many have flow rates of 30 gph or more, making them ideal for fruit trees, shrubs, and large plants like squash and roses.
Soaker drip lines. Available in 1⁄4" and 1⁄2" diameters, soaker drip lines contain a series of built-in drippers, making them ideal for watering rows of vegetables and flowers.
Rotating sprinklers. These dispense water in a circle with a radius of 25 feet or more at a rate of 30 gph or more.
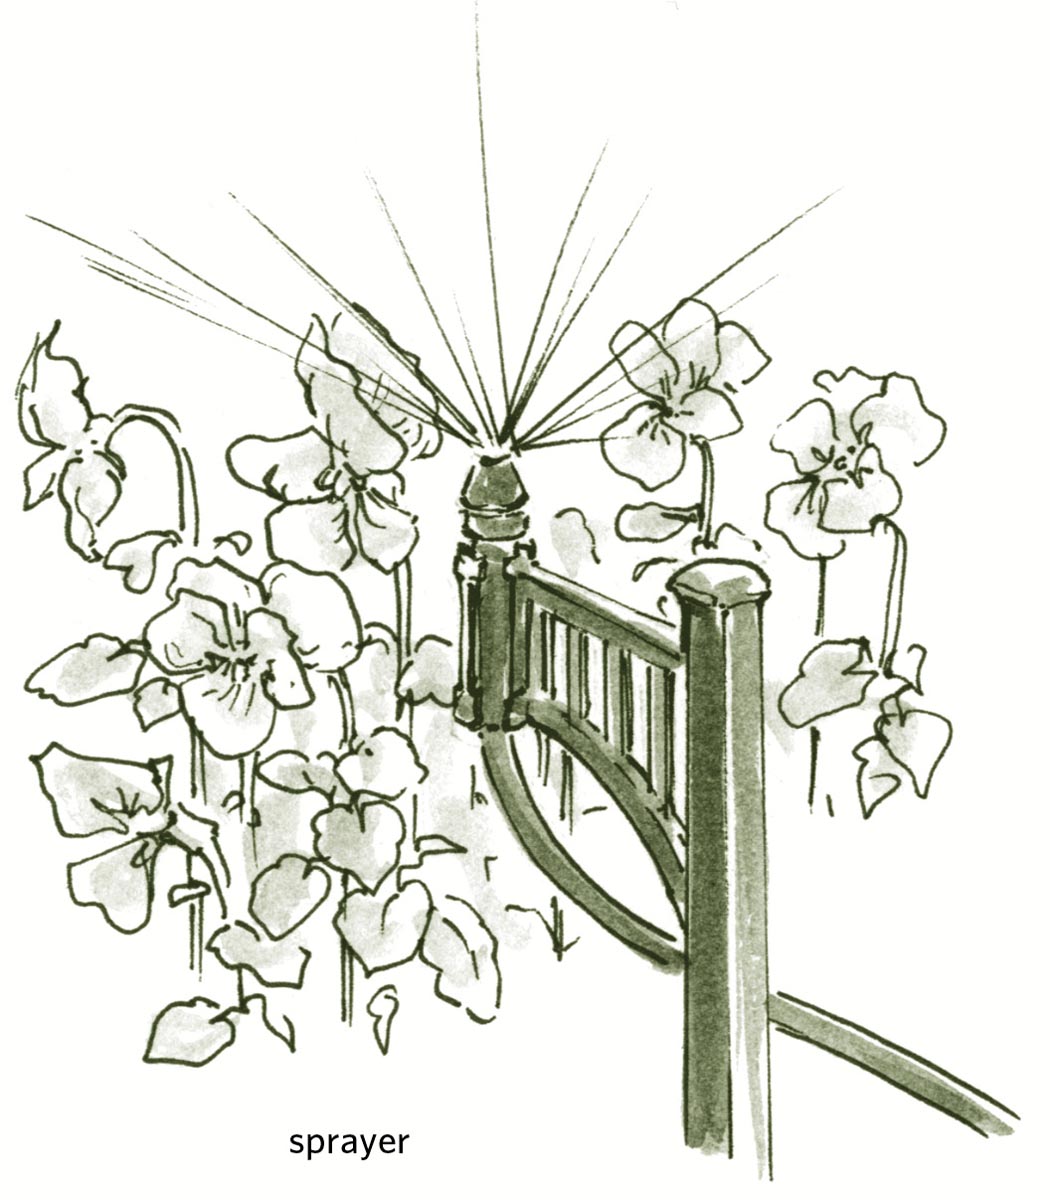
Stationary sprayers can be adjusted to spray water in a variety of arcs and patterns. These are excellent for watering ground covers or dense flower gardens.
Take Note: Drip irrigation systems are just that — systems. It’s best to use components from a single manufacturer. Most manufacturers and retail outlets offer excellent installation brochures or online videos.
Installation and Maintenance
The basic installation tools are pruning shears for cutting the tubing to length and a hole punch for creating the openings for branch lines and emitters. A few installation tips:
- Unroll the 1⁄2" tubing and let it warm in the sun for an hour or two before installation, to make it more flexible and easier to work with.
- Start at the faucet and work outward. Install the main 1⁄2" supply lines first, then the 1⁄4" feeder tubes.
- Most manufacturers recommend you install emitters, branch lines, Ts, and elbows by creating a hole in the tube with the hole punch, then inserting a barbed or friction-fit fitting.
- You can bury 1⁄2" tubing in a shallow trench as you work or cover it later with mulch if you want it out of sight. In high-traffic areas you can sleeve the tubing in lengths of PVC pipe for protection.
- Use U-shaped stakes or hold-downs, available through most manufacturers, for holding the tubing firmly in place every 4 to 6 feet.
- Once your system is up and running, check it periodically to see if any of the joints or connections are leaking profusely. If you installed a filter, clean it once a month.
Dealing with Old Man Winter
If you live in an area with below-freezing temperatures, you’ll need to take a few precautions to prevent damage to your system. Before the first freeze, remove the timer, filter, and adapter connected to your outside faucet and store them inside. You also need to drain the system. If your system is installed on a slope, you may be able to simply remove a few downhill emitters and let the water drain out of the system. A more thorough approach is to use an air compressor set at low pressure to blow the water out of the system.
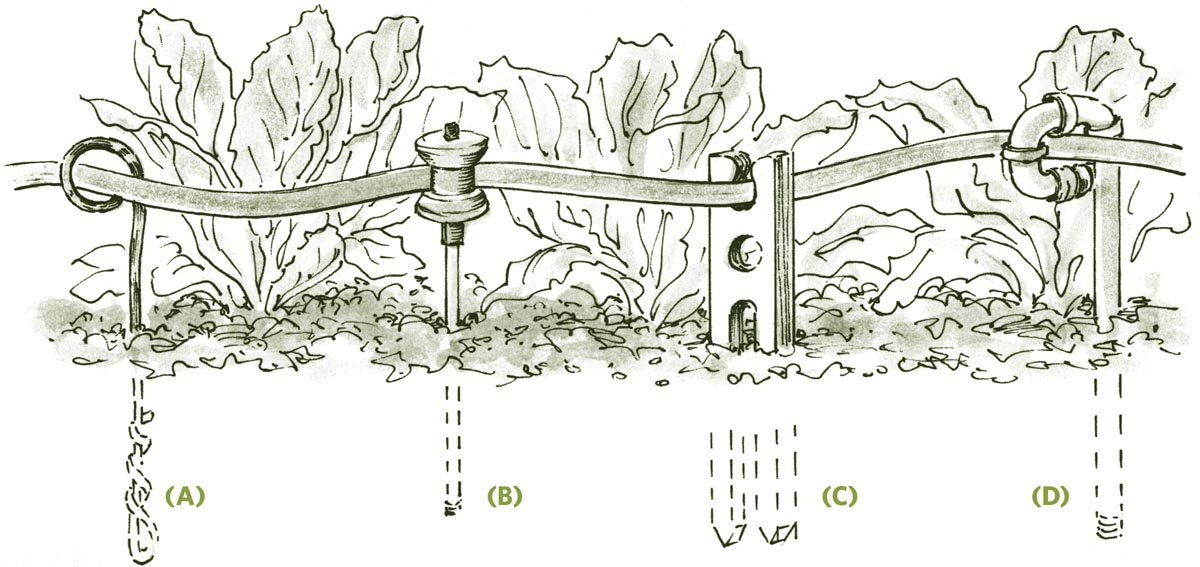
Simple Hose Guides
Minimize damage to your plants, hoses, and nerves
It’s pretty easy to inflict major damage on flowers, vegetables, low-voltage lights, and garden accents by dragging a hose across them. These four simple guides will help minimize damage to both your plants and hoses, and help keep your hoses tangle-free.
Copper Pipe (A)
Cut a piece of 3⁄8" soft copper pipe about 24" long. Create a loop on one end by bending it around a pint paint can or something of similar size. Make a sharp bend 6" to 8" from the other end, and then use two pliers to twist the free end around the stem to create “threads.” Twist the hose guide into the ground like a giant corkscrew; the threads will help prevent the guide from twisting when the hose is pulled through it.
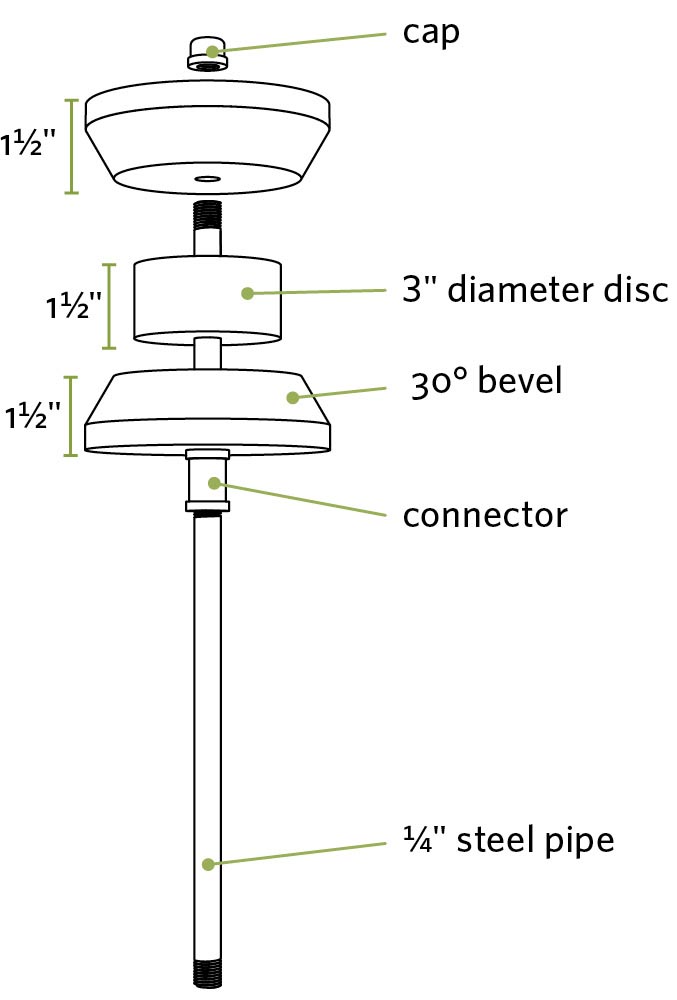
Roller Stake (B)
If you need to guide your hose around sharp corners, a roller will allow you to pull the hose more easily. To create the wooden spool:
Instructions
- 1. Use a compass to draw one 3" circle and two 5" circles on a 2×6. Drill a 1⁄2"-diameter hole through the center of each circle.
- 2. Use a jigsaw to cut out each of the circles. Then set your jigsaw to 30 degrees and cut the bevel on the lower half of the larger circles as shown.
- 3. Apply exterior glue to the three discs; then clamp them together to create a spool. Slide a 1⁄2" dowel or piece of pipe through the center holes to keep them aligned while the glue sets.
- 4. Once your glue has set, place the roller on a stake made from two pieces of threaded iron pipe, a connector, and a cap.
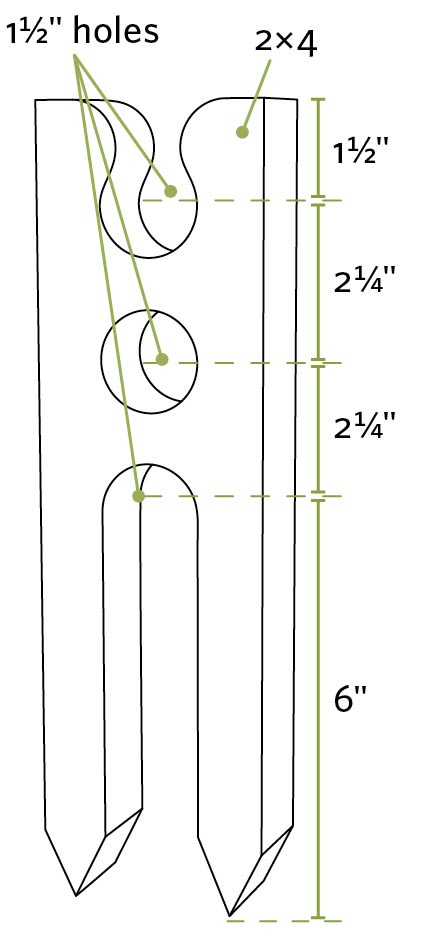
Wooden Stake (C)
Drill a trio of 11⁄2" holes through a 12"-long piece of pressure-treated 2×4. Use a jigsaw to cut the 1"-wide slot to the top hole and to cut the legs that extend from the bottom hole. For temporary use, slip the hose into the top hole; for more long-term use, feed the hose through the middle hole.
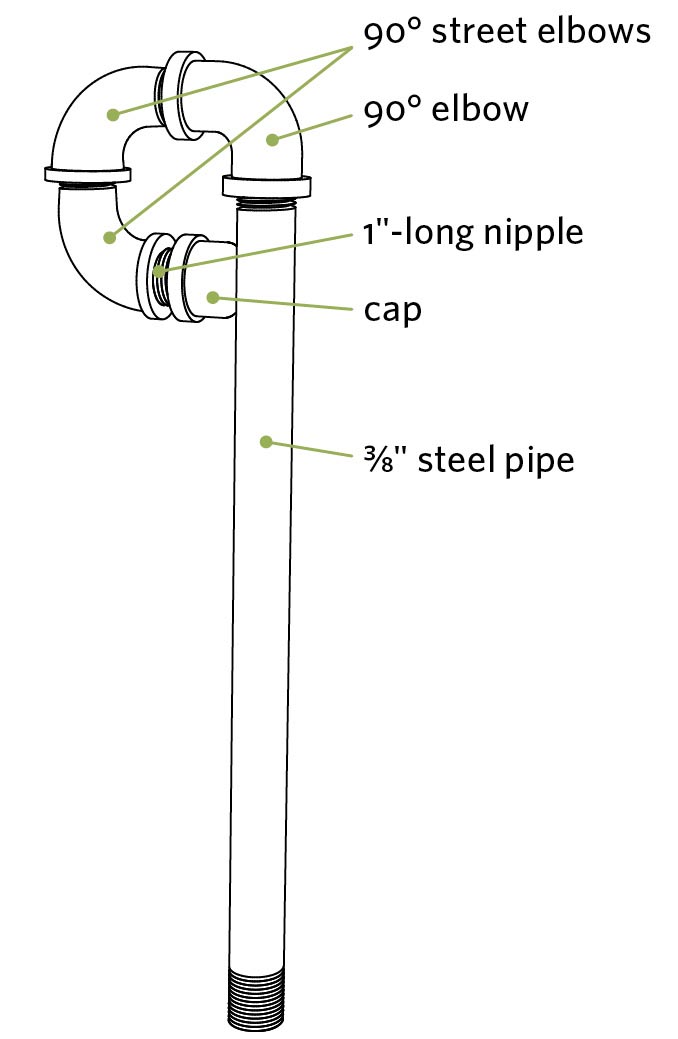
Threaded Iron Pipe (D)
Purchase 3⁄8" threaded iron pipe and fittings, and then assemble them to create a loop as shown. Experiment with different fittings and configurations to create the right size of opening.
Garden Marker/ Stepping-Stone
A cheap, fun way to leave an impression
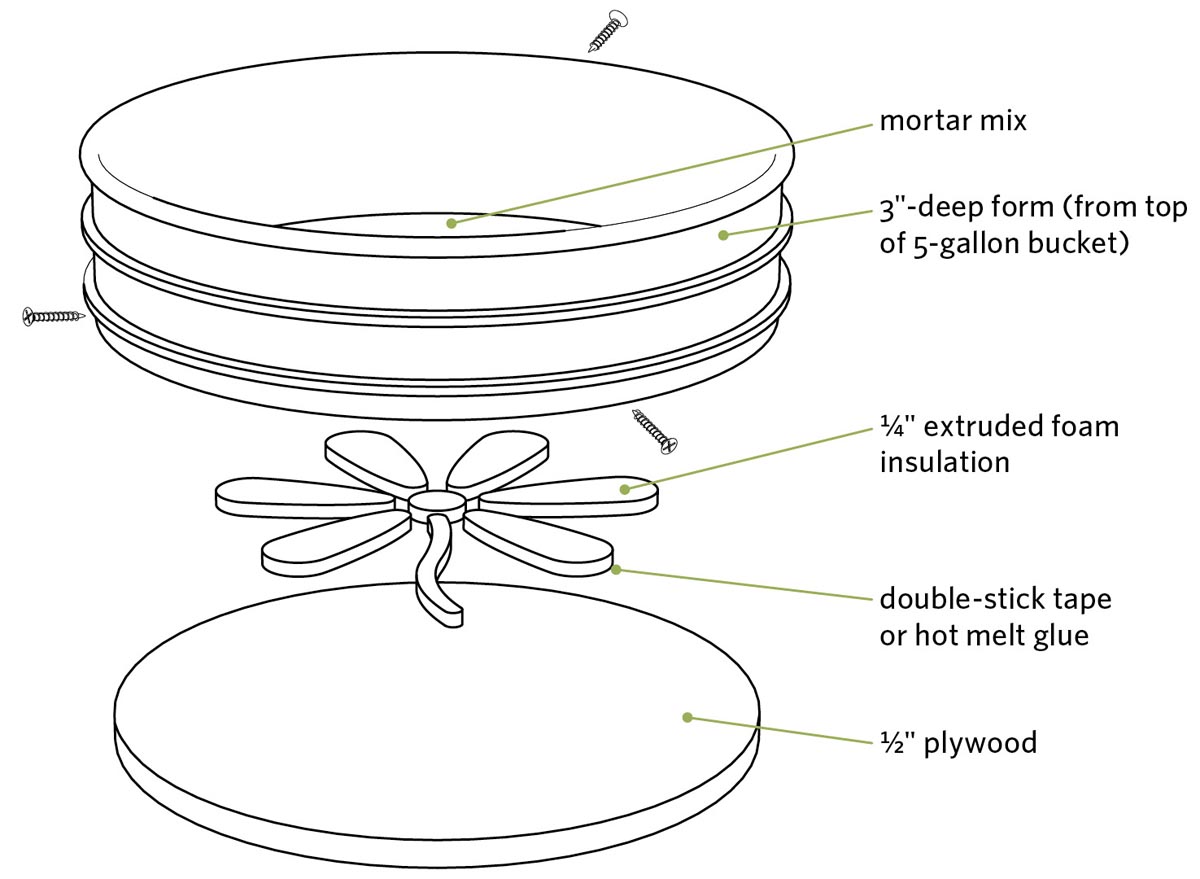
These garden markers can be functional, directional, informative, decorative, or just plain fun. We made our circular form by cutting off the top 3" of a 5-gallon bucket, but you can use nearly anything for yours.
Materials
- One 5-gallon plastic bucket
- 1⁄2" plywood, 12" × 12" minimum
- Three drywall screws
- Extruded foam insulation board
- Double-sided tape
- Vegetable oil
- Concrete mix
Instructions
- 1. Create the form by using a jigsaw to cut off the top 3" of a 5-gallon bucket. Place the form on a scrap piece of 1⁄2" plywood and trace around the inside. Use your jigsaw to cut out the disc. Place the plywood disc in the bottom of your form and secure it in place by driving three short drywall screws through the side of the form into the edge of the plywood.
- 2. Cut the design, pattern, or words you want from 1⁄4" extruded foam insulation using a sharp utility knife or jigsaw. Use double-sided tape or a dab of hot melt glue to secure the shapes or letters to the plywood disc. Remember: If you’re creating words, arrange the letters backward!
Take Note: Use a computer to find or create the letters, shapes, or objects you want. Then enlarge them to the size you need and print them out. Use carbon paper or a pointed awl to transfer the images to the foam.
- 3. Brush vegetable oil or concrete form oil onto the sides and bottom of the form and your pattern to prevent the concrete from sticking. Mix the concrete to a loose peanut butter consistency, add concrete colorant (if you want), and then pour the concrete into the mold. Tap the sides with a hammer and tamp the material down so it nestles around the foam shapes. You’ll be able to get three or four markers from each bag of concrete mix.
Take Note: Use premixed mortar — the stuff without gravel in it — if you want crisp details on your markers.
- 4. Let the concrete harden overnight. Once it’s hard, carefully turn the form over. Remove the screws holding the plywood disc in place and gently push on the bottom until the concrete comes out. If it’s stuck, run a flexible putty knife between the form and the concrete to loosen the marker. Remove the plywood disc from the concrete by gently twisting it as you pull up. Your foam letters or shapes will stay embedded in the concrete.
- 5. Use a putty knife or screwdriver to remove the embedded foam shapes. Round and clean up the edges of the shapes and the marker with an old file. Let your markers cure for two or three days before setting them outside.
Super-Simple Path
Easy on the budget, feet, and back
A path can be as simple as a trail worn across the lawn or as heavy-duty as a truckload of flagstone set on a gravel base. This path leans toward the simple. You can build it in the garden, across the lawn, or through the woods. The cedar shakes used as the border are naturally rot-resistant and have a life span of 10 years or more. The materials are available through most garden and home centers (though you may have to special-order the cedar shakes). You can build most paths in an afternoon.
Materials
Amounts vary based on length of path.
- 18" cedar shakes or shingles
- 36"-wide woven landscape fabric (weed barrier)
- Landscape staples
- Mulch, stone, or other path surface material
Instructions
- 1. Use a pair of garden hoses to mark the edges of your path. The path can be straight as an arrow or crooked as a snake. Since the base will be 36"-wide landscape fabric, keep the path width to 30" or less.
- 2. For the border, cut the cedar shakes in half lengthwise using a miter saw, circular saw, jigsaw, or handsaw; you’ll use both halves. Using the hose as your guide, pound the first shake into the ground. Install the second shake, overlapping the side of the first one by about 1". Continue staggering and pounding in the shakes. Complete both sides of the path.
Take Note: To minimize damage to the tops of the shakes, use a scrap 2×4 as a pounding block between the shake and hammer. In tough soils you may need to loosen the soil beforehand with the blade of a shovel.
- 3. Roll out the landscape fabric between the shake borders. Where the path curves, fold the material onto itself to make the turns. Use landscape staples — normally used to keep sod and erosion-control fabrics in place — to secure the material to the ground as needed. Use the tip of a shake to tuck the edges of the material down in between the soil and the border shakes; the tighter you can make the fit, the fewer weeds you’ll have to pull.
- 4. Cover the landscape fabric with an even 3"- to 4"-thick layer of mulch, stone, or other loose-fill path material to complete the path. Renew the mulch as needed.
Sitting and Kneeling Garden Stool
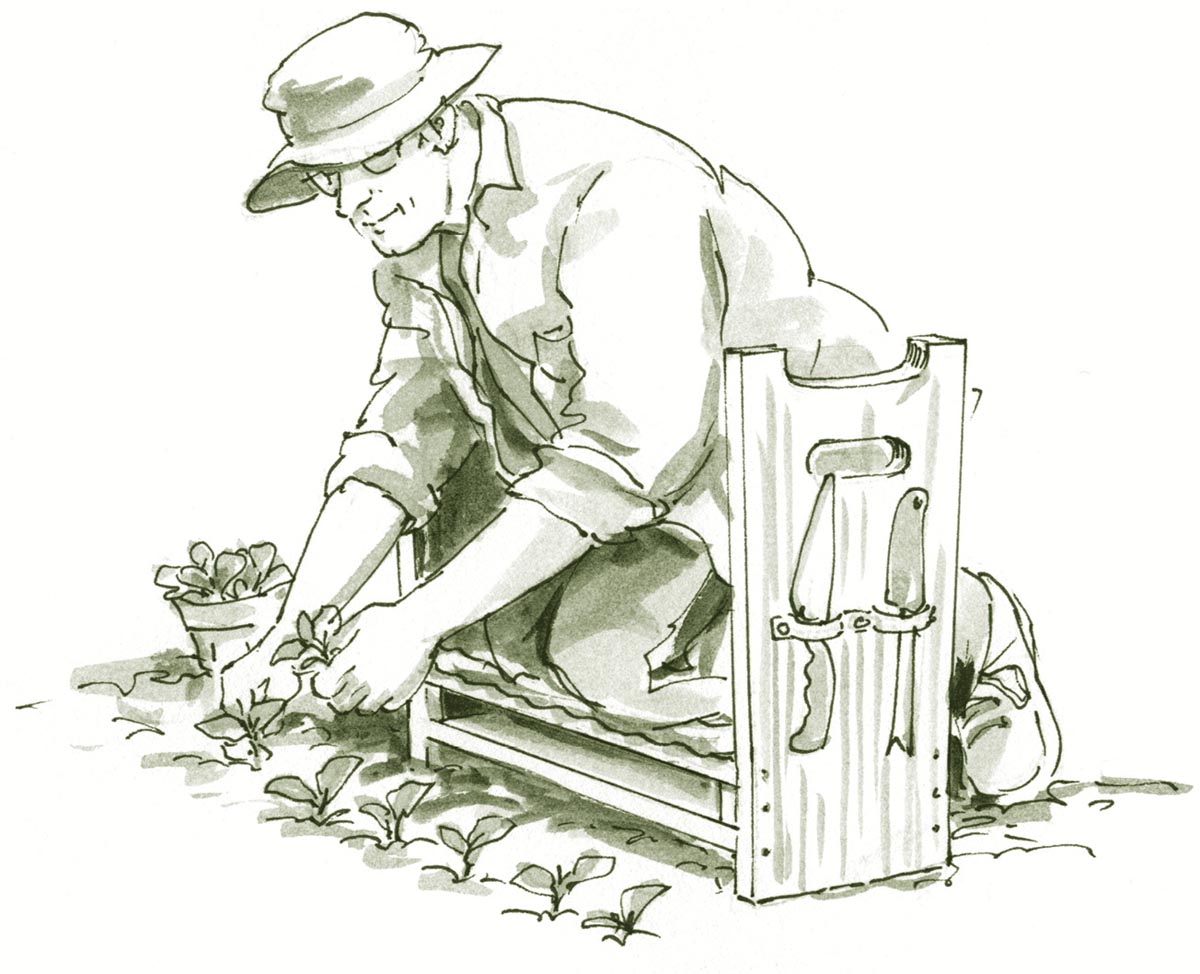
Whether you’re pruning, planting, or shucking, this bench provides the just-right height
Gardening can put you in a lot of different, some-times awkward positions: one minute you’re kneeling, the next you’re sitting, the next you’re standing. This bench will make life easier on all three counts. Flip it into high mode for sitting, then into low mode for weeding and planting. Use the sides and handholds to help you stand or move from one position to another. The stool also has a compartment for stowing a kneeling pad, loops for holding hand tools, and a handhold for carrying it to and fro.
Materials
All lumber is pine or pressure-treated pine.
- One 4-foot 1×12
- One 4-foot 1×10
- One 4-foot 1×2
- Exterior glue
- 6d galvanized casing nails
- 11⁄4" exterior screws
- 2" exterior screws
- Four 2" L-brackets with screws
Instructions
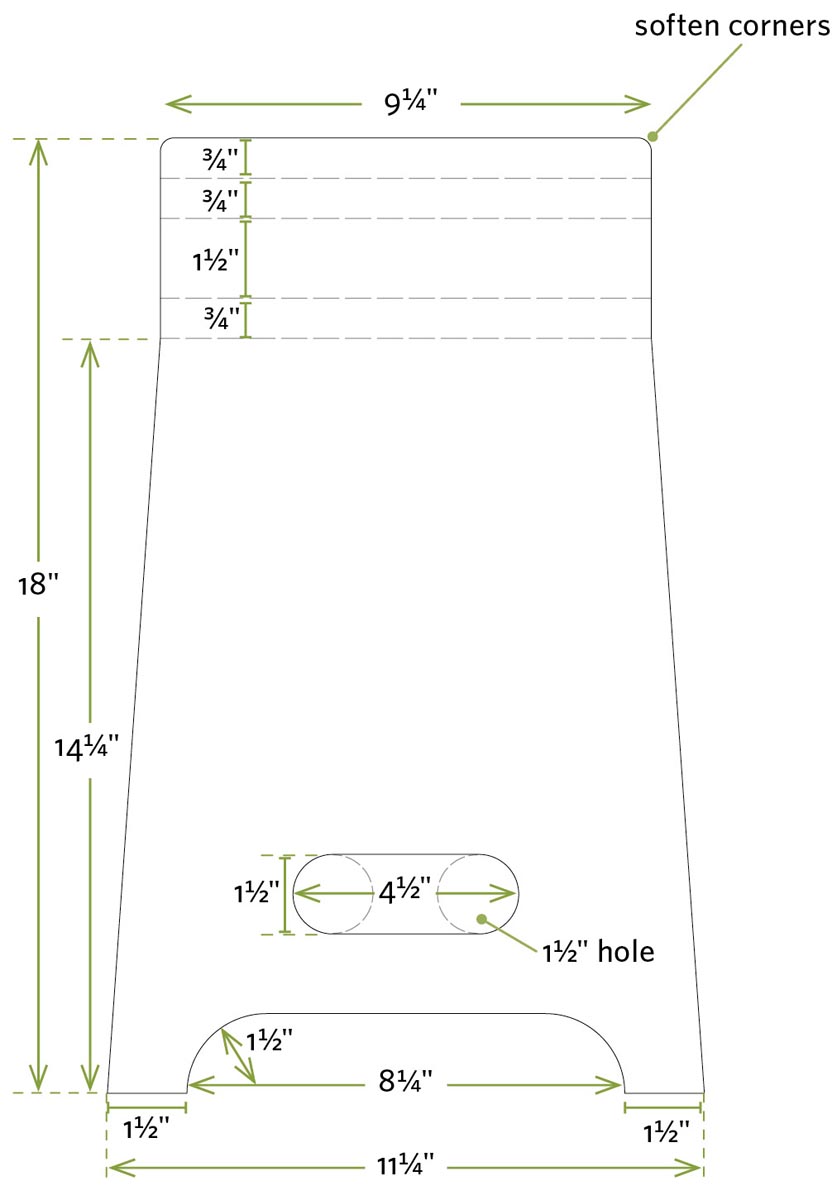
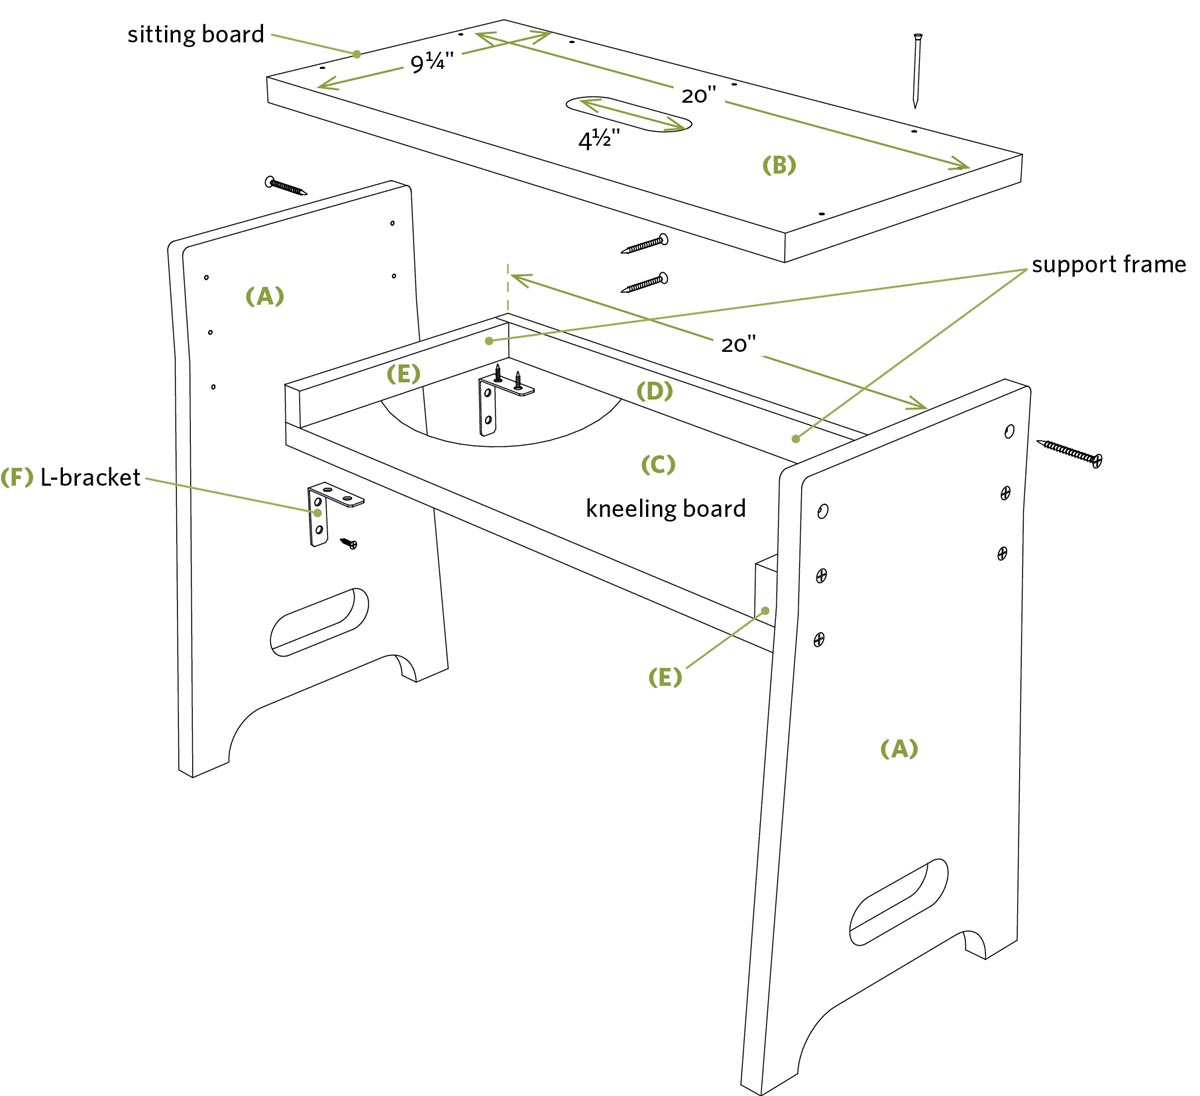
- 1. Cut the two sides (A) to length. Use the dimensions as shown to mark the locations of the sitting board (B) and kneeling board (C), handhold cutouts, curved bottom, and tapered sides. Use a 11⁄2" spade bit to create the rounded ends of the handholds, and use a jigsaw to cut the tapered sides and arched bottom.
- 2. Cut the sitting board (B) and kneeling board (C) to length. Use a 11⁄2" spade bit and jigsaw to cut out the handhold in the sitting board.
- 3. Cut the three support frame members (D, E) to length and assemble the 3-sided frame using 2" screws. Use exterior glue and 6d galvanized casing nails to secure the sitting and kneeling boards to each side of the frame to create an open-ended box.
- 4. Secure the open-ended box in place by applying glue to the side frame supports (E), and drive 11⁄4" exterior screws through the sides of the bench into the support frame. Drive 2" screws into the ends of the sitting and kneeling boards.
- 5. Install the four L-brackets (F) to connect the kneeling board to the sides. These are important: they not only help support the seat assembly but also prevent the sides from splaying out when you use the bench to move from kneeling to standing positions.
- 6. Soften the edges and corners using sandpaper or a router with a roundover bit.
Take Note: Paint your bench or apply a clear finish to increase longevity.
Accessorizing Your Garden Stool
You can make your garden stool even more useful by adding a few accessories.
- Slip a foam kneeling pad into the narrow storage compartment between the sitting and kneeling boards.
- Use a rubber bungee cord to create loops just large enough to snugly hold hand tools that you commonly use. Cut the ends from the cord. Use screws and washers to secure the cord to the side of the bench.
- Add a bicycle water bottle holder to one side so you can bring plenty of water with you on hot days.
Five Raised-Bed Gardens
Cramped space? Crummy soil? Aching back? Solve these problems with raised-bed gardens
If you’ve been putting off starting a garden because of limited space, poor soil, or an aching back, or because the thought of a big garden is overwhelming, consider building raised beds. They can solve a multitude of problems. You can fill them with fresh soil and amendments to create rich growing soil regardless of the natural soil beneath you. Since the raised beds reduce the need to stoop, you’ll experience less back and knee strain. And having a well-defined space makes gardening more manageable.
Here are five concepts for raised beds. There are no specific measurements, since all are easily adjusted to fit your space, needs, and budget.
Option #1: Timber Beds
Pressure-treated retaining wall timbers are a natural for creating raised beds; they’re sturdy, rot-resistant, and easy to install. The timbers we used are 4×6s. You can use larger timbers, but they’re rarely required for strength.
Key Building Points:
- Spend time carefully leveling the first row of timbers; it will make the rest of the job easier and your beds will look better. Bury the first row a couple of inches for stability.
- Overlap the corners for strength. Secure the timbers to one another with long spikes or hex-head timber screws.
- If your walls are longer than 8 feet, install timbers across the middle to prevent the sides from bulging outward.
- If you like the idea of “square-foot gardening,” these beds provide the perfect venue.
Option #2: Post and Plank Beds
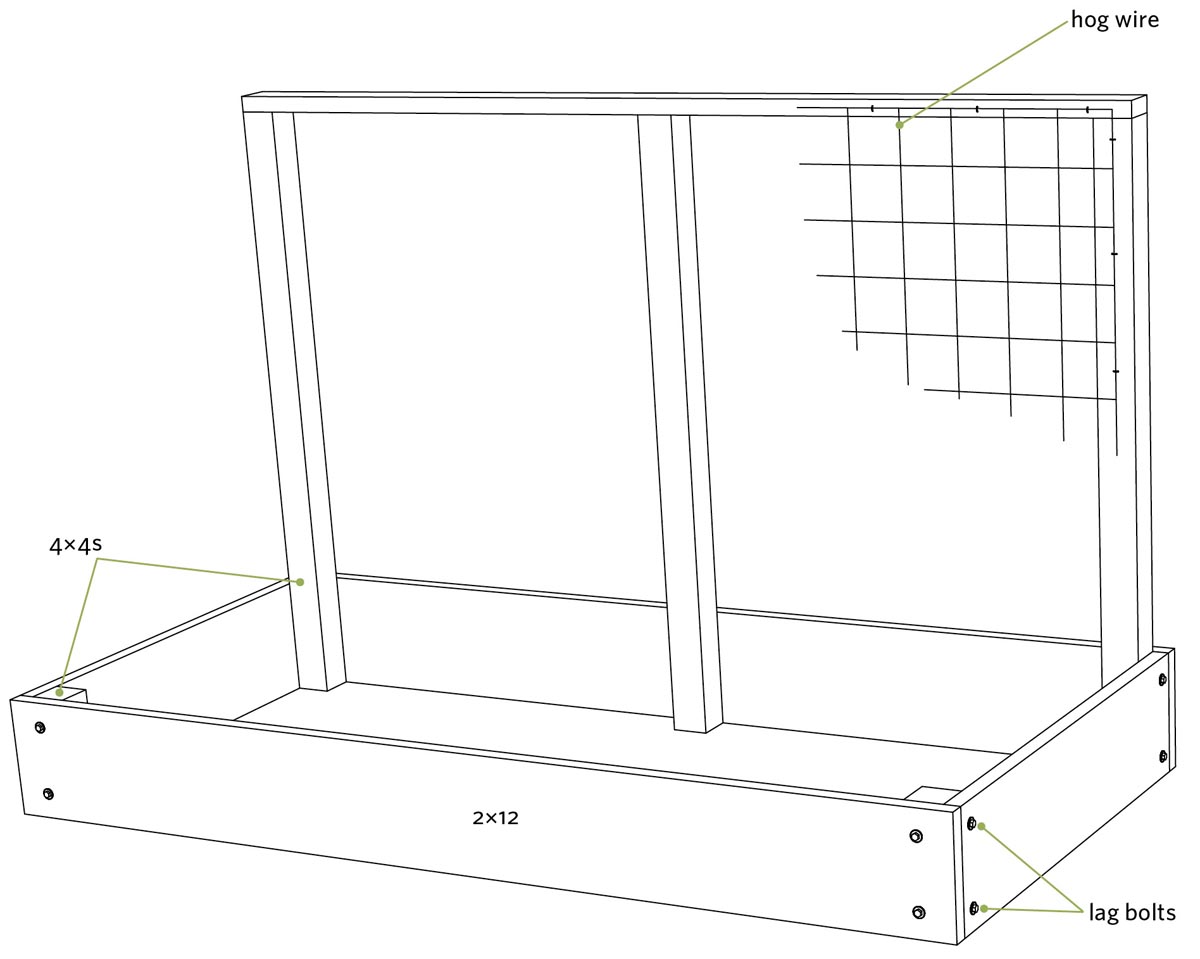
One of the easiest ways to establish a raised bed is to install 4×4 corner posts and connect them with 2×12s. You have total flexibility in the length, width, and height of your beds. By extending the back posts upward and installing wire or mesh, you can create a sturdy plant trellis.
Key Building Points:
- Bury the short posts at least 12" into the ground and the tall posts 3 feet or more for stability. After digging the holes, add a few inches of crushed rock to the bottom, install the posts, and then fill around them with more crushed rock, tamping as you go. The rock on the bottom will provide good drainage to minimize rot, and the rock on the sides will bite into the posts to minimize wiggle.
- Use 3⁄8" × 4" lag bolts (or 4" timber screws) to secure the 2×12s to the 4×4s. Install two bolts and washers, one high and one low, to secure each board to each 4×4.
- If your bed is more than 8 feet long, install one or two 2×12 crosspieces or add an intermediary 4×4 post to prevent the sides from bulging outward.
- To create taller beds, install taller 4×4 posts and secure a second row of 2×12s (or other width of lumber) on top of the first row.
Trick Out Your Planters
Your raised beds look great. Here are a few ways to make them look and perform greater still.
- Add a drip irrigation system (see page 57). A single run of supply hose down the center, along with a few sprinkler heads, is all you need to water most raised beds.
- Create a mini-hoop greenhouse to extend the growing season. Install U brackets along the outside edges of your bed; then bend 1⁄2" PVC pipe into an arch to fit into these brackets. (See Hoop Greenhouse, page 90, to get a general idea.) Cover the hoops with plastic, and you have an instant greenhouse. Remove the hoops and plastic when the temperature is warm enough.
- Plant by the square foot. Pound in a nail every 12", and then weave string between the nails to create a gridwork for planting (see Timber Beds illustration, page 69).
Option #3: Modular Block Beds
Modular retaining-wall blocks allow you to create beds of nearly any size, height, or shape. Most blocks come as systems that include a decorative cap block you can use for topping off the raised bed. As shown here, you can use treated 2×10s to divide your bed into “pie slices” for planting eight different varieties. Divide yours up as you see fit, or not at all.
Key Building Points:
- Create an outline of the bed with a garden hose. Then dig a shallow 12"- to 16"-wide trench and fill it with coarse sand or compactable base material. Level the material; then carefully level each block in the first row. If your base row is level, the other rows will go down fast.
- If you need blocks cut to size, you can get the job done with a hammer and chisel or a circular saw equipped with a diamond blade. Some landscape supply yards and rental stores have machines available for getting the job done faster.
- Once all your blocks are installed, use block adhesive to set the top caps if you wish to use them.
Raised-Bed Guidelines
Raised beds can be any size, shape, or height you want, but keep these dimensions in mind:
- Leave at least 3 feet between beds so you have room for walking, working, and navigating a wheelbarrow.
- Spread gravel or mulch in the space between your beds to keep weeds down and appearances up.
- Limit the width of your beds to 4 feet or less so you don’t have to reach farther than 2 feet from either side. Greater widths mean more difficult access.
Option #4: Plywood Beds
If you need a raised-bed planter small enough to fit on your back stoop or patio, build this one from treated plywood and treated 2×4s. You can eliminate the bottom plywood and use the same techniques to create larger on-the-ground planters, too.
Key Building Points:
- Build and sheathe the four walls while they’re lying flat on the ground; then stand them up and secure the corners to one another. You’ll save time and hassle.
- Nail 2×2 cleats along the bottoms of the walls; then drop in the plywood bottom. If your planter exceeds 3 feet in width or length, add an extra support 2×2 in the middle. Drill holes in the bottom for drainage; a layer of landscape fabric will prevent dirt from washing through the holes.
- Install a 2×6 cap piece to cover the edges of the plywood and frame the planter.
Option #5: Tiered Beds
Tiered beds are not only attractive but functional as well. They give plants with deep roots more depth and plants that spread out a little more elbow room.
Key Building Points:
- Build each upper tier so the ends lock into the lower tier as shown. In this example, the sides of the second tier are 2×10s, and the ends are 2×8s, allowing it to lock together with the one below. This also helps keep the dirt in place.
- For spans exceeding 8 feet, install cross bracing to prevent the sides from bowing out.
- Be creative: build your tiers at angles, as steps, or any other way you choose.
The Dirt on Treated Lumber
A decade ago, most exterior lumber was treated with chromated copper arsenate (CCA) or other heavy-duty chemicals. They did a great job of preventing wood from rotting, but there were safety concerns about the chemicals used.
Since around 2002 most lumber has been treated with a more environmentally friendly chemical called alkaline copper quarternary (ACQ). The jury’s still out on whether the wood will last as long, but studies have shown that ACQ is safer to handle than CCA. These studies also show some leaching may occur, but that the chemicals are mostly bound into the soil, and, if taken up by plants, are mostly taken up by the parts we don’t eat.
Still, you should use certain precautions:
- Wear gloves when handling treated wood.
- Wear a safety mask and goggles when cutting it.
- Don’t burn scraps, and don’t use sawdust or chips for compost or mulch.
- There are alternatives to treated lumber — most commonly cedar, redwood, and synthetic lumber — but be prepared to spend three times as much for them.
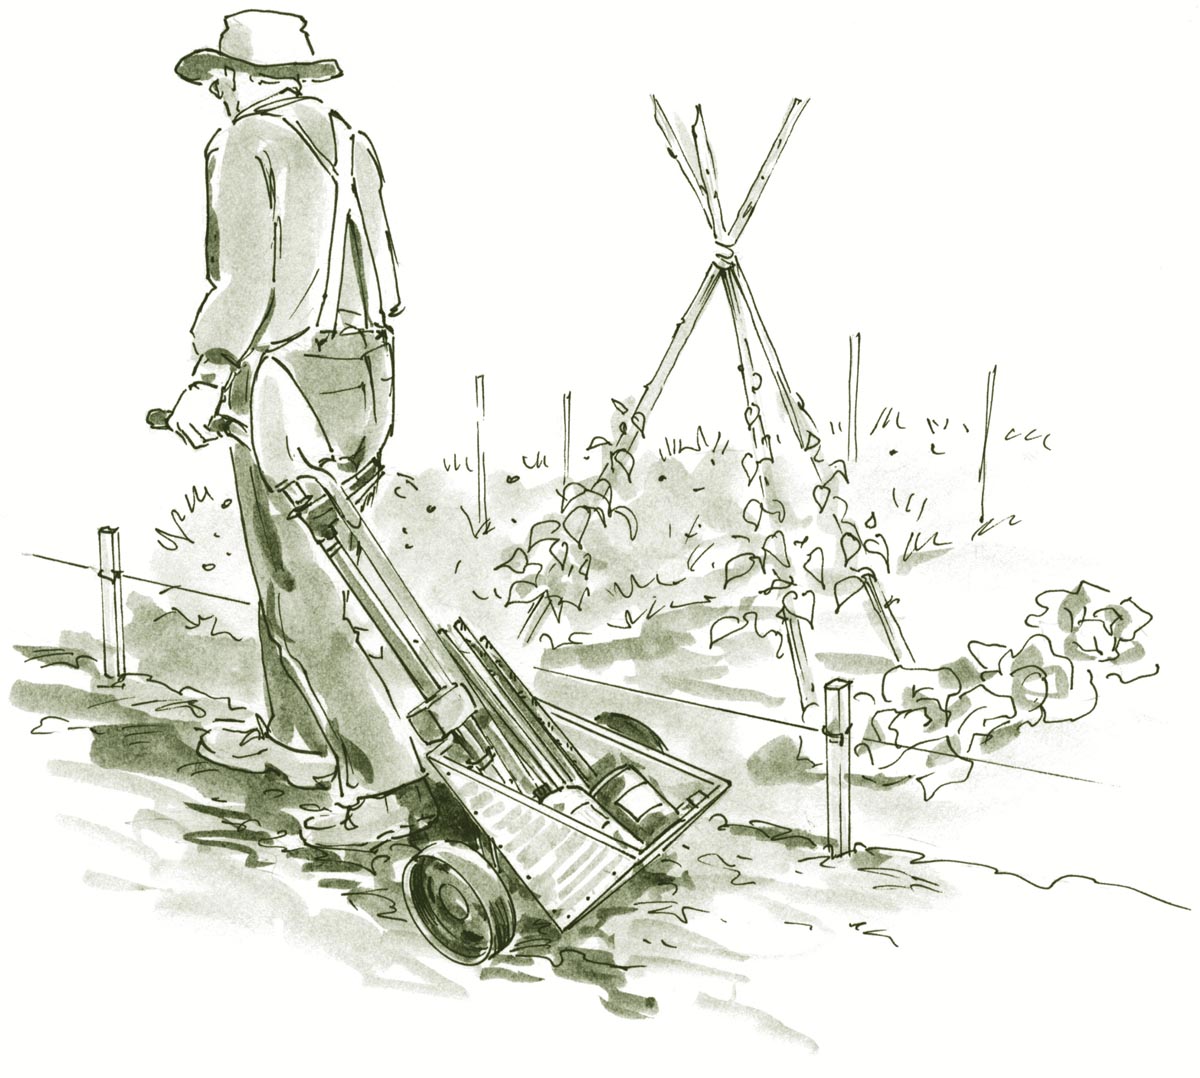
Five Simple Plant Supports
Easy-to-build props for keeping your veggies healthy
Getting seeds planted and seedlings growing is just part of the battle. For your tomatoes, beans, peas and other veggies to thrive, you need to offer them support, of the wood and wire kind.
Some plants, like peas and beans, are natural climbers and have tendrils and holdfasts to support the fruits of their labor. Others, like tomatoes, need to be tied to supports as they grow. Here are five projects for commonly grown plants.
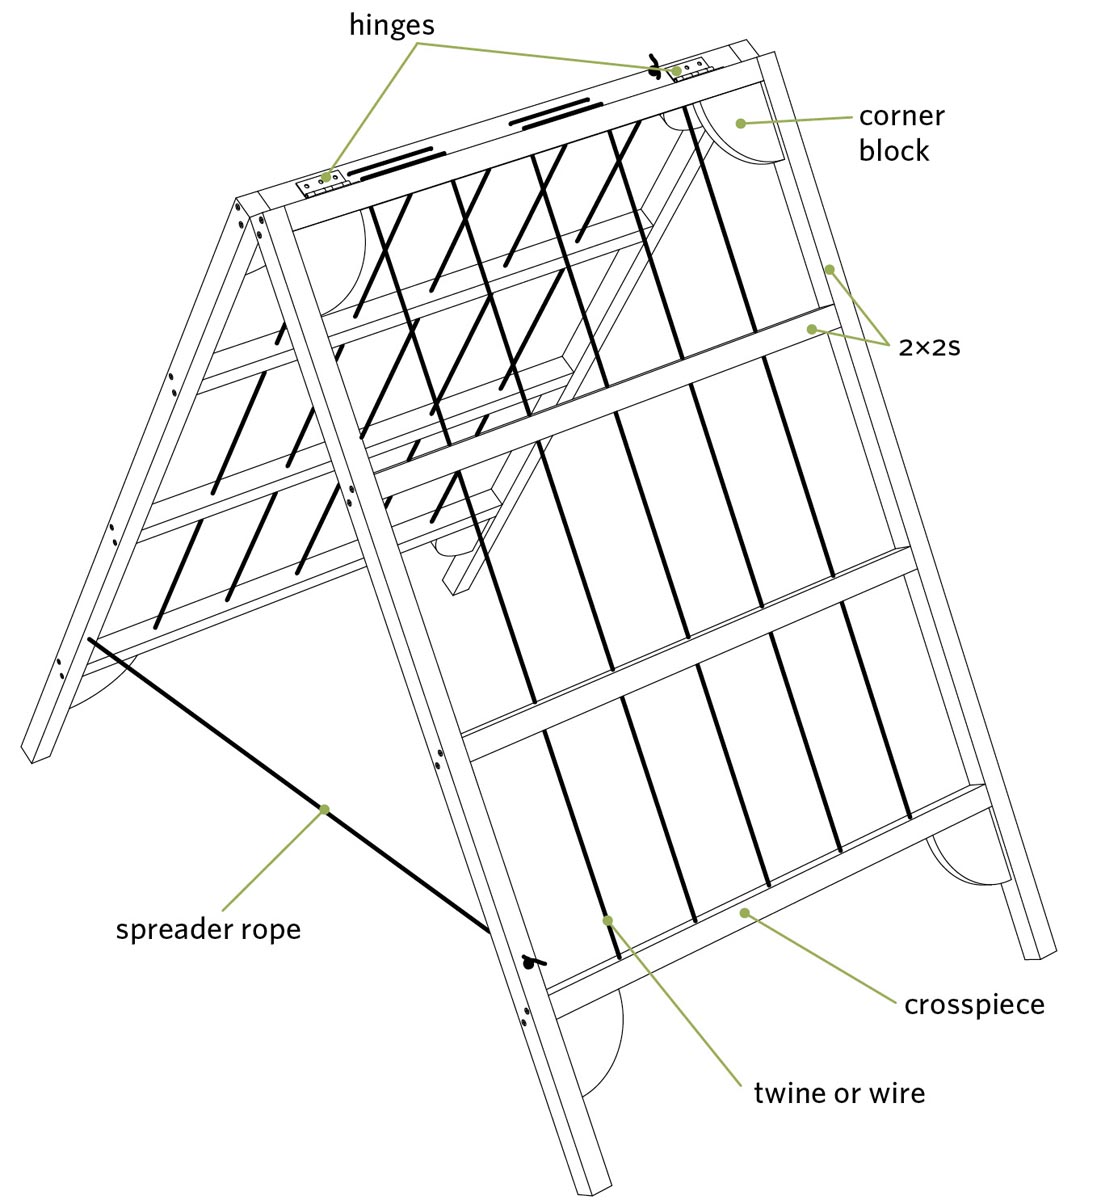
Option #1: Folding Trellis
This trellis is easy to build, easy to set up, and easy to store. All you need are 2×2s, twine or wire, a couple of hinges, and a couple of hours to build each one.
Key Building Points:
- Before assembling the trellis, lay all the horizontal crosspieces side by side, mark the positions of the string holes on one crosspiece, and then use a Speed Square to transfer the marks across all the crosspieces. Drill 1⁄4" holes at the centers of the marks.
- Predrill holes in the 2×2 uprights so they don’t split when you install the screws for the crosspieces. Use two screws in each end of each crosspiece to prevent them from twisting.
- Cut corner braces from scrap wood; then glue and screw them in place.
- Add hinges to hold the tops of the legs to each other. Use rope to prevent the bottoms of the legs from splaying out too far.
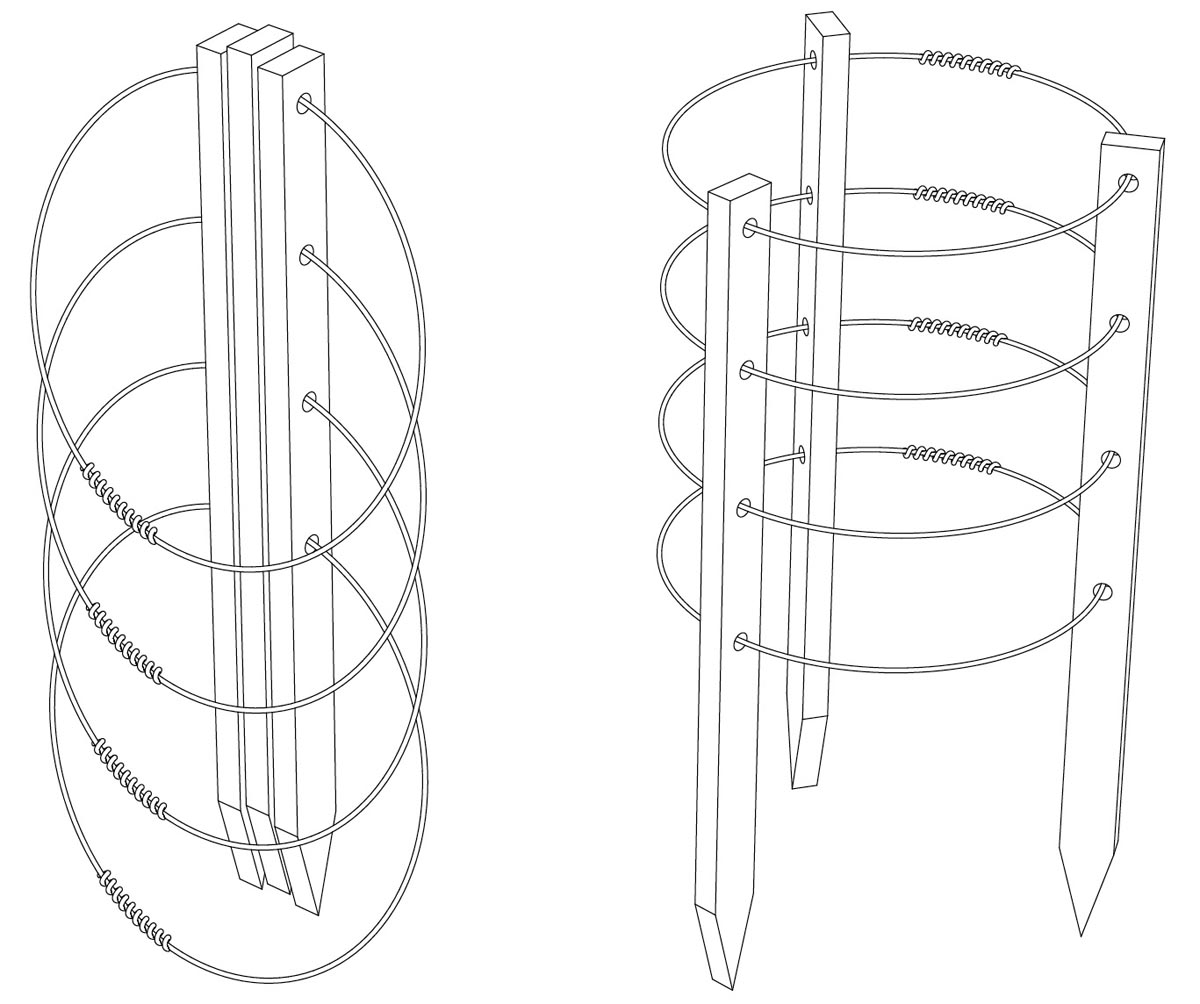
Option #3: Veggie Cages
These plant supports are sturdy in use and collapsible for winter storage. To erect them, position the stakes equally around the loops and drive them into the ground. To store them, pull the cage out, nestle the stakes side by side, and then lower the loops so they lie flat.
Key Building Points:
- Use pine lath, scrap lumber, or construction stakes.
- Stack the three stakes on top of one another and drill the holes for the wire loops through all of them at the same time for consistency.
- Preform the loops by wrapping 45" lengths of stiff wire around a 5-gallon bucket. Slide the wires through the stake holes, overlap the ends, and then twist them together with pliers to complete the loops.
Option #2: Tomato Stakes
This is probably the simplest project you’ll ever tackle, but a worthwhile one indeed. The side pegs provide good anchors for your tomato ties, and the top dowel and ball add a decorative touch, plus a place to stash extra wire and ties for securing the plant to the stakes.
Drill holes through the 2×2 stake, spacing them as shown. Secure the dowels in place with glue or by driving a small finish nail through the side of the stake into the dowel. Use a handsaw or power saw to create the point on the end of the stake.
Drill holes into the top of the stake and decorative ball, then use a dowel to secure the ball to the stake.
Drive the stakes into the ground at the same time you plant the tomatoes to avoid inflicting root damage later on.
Take Note: Use a curtain rod finial end for the top ball.
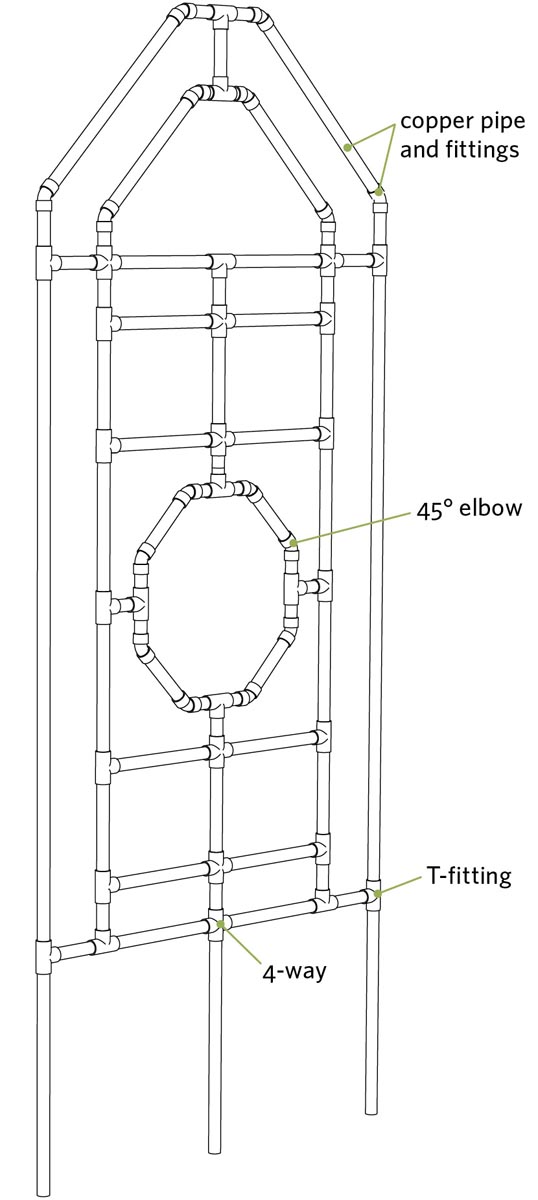
Option #4: Copper Trellis
Plant supports don’t need to be boring. Or made of wood. This trellis, crafted from copper plumbing fittings and pipe, is a great use for those odds-and-ends plumbing parts lying around.
Key Building Points:
- Cut and dry-fit the pieces together before permanently securing them to one another.
- You can use propane and solder to secure the joints, especially if you need to practice your plumbing skills. But you can also secure the joints with epoxy or metal adhesive.
- Don’t limit yourself to copper pipe: you can use iron, PVC, and other types of pipe, too. You can also build the outer frame from wood and incorporate pipe for the inner supports.
Option #5: Horizontal Gridwork
If you’re a plant-’em-then-forget-to-stake-’em person, consider this horizontal plant support. Once you’ve guided the plants — tomatoes are a prime candidate — through the openings in the wire grid, they’re free to stretch out and grow. The grid will keep your vegetables off the ground and less likely to spoil. You can also stake the plants vertically.
Key Building Points:
- Cut the wire mesh to size, and then build the box; that way you’ll have solid support for the mesh and staples around the entire perimeter.
- Use U-shaped fence staples for holding the wire to the box.
- Install cross supports every couple of feet to help prevent the wire mesh from sagging. Install short stakes in each corner to secure the box to the ground.
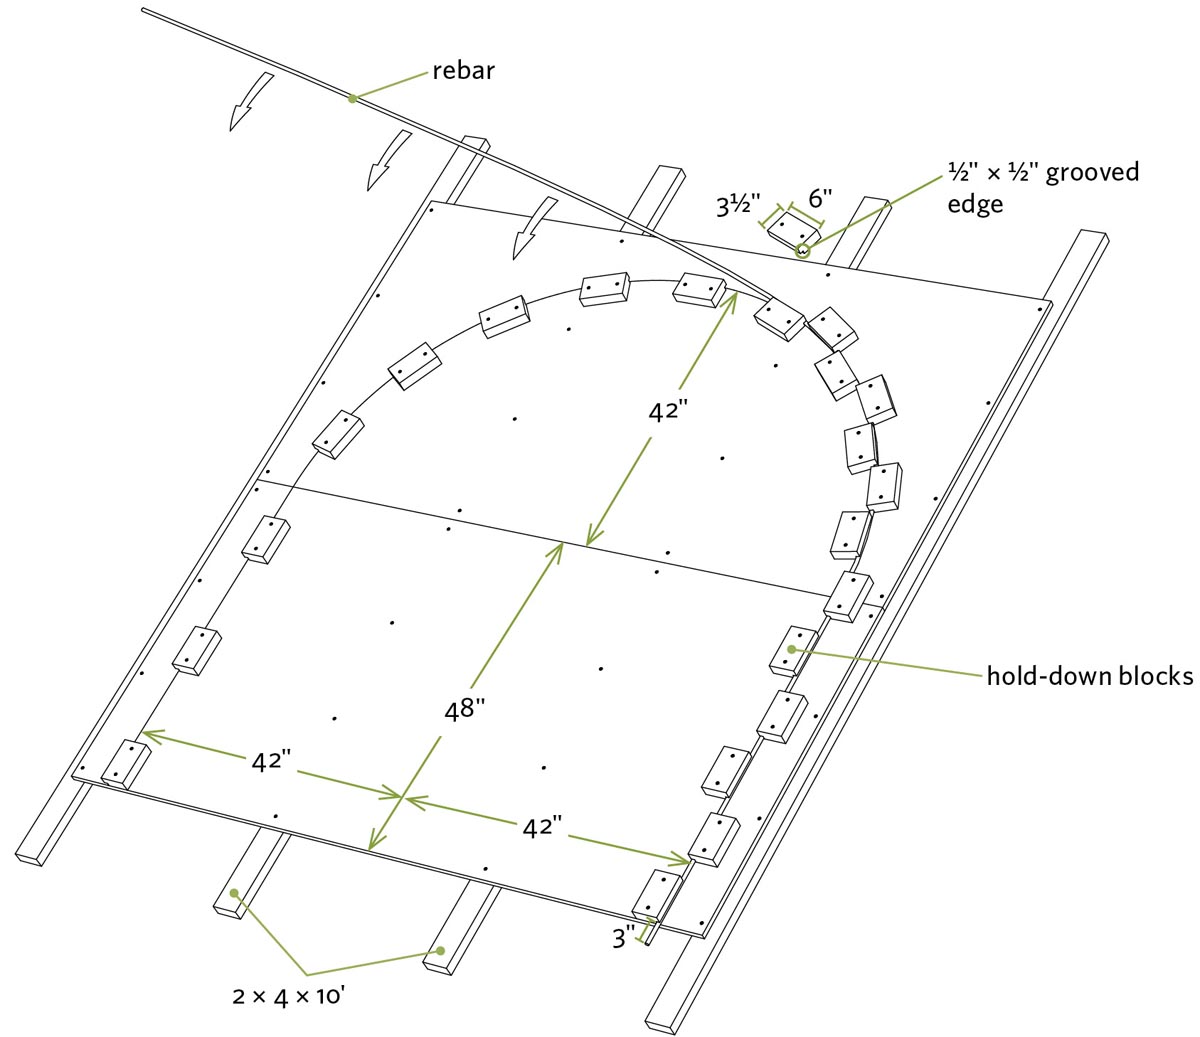
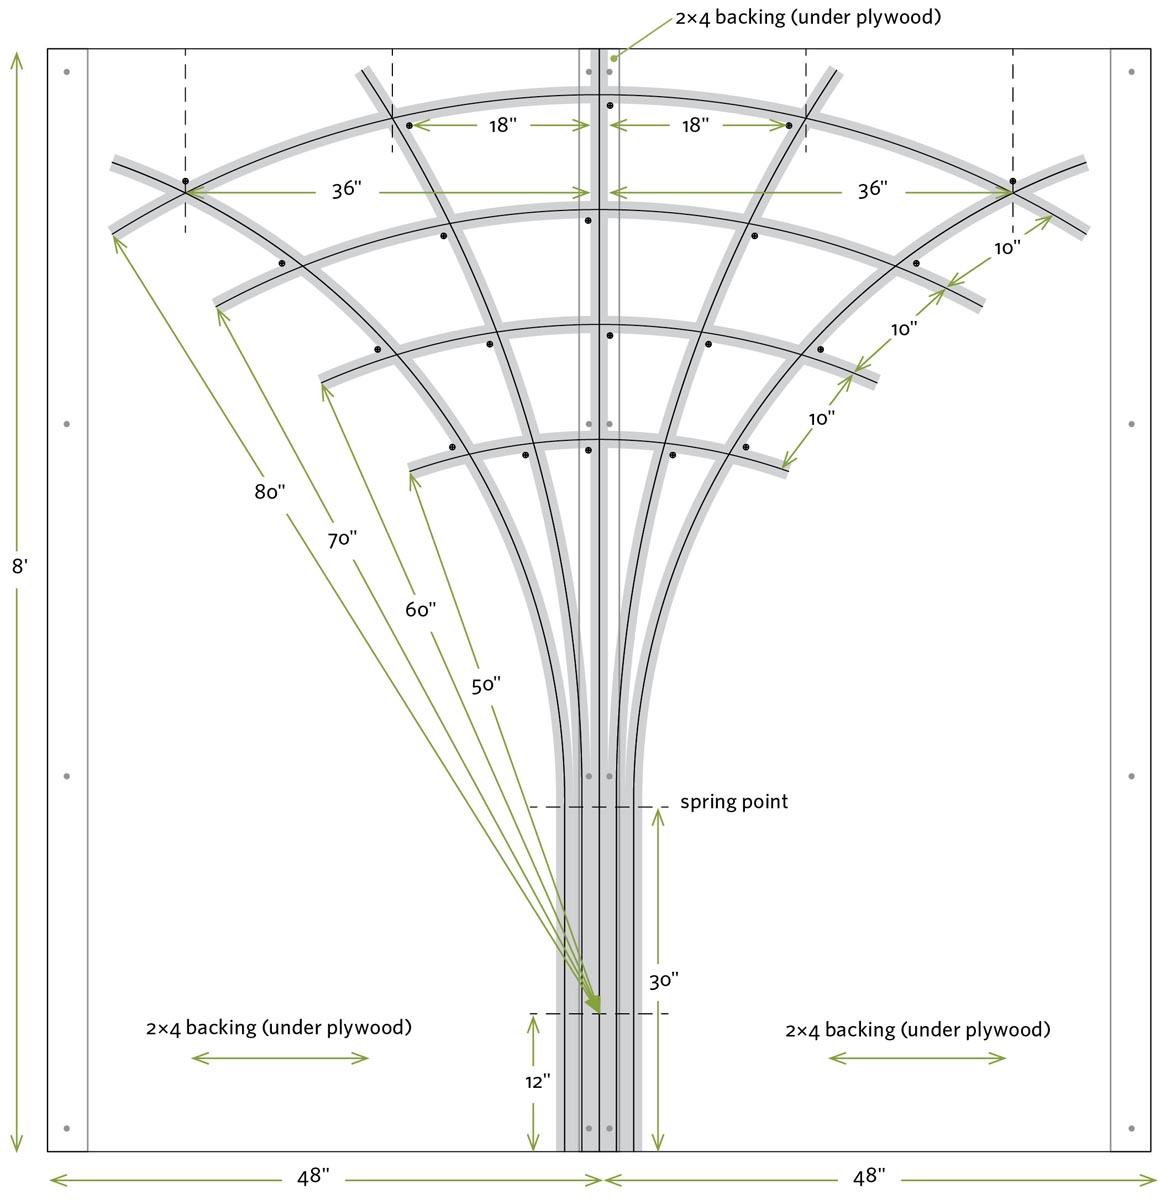
Bent Rebar Pergola
Use rugged masonry materials to build this shady retreat
A pergola can be wood or metal, large or small, decorative or functional. It can be used for supporting vines or creating a shady retreat. And it can be expensive! But not this one. This pergola uses inexpensive rebar and wire ladder mesh to create an attractive centerpiece for your garden or backyard.
One of the most time-consuming parts of this project is building the bending jig, or form, but once that’s done the rest of the project moves forward quickly.
If you need an arbor or arched entryway for your garden, build and install just one set of loops.
Materials
- Two 4 × 8-foot sheets 3⁄4" plywood (for bending form)
- Four 10-foot 2×4s (for bending form)
- Two 8-foot 2×4s (for hold-down blocks)
- Scrap 2×8 lumber or five 8" concrete blocks (temporary spacers)
- Four 20-foot pieces 1⁄2" (#4) rebar
- Rebar tie wire (3.5-pound roll)
- Four pieces 8" × 10-foot ladder mesh (see step 7)
- One wood or metal finial (as desired)
- Eight 60-pound bags concrete (optional; see Take Note, after step 8)
- 15⁄8" drywall screws (for bending form)
- 2" drywall screws (for bending form)
Instructions
- 1. Build the 8 × 8-foot bending jig platform by positioning two sheets of 3⁄4" plywood over four evenly spaced 10-foot 2×4s and securing them with drywall screws.
Take Note: If you have a large, open wood floor or deck, you can turn that into a bending jig, too. Just be aware that you’ll wind up with lots of screw holes in it.
- 2. Using a nail as a centerpoint and a tape measure as a large compass, draw the 42" radius arch on the platform as shown. Use a drywall square or straight board to draw in the two 48"-long legs.
- 3. Create the grooved hold-down blocks by cutting a 1⁄2" × 1⁄2" groove along one edge of the 8-foot 2×4s, using a table saw, circular saw, or router with a rabbeting bit. Cut the 2×4s into 6" pieces.
- 4. Use 2" drywall screws to secure hold-down blocks every 12" along the inside edge of the layout lines for the hoop. Position one end of the rebar on the form, letting the bar extend about 3" beyond the bottom of the platform. Add more hold-down blocks along the outside of the straight portion of layout line to pinch the rebar and hold it in place.
- 5. Put on gloves, grab the free end of the rebar, and start bending it around the curved part of the form. If the entire form moves, secure it to the ground or have a helper hold it in place. As you work, have a helper screw hold-down blocks to the outer edge of the hoop layout marks to hold the rebar in place.
- 6. When you approach the bottom of the arch on the opposite side, overbend the rebar a bit since it will tend to spring back; then, reposition the rebar against the inside blocks, and continue to have a helper add hold-down blocks until you’ve created the entire hoop. Use a hacksaw to cut off the end of the rebar so both legs are of equal length. Remove the outer hold-down blocks and then the rebar hoop. Repeat this three more times!
- 7. Place one hoop on the ground, position 2×8 scraps or 8" concrete blocks on top of it, and then place another hoop on top. Position a piece of ladder mesh near one end, and use rebar tie wire to secure the mesh to the hoops. Since it’s hard to continuously wrap the wire around the bottom hoop, secure it with a few short pieces of wire. Then, once the top arch is fully secured, flip the arch over and finish wiring the other side. Build both hoop assemblies.
Take Note: Ladder mesh is normally used for reinforcing the mortar line between rows of concrete block. It’s available through lumberyards, home centers, and masonry suppliers but may need to be special-ordered in some areas.
- 8. Install your pergola by crisscrossing the tops of the hoop assemblies, wiring the tops together, and then wiggling the ends of the legs into the dirt. Add a decorative fence post finial or other doodad (use your imagination!) to the top for a finishing touch.
Take Note: For a more permanent installation, set the legs in concrete. To do this, dig four holes to accommodate the legs. Wire the tops of the arches together, and then position the arches so the legs descend 6" to 8" into the holes. You’ll need to have a helper or two to help you position the pergola and to slide scraps of rebar through the ladder mesh to hold the legs at the desired height. Check to make sure everything is plumb and level; then mix and pour the concrete into the holes.
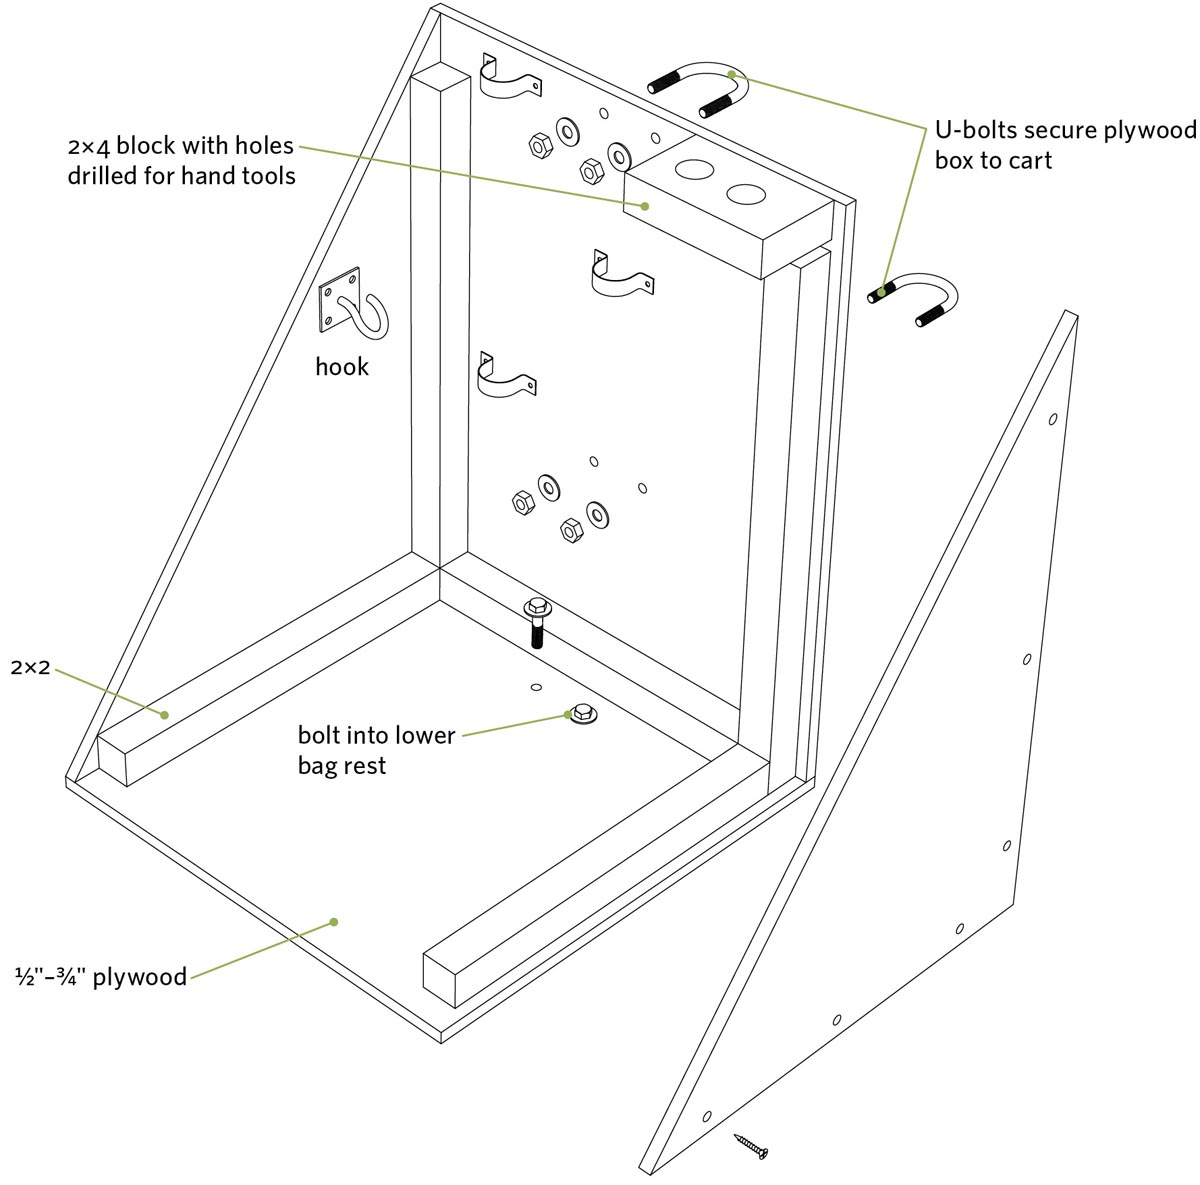
Golf Cart Garden Dolly
An above-par use for a flea market find
If you’ve given up golf and taken up gardening, here’s the perfect use for that old pushcart. Even if you don’t have a cart sitting around, you can often buy one at a garage sale or flea market for a few bucks.
The bottom golf bag rest gives you the perfect place for perching a homemade plywood tray, the big wheels allow you to navigate rough or muddy terrain, and the overall design makes the dolly easy to steer and push. You can customize yours to haul garden tools, pots, hoses, mulches, chicken feed, or anything else you want.
Every golf cart is a little different, so before you pick up your tools, scratch your head a little. Figure out how much space you have between the wheels and how you’re going to attach the tray to the cart. Once you have the basics figured out, go at it.
Materials (quantities as needed)
- Scrap 1⁄2" or 3⁄4" plywood
- One 4- to 6-foot 2×2
- One 12" to 18" 2×4
- 15⁄8" or 2" screws
- Waterproof glue
- Pipe straps with screws
- U-bolts (with washers and nuts)
- L-brackets (optional)
- Hooks and other hardware, as desired
Instructions
- 1. Build the open-front box or tray out of 1⁄2" or 3⁄4" plywood. Reinforce the box by gluing and screwing 2×2s into the corners or using metal L-brackets.
- 2. Secure the plywood box to the cart in at least three places for stability. Use U-bolts, pipe straps, or screws.
- 3. Accessorize your dolly. Add pairs of pipe clamps to hold long-handled tools and hooks for hauling hoses, ropes, and wire. Drill holes through 2×4 scraps and secure them to the box to create hand tool holders. Remove the upper curved bag rest, or leave it in place to help support tall objects you’re hauling.
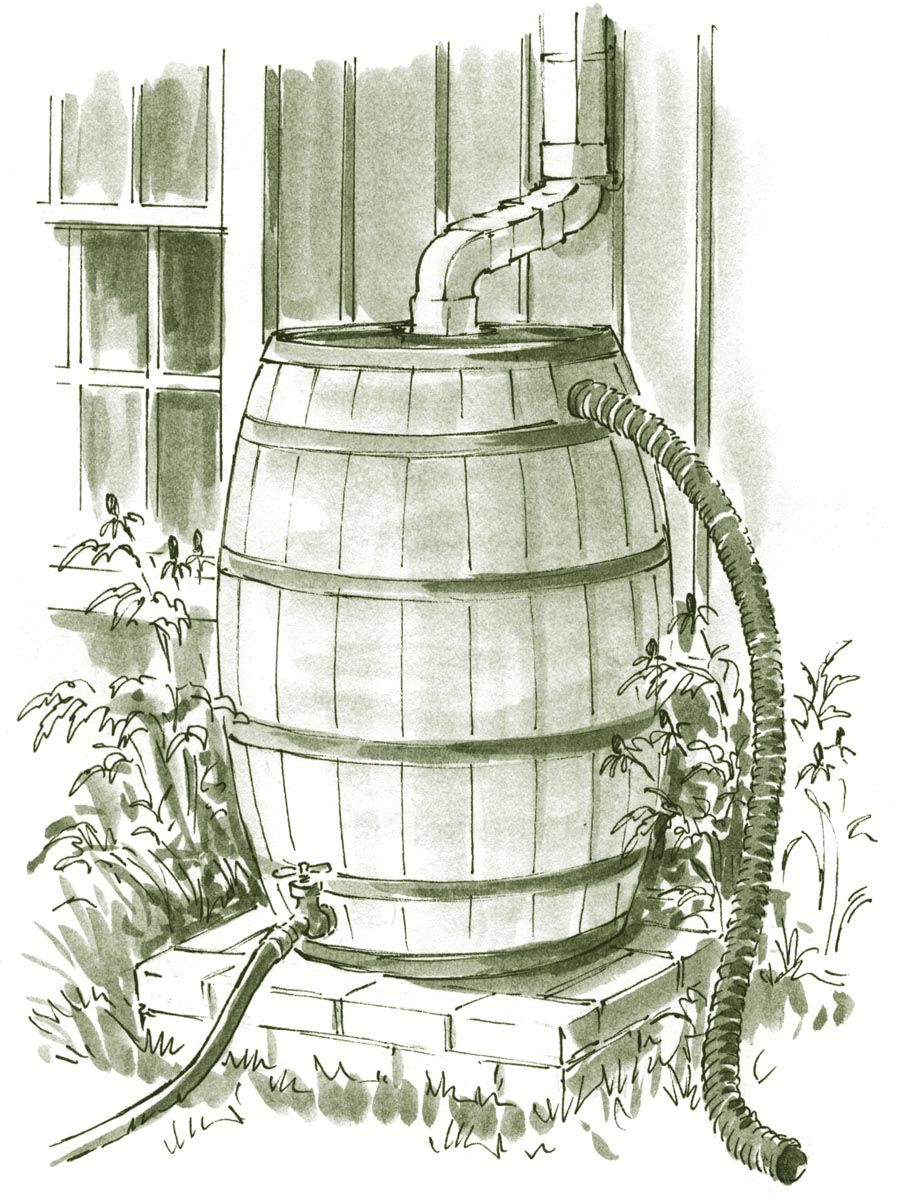
Rain Barrel Basics
Catch some falling water and save it for a rainless day
During an average rainfall, the average roof sheds more than 150 gallons of water per hour. Why let all that precious moisture go to waste? Rain barrels conserve not only water but dollars to boot.
Prior to breaking out the tools, picture an imaginary rain barrel in place and ask yourself some questions. Can you position it high enough so the water will flow naturally when you turn on the spigot? Can you conveniently access the spigot? Does it look okay? Is it a convenient distance from the garden? Where will you divert the overflow? Another question is: Does local code allow this? Some areas have codes that restrict the use of rain barrels. Once you’re satisfied with your answers, forge ahead.
Building the Rain Barrel
Before starting the project, purchase faucet, downspout, and overflow fittings. You can buy them through hardware stores, home centers, and online retailers (see Resources). Some companies offer complete kits with all the needed parts for the three openings. Obtain a 30- to 80-gallon plastic barrel (see Barrel Considerations, page 84); cut the openings and install the fittings. There are many ways of tackling each assembly, so improvise as needed.
Faucet Assembly
For materials, you’ll need a faucet with a threaded male nipple, two rubber gaskets, and a nut or bushing to fit the threaded nipple.
Use a hole saw to drill an opening near the bottom of the barrel that matches the diameter of the faucet nipple (threaded end). Slide a gasket over the faucet nipple, insert the nipple through the opening, slide a second gasket over the nipple inside the barrel, and secure the faucet to the barrel with a nut or bushing. You can heat the area with a hair dryer to soften the plastic so the fittings seat more tightly, and use silicone caulk to fill any gaps.
Downspout Inlet Assembly
You’ll need a pair of downspout elbows or a flex connector to direct rainwater from the drainpipe into the barrel. A screen or screened basket to help keep debris and mosquitoes out of your tank is optional.
Determine the location of your downspout inlet. Trace around a short section of downspout (or the screen basket), and then use a jigsaw to cut the opening in the top of the barrel. Cut the downspout to the appropriate length, then use the elbows or flexible fitting to direct the water into the barrel.
Overflow Assembly
You’ll need a fitting with threads on one end and a barbed, threaded, or gluable fitting or connector on the other. The outside connector should be able to accommodate an overflow pipe that’s at least 11⁄2" in diameter. You’ll also need a nut for securing the fitting on the inside of the barrel and a hose clamp or other device to secure the overflow pipe to the fitting.
Drill a hole on the side of the barrel near the top, insert the threaded end of the fitting, apply a bead of silicone caulk, and secure it with the nut on the inside of the barrel. Connect the overflow pipe to the outside end of the fitting, making sure the pipe discharges to a well-drained area.
When you’re done, and all caulk has dried, fill the barrel with water and check the fittings for leaks. You can stop minor leaks with a bead of caulk.
Take Note: You can buy a device that will divert water into your rain barrel when it’s less than full and through your standard downspout when the barrel is full (see Resources). Such devices require a different drainpipe inlet assembly than the one shown.
Take Note You can link two or more barrels together to expand capacity. This can be done with fittings similar to those used for the overflow assembly.
Barrel Considerations
You can purchase specialized rain barrels starting at about $100, but if you’re adventurous or thrifty you can track down yours for much less:
- Almost any container will work, though the more opaque, the less risk of algae growth. Plastic or wood barrels that hold 30 gallons and up are good candidates. You may be able to obtain a “food-safe” plastic barrel from a bulk food distributor for a reasonable price.
- Some communities offer rain barrel subsidies or barrels at reduced prices to qualified homeowners; search online or make a few calls to learn about programs in your area.
- Make sure the barrel didn’t contain any pesticides or chemicals that could be harmful to people, plants, pets, or wildlife. If you’re not sure what it contained, don’t use it.
- You can use a heavy-duty plastic garbage can for your barrel. Make certain the lid fits securely and the sides are thick enough to support the weight of several hundred pounds of water.
- To minimize the chance of the barrel being used as a breeding ground for mosquitoes, add a tablespoon of vegetable oil from time to time to coat the top surface of the water.
How Safe Is the Water?
Most experts agree that you shouldn’t directly drink water collected in a rain barrel. Beyond that there’s little consensus as to which roofing materials, and what’s on them, affect water purity, or to what extent. Below are some roofing materials and situations that could (I repeat, could) affect water purity and therefore the purity of the garden fruits and vegetables watered by the supply. If these possibilities concern you, use your water only for lawns and ornamental plants:
- Roofs composed of wood shingles or shakes that have been treated with chromated copper arsenate (CCA) or a fire retardant may leach harmful chemicals.
- Roofs with copper sheathing, flashing, or gutters, or with zinc antimoss strips, may leach harmful chemicals.
- Roofs that are frequented by birds, raccoons, and other animals may harbor droppings.
Some people prefer to let the first few heavy spring rainfalls flush debris and droppings from the roof before hooking up their rain barrels to collect water for the summer.
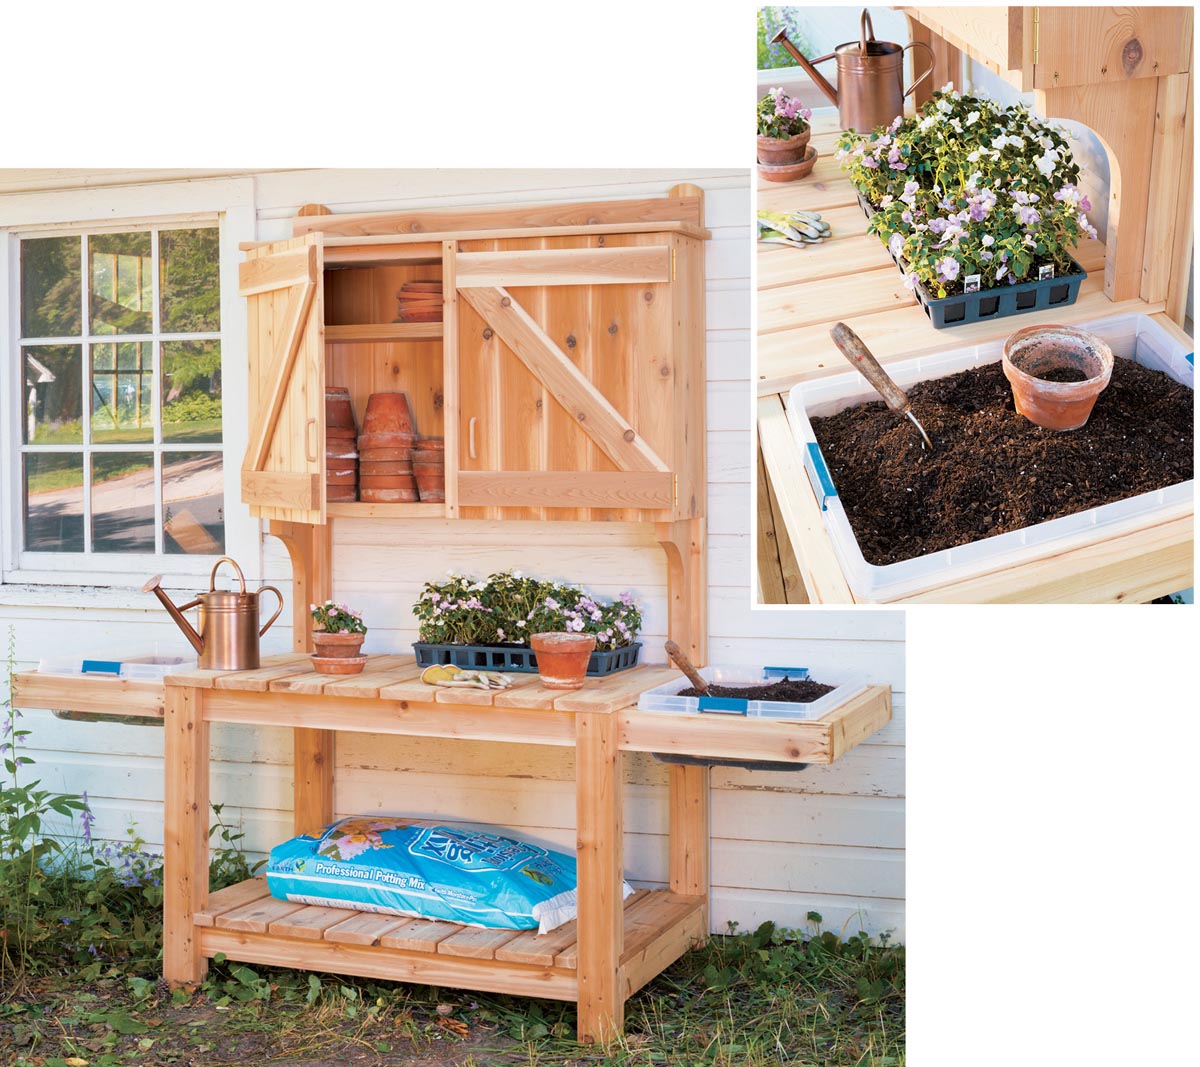
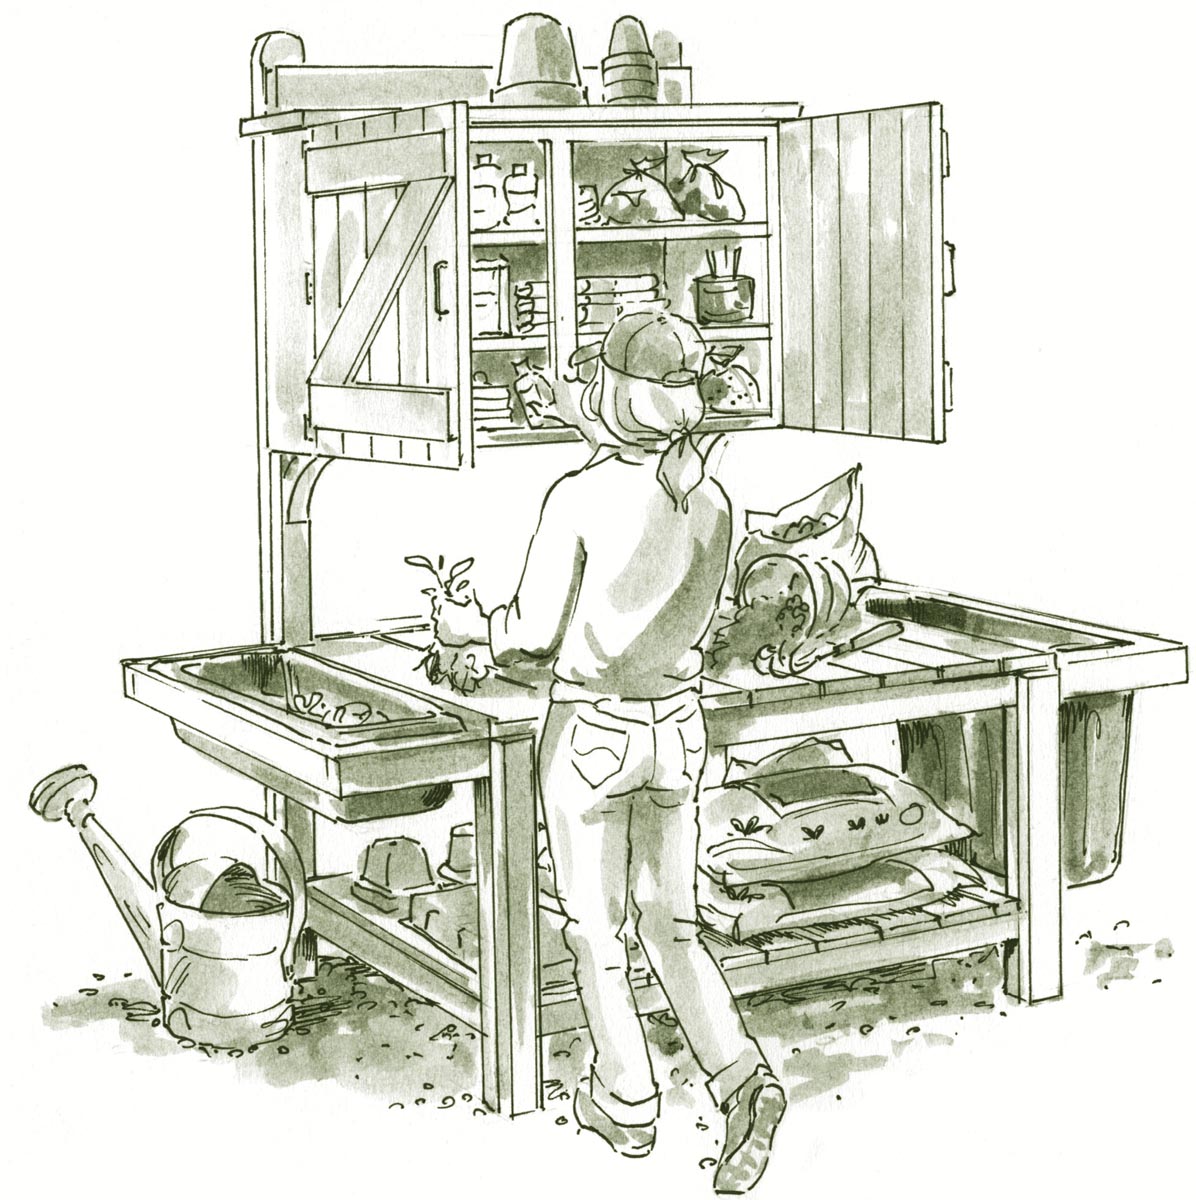
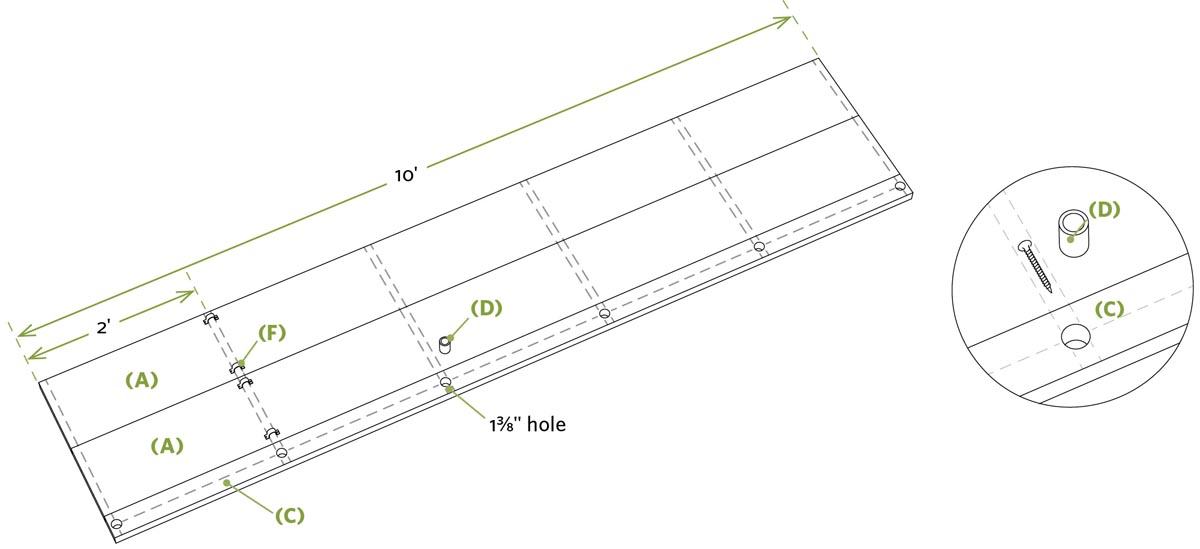
Potting Bench
A workbench for plant lovers
Where do you repot your plants and divide your hostas? In the laundry room sink? On your knees in the garage? On your picnic table? Well, here’s a permanent substitute for those improvisational places. This handy bench allows you to work at a convenient height and to stash all your tools and supplies in one central place. The tubs or bins on the sides give you a place to stash your peat, soil, compost, waste, and other materials.
If you’re building this for outside use, build it from cedar (like I did) or use treated pine or other rot-resistant lumber (see Selecting the Best Exterior Wood, page 16). For inside use, any lumber is fair game.
Before building your bench, purchase the storage tubs or baskets you’ll be using for the cantilevered wings; then tweak the dimensions of the bench parts accordingly. The project is broken into separate sections for the bench and cabinet construction; if you need just one of the components, you can build only that part of the project.
Bench Materials
- Ten 8-foot cedar 2×4s
- Four 10-foot cedar decking boards
- Construction adhesive
- 10d galvanized nails
- 31⁄2" exterior screws
- 8d galvanized nails
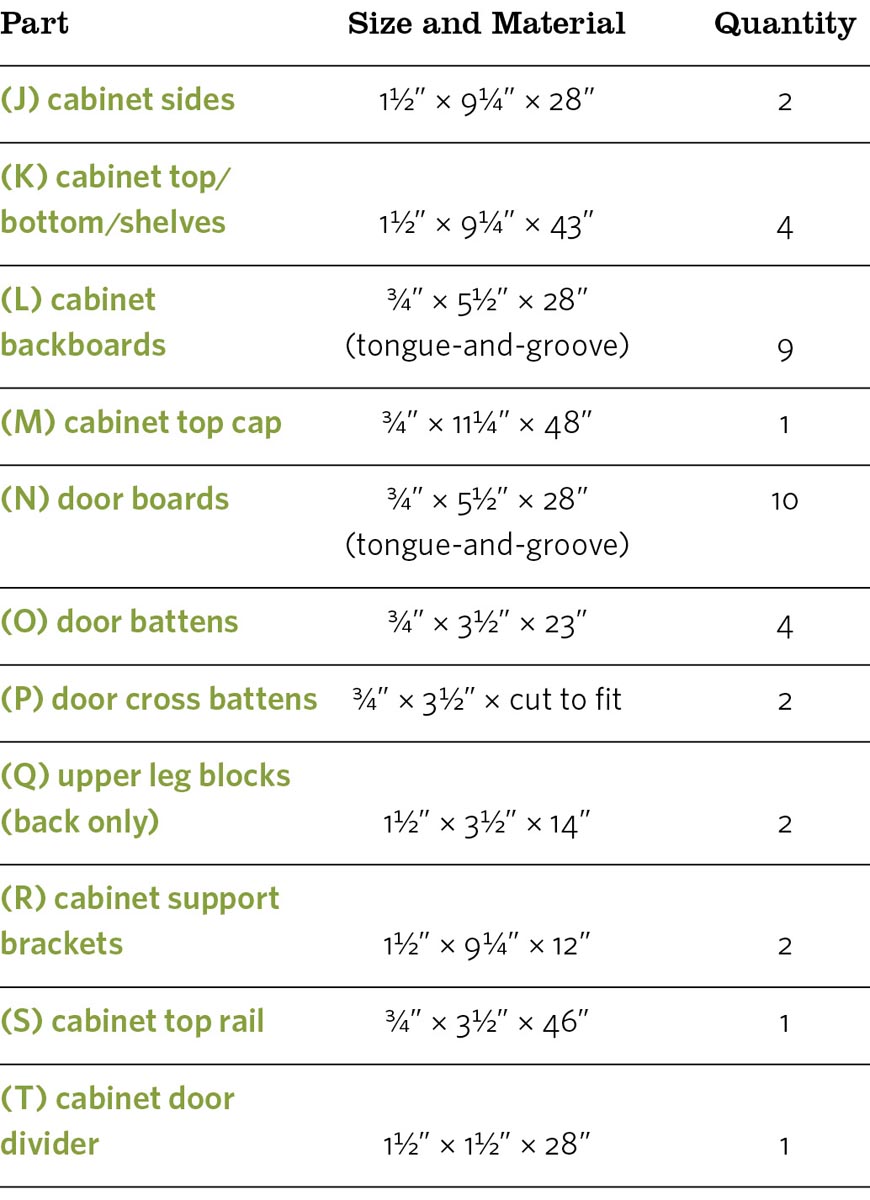
Bench Parts and Cutting List
Building the Bench
- 1. Cut the 2×4 legs (A, B) and leg blocks (C, D) to length; then secure them to one another using construction adhesive and 10d galvanized nails. Make the space between the blocks wide enough to tightly sandwich the platform and slats that fit between. A too-big gap will result in a wobbly bench; a too-small gap will result in you having to persuade the parts together with a hammer or having to cut the blocks shorter while in place.
- 2. Build the frames (E, F, G) for the top and bottom platforms, fastening the corner joints with 31⁄2" exterior screws. Check to make sure the openings on the ends of the top platform will accommodate your tubs. (You bought the tubs first, right?) If the openings are too large, use 1×4s or 2×4s to fill in the extra space.
- 3. Check to make sure the platform frames are square; then install the 1×6 slats (H) using 8d galvanized nails. To prevent splitting, predrill the nail holes.
- 4. Lay the two back legs on a solid, flat surface, and fit the bottom platform into the notches you created between the blocks. Position the top platform on top of the middle leg blocks (D). Secure the platforms to the back legs with 3" exterior screws. Use construction adhesive if you want to increase rigidity. Install the front legs and secure them in place with screws.
Take Note: If all you need is a bench, stop here. Add open shelves to the back uprights and support them with brackets. If you want a storage cabinet, read on!
Stay Mud-Free
To prevent the soil or other potting materials in the plastic bins from turning muddy, save the plastic tops and snap them in place when you’re done for the day. You can also drill a few holes in the bottom of each tub to provide drainage.
Cabinet Materials
All lumber materials are cedar. Cedar board dimensions aren’t as uniform as those of pine and treated pine; adjust your measurements accordingly. Most deck board material (H) is a true 1" thick.
- Two 10-foot cedar 2×10s
- Five 10-foot cedar tongue-and-groove 1×6 boards
- One 4-foot cedar 1×12
- Three 8-foot cedar 1×4s
- One 4-foot cedar 2×4
- One 3-foot cedar 2×2
- 4" exterior screws
- 11⁄4" exterior screws
- Four 3" no-mortise hinges
- One door hasp or other latch, with screws
Cabinet Parts and Cutting List
Building the Cabinet
- 1. Build the cabinet box by securing the bottom, top, and shelves (K) to the cabinet sides (J) using 4" exterior screws. You can alter the spacing of the shelves according to your needs.
- 2. Check the cabinet box to make sure it’s square by measuring the diagonals; then install the tongue-and-groove backboards (L). You’ll need to rip the last board lengthwise to fit.
- 3. Secure the cabinet top cap (M) in place. Position it so the back edge is flush with the back of the tongue-and-groove boards and the ends overhang the sides equally.
- 4. Install the 2×2 door divider (T). Measure from the edge of the cabinet to the divider and make your doors about 1⁄4" smaller in width. Fit five of the 1×6 tongue-and-groove boards (N) together to create a door panel wider than you need. Mark out the width of the actual door on this panel; then separate the boards and rip one or both end boards to width so when the boards are reassembled the door will be the correct width. Fit together the boards again and lay them on top of your cabinet opening to make sure they’re the right dimensions.
- 5. Place 1×4 door battens (O) near the tops and bottoms of the doors, check to make sure everything fits right, and then secure the battens to the 1×6 door boards (N) with 11⁄4" exterior screws. Lay the cross battens (P) in place, mark them, cut them to the correct angle and length, and then secure them in place.
- 6. With the cabinet still on its back and the doors still in place, secure the doors to the cabinet using 3" hinges. Install pulls for opening the doors and a hasp for keeping them shut.
Assembling the Bench and Cabinet
- 1. With the bench on its back, position the cabinet on the back legs (A) 14" above the top platform. Secure the cabinet to the legs by driving screws through the cabinet back and sides.
- 2. Cut the upper leg blocks (Q) and secure them to the back legs (A) to support the bottom of the cabinet.
- 3. Create and install your own cabinet support brackets (R) or use store-bought metal shelf brackets. Install the top rail (S) to add rigidity to the cabinet and prevent objects placed on top of the cabinet from falling off the back.
Play It Safe
To secure your potting bench and prevent it from tipping due to unequal loading or climbing kids and cats, anchor it to a wall, railing, tree, or fence with screws. You can also secure the legs to a concrete slab with L-brackets and concrete fasteners.
Hoop Greenhouse
Extend your growing season with this easy-to-build greenhouse
If you yearn for a longer growing season, you don’t have to pack up and head south: you can simply head to your nearest home center and pick up materials to build this hoop greenhouse. It’s designed to be assembled in a weekend, and it can easily be made larger by adding more hoops. It’s also easy to adapt this basic design to enclose the timber raised-bed garden (page 69).
Materials
- Two 10-foot pressure-treated 2×12s
- Two 8-foot pressure-treated 2×12s
- Three 10-foot pine 2×4s
- Ten to twelve 8-foot 2×3s (pressure-treated if available)
- One 8-foot pressure-treated 1×2
- Twelve 3⁄4" × 10-foot thin-wall PVC pipes
- Six 3⁄4" PVC couplings
- Two 3⁄4" × 10" metal reinforcing straps
- Twenty-four 3⁄4" conduit clamps
- One 20 × 25-foot roll 6-mil polyethylene sheeting
- Thirty polyethylene U-clips
- 11⁄4" exterior screws
- 15⁄8" exterior screws
- 3" exterior screws
- 5" timber screws
Building the Greenhouse Base
- 1. Lay the two base sides (A) and the ridge board (C) side by side with the ends even, as shown in Side and ridge board layout, page 92. Make marks 1" in from each end, and in addition mark every 24" along the edge of one board. Use a framing or drywall square to extend the lines across all the boards. Make a second set of marks 1" away from each of the first lines, and draw a second set of lines (except for on the ends).
- 2. To drill 13⁄8" holes in the center of the ridge board (C) for holding the PVC couplings, start by drawing crosshairs through the center of each pair of layout marks to establish the center of the hole. Drill the holes, keeping your bit or hole saw as vertical as possible. Insert the couplings and drill a 1⁄8" hole through the top of the ridge board into the center of each coupling. Use a 15⁄8" drywall screw to secure the coupling to the ridge. Bend and nail the metal reinforcing straps (E) over and around the ends to prevent the ends of the ridge board from splitting.
Take Note: Buy your couplings before you drill the holes; diameters can vary, and you want a tight fit.
- 3. Install the hoop end holders (F; U-shaped conduit clamps) on the base sides (A) for holding the hoop ends. For each hoop end, install two clamps, each about 1" from the top or bottom edge of the 2×12 sides and centered on each layout line, and loosely drive a 11⁄4" screw through each hole; you’ll tighten them after the hoops are installed.
- 4. Cut the end boards (B) for the greenhouse base and use 3" screws to secure them between the side boards (A) as shown in Greenhouse framework (facing page). Position the frame where your hoop greenhouse will be located.
Take Note: You’ll make the doorway cutouts on one or both ends (B) after the framework of the house is up.
- 5. Measure diagonally from one corner of the frame to the opposing corner; when the measurements are equal, your base is square. Use a level to check the frame for level on all four sides. If it’s not level, use spray paint to mark the perimeter of the frame, set the frame aside, and then use a shovel to level the area. Reposition the frame, check again for level, and repeat until your frame is square and level. Pound in stakes (H) at the corners and at least two other places along each side; then secure the base frame to the stakes with 3" exterior screws.
Completing the Greenhouse Structure
- 1. Lay the ridge board (C) in a large flat area. Insert and twist the ends of each 10-foot PVC pipe for the hoops (G) into the coupling on each side of the ridge. Make sure the pipes are inserted all the way, until they hit the little lip inside the coupling. Give the ends of the pipe a shot of spray lubricant if you’re having trouble sliding them in. Drill a 1⁄8" hole through the edge of the coupling and secure each pipe using 11⁄4" screws. When you’re done, the assembly will look like a 10 × 20-foot rib cage.
- 2. Set a couple of stepladders in the center of the greenhouse frame, and set the ridge beam on the ladders. Starting at one end of the house, have two helpers grab opposite ends of the PVC pipes, bend them, and insert the ends through the hoop end holders (F). (You left the clamps loose, right?) Bend and install the pipes on the other end of the house; then install the intermediate ribs. Tighten the screws in the hoop end holders. The main structure is up.
- 3. You need to take the “wigglies” out of your structure before framing the end walls. Measure from the ground to the bottom of the ridge board near each end, then cut and secure temporary 2×4s of that length near each end to keep the ridge from sagging. Install angle braces from these temporary 2×4s to stakes pounded into the ground to hold the ends of the ridge board plumb with the end walls below. Keep these temporary braces in place until the end walls are framed and permanently braced (see Step 7).
- 4. Determine the width of the door. You can have a door on one or both ends of the house, and they can be anywhere from 36" to 44" wide. Cut the 8"-deep notch for each doorway in the base end (B) with a circular saw or jigsaw.
- 5. Frame each door opening by standing up a 2×3 (I) at one side of the planned opening; plumb it, and then use a pencil to mark the angle where the hoop crosses it (see Door frame and house covering details, page 94). Cut the angle. Secure the bottom of this wall stud to the edge of the door opening with 5" screws. Drill a pair of holes where the wall stud (I) meets the hoop, and secure it with two 3" screws. Install a horizontal 2×3 to create the top of the door. Install the angled studs (P).
- 6. Frame the solid wall, starting with 2×3 studs (I) spaced 12" on each side of the ridge board (C). Fasten each stud to the ridge and base end with 3" screws. Install one more stud spaced 24" to each side of these studs; you have to mark and cut the top ends of these like you did with the door studs.
- 7. To permanently brace the solid wall studs, screw 2" × 4" × 32" blocks (N) to the base end (B) and the end studs (I) as shown in the illustration. Use at least four 3" screws per stud (two in the base end and two in each stud). On the “door” side, run 36"-long angle braces (O), with 45 degree cuts on each end, from the angled studs to the side base pieces (A) as shown.
Installing the Plastic Cover
- 1. Cover the ends with polyethylene (poly) sheeting (J) as shown. Begin by cutting a 9 × 9-foot piece of poly for each end. Use a staple gun to secure the poly along the bottom edge of the base end (B) on the outside of the board. Have a helper stretch the poly upward as you secure it to the vertical 2×3s with staples. Initially hold it in place with just a few staples; then once it’s stretched tight, install additional staples. Wrap the poly around the end hoops, and hold it temporarily in place with duct tape. Trim any excess poly with a sharp utility knife.
- 2. Cut out the poly in the door opening, leaving 2" to 3" of extra material so you can wrap it around the door framing to secure it better. Create the door flap by cutting a piece of poly a few inches larger than the door opening in each direction and stapling it to the outside top of the door frame. On the bottom, wrap the poly around a 1x2 door flap weight (L) and staple it.
Take Note: You can concoct a more elaborate swinging door from 1×3s or 2×3s and poly for convenience.
- 3. To cover the hoops, start by cutting a piece of poly to size at 12 × 20 feet; roll it up to create a 12-foot-long tube. Center the roll along one side, and use staples to secure the leading edge to the bottom of the side board (A); the poly will bulge a little where it crosses over each hoop. Using a helper, unroll the poly up and over the ribs. Staple it at the ridge, and then run it down to the base side board on the other side of the house. Install a few more staples to hold it in place. Wrap the plastic around the hoop ends, and secure it and the end-wall poly to the hoops with the U-clips (K). You can use gigantic binder clips to hold the poly in place while installing it or wherever extra grip is needed.
Take Note: I used clips from Lee Valley (see Resources). Enterprising souls can make their own clips by cutting stiff polyethylene tubing into short lengths, then slitting it. However, I found it way easier, and almost the same price, to use the store-bought clips.
- 3. Once the plastic is pulled taut and the ends are secure, install blocking (M) between the hoops on each base piece. Make sure the ends of your blocks don’t puncture the plastic.
Lessons from the Homestead
A King-Size Hoop House for Year-Round Produce
By Roger Nelson
We loved the idea of growing and eating fresh produce year-round. So with the help of friends, over two weekends, we erected a 24' × 36' “high tunnel” hoop house kit from FarmTek (see Resources). The project was made financially feasible through a USDA matching grant available at the time for high tunnel greenhouses. It’s worth your time to look into similar programs and options in your area. The size is actually much smaller than the 48' × 96' size used by other local growers, but that seemed dauntingly large to us. We didn’t want to lose pasture for our cows or have such a huge visual impact on our little farm.
Our hoop house has two layers of plastic and a small pump — that costs only pennies a day to run — to blow air between the layers to increase insulation. Growing in the unheated hoop house is like being in an area two growing zones warmer. During our first full season, to play it safe, we decided to plant cool season crops like chard, radishes, spinach, beets, carrots, kale, scallions, tatsoi, broccoli raab, and pansies. In November, we covered the plants with Agribon row covers, which added another 4 degrees protection. Being in Minnesota, we expected the veggies to be done by Thanksgiving, but during the mild winter were able to reap the bounty year-round.
We love working inside the hoop house during the winter — a warm, sunny spot with an earthy smell and all that green. The size has turned out to be just right. We grew plenty of fresh produce for ourselves, plus for a few farm customers. We have enjoyed great beginner’s luck so far — no weeds, no freezing, no insects. However, now that we’ve begun to open up the sides for ventilation as warm weather approaches, the chickens have discovered the yummy greens growing inside. Our latest project? Erecting garden fencing along the walls of the hoop house to keep the critters out.
Roger Nelson and his wife, Susan Waughtal, revived an existing farmstead in southern Minnesota into Squash Blossom Farm, where they live today. They grow most of their food and host regular Sunday get-togethers at which they serve up pizza, cheese, fresh produce, and live country music. They also host an annual Blessing of the Cows. (See Resources for more information.)
Rustic Trellis
A natural home for climbing vines
This simple bent-branch trellis gives climbing plants of every kind a place to stretch out and grow: morning glories, pole beans, ivy, you name it. Best of all, if you have access to branches and a couple of sheets of plywood lying around for the form, you can build it for the cost of the fasteners, about $5.
You can mount the finished trellis to a wall or fence, or install it as a freestanding structure. Here you’ll learn how to build a fan trellis, but you can use the same techniques, tools, and materials to build a trellis of any size and shape; hearts, diamonds, and ovals are other popular motifs. The most suitable branches are those ranging from 1" to 2" in diameter. (See Locating the Right Branches: Which, When, Where, and How, page 99, for more specific information.)
You can build your trellis free-form, but if you want symmetry, or two or more trellises of a similar shape, create the form shown using two pieces of 3/4" × 4 × 8-foot plywood secured to each other. A wood floor or deck (one you don’t mind driving screws into) will also work.
Materials
- Two 4 × 8-foot sheets 3⁄4" plywood (for form)
- Three 8-foot 2×4s or scrap lumber (for form)
- Branches
- 15⁄8" screws
- 3" exterior screws
Instructions
- 1. Build the form by laying two sheets of plywood side by side and joining them with 15⁄8" screws and 2×4s or scrap lumber positioned on the back sides of the panels. Draw a centerline on your form (or use the joint between pieces of plywood) as shown, and then install a screw 12" up from the bottom. Using that screw as a centerpoint and your tape measure as a compass, draw the four arched horizontal arms of the trellis with 50", 60", 70", and 80" radii.
- 2. Make a mark 30" up from the bottom of the centerline to serve as the spring point. Make marks 18" and 36" on each side of the centerline where they intersect the uppermost arched arms, as shown in Trellis form layout. Bend a thin strip of wood between these points and the spring point (a helper will make this easier), adjusting the tension until you get the right curve. Then trace along an edge to create the pattern for the uprights.
- 3. Install 3" screws to serve as pivot points where the arms and uprights intersect, as shown below. Note that the pivot screws on the ends of the arms are installed above the marks, and the rest below; this helps create leverage points when bending the branches. If your branches are exceptionally stiff, you may need to screw down blocks instead of just using screws.
- 4. Lay five branches of approximately the same diameter side by side along the centerline of the form. Make sure they’re extra long; you’ll trim them later. Use 3" exterior screws (or longer or shorter ones, depending on your branch thickness) to secure three or four short crosspieces, spaced about 10" apart, across the lower portion of these uprights. If the wood splits, predrill the holes before driving the screws.
Take Note: If you’re going to install your trellis as a freestanding structure, rather than securing it to a wall or fence, use longer branches to create a longer lower leg so you can bury the base at least 2 to 3 feet in the ground.
- 5. Install temporary hold-down screws at the bottom of the upright assembly to prevent this end from shifting as you bend the branches. Bend the two outer uprights to the approximate shape of your pattern, and use additional pivot point screws or blocks to hold them temporarily in place. If the branches are stiff, you may need a helper for this step. Repeat this procedure to curve and secure the other uprights. If the branches pop up and off the form, temporarily secure them to the form with screws.
- 6. Bend and secure the upper curved arm to the uprights, using exterior screws. Start at one end, bending the branch and installing the screws as you go. Install the other three curved arms the same way.
- 7. Once the trellis is assembled, use a lopping shears to trim the ends of the uprights and arms. For freestanding trellises or those that need to support a lot of weight, flip the trellis over and add another set of curved arms and short crosspieces to the other side to create a beefier structure.
- 8. Install the trellis by securing it to the side of your house, outbuilding, or fence, using exterior screws. You may want to add 2×4 spacer blocks between the trellis and the mounting surface to create a gap for vines to twine and moisture to escape. If you’re installing the trellis as a freestanding garden structure, dig a hole least 25" to 30" deep, position the trellis, and then backfill with small, sharp-edged rock, tamping the rock periodically as you fill the hole. The rock will not only stabilize and support the trellis but also promote drainage so your structure will last longer.
Locating the Right Branches: Which, When, Where, and How
Any bendable branch is fair game for the trellis project, but there are a few things to keep in mind when harvesting materials:
Which: Sandbar and weeping willow, birch, cedar, dogwood, and fruit trees are all good prospects. Remember, branches with curves, knobs, and crooks aren’t rejects; they’re materials with character!
When: Harvest the wood in winter or early spring if possible. The branches will be more pliable, and the bark will be tougher. Since the branches are leafless, you’ll be better able to spot good branches, and you won’t have to strip off lots of leaves.
Where: If you don’t have suitable trees on your property, try contacting tree trimmers, nurseries, or orchards (which often have piles of pruned limbs and branches); power companies (which thin out trees growing near power lines); or local farms and housing developments where land is being cleared.
How: You can cut most branches with a lopping shears. Use a coarse-tooth pruning saw or a bow saw for larger branches.
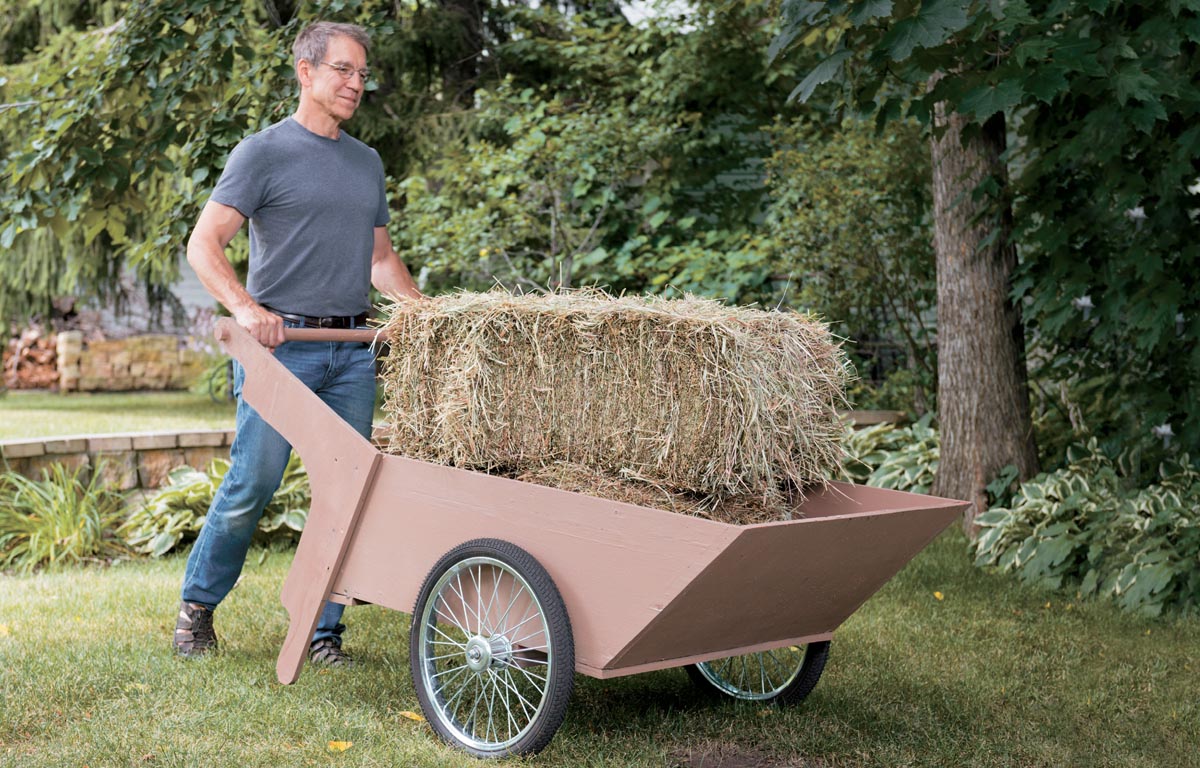
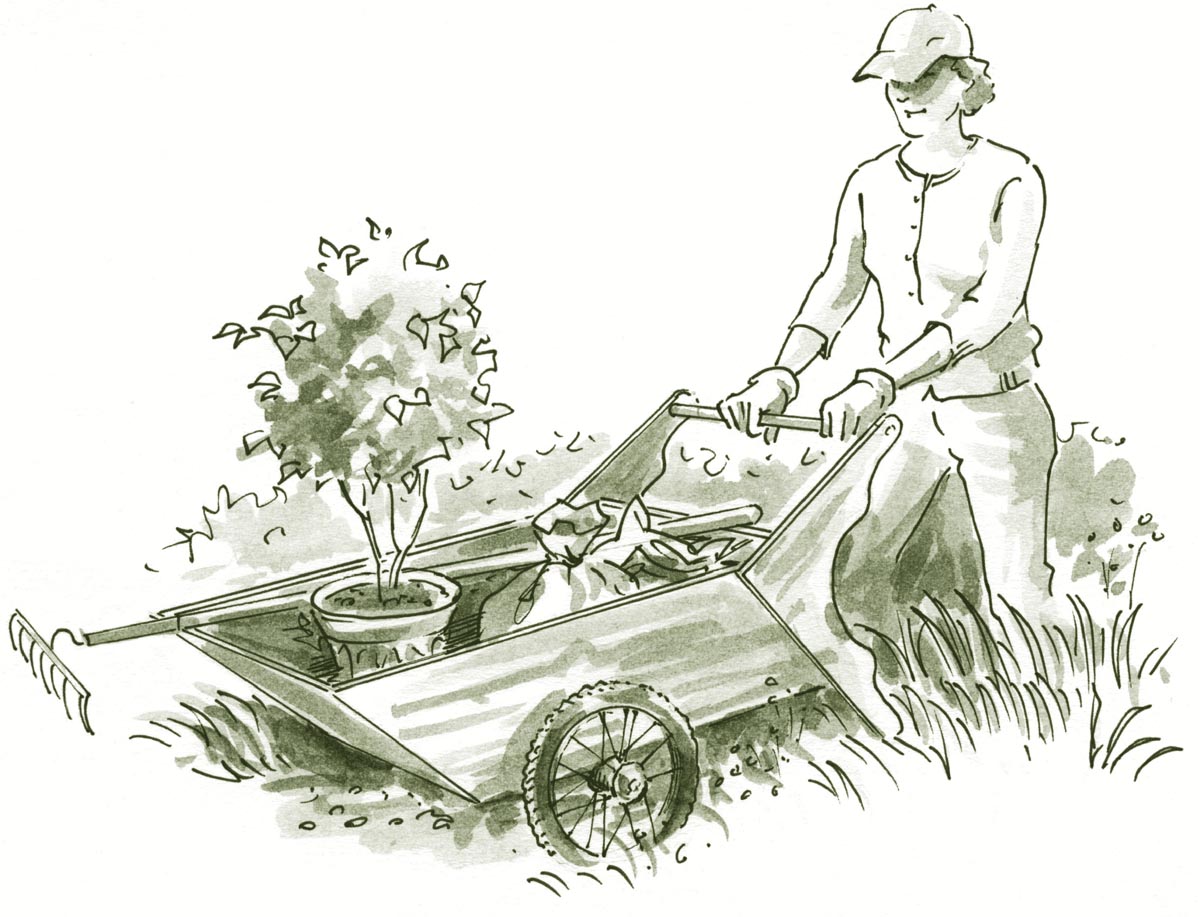

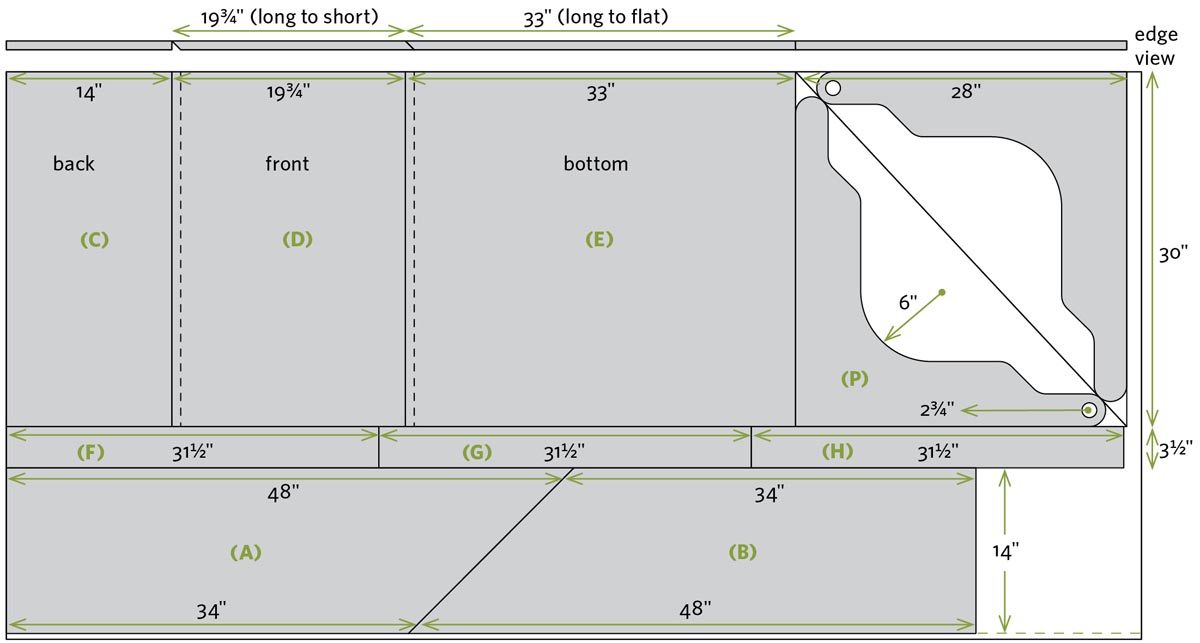


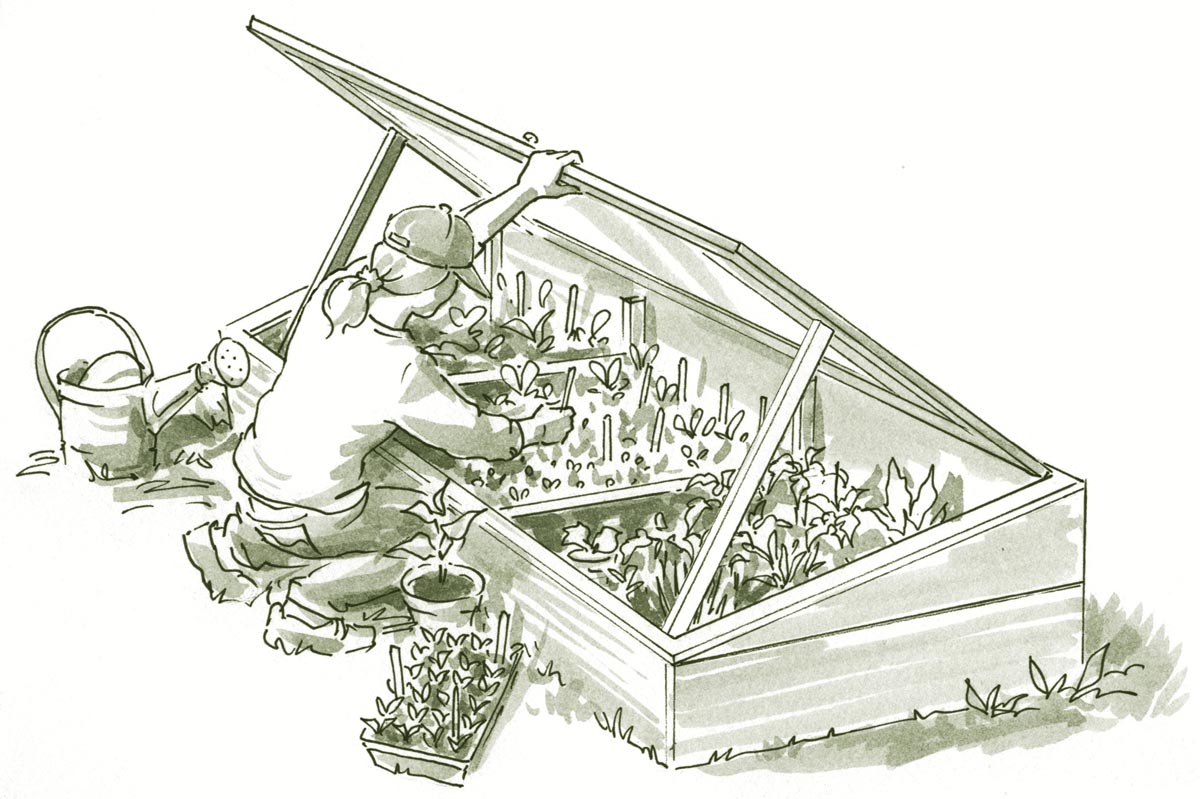


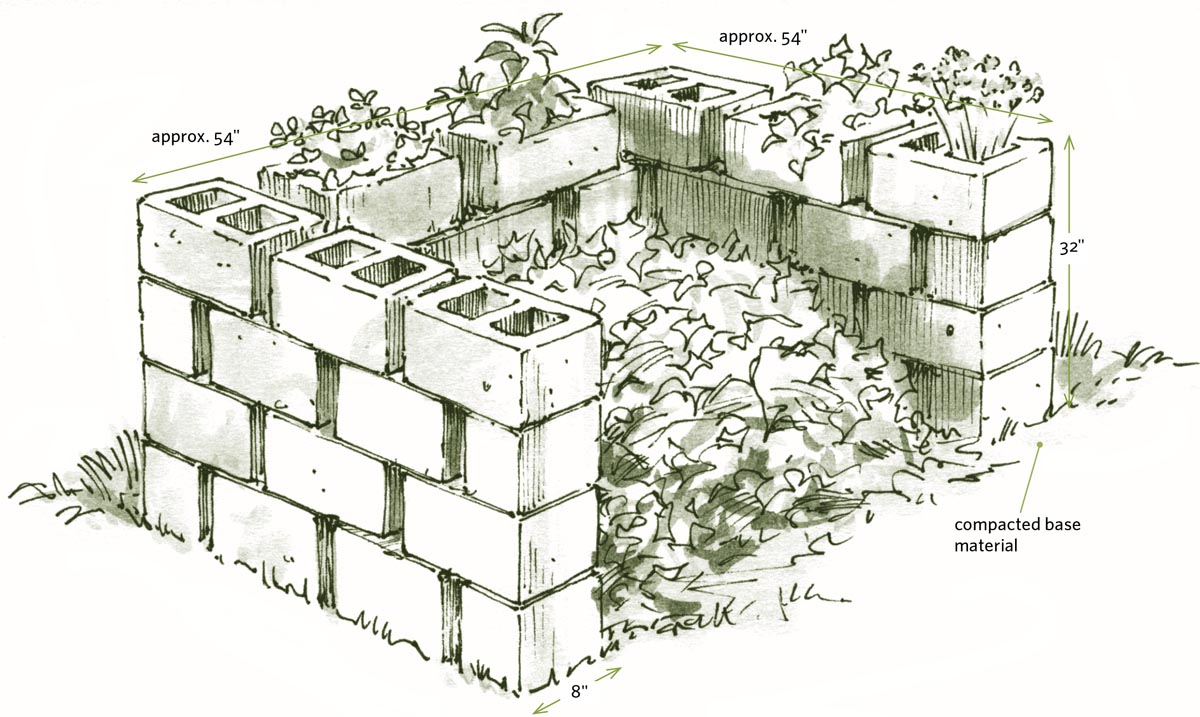

_fmt.jpeg)