Chicken and other broths
Vegetable soups
Savoury tarts
Salads and dressings
Pan-grilling and pan-frying
Roasting
Casserole-roasting
Baked fish
Green vegetables
Roots and alliums
Potatoes
Rice
Pulses – beans, peas and lentils
Simple soda breads
Sweet essentials
Fruit fools, compotes and salads
Biscuits
Ice creams, sorbets and granitas
Meringues
Warm puddings
Cold puddings
A few cakes
‘For green vegetables, rapidly boiling water in large quantities and enthusiastic salting of that water are crucial.’
Green vegetables are an essential part of the ingredient basket for all cooks. At any time of the year there will be something green in season. From the profusion of the spring, summer and autumn months to the relative scarcity of winter, there is always a green vegetable that is bang in season and ready for the table. Not everyone gets excited about green vegetables, and they are generally seen in this part of the world as something to be served as an accompaniment to a main course. We will concentrate here on relatively simple preparations, and for the purpose of this particular chapter will cook our vegetables in the traditional way with a view to serving them with a main course of fish, meat or poultry, but where appropriate I will suggest when and how they can be served on their own as a separate course.
Generally speaking, I like to cook my green vegetables in boiling, salted water. Some cooks like to steam their vegetables and that’s fine, but I never feel the flavour is as good as the boiling water and salt method.
The key to a delicious and nourishing bowl of green vegetables for the table is seasonality and freshness. So if you decide you want to eat French beans in December – well, I’m afraid there is nothing I can do or say that will magically make them taste like they taste in July and August. The same goes for asparagus. Fantastic and worth waiting for when at its best here in April and May, but a rather pale imitation of that brilliance when eaten after a long voyage in other months of the year. So it is for all vegetables – buy them when they are at their freshest and you will get the very best results, and vegetables that you might have hitherto considered as rather humble, when at their best, can become a revelation. Where before you might have considered only the haughty asparagus worthy of being elevated on to a slice of buttered toast or olive-oil-drenched grilled bread, now you might begin to realise that the lowly kales or sprouting broccolis can be just as heavenly and worthy of that lofty position, and that they too are deserving of a grating of Parmesan or a drizzle of hollandaise sauce.
The other important point to make is that when your particular vegetable of choice is in season, it will also be at its cheapest. So it’s a win-win situation. Great taste and great price.
There are subtleties involved in cooking the suggested green vegetables listed here but there are rules that are common to the cooking of all of them.
Keys to success
The vegetables must be really fresh to get a great result.
The fresher the vegetables are, the more quickly they cook.
The quicker the vegetables cook the more delicious they will be to eat and the more beautiful they will be to look at.
Rapidly boiling water in large quantities and enthusiastic salting of that water are crucial.
Green vegetables should never be covered when being cooked.
Serve the cooked vegetables immediately they are cooked, if possible.
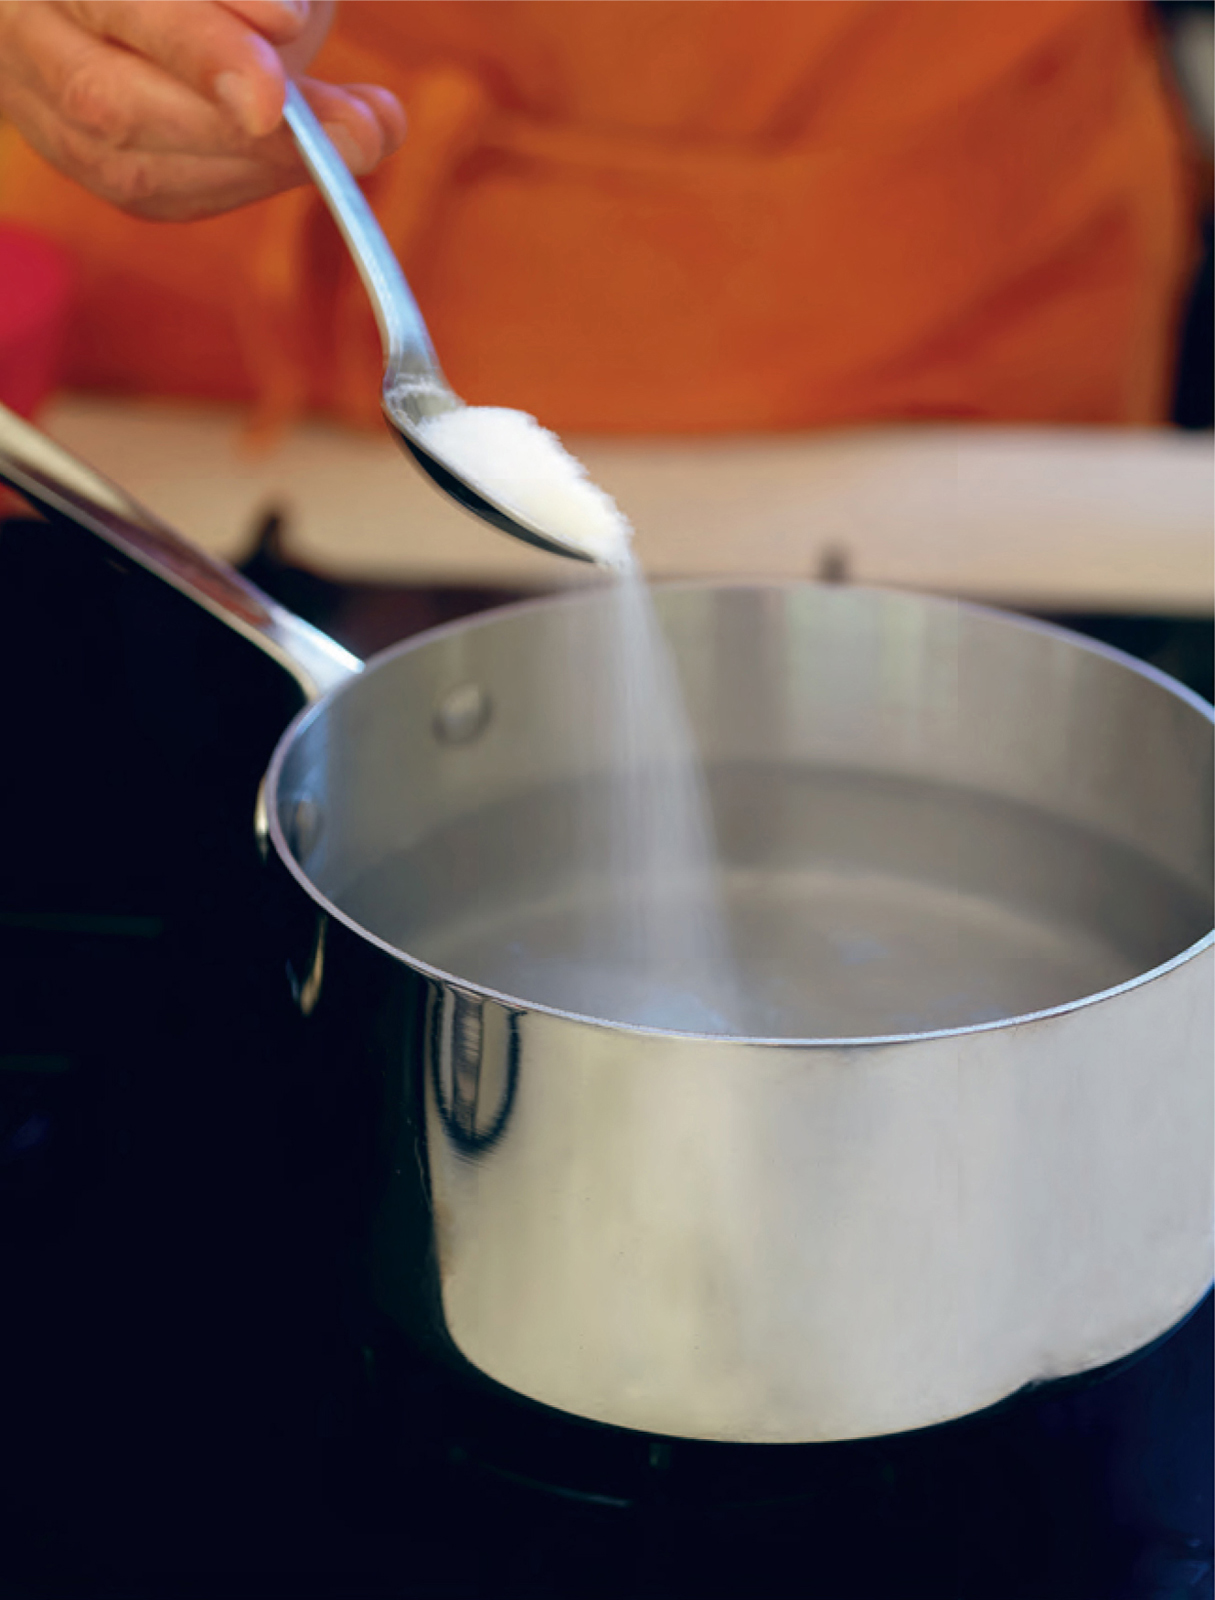
Measuring in the salt

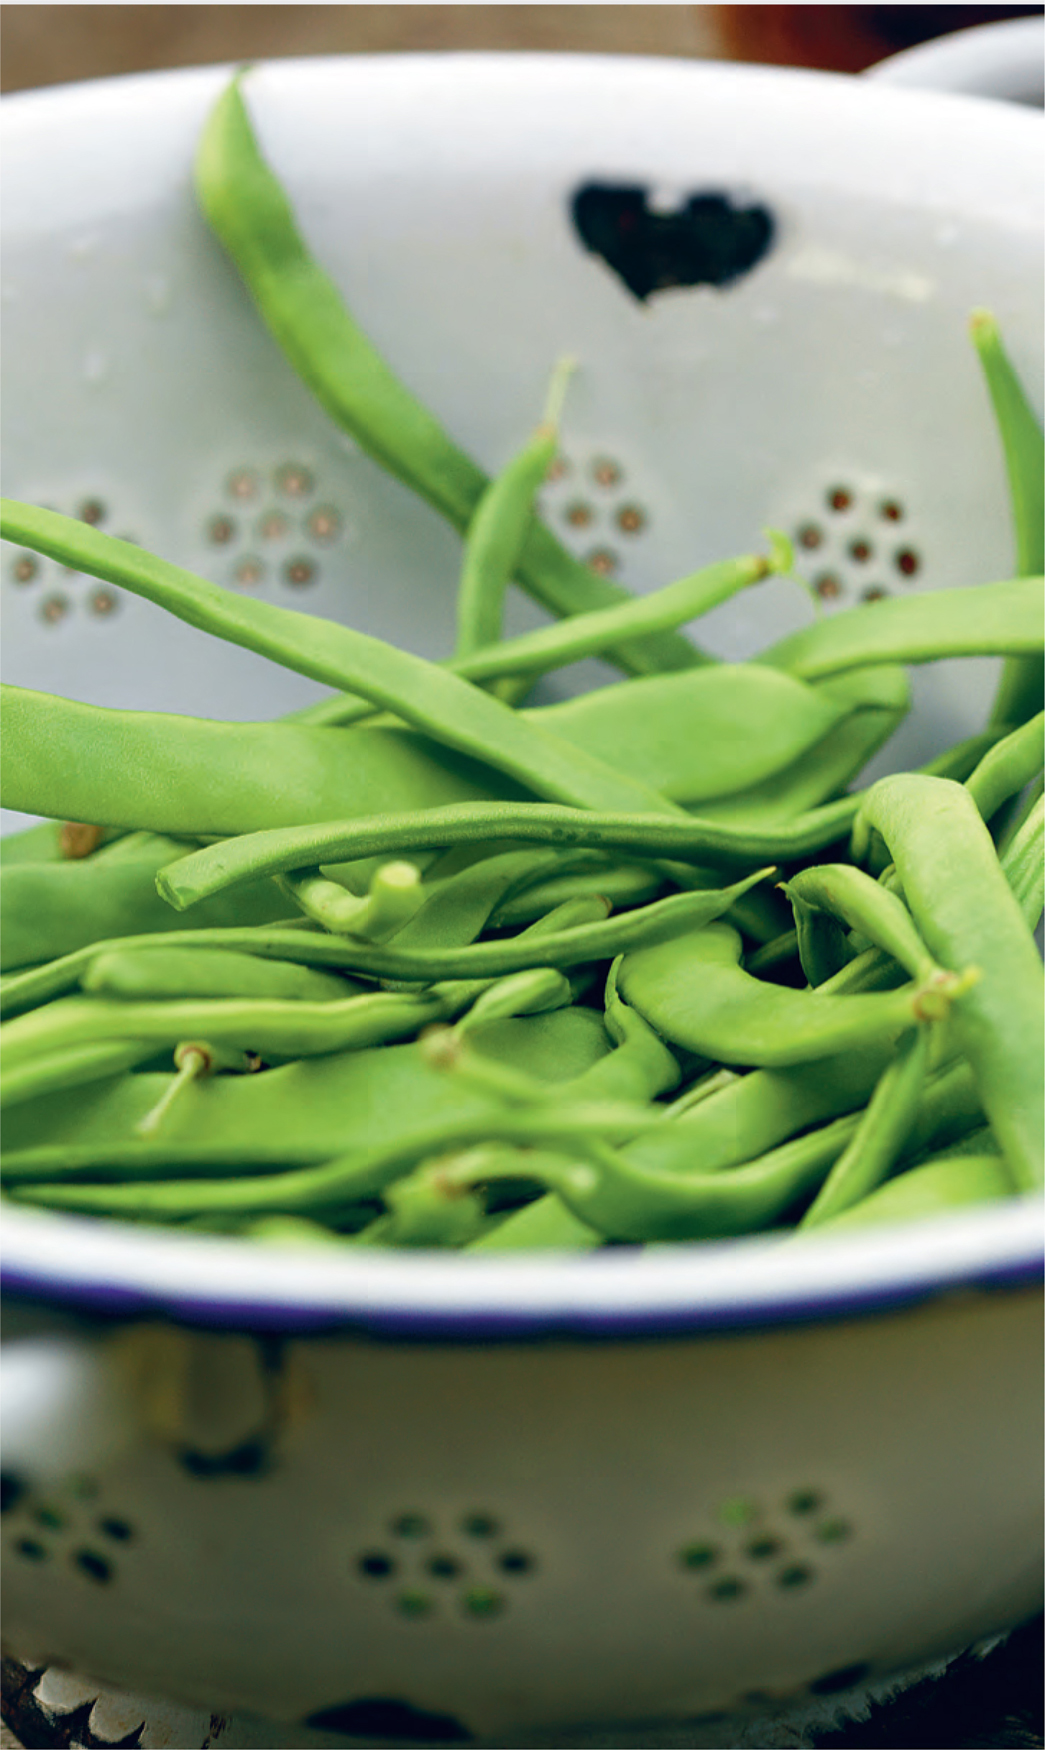
Cooking French, flat or runner beans to serve ‘plain’
The bean recognisable to most will be what we call the French bean or haricot vert. Thin, green, slender and pencil-shaped, ideally not more than 10cm long, these can be delicious and I eat lots of them when in season in July and August and into September. However, for the rest of the year they are imported in vast quantities from distant parts of the planet at great expense, and really I can’t countenance eating them after such a long voyage.
The French bean has yellow, purple and black relations that you treat in exactly the same way.
The ingredients
The beans should be really fresh, not too big, and should be kept cool until you are ready to use them.
These beans take more salt in the cooking water than any other vegetable I cook.
Serves 4–6 1.2 litres water
Maldon sea salt and freshly ground black pepper
900g beans, topped and tailed and cut into 5cm pieces on the bias
25g butter or 2 tablespoons olive oil
Bring the water to a rolling boil, then add 2–3 teaspoons of salt. Add the prepared beans and cook uncovered for about 6 minutes, then taste one of the beans. The texture should be slightly firm, but not in any way tough or ‘squeaky’. ‘Yielding’ is perhaps the best word to describe the texture. Strain the beans immediately through a sieve or colander.
Place the beans back in the empty but still hot saucepan and add the butter or olive oil and a few grinds of black pepper. Stir to glaze the beans and taste one to see if a little more salt is required. Serve immediately in a hot serving dish.
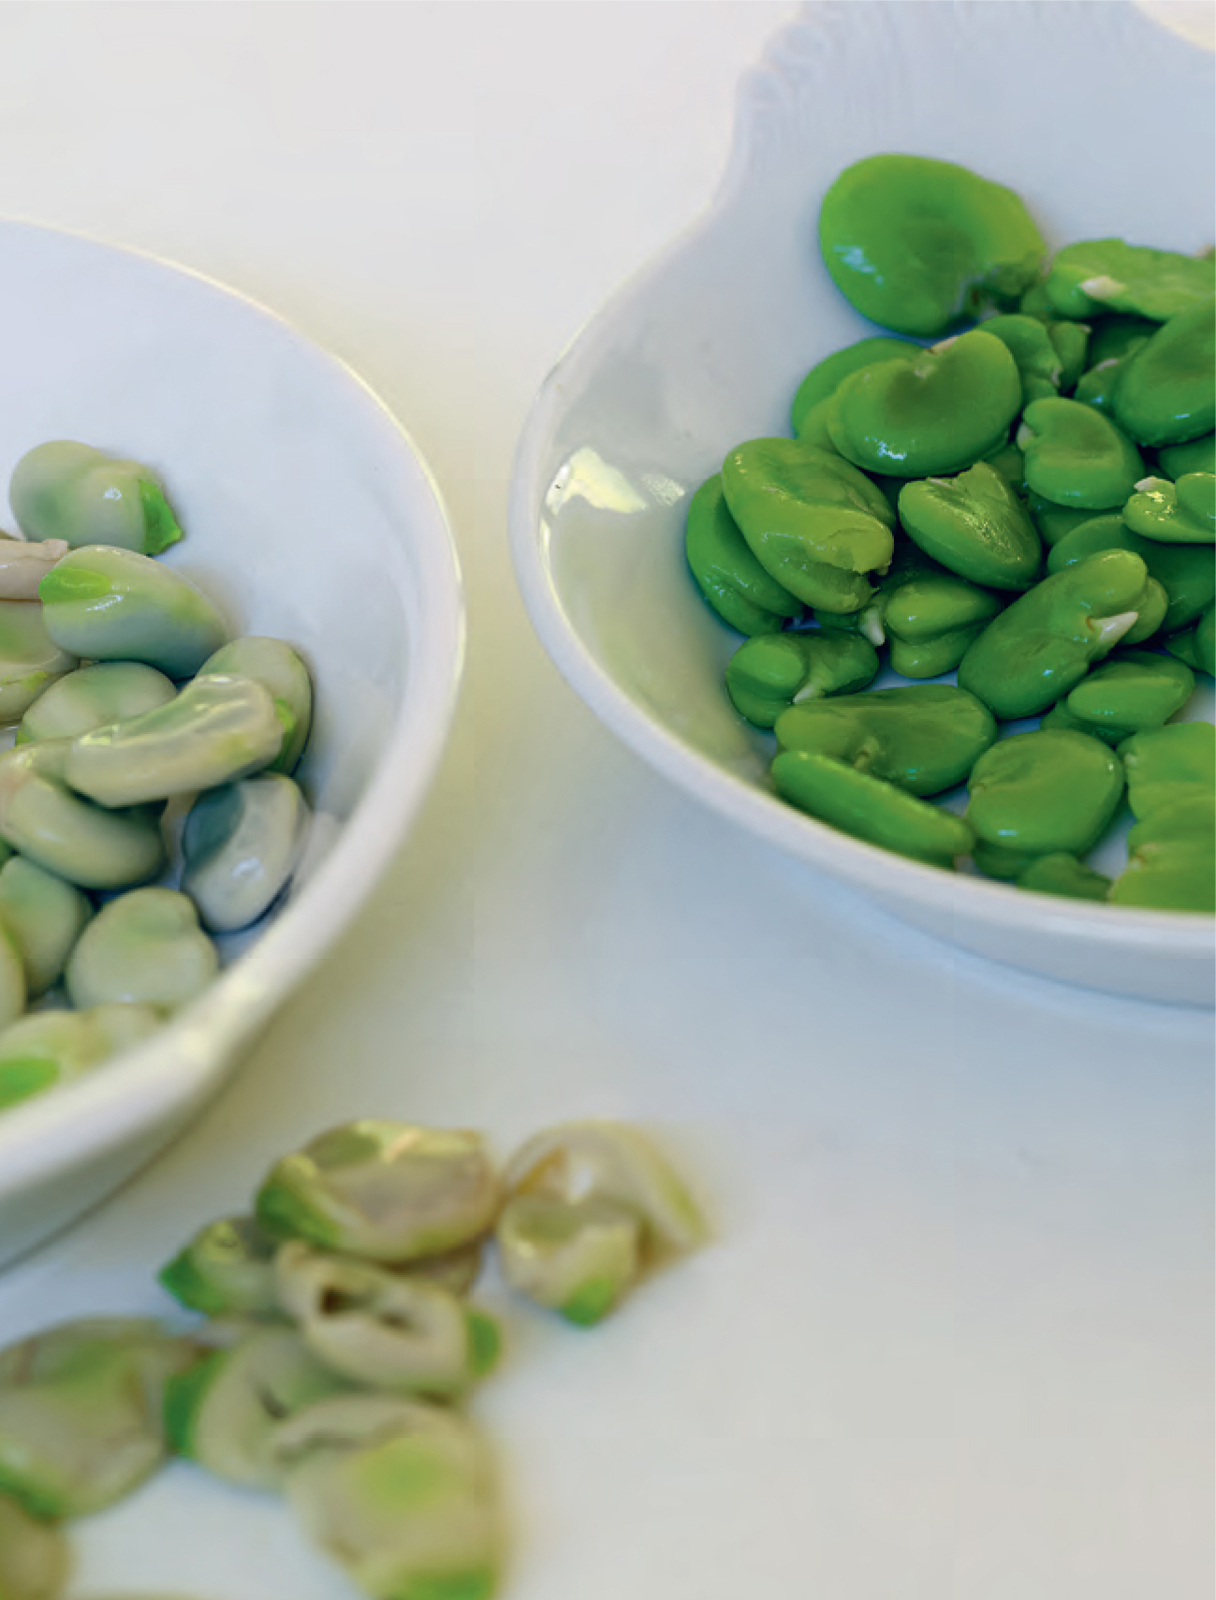
Broad beans, removed from their rubbery skins and ready for eating
Cooking broad beans to serve ‘plain’
Broad beans, of all the beans, require the most commitment from the point of preparation. They are grown especially for the beans inside the pod. The pods are large and have a spongy lining, like nature’s eiderdown, in which the beans are snugly nestled. These pale green beans are removed from their cushioned environment and then cooked like the others, in boiling, salted water, but generally they are not eaten before another soft leathery skin is removed to reveal the glamorous and vibrant green beans inside. I think they are worth every bit of the labour involved. When the pods are particularly small, the extracted beans can be eaten raw and still in their skins, with a little sea salt and olive oil.
The beans should be really fresh as above, not too big, and should be kept cool until you are ready to cook them.
Serves 4–6 600ml water
Maldon sea salt and freshly ground black pepper
500g broad beans, weighed after removing the beans from their pods
10g butter or 1 tablespoon olive oil
Bring the water to a rolling boil, then add a good pinch of salt. Add the beans and cook uncovered for about 5 minutes, by which time you should notice the leathery skin starting to crack to expose the bright green bean inside. Taste one of the beans to ensure it is tender. If so, strain the beans through a colander, reserving about 6 tablespoons of cooking water for reheating the beans later. If you don’t mind the skins on the broad beans, you can toss the beans in a little butter or olive oil now and serve them immediately. Unless the beans are really tiny, I prefer to proceed as follows: with the beans still in the colander, hold them under a cold running tap to stop them overcooking. Spread them out on a flat tray to cool. Now pinch the beans out of their skins. Discard the skins unless there is someone in the kitchen who likes them. The peeled beans can be reheated for serving now or kept cool until later.
To reheat the beans, bring the reserved cooking water to a gentle simmer in a small wide saucepan. Add the beans and just warm them through. This will take only a matter of minutes. Broad beans should never be served red hot, as they will overcook and spoil. Finally and quickly, add the butter or oil and a little black pepper and mix. By now the water will have evaporated and the beans will have a light shiny glaze. Taste to check the seasoning and serve immediately in a warm serving dish.
Broad beans and their leaves
The ingredients are as above, but with 1 large handful of broad bean or pea leaves.
Proceed as above to the point where you are reheating the peeled beans. Add the leaves to the simmering cooking water in the saucepan with the beans and continue. The leaves will wilt, taking on a lovely melted consistency. Add the oil or butter, taste and correct the seasoning and serve immediately in a warm serving dish.
Cooking peas to serve ‘plain’
Fresh peas are truly a treat, but they need to be moist, juicy and tiny so they have not become hard and starchy.
The peas should ideally be fresh and recently podded; however, it must be said that best-quality frozen peas are a remarkably good product, although I do feel quite naughty any time I use them. Chopped mint, coriander or chervil, may be added to the peas just before serving.
Serves 4 225ml water
Maldon sea salt and freshly ground black pepper
450g podded peas
10g butter or 1 tablespoon olive oil
Bring the water to a rolling boil and add a good pinch of salt. Add the peas and cook uncovered for about 5 minutes until tender. Drain in a sieve or a colander and replace in the warm saucepan. Add the butter or olive oil and stir in gently. Taste and correct the seasoning, adding a little black pepper if you wish. Serve immediately in a warm serving dish.
Add 1 tablespoon of the freshly chopped herb of choice to the peas with the butter or olive oil. Taste, correct the seasoning and serve.
Green, white and purple sprouting broccoli with lemon and Parmesan
I feel sorry for the poor children whose loved ones are to be seen with arms tensely folded over a heaving chest, watching said child trying to swallow the dreaded green because ‘it’s good for you’. Please, mums, dads, minders all, do yourselves and the little darlings a big favour – put a little dab of butter on it or a lick of olive oil and the path of the green goodness will be much quieter, smoother and even enjoyable.
The broccoli that I like to cook is not the type with large and uniform-looking heads that is for the most part commercially grown and available year round in the shops. These look bland and they taste bland. I prefer the varieties that do better during the cold growing season, and in autumn, winter and spring I am happy to cook any of the sprouting green, white or purple varieties. These varieties require just a little more time in the preparation but have a much better flavour than the forced and rather crude large broccolis, though a cleanly produced head of calabrese can be very good indeed. Another member of this varied and complicated vegetable family to watch out for is romanesco, which looks like a cauliflower that has become fused with a fantastic sea-shell. Its pale green florets have a pointy tip, and overall it looks like the work of a sculptor rather than a gardener, but then we always knew that nature was the real genius. It has a really good flavour and will be perfect in this recipe.
The ingredients
Whichever broccoli you choose to use, make sure it is as fresh as possible. The general appearance and feel of the vegetable will tell you most about its freshness, so the colour should be good and vibrant, the stalks firm and there should be no sign of yellowing regardless of the variety you are choosing. When choosing these types of vegetables, turn them upside down and look at where the stalk has been cut from the plant. The fresher-looking the cut, the more recently harvested the vegetable will be and the better it will be to eat.
The amount of olive oil used here is scant and should be of a lovely quality.
The amount of Parmesan in the recipe is also scant and ideally should be just freshly grated.
Serves 4–6 600g sprouting broccoli
1.2 litres water
Maldon sea salt and freshly ground black pepper
2 tablespoons olive oil
1–2 tablespoons grated Parmesan
Zest and juice of ½ a lemon
Broccolis will vary in appearance and shape, depending on what time of the growing season it is when you are cooking them. So each time you prepare them there may be slight changes to be made. In any event, the object of the exercise is to remove any really tough stalks or skin on the stalks, and to cut the heads or florets into even-sized pieces that will cook quickly and uniformly with the trimmed stalks.
If necessary, separate the florets from the stalks in even-sized pieces. If there are any particularly tough-looking ends on the broccoli stalks, carefully trim them off. Peel the remaining stalks with a sharp vegetable peeler, just to remove the tough skin. Bring the water to the boil and add salt, a generous teaspoon or so. Taste the water; it should taste really quite salty. Add the peeled stalks and cook for 1 minute before adding the florets. Continue to cook uncovered and at a rolling boil. Using a skewer or a small knife, check one piece of the broccoli after about 4 minutes to see if it is cooked. When it is tender, carefully strain off all the water using a sieve or a colander.
Allow the broccoli to sit in the strainer for 1 minute to be sure all the water has drained away. Replace it in the still warm but now empty saucepan and drizzle on the olive oil. Sprinkle on the Parmesan, lemon zest and juice, a pinch of sea salt and a few grinds of black pepper. With a light hand, shake and rotate the pan to mix the oil, cheese and lemon through the broccoli. Taste a little, correct the seasoning and serve immediately in a hot serving dish.
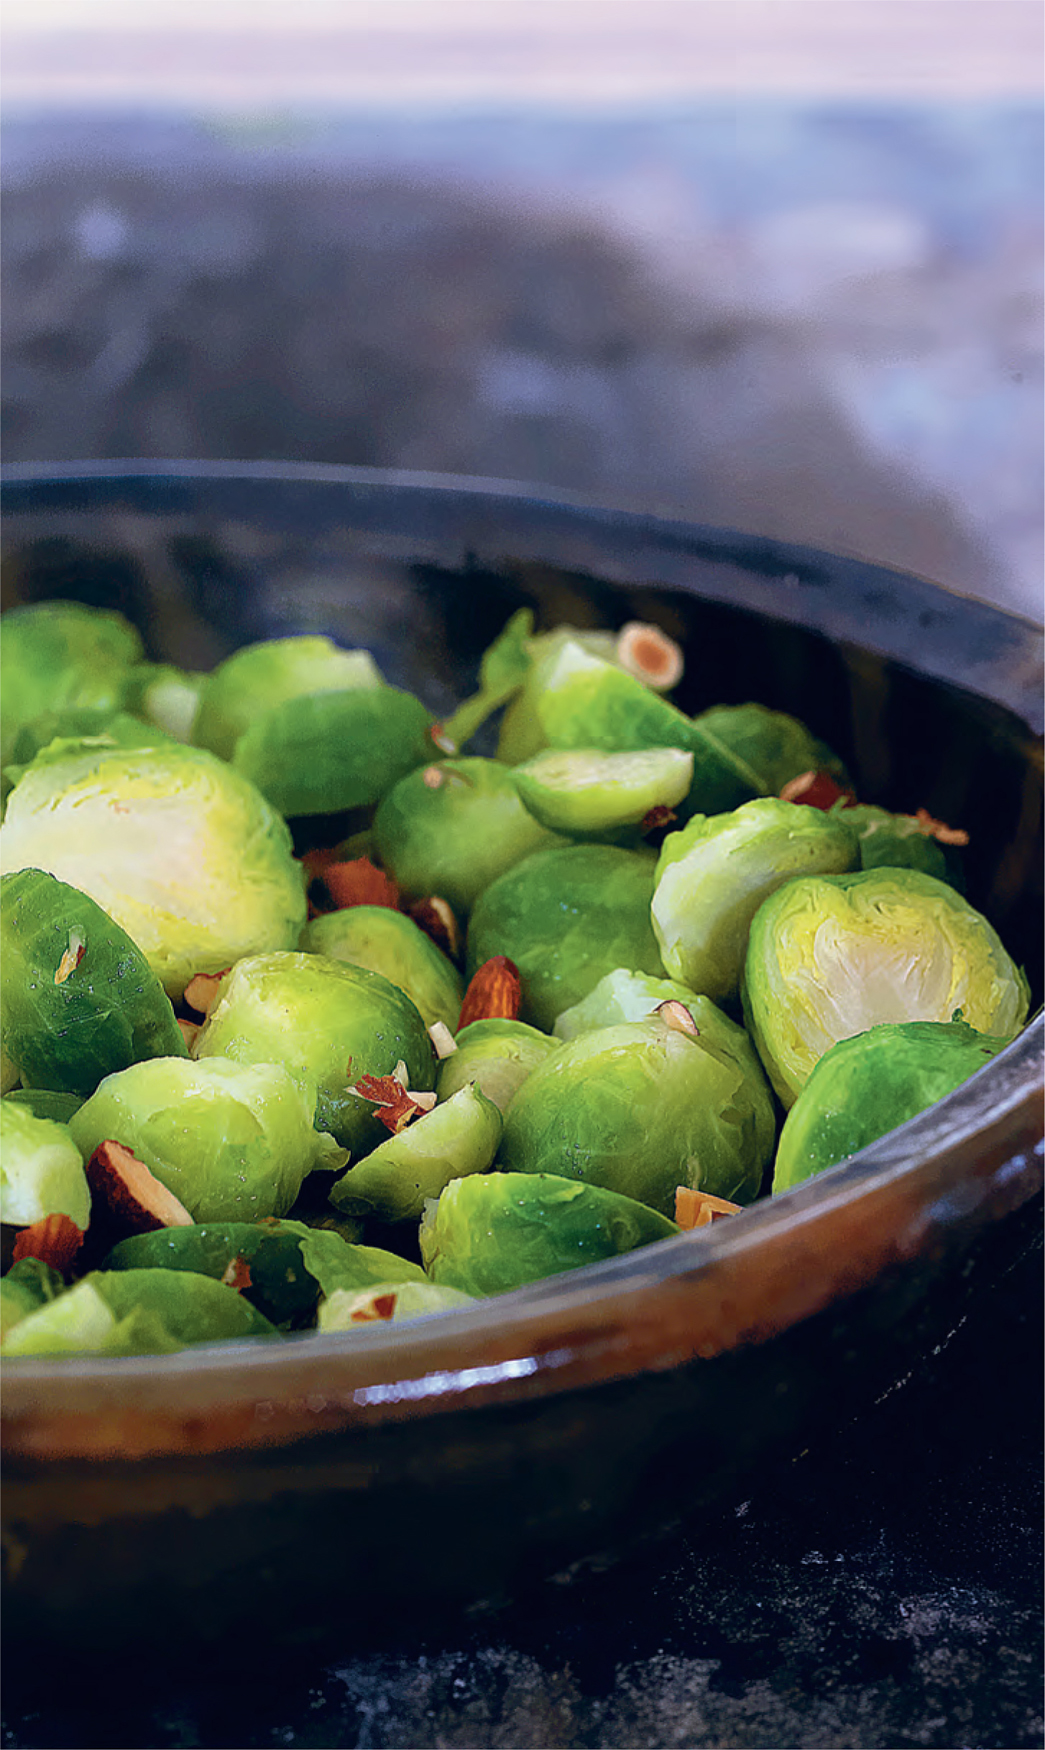
Brussels sprouts with brown butter and almonds
The particular look of disgust that creases some faces at the very mention of Brussels sprouts is an indication of how horribly badly cooked this vegetable has been in many people’s formative experience. When overcooked, they are like soggy little miniature cabbages with that unique overcooked flavour. But they can be fresh-tasting, nutty and delicious and will sit happily with lots of different flavours. If you consider how many flavours you can combine with cabbage, then Brussels sprouts are no different.
The sprouts themselves need to be small, tight and with dark green outer leaves, and like many winter vegetables seem to taste more delicious after the first few frosts. I sometimes make a purée with the sprouts to serve with a peppered steak, which I think is heaven, though the nay-sayers think that is even more torturous than the plain old sprout. They also sometimes end up in the winter salad bowl, raw and sliced as thin as paper, where with other winter leaves they will be enlivened with a few roast hazelnuts and some jewel-like pomegranate seeds.
The ingredients
Brussels sprouts should be small, firm, dark green and fresh-looking and not in any way yellowing on the outside.
Watch out for the purple variety – pretty, though it turns green when cooked.
Buy almonds with their skins still on, as the skins keep the flavour of the almond intact.
Serves 4–6 40g whole almonds
450g Brussels sprouts
1 litre water
1 teaspoon Maldon sea salt
25g butter
Freshly ground black pepper
Preheat the oven to 200°C/400°F/gas 6.
Chop the almonds coarsely and place them on a baking tray. Roast in the oven for about 15 minutes, or until golden brown. Remove from the oven and they will crisp up as they cool.
To prepare the sprouts, remove the darker and sometimes damaged outer leaves. Cut each sprout straight down through the middle with a vertical cut to achieve perfect halves. The sprouts cook more quickly when prepared like this, and retain their bright green colour and nutty flavour.
Bring the water to a boil and add the salt. Add the sprouts, bring back to the boil and cook uncovered for 6–8 minutes. Test with a skewer to check that they are tender. Strain the cooked sprouts well, allowing all the cooking water to drain off. Keep them warm.
Melt the butter in the saucepan, then let it cook until it turns to a hazelnut brown colour. Keep a close eye on the butter, stirring it from time to time. You will smell the nutty aroma when it has reached the colour of a hazelnut. Put the sprouts and almonds back into the pan and toss gently. Taste, correct the seasoning and serve immediately in a warm serving dish.
Savoy cabbage purée
I could bore you to tears extolling the virtues of cabbage. It is a wonderful vegetable and in my opinion much undervalued. It is generally regarded as a very poor relation to supposedly smarter vegetables like French beans or sugar snap peas, and you know by now that I have no interest in beans and peas that have been flown from the other side of the world when I can get a crisp, sweet and peppery cabbage which has been grown locally.
There are many lovely varieties of cabbage and I particularly like the crinkly green leaves of the Savoy. Essentially, the important thing is to buy the cabbage that’s in season when you are making this purée. I also love the elegant shape of greyhound cabbage, so called because the head looks like the long elegant nose of a greyhound. Dark green spring cabbage is also a favourite. I avoid white cabbages, especially the cannonball-like ‘Dutch’ cabbage. In my opinion it would be better used for target practice than in the kitchen. I don’t understand why the ‘Dutch’ cabbage is the cabbage of choice for coleslaw, which is often revolting but can be quite delicious. In this country we have so many good green cabbages that look and taste so much better. Cabbage is spectacularly good value, and if you slice it as thin as you can bear to, it is a good addition to a salad bowl and again will have so much more flavour and crisp texture than something that’s been cranking up the air miles on its way to your kitchen.
This purée is good with most meats and poultry. I sometimes serve it with venison and wild duck, and it has also been successful with roast and grilled fish.
The ingredients
The cabbage, fresh, crisp and green, is the easy secret to success here.
The cream and butter can be scant or plentiful here, though there is no point making the dish too rich, otherwise the green charm of the cabbage will be lost under the cream and butter.
Serves 4–6 1 head of Savoy cabbage
1.75 litres water
Maldon sea salt and freshly ground black pepper
25–40ml regular or double cream
25–40g salted butter
Remove any damaged outside leaves from the cabbage. However, don’t remove any more of those nice green outside leaves than is necessary, as they are full of flavour and will give lovely bright green flecks to the finished purée. Place the cabbage on a chopping board and cut directly down through the middle of the head, then quarter and remove the hard core. Slice the cabbage against the grain, nice and thinly.
Bring the water to the boil and salt well. Add the cabbage and cook uncovered at a simmer until it is just tender. Strain the cabbage well, reserving 100ml of the cooking water. In a blender or using a hand-held blender, blend to a coarse purée, adding cream and butter as you see fit. The consistency should be like that of a soft mashed potato. If the purée is a bit firm, add a little of the reserved cooking water to soften it and blend briefly again. Taste and correct the seasoning and serve in a hot dish.
The purée can be made ahead of time and gently reheated later. A non-stick pan is perfect for reheating it, and a little of the reserved cooking water can be used here as well if the purée has thickened in the meantime.
Summer spinach with garlic, chilli and lemon
Spinach is such a versatile vegetable and is used in cuisines all over the world. It ranges in size from small baby leaves, which can be eaten raw or cooked with the stalks attached, to large leaves, which generally have the stalks removed. The removed stalks on the medium and large leaves can also be cooked and eaten, though they will only taste really delicious if they have come from tender spring or early summer spinach. The stalks of really fresh spinach should be crisp, and the leaves regardless of size should be glossy, firm and a rich green colour. The central rib or stalk of medium and large spinach leaves is easily removed. Fold one side of the leaf over the stalk to rest on the other piece of leaf and gently pull the stalk away.
Spring and summer spinach cooks quickly, so you need to be vigilant. Winter spinach will need more cooking.
The ingredients
Try to use spinach as soon as you can after buying or picking. It deteriorates quite quickly, and is immeasurably better when fresh.
Spinach requires less salt than most vegetables, so season with caution here.
The chilli in this recipe is dried rather than fresh, to impart a flavour that is less harsh, and a texture that is less fleshy, than a fresh chilli.
The garlic is thinly sliced and cooked slowly so that it turns golden, becomes nutty and releases its flavour. Be careful not to allow the garlic to become too dark or it will be bitter and spoil the dish.
The lemon juice and zest are the final addition to the dish. They should be added with caution and to taste. They are there to enliven the dish and to pull all the flavours together.
Serves 4–6 1kg spinach leaves, stalks removed
2 tablespoons olive oil
2 large cloves of garlic, peeled and very thinly sliced
1 dried chilli, crushed into small pieces, or a pinch of chilli flakes
Maldon sea salt and freshly ground black pepper
1 lemon, zested and juiced
Wash the spinach in several changes of cold water and allow to drain in order to remove as much of the water as possible. Place a wide low-sided heavy-based saucepan or frying pan on the heat and add the olive oil. Immediately add the garlic and cook gently until the oil gets hot and the garlic colours slightly. Add the chilli and cook for a few seconds. By now the pan should be very hot and the garlic golden. Add the spinach, being careful as it will hiss and spit a bit. Continue cooking the spinach, turning it constantly. Season with a little salt and pepper. Add the lemon juice and zest and stir in. Pull the pan off the heat and taste. Correct the seasoning and serve immediately in a hot dish.
The spinach can be removed from the pan when cooked, spread out flat to cool, and served later at room temperature.
Winter spinach
Follow the recipe above, but instead of sautéing the spinach in the pan, cook it in a large saucepan of boiling, lightly salted water until tender. Drain, removing as much water as possible, then proceed exactly as above, replacing the raw spinach leaves with the cooked spinach.
Curly kale with anchovy and marjoram
Kale is another of those vegetables that is not regarded as being glamorous, but when cooked properly is as delicious and stylish as anything. I love it in the winter months, when the availability of fresh green vegetables is scarce. With tightly curled crisp green leaves, it stands brave and tall in the garden, surviving winter chills, and is a beautiful sight sparkling in the sunlight on a crisp and frosty morning or when covered with a dusting of snow. Its more stylish cousins, such as the ragged-leaved and purple-tinged Red Russian or the long, dark and plume-leaved Nero di Toscano, otherwise known as Black Tuscany or cavolo nero, can also be cooked in the manner suggested here.
Any of the kales are great in soups and broths, in purées, folded through mashed potatoes, in gratins, as a topping for grilled bread, as a simple accompanying vegetable to poultry, meat and fish and so on. Tiny pinched pieces of raw kale can also be added to the winter green salad bowl. So you can see it is tremendously versatile.
The key to the success of any kale recipe is to cook it really well until it is quite tender, and it takes quite a bit of cooking to get it to this soft and comforting stage, so be a little patient and hopefully you will be amazed by its versatility and deliciousness.
The ingredients
Curly kale is the easiest of all of the kales to find, but any of the kales will work perfectly in this recipe. The kale should look fresh and vibrant and the tough stalks should always be removed before cooking.
The small amount of anchovy gives a very savoury flavour to the kale. Buy the best quality you can, either salted or packed in oil, and store any excess anchovies in a covered container in the fridge, where they will store perfectly for at least a month.
Sweet or annual marjoram, as it is known, is a marvellous herb and works beautifully here. I have also used rosemary in this recipe with excellent results.
Serves 4–6 3 litres water
3 teaspoons Maldon sea salt
500g kale, with stalks removed to yield about 350g kale leaves
4 anchovies
1 heaped tablespoon marjoram leaves
5 tablespoons olive oil
1 lemon
Freshly ground black pepper
Bring the water to a boil in a large wide saucepan and add the salt. Add the kale leaves and cook uncovered at a good simmer for about 8 minutes. Taste a small piece of the kale to ensure it is really tender. Drain the kale and allow to sit in a sieve or colander to lose as much of the cooking water as possible. Press it gently with your fingers to encourage a little more of the water to be expelled, but don’t manhandle it otherwise it will become compacted and less pleasant to eat. Lay the drained kale out flat on a wide dish and allow it to cool slightly.
While the kale is cooling, chop the anchovies and marjoram together until they look like a coarse purée. Transfer to a small bowl and blend in the olive oil. It is unlikely that this mixture will take salt, as the anchovies are already salty. Sprinkle this oil over the still warm but not hot kale and gently massage it into the leaves. If the kale is still hot it may ‘cook’ away the fresh taste of the olive oil and the marjoram. Grate the zest of half the lemon over the kale, then cut a quarter out of the lemon and squeeze the juice from that over as well. Mix again gently. Add a few grinds of black pepper and taste to check the seasoning. If necessary, add a little sea salt and perhaps another splash of olive oil.
Serve the kale at room temperature, not chilled, as an accompaniment to a grilled steak or oily fish such as mackerel. It is also excellent on warm grilled bread which has been rubbed lightly on one side with a cut clove of garlic. A soft poached egg sitting on top of that would be a feast.
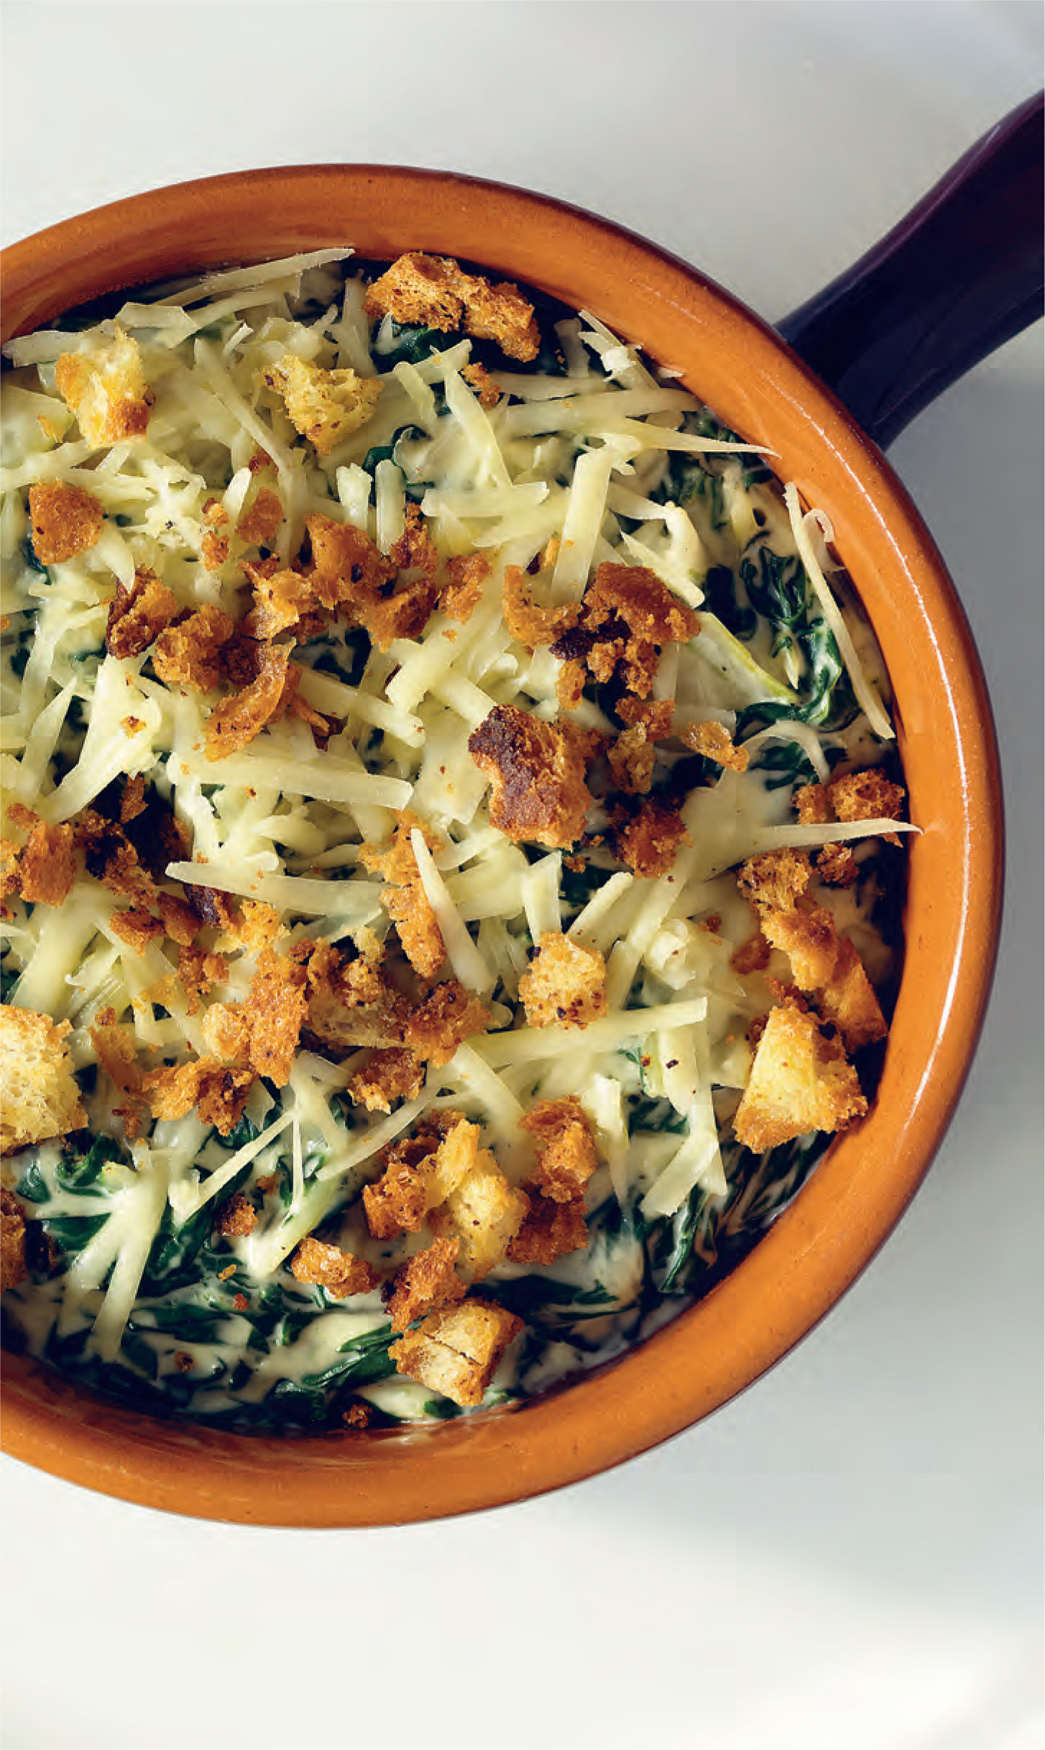
Gratin of chard and Gruyère
Big and leafy, looking like an exceptionally healthy leaf of spinach and with several colourful varieties, chard is great. The most well-known variety, with its thick white stalk and glossy leaves, is sometimes called Swiss chard. The colourful members of the family are the red-stemmed Ruby chard and the variety known as Bright Lights or Rainbow chard, which has a range of multi-coloured stems varying from white, yellow and orange to pink, purple and red.
Generally, unless the leaves are tiny, the stalk is removed from the leaf and cooked separately. The cooked leaves and stalks can be served together or as individual dishes. The flavour of the leaf is similar to spinach, but somewhat stronger and earthier in flavour, though the two greens are pretty much interchangeable in any recipe. I like to cut out the stalks or stems from the leaves with a sharp knife to achieve a neat finish. This is another vegetable that needs to be well cooked, and there is no flavour or texture advantage to having to chew it. The tiniest leaves, no more than 8cm long and including the stems, colourful or otherwise, sometimes end up in the salad bowl.
This recipe combines the vegetable with Gruyère cheese in a gratin and is finished with a crisp bread topping. This dish can be prepared ahead and reheated later. It will make a delicious vegetarian supper dish or accompaniment to a roast shoulder of lamb or a grilled lamb chop.
Serves 4–6 1kg chard
3 litres water
3 teaspoons Maldon sea salt
60g coarse sourdough breadcrumbs
3 tablespoons olive oil
30g butter
30g plain flour
300ml full-fat milk
100ml regular or double cream
Freshly ground black pepper
160g Gruyère cheese, coarsely grated
1 tablespoon marjoram leaves, chopped
Preheat the oven to 200°C/400°F/gas 6.
Remove the stalks from the chard with a sharp knife. Cut the stalks against the grain into 2cm pieces. Bring the water to a boil and add the salt, then add the stalks to the boiling water and cook at a simmer for about 6 minutes, or until nearly tender. Add the leaves to the pot and cook for a further 3 minutes, until the leaves and the stalks are both cooked. Strain off all the water and allow the chard to sit in the strainer so that the rest can drain away.
Toss the breadcrumbs in the olive oil, then spread out on a baking tray and place in the preheated oven for about 15 minutes, or until toasted and golden. The crumbs tend to cook unevenly, so you will need to move them around on the tray a couple of times while they are cooking. When ready, remove from the oven and reserve for later.
Melt the butter in a small saucepan, then add the flour and stir to mix. Cook on a gentle heat for about 3 minutes, then stir in the milk and cream and bring the mixture to the boil, whisking constantly. The sauce will by now have thickened. Turn the heat down low and allow it to simmer for a further 2 minutes. Remove from the heat and season with salt and pepper. Give the drained chard a further gentle squeeze, then add to the sauce with 110g of the grated Gruyère and the chopped marjoram and mix gently but thoroughly. Taste again and correct the seasoning.
Place the mixture in an ovenproof gratin dish and sprinkle with the remaining Gruyère and finally the roasted breadcrumbs.
The gratin can be put aside for later or reheated now at 180°C/350°F/gas 4 for about 15–20 minutes, until bubbling and golden. If you are reheating it from cold it will need 30 minutes.