
You may be asking yourself whether herbs qualify as vegetables. It all comes down to how they are used. Often, you might think they don’t, since we frequently use herbs in small quantities to enhance dishes, rather than as the star component of a dish. But when basil is crushed in large quantities to make a pesto, we embrace the fact that it’s being used as a vegetable. Likewise, in Thai-Style Chicken with Basil, in which a full 2 cups of fresh basil leaves are used in three different ways to flavor the chopped chicken, it’s difficult to dispute basil’s function as a vegetable.
The recipes here all put fresh herbs firmly front and center in dishes in which they act as integral vegetable ingredients. We offer a number of pestos, both classic and inventive, that showcase the bright freshness of herbs. In addition to our Classic Pesto (with basil), we include versions with oregano and parsley, as well as our Cilantro-Mint Chutney. Herbs are also the star in other sauces, including our Chimichurri, which we pair with grilled steaks, and our Mint-Almond Relish, which is a new way to apply the classic mint flavor profile to rack of lamb. And a fragrant herb-packed butter flavors a succulent brined roast chicken that starts on the stovetop and finishes in the oven for perfect crispy browned skin.
Beyond meat and seafood, fresh herbs also lift and brighten the earthy flavor of grains. Although you may think of tabbouleh as a grain-based dish, its original version features parsley first and foremost, and our recipe honors that tradition. And earthy, musky sage pairs well with floral thyme in our Classic Bread Stuffing with Sage and Thyme.
shopping and storage
Fresh herbs are readily available year-round. Generally, herbs sold in loose bunches are a better bet than those in plastic clamshell packaging, which can be of inconsistent quality and tend to get slimy quickly. Look for fresh herb bunches with perky, vibrantly colored leaves; avoid any bunches with bruised, wilting, or yellowing leaves.
The best way to store delicate fresh herbs—basil, parsley, cilantro, mint, dill, and tarragon—is stems down in water, with the leaves covered by a plastic bag. If using them within a day or two, store them at room temperature. Refrigerating them will prolong their life, but even so, delicate herbs don’t keep well for more than a few days. For herbs with sturdier leaves and woodier stems—oregano, sage, rosemary, thyme, and marjoram—wrap them in damp paper towels, place in a sealed zipper-lock bag, and store in the crisper drawer of the refrigerator for about a week.
vegetable science
Does Cilantro Taste Soapy to You?
There is no herb more divisive among home cooks than cilantro. Some people have a visceral reaction against it, describing the flavor as soapy, or like metallic pennies or moldy shoes! Though some aversion could be cultural, there is also a possible genetic reason. The personal genomics company 23andMe found that variations in a single-nucleotide polymorphism (or SNP, part of our DNA building blocks) are strongly associated with the perception of a soapy taste in cilantro. This SNP lies within a cluster of olfactory genes—and aroma is strongly associated with our perception of taste. Among these olfactory genes is the OR6A2 gene, a receptor that binds many of the compounds associated with cilantro’s unique smell. Still, this SNP shows relatively low heritability, making it an uncommon trait.
vegetable prep
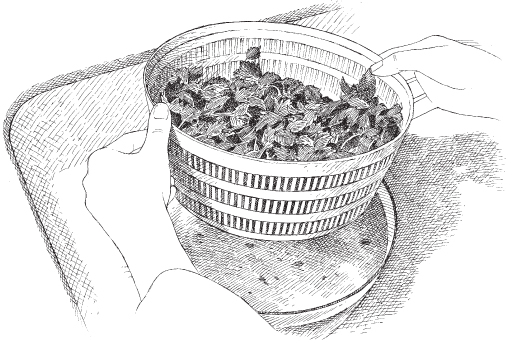
Use a salad spinner to wash herbs. Swish loose sprigs around in cold water and, once herbs are clean, lift basket with herbs out of water, discard water, fit basket back into its base, and spin herbs dry.
Try this quick, easy way to dry and store a plethora of fresh herbs.
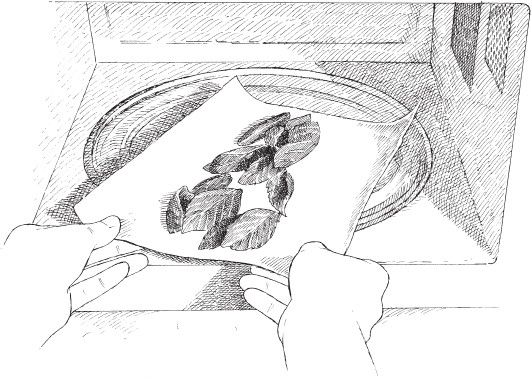
1. Place washed and dried herbs on paper towel and microwave for 30 to 40 seconds.

2. Crumble dried herbs and store in airtight container for up to 3 months.
Often, home cooks buy a bunch of herbs only to end up using just a small fraction, leaving the rest to go bad. Luckily, there’s a good way to keep leftover herbs usable indefinitely.
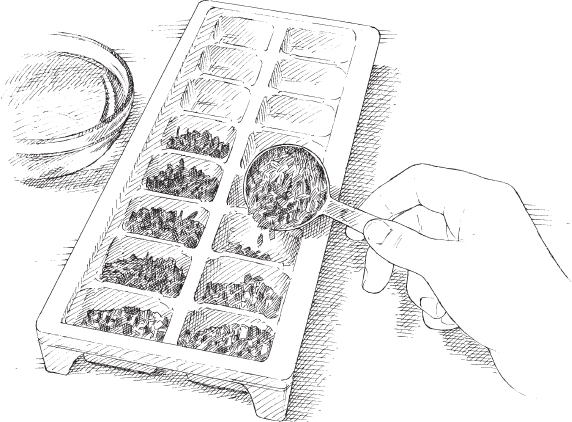
1. Chop leftover fresh herbs by hand or in food processor, transfer spoonfuls into ice cube trays, and top with water to cover. For standard ice cube tray, place 2 tablespoons chopped herbs and approximately 1 tablespoon water in each cube.
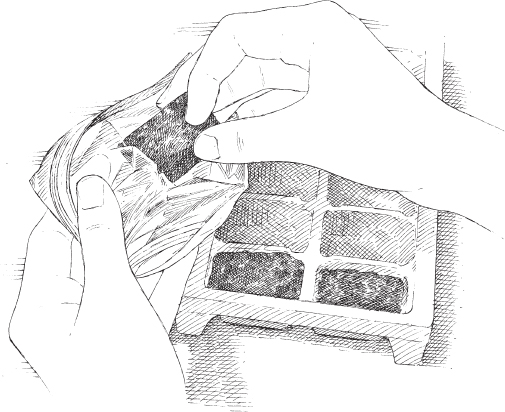
2. Once cubes are frozen, transfer them to zipper-lock bag and seal. Store until you want to add them to sauces, soups, or stews.
using dried herbs
We all have dried herbs in our pantry and sometimes need to use those instead of fresh. We recommend avoiding dried forms of delicate, leafy herbs like basil, parsley, chives, mint, and cilantro, which are vastly inferior in flavor. Heartier herbs, such as oregano, sage, and thyme, dry well and can be good substitutes for fresh, especially in recipes where the herbs will cook in liquid (such as soups and sauces). Use only about one-third the amount, and add them at the same time as you would fresh.
flat-leaf or curly?
Flat-leaf parsley (also called Italian parsley) is the strong favorite over curly parsley in the test kitchen. Flat-leaf parsley is much more fragrant, and it has a sweet, bright flavor that we prefer to the more bitter, grassier notes of curly-leaf parsley.
HERB-GARLIC COMPOUND BUTTER
Makes about 1 cup
Total time: 15 minutes
WHY THIS RECIPE WORKS It’s handy to have a compound butter packed with herbs in your freezer to pull out at the last minute to top a grilled steak, roast fish, potatoes, and more. It instantly takes just about any dish to a higher level with bright herb flavor. We started with a stick of softened butter and mashed it with a mixture of minced fresh herbs, minced garlic, and salt and pepper. You can use it right away or shape it into a log, wrap it in plastic wrap, and store it in your freezer for up to two months.
8 tablespoons unsalted butter, softened
2 tablespoons minced fresh sage or 1½ teaspoons dried
1 tablespoon minced fresh parsley
1 tablespoon minced fresh thyme or ¾ teaspoon dried
2 garlic cloves, minced
¼ teaspoon salt
¼ teaspoon pepper
Combine all ingredients in bowl. Cover with plastic wrap and let sit to blend flavors, about 10 minutes, or roll into log, wrap in plastic wrap, and refrigerate or freeze.
CLASSIC PESTO
Makes about 1½ cups; enough for 2 pounds pasta
Total time: 25 minutes
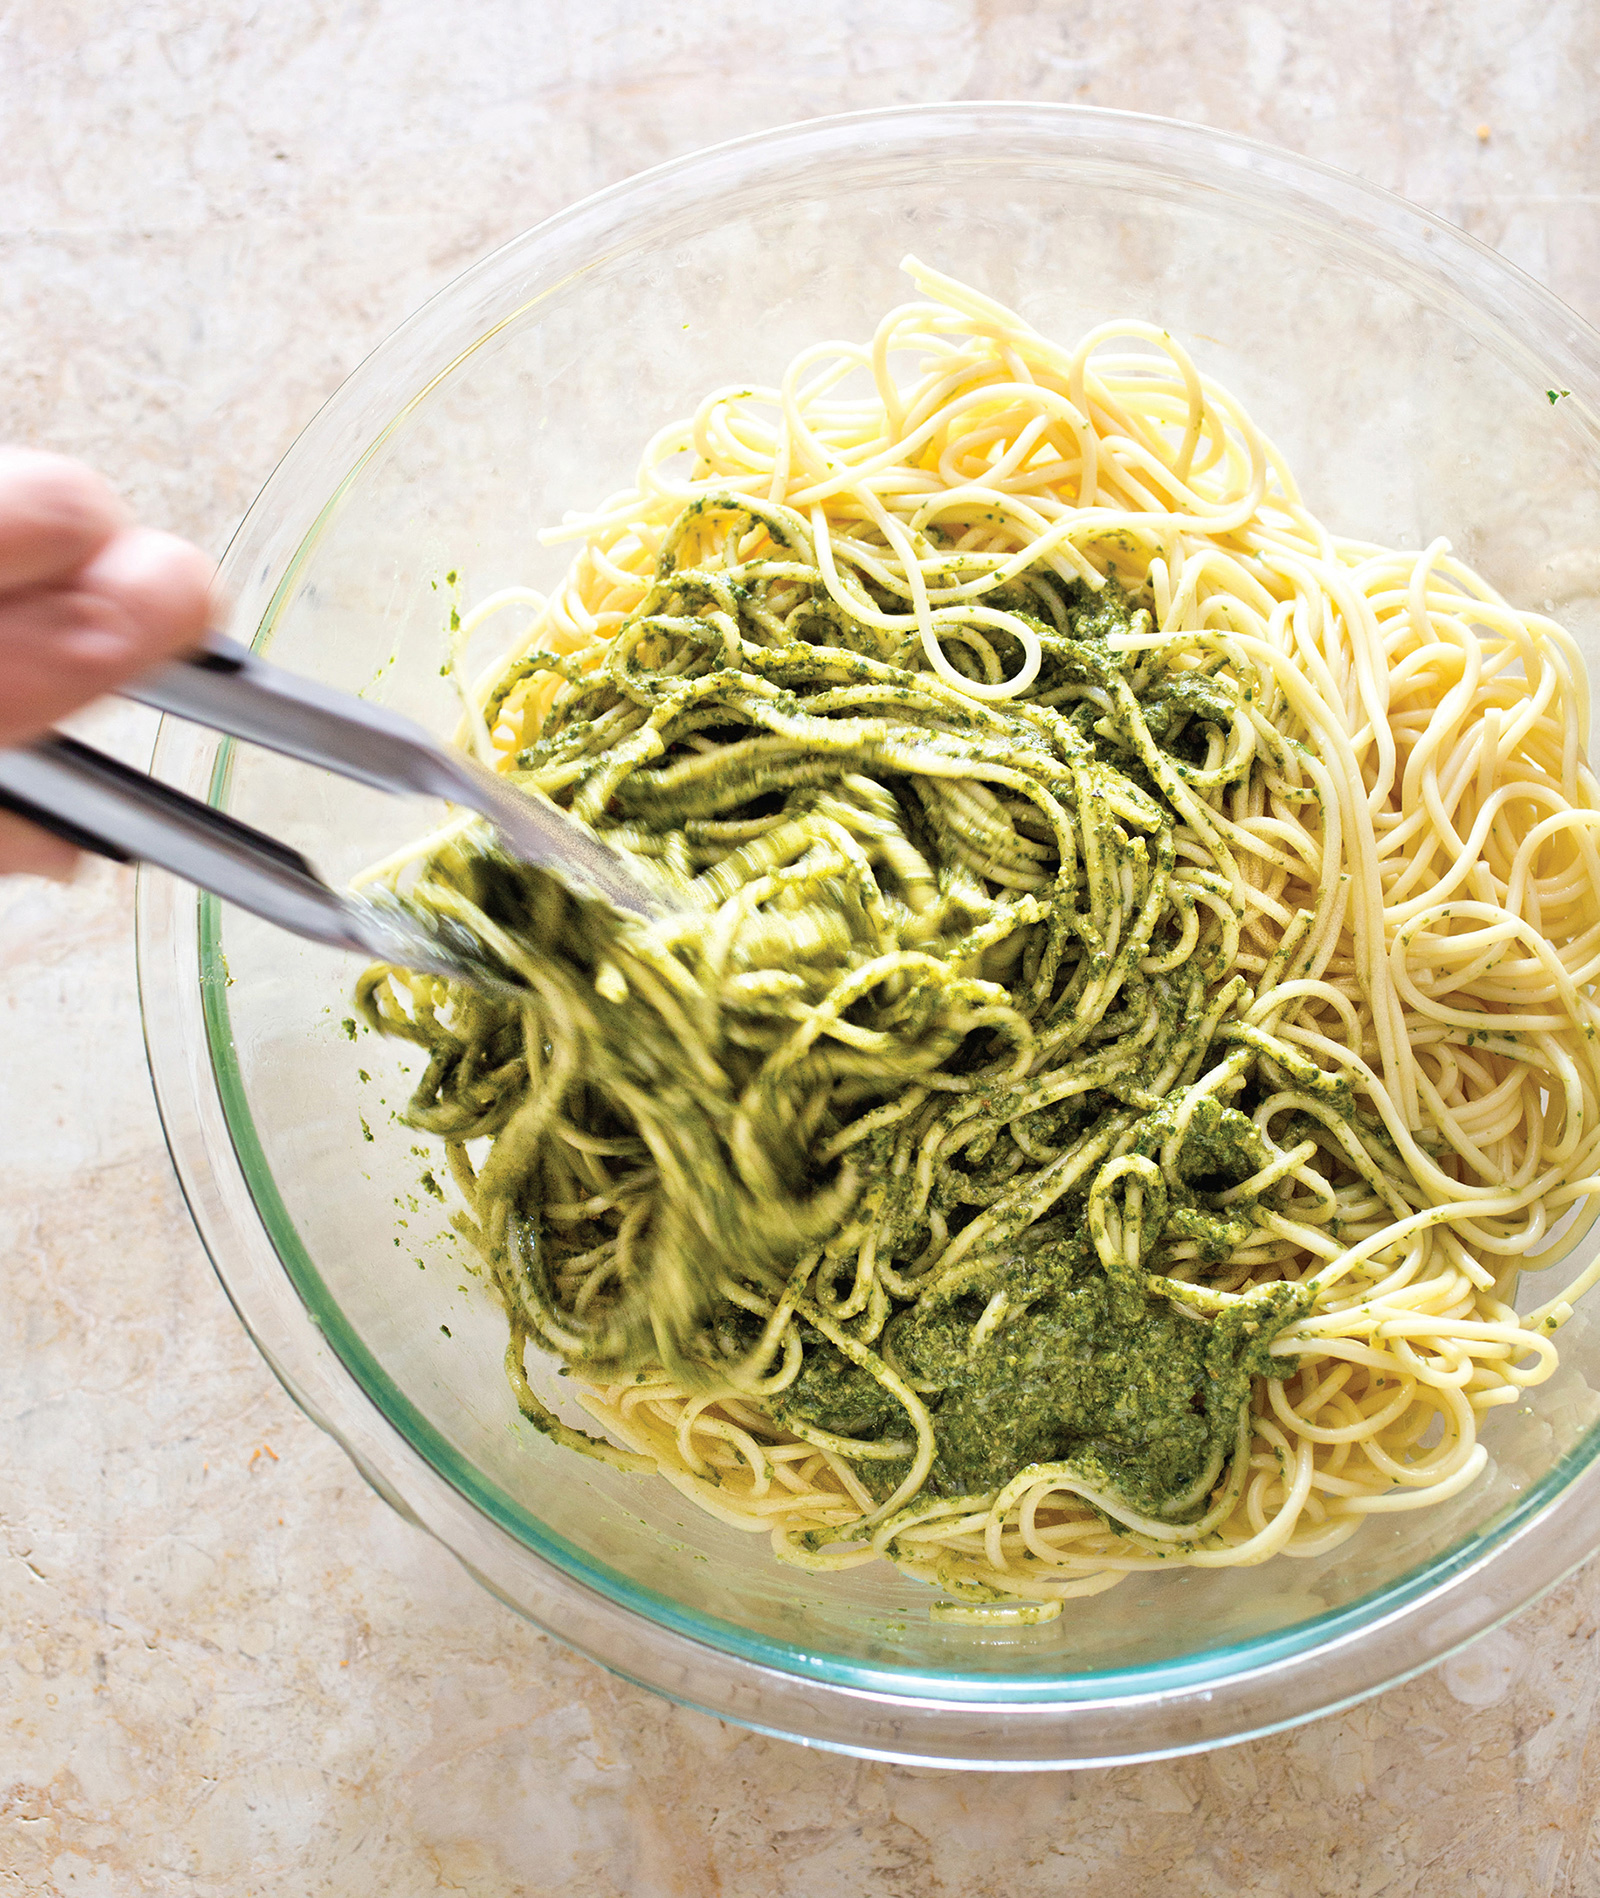
WHY THIS RECIPE WORKS There are a few basic rules for a great pesto: Use high-quality extra-virgin olive oil (its flavor will really shine through), toast the garlic (to help tame its fiery flavor), pound the herbs to bring out their flavorful oils, and add some type of nuts or seeds (for richness and body). Classic pesto includes fresh basil, pine nuts, garlic, and Parmesan. When you’re tossing the pesto with cooked pasta, it is important to add some pasta cooking water to achieve the proper sauce consistency. Or try any of the following pairings for a new spin: as a spread on a sandwich, in place of tomato sauce on pizza, dolloped onto soups and stews before serving, brushed onto fish or chicken after cooking, thinned with lemon juice to make a vinaigrette, or stirred into mashed potatoes.
6 garlic cloves, unpeeled
½ cup pine nuts
4 cups fresh basil leaves
¼ cup fresh parsley leaves
1 cup extra-virgin olive oil
1 ounce Parmesan cheese, grated (½ cup)
Salt and pepper
1. Toast garlic in 8-inch skillet over medium heat, shaking skillet occasionally, until softened and spotty brown, about 8 minutes. When garlic is cool enough to handle, discard skins and chop coarse. Meanwhile, toast pine nuts in now-empty skillet over medium heat, stirring often, until golden and fragrant, 4 to 5 minutes.
2. Place basil and parsley in 1-gallon zipper-lock bag. Pound bag with flat side of meat pounder or with rolling pin until all leaves are bruised.
3. Process garlic, pine nuts, and herbs in food processor until finely chopped, about 1 minute, scraping down sides of bowl as needed. With processor running, slowly add oil until incorporated. Transfer pesto to bowl, stir in Parmesan, and season with salt and pepper to taste. (Pesto can be refrigerated for up to 3 days or frozen for up to 3 months. To prevent browning, press plastic wrap flush to surface or top with thin layer of olive oil. Bring to room temperature before using.)
PARSLEY AND PECAN PESTO
Makes about ¾ cup; enough for 1 pound pasta
Total time: 25 minutes
WHY THIS RECIPE WORKS Once you go beyond the classic version, pesto can actually be prepared with a variety of ingredients—other herbs and greens like parsley or arugula, or even potent ingredients like sun-dried tomatoes or olives. For this delicious variation, we chose parsley as the star. To balance out the flavor of the parsley, which is grassier and heartier than the traditional basil, we found it necessary to ramp up the nut flavor profile. Pecans have a more pronounced flavor than pine nuts, so we decided to use those here. You can substitute walnuts, blanched almonds, skinned hazelnuts, or any combination of these three for the pecans. Stir this into rice or a bowl of steamed or sautéed green beans.
2 garlic cloves, unpeeled
½ cup pecans
2 tablespoons fresh parsley leaves
3½ tablespoons extra-virgin olive oil
2 tablespoons grated Parmesan cheese
Salt and pepper
1. Toast garlic in 8-inch skillet over medium heat, shaking skillet occasionally, until softened and spotty brown, about 8 minutes. When garlic is cool enough to handle, discard skins and chop coarse. Meanwhile, toast pecans in now-empty skillet over medium heat, stirring often, until golden and fragrant, 4 to 5 minutes.
2. Place parsley in 1-quart zipper-lock bag. Pound bag with flat side of meat pounder or with rolling pin until all leaves are bruised.
3. Process garlic, pecans, and parsley in food processor until finely chopped, about 1 minute, scraping down sides of bowl as needed. With processor running, slowly add oil until incorporated. Transfer pesto to bowl, stir in Parmesan, and season with salt and pepper to taste. (Pesto can be refrigerated for up to 3 days or frozen for up to 3 months. To prevent browning, press plastic wrap flush to surface or top with thin layer of olive oil. Bring to room temperature before using.)
OREGANO, LEMON, AND FETA PESTO
Makes about ¾ cup; enough for 1 pound pasta
Total time: 25 minutes
WHY THIS RECIPE WORKS For a pesto with a definitively Greek bent, we added fresh, fragrant oregano, crumbled feta cheese, and lemon zest and juice to the trad-itional ingredients—basil, pine nuts, and garlic. Fresh oregano is crucial here; do not substitute dried oregano. This pesto is delicious combined with pasta or roasted potatoes, or dollop it on top of grilled zucchini or yellow summer squash.
3 garlic cloves, unpeeled
¼ cup pine nuts
1¾ cups packed fresh basil leaves
¼ cup packed fresh oregano leaves
½ teaspoon grated lemon zest plus 2 tablespoons juice
7 tablespoons extra-virgin olive oil
1 ounce feta cheese, crumbled (¼ cup)
Salt and pepper
1. Toast garlic in 8-inch skillet over medium heat, shaking skillet occasionally, until softened and spotty brown, about 8 minutes. When garlic is cool enough to handle, discard skins and chop coarse. Meanwhile, toast pine nuts in now-empty skillet over medium heat, stirring often, until golden and fragrant, 4 to 5 minutes.
2. Place basil and oregano in 1-gallon zipper-lock bag. Pound bag with flat side of meat pounder or with rolling pin until all leaves are bruised.
3. Process garlic, pine nuts, herbs, and lemon zest and juice in food processor until finely chopped, about 1 minute, scraping down sides of bowl as needed. With processor running, slowly add oil until incorporated. Transfer pesto to bowl, stir in feta, and season with salt and pepper to taste. (Pesto can be refrigerated for up to 3 days or frozen for up to 3 months. To prevent browning, press plastic wrap flush to surface or top with thin layer of olive oil. Bring to room temperature before using.)
CILANTRO-MINT CHUTNEY
Makes about 1 cup
Total time: 10 minutes
WHY THIS RECIPE WORKS This herb-based chutney comes together in a flash in the food processor, with no need to chop the herbs in advance. We used a 2:1 ratio of grassy cilantro leaves to sweet mint leaves for the herbal flavor here, and chose whole-milk yogurt for a creamy base. A little sugar added balance, while the onion and cumin delivered a savory punch. We prefer to use whole-milk yogurt here but low-fat yogurt can be substituted; do not use nonfat yogurt. Dollop this chutney on grilled chicken or spread it on flatbread or naan.
2 cups fresh cilantro leaves
1 cup fresh mint leaves
⅓ cup plain whole-milk yogurt
¼ cup finely chopped onion
1 tablespoon lime juice
1½ teaspoons sugar
½ teaspoon ground cumin
¼ teaspoon salt
Process all ingredients in food processor until smooth, about 20 seconds, scraping down sides of bowl as needed. (Chutney can be refrigerated for up to 2 days.)
GREEN GODDESS DIP
Makes about 1¾ cups
Total time: 10 minutes (plus 1 hour chilling time)
WHY THIS RECIPE WORKS Green goddess dip is all about the fresh herbs, and here we use a trio of them: parsley, chives, and tarragon. For our base, we tested mayonnaise, sour cream, yogurt, buttermilk, heavy cream, cottage cheese, and cream cheese—in all possible combinations. It turned out that a combo of mayonnaise and sour cream made the strongest pairing with the herbs. The mayonnaise contributed the body, richness, and velvety texture we wanted in a creamy dip, while the sour cream heightened the tanginess. The flavor of this dip will continue to develop over the chilling and storage time. This is great with all manner of crudités, and it can even be thinned with a little water to use as a salad dressing.
¾ cup mayonnaise
¾ cup sour cream
¼ cup minced fresh parsley
¼ cup minced fresh chives
2 tablespoons minced fresh tarragon
1 tablespoon lemon juice
2 garlic cloves, minced
⅛ teaspoon salt
⅛ teaspoon pepper
Whisk all ingredients together in serving bowl until smooth and creamy. Cover with plastic wrap and refrigerate until flavors are blended, at least 1 hour. (Dip can be refrigerated for up to 2 days.)
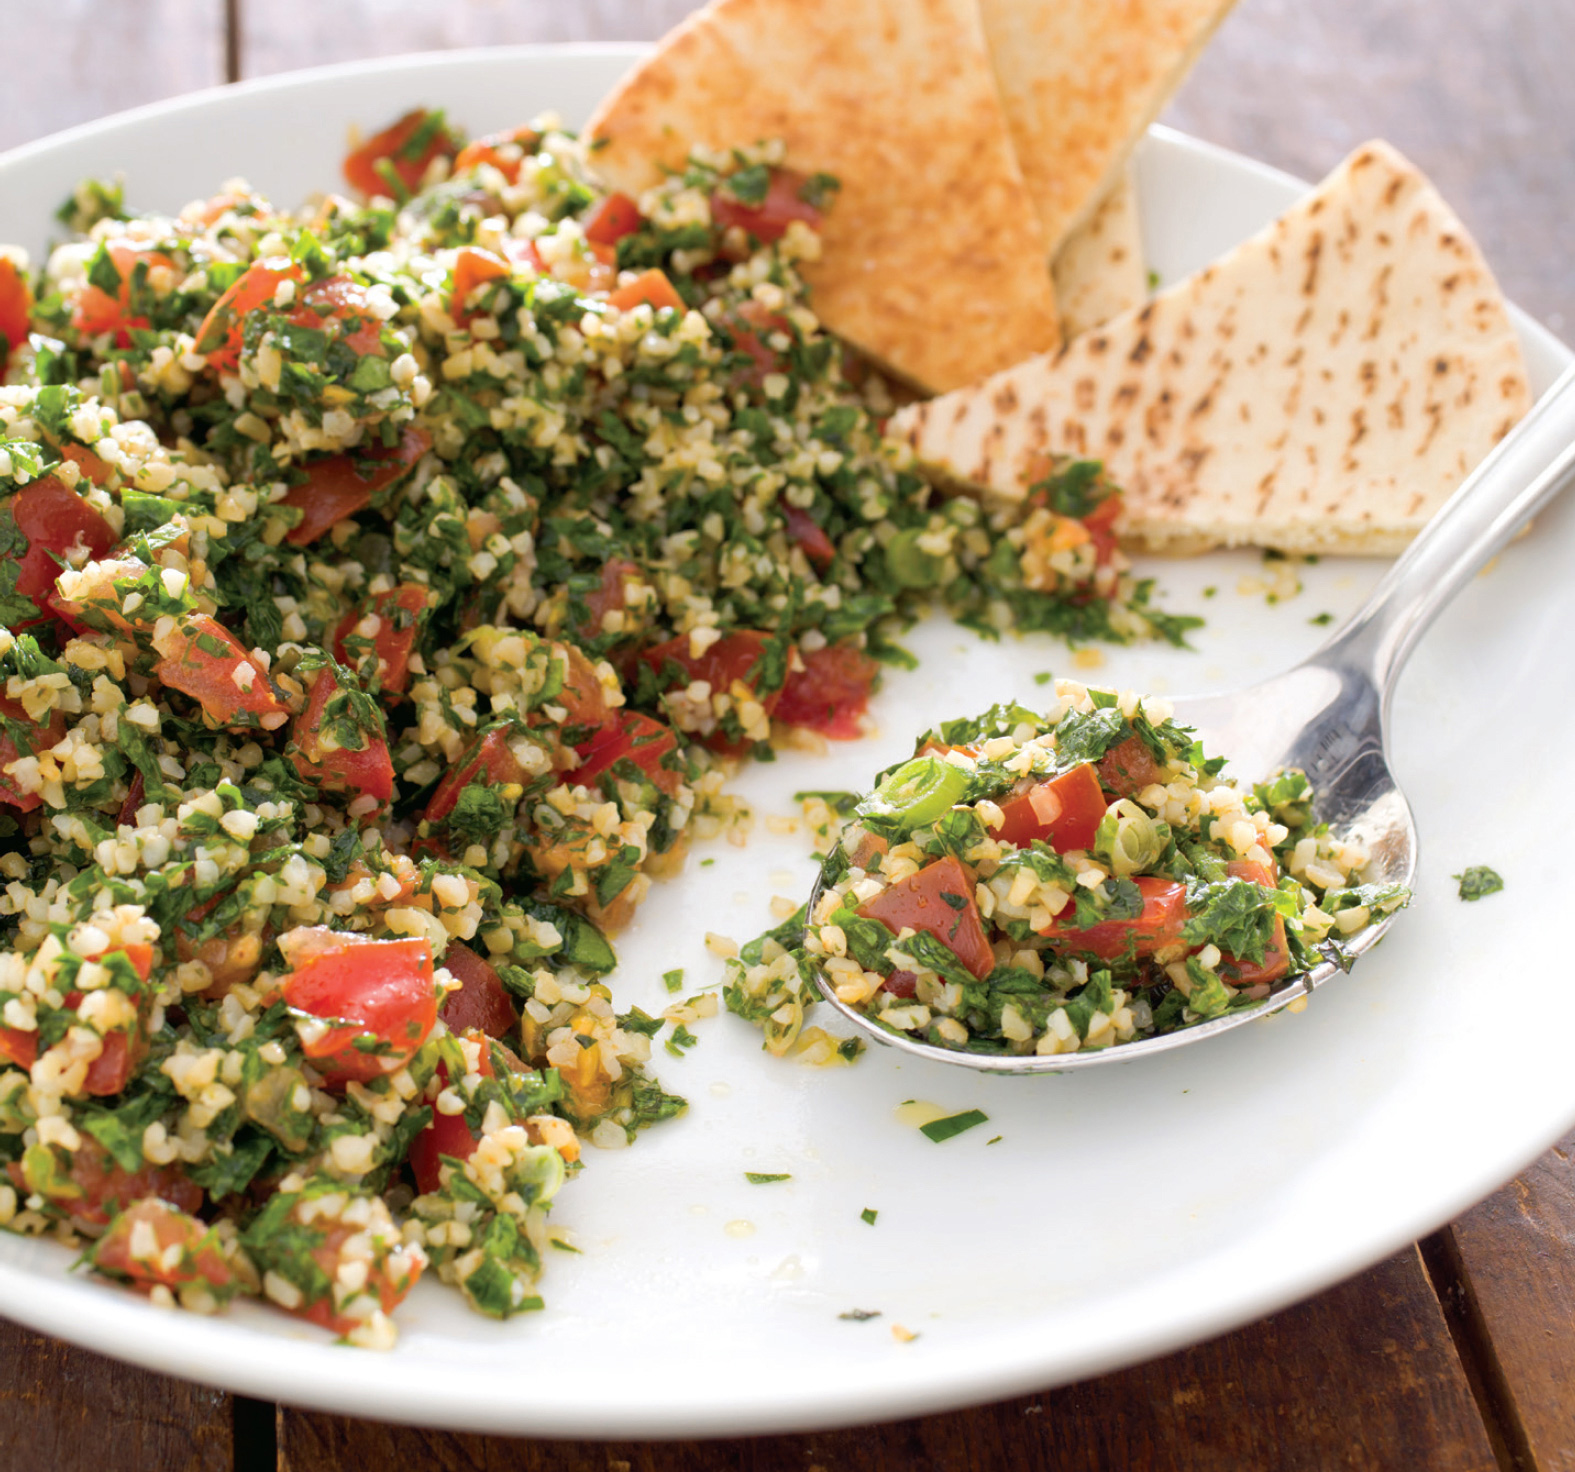
TABBOULEH
Serves 4 to 6
Total time: 40 minutes (plus 1 hour resting time)
WHY THIS RECIPE WORKS: Tabbouleh is a signature Levantine salad from the Eastern Mediterranean that puts parsley front and center, along with bulgur, tomatoes, and onion, all steeped in a penetrating mint and lemon dressing. We started by salting the tomatoes to rid them of excess moisture that otherwise would have made our salad soggy. Soaking the bulgur in lemon juice and some of the drained tomato liquid, rather than in water, allowed it to absorb lots of flavor as it softened. Chopped onion overwhelmed the salad, but a couple of mild scallions added just the right amount of oniony flavor. Fresh mint and a bit of cayenne pepper rounded out the dish. Adding the herbs and vegetables while the bulgur was still soaking gave the components time to mingle, resulting in a cohesive dish. Don’t confuse bulgur with cracked wheat, which has a much longer cooking time and will not work in this recipe.
3 tomatoes, cored and cut into ½-inch pieces
Salt and pepper
½ cup medium-grind bulgur, rinsed
¼ cup lemon juice (2 lemons)
6 tablespoons extra-virgin olive oil
⅛ teaspoon cayenne pepper
1½ cups minced fresh parsley
½ cup minced fresh mint
2 scallions, sliced thin
1. Toss tomatoes with ¼ teaspoon salt in fine-mesh strainer set over bowl and let drain, tossing occasionally, for 30 minutes; reserve 2 tablespoons drained tomato juice. Toss bulgur with 2 tablespoons lemon juice and reserved tomato juice in bowl and let sit until grains begin to soften, 30 to 40 minutes.
2. Whisk remaining 2 tablespoons lemon juice, oil, cayenne, and ¼ teaspoon salt together in large serving bowl. Add tomatoes, bulgur, parsley, mint, and scallions and toss gently to combine. Cover and let sit at room temperature until flavors have blended and bulgur is tender, about 1 hour. Toss salad to recombine and season with salt and pepper to taste. Serve.
VARIATION
Spiced Tabbouleh
Add ¼ teaspoon ground cinnamon and ¼ teaspoon ground allspice to dressing with cayenne.
HERBED ROAST CHICKEN
Serves 6
Total time: 1 hour 45 minutes (plus 1 hour chilling time)
WHY THIS RECIPE WORKS One of our favorite ways to roast a chicken is to pack it with lots of fresh herb flavor. But the reality is that this is one of the hardest culinary tasks to get right, since the heat of the oven tends to destroy the flavor of fresh herbs. The most common approach—spreading herb butter under the skin of the breast—flavors the chicken weakly at best. After much testing with herb pastes (and lots of torn chicken skin), we decided to butterfly the chicken. This simple step made it far easier both to spread the paste and to get the crisp skin we were after. After brining, we made shallow cuts in the dark meat, which not only helped the skin render but also created pockets to trap the flavorful herbs. We carefully rubbed part of our herb paste under the skin on the breast meat and then browned the chicken in a large skillet before transferring the skillet to the oven. Halfway through cooking, we slathered on more of the herb paste. Just to make sure that every bite of chicken was bursting with herby flavor, we made a quick pan sauce using the drippings in the skillet, finishing it off with a couple of tablespoons of extra herb butter and a few drops of lemon juice. You can substitute an equal amount of basil for the tarragon and replace the thyme with rosemary, oregano, or sage. If using a kosher chicken, do not brine in step 1. The chicken may slightly overhang the skillet at first, but once browned it will fit.
CHICKEN
1 (5-pound) whole chicken, trimmed, giblets discarded
Salt and pepper
6 tablespoons unsalted butter, softened
6 scallions, green parts only, minced
¼ cup minced fresh tarragon
1 tablespoon minced fresh thyme
1 garlic clove, minced
1 tablespoon vegetable oil
SAUCE
1–1½ cups chicken broth
2 teaspoons all-purpose flour
1 teaspoon lemon juice
Salt and pepper
1. For the chicken With chicken breast side down, use kitchen shears to cut through bones on either side of backbone and discard backbone. Flip chicken over and press on breastbone to flatten. Using sharp knife, cut 2 slashes, ⅛ inch deep, into skin of thighs and legs, about ¾ inch apart. Dissolve ½ cup salt in 2 quarts cold water in large container. Submerge chicken in brine, cover, and refrigerate for 1 hour.
2. Meanwhile, adjust oven rack to middle position and heat oven to 450 degrees. Combine softened butter, scallions, tarragon, thyme, garlic, ¼ teaspoon salt, and ¼ teaspoon pepper in bowl. Transfer 2 tablespoons herb butter to small bowl and refrigerate; set remaining herb butter aside.
3. Remove chicken from brine and pat dry with paper towels. Using your fingers or handle of spoon, gently loosen center portion of skin covering each side of breast. Using spoon, place 1 tablespoon room-temperature herb butter underneath skin over center of each side of breast. Gently press on skin to distribute butter over meat. Season chicken with pepper.
4. Heat oil in 12-inch ovensafe skillet over medium-high heat until just smoking. Add chicken skin side down and reduce heat to medium. Cook until lightly browned, 8 to 10 minutes. Transfer skillet to oven and roast chicken for 25 minutes.
5. Using pot holder, remove chicken from oven. Using 2 large wads of paper towels, flip chicken skin side up. Using spoon or spatula, evenly coat chicken skin with remaining room-temperature herb butter and return to oven. Roast chicken until skin is golden brown, breast registers 160 degrees, and thighs register 175 degrees, 15 to 20 minutes. Transfer chicken to cutting board and let rest for 20 minutes.
6. For the sauce While chicken rests, pour pan juices into fat separator. Let liquid settle for 5 minutes, then pour juices into 2-cup liquid measuring cup. Add enough broth to measure 1½ cups. Heat 2 teaspoons fat from fat separator in now-empty skillet over medium heat until shimmering. Add flour and cook, stirring constantly, until golden, about 1 minute. Slowly whisk in broth mixture, scraping up any browned bits. Bring to rapid simmer and cook until reduced to 1 cup, 5 to 7 minutes. Stir in any accumulated chicken juices, return to simmer, and cook for 30 seconds. Off heat, whisk in lemon juice and reserved cold herb butter. Season with salt and pepper to taste. Carve chicken and serve, passing sauce separately.
THAI-STYLE CHICKEN WITH BASIL
Serves 4
Total time: 40 minutes
WHY THIS RECIPE WORKS This traditional Thai street food features the bright flavor of basil in three ways. First, we ground a cup of basil leaves in the food processor with garlic and Thai chiles for a stir-fry base for the chicken. We removed a tablespoon of that base mixture to make a pungent sauce with ingredients including fish sauce and oyster sauce, which we added toward the end of cooking as a finishing sauce. Finally, we stirred another cup of fresh basil leaves into the dish right before serving, for a big pop of herbal flavor. This dish, called gai pad krapow, is normally very spicy; we halved the amount of chiles, cutting the amount of sugar by half as well to keep the flavors balanced. If fresh Thai chiles are unavailable, substitute two serranos or one medium jalapeño. In Thailand, red pepper flakes and sugar are passed at the table, along with extra fish sauce and white vinegar, so that the dish can be adjusted to suit individual tastes. Serve with steamed rice and vegetables, if desired.
2 cups fresh basil leaves
3 garlic cloves, peeled
6 green or red Thai chiles, stemmed
2 tablespoons fish sauce, plus extra for serving
1 tablespoon oyster sauce
1 tablespoon sugar, plus extra for serving
1 teaspoon distilled white vinegar, plus extra for serving
1 pound boneless, skinless chicken breasts, trimmed and cut into 2-inch pieces
3 shallots, sliced thin
2 tablespoons vegetable oil
Red pepper flakes
1. Pulse 1 cup basil, garlic, and Thai chiles in food processor until finely chopped, 6 to 10 pulses, scraping down sides of bowl as needed. Transfer 1 tablespoon basil mixture to small bowl and stir in 1 tablespoon fish sauce, oyster sauce, sugar, and vinegar; set aside. Transfer remaining basil mixture to 12-inch nonstick skillet.
2. Pulse chicken and remaining 1 tablespoon fish sauce in now-empty food processor until meat is chopped into approximately ¼-inch pieces, 6 to 8 pulses. Transfer to bowl and refrigerate for 15 minutes.
3. Stir shallots and oil into basil mixture in skillet. Heat over medium-low heat (mixture should start to sizzle after about 1½ minutes; if it doesn’t, adjust heat accordingly), stirring constantly, until garlic and shallots are golden brown, 5 to 8 minutes.
4. Add chicken, increase heat to medium, and cook, stirring and breaking up chicken with rubber spatula, until only traces of pink remain, 2 to 4 minutes. Add reserved basil–fish sauce mixture and continue to cook, stirring constantly, until chicken is no longer pink, about 1 minute. Stir in remaining 1 cup basil and cook, stirring constantly, until basil is wilted, 30 seconds to 1 minute. Serve immediately, passing extra fish sauce, sugar, vinegar, and pepper flakes separately.

GRILLED ARGENTINE STEAKS WITH CHIMICHURRI SAUCE
Serves 6 to 8
Total time: 1 hour 30 minutes (plus 30 minutes salting time)
WHY THIS RECIPE WORKS A fresh, herb-packed chimichurri sauce complementing rich, smoky grilled steaks is an Argentine favorite. We think it’s a perfect meal for summer evenings outside with friends and family. To translate the Argentine grilling method to our smaller American steaks, we rubbed the boneless strip steaks with salt and used the freezer as a dehydrator to evaporate the surface moisture; this, along with rubbing the steaks with cornstarch, helped them develop a substantial browned exterior on the grill. Covering the grill for the initial cooking jump-started the flavoring process.
CHIMICHURRI SAUCE
¼ cup hot water
2 teaspoons dried oregano
1 teaspoon salt
1⅓ cups fresh parsley leaves
⅔ cup fresh cilantro leaves
6 garlic cloves, minced
½ teaspoon red pepper flakes
¼ cup red wine vinegar
½ cup extra-virgin olive oil
STEAKS
1 tablespoon cornstarch
Salt and pepper
4 (1-pound) boneless strip steaks, 1½ inches thick, trimmed
4 medium wood chunks, unsoaked
1 (9-inch) disposable aluminum pie plate (if using gas)
1. For the chimichurri sauce Combine water, oregano, and salt in small bowl and let sit until oregano is softened, about 15 minutes. Pulse parsley, cilantro, garlic, and pepper flakes in food processor until coarsely chopped, about 10 pulses. Add water mixture and vinegar and pulse to combine. Transfer mixture to bowl and slowly whisk in oil until combined. Cover and let sit at room temperature for 1 hour. (Chimichurri sauce can be refrigerated for up to 3 days.)
2. For the steaks Meanwhile, combine cornstarch and 1½ teaspoons salt in bowl. Pat steaks dry with paper towels and place on wire rack set in rimmed baking sheet. Rub entire surface of steaks with cornstarch mixture and place steaks in freezer, uncovered, until very firm, about 30 minutes.
3a. For a charcoal grill Open bottom vent halfway. Light large chimney starter filled with charcoal briquettes (6 quarts). When top coals are partially covered with ash, pour evenly over grill. Using tongs, place wood chunks directly on top of coals, spacing them evenly around perimeter of grill. Set cooking grate in place, cover, and open lid vent halfway. Heat grill until hot and wood chunks are smoking, about 5 minutes.
3b. For a gas grill Turn all burners to high, cover, and heat grill until hot, about 15 minutes. Leave all burners on high. Place wood chunks in disposable aluminum pie plate and set on cooking grate. Close lid and heat until wood chunks begin to smoke, about 5 minutes.
4. Clean and oil cooking grate. Season steaks with pepper. Place steaks on grill, cover, and cook until beginning to brown, 2 to 3 minutes per side.
5. Flip steaks and cook, uncovered, until well browned on first side, 2 to 4 minutes. Flip steaks and continue to cook until meat registers 115 to 120 degrees (for rare) or 120 to 125 degrees (for medium-rare), 2 to 6 minutes longer.
6. Transfer steaks to carving board, tent with aluminum foil, and let rest for 5 to 10 minutes. Slice each steak ¼ inch thick. Serve, passing chimichurri sauce separately.
RACK OF LAMB WITH MINT-ALMOND RELISH
Serves 4 to 6
Total time: 2 hours 15 minutes
WHY THIS RECIPE WORKS Mint and lamb are a venerable flavor pairing—some might even say a bit old-fashioned—so we wanted to reinvigorate this classic in a new way. The simple stir-together mint relish, loaded with bright flavors, and the anise-spiced salt achieved this simply but effectively. To make this a company-worthy dish, we decided on rack of lamb. To prepare the racks, we frenched them (cleaned the rib bones of meat and fat) and also discovered that we needed to remove a second layer of fat to avoid a greasy finished dish. We slowly roasted the lamb in a low oven to ensure a uniformly rosy, juicy interior. To brown and crisp the exterior, we quickly seared the racks after roasting. We prefer the milder taste and bigger size of domestic lamb, but you may substitute imported lamb from New Zealand and Australia. Since imported racks are generally smaller, in step 1, season each rack with ½ teaspoon of the salt mixture and reduce the cooking time to 50 minutes to 1 hour 10 minutes. You can substitute ground fennel for the ground anise if you prefer.
LAMB
2 (1¾- to 2-pound) racks of lamb, fat trimmed to ⅛ to ¼ inch and rib bones frenched
Kosher salt
1 teaspoon ground anise
1 teaspoon vegetable oil
½ cup minced fresh mint
¼ cup sliced almonds, toasted and chopped fine
¼ cup extra-virgin olive oil
2 tablespoons red currant jelly
4 teaspoons red wine vinegar
2 teaspoons Dijon mustard
Salt and pepper
1. For the lamb Adjust oven rack to middle position and heat oven to 250 degrees. Using sharp knife, cut slits ½ inch apart in crosshatch pattern in fat cap of lamb, being careful not to cut into meat. Combine 2 tablespoons salt and anise in bowl. Rub ¾ teaspoon salt mixture over entire surface of each rack and into slits. Reserve remaining salt mixture. Place racks, bone side down, on wire rack set in rimmed baking sheet. Roast until lamb registers 130 to 135 degrees (for medium), about 1 hour 25 minutes.
2. For the mint-almond relish Meanwhile, combine all ingredients in bowl, seasoning with salt and pepper to taste. Let sit at room temperature for 1 hour.
3. Heat oil in 12-inch skillet over high heat until just smoking. Place 1 rack, bone side up, in skillet and cook until well browned, 1 to 2 minutes. Transfer to carving board. Pour off all but 1 teaspoon fat from skillet and repeat browning with second rack. Tent racks with aluminum foil and let rest for 20 minutes. Cut between ribs to separate chops and sprinkle cut side of chops with ½ teaspoon salt mixture. Serve, passing mint-almond relish and remaining salt mixture separately.
GRAVLAX
Serves 8 to 10
Total time: 25 minutes (plus 3 days curing time)
WHY THIS RECIPE WORKS Gravlax, salmon that’s cured with sugar and salt and infused with sweet, slightly citrusy fresh dill, is a favorite throughout Scandinavia. Homemade gravlax sounds like it would require an extravagant time commitment and specialty tools and ingredients, but in fact it’s a supereasy and fun project that is an impressive make-ahead choice for a weekend brunch. For gravlax that was evenly moist, tender, and consistently seasoned, we drizzled the fish with brandy, coated it in brown sugar, salt, and dill, and then pressed and refrigerated it. The salt drew liquid from the fish and cured it, while the brown sugar counterbalanced the salt and added deep flavor. The brandy helped the rub adhere and also added flavor. We basted the fish once a day to keep it moist. Once it was finished, all we had to do was slice the salmon as thin as possible. This homemade gravlax is ready when the fish is no longer translucent and its flesh is firm, with no give.
⅓ cup packed light brown sugar
¼ cup kosher salt
1 (1-pound) skin-on center-cut salmon fillet
3 tablespoons brandy
1 cup coarsely chopped fresh dill
1. Combine sugar and salt in bowl. Place salmon, skin side down, in 13 by 9-inch glass baking dish. Drizzle with brandy, making sure to cover entire surface. Rub salmon evenly with sugar mixture, pressing firmly to adhere. Sprinkle dill over top, pressing firmly to adhere.
2. Cover salmon loosely with plastic wrap, top with square baking dish, and weight with several large, heavy cans. Refrigerate until salmon feels firm, about 3 days, basting salmon with liquid released into baking dish once a day.
3. Scrape dill off salmon. Remove fillet from dish and pat dry with paper towels. Slice salmon crosswise on bias into very thin pieces and serve. (Unsliced gravlax can be wrapped tightly in plastic wrap and refrigerated for up to 1 week.)
ALMOST HANDS-FREE RISOTTO WITH HERBS AND PARMESAN
Serves 6
Total time: 50 minutes
WHY THIS RECIPE WORKS Risotto with fresh mixed herbs, butter, and cheese is a wonderful side dish for all manner of braised meats. We love the combination of parsley and chives here to brighten the richness of the dish. However, classic risotto can demand half an hour of stovetop stirring tedium. We set out to create a version that would free the cook to prepare the other parts of the meal while the risotto cooked. We chose to cook our risotto in a Dutch oven rather than a saucepan, because the former’s thick, heavy bottom, deep sides, and tight-fitting lid are made to trap and distribute heat as evenly as possible. We also added most of the broth at once, instead of in small increments as is typical. Then we covered the pan and simmered the rice until almost all the broth had been absorbed, stirring just twice. After adding the final addition of broth, we stirred the pot for a few minutes and then took it off the heat. The rice turned out thickened, velvety, and just barely chewy. Stirring in the herbs at the end kept their flavors assertive. This more hands-off method does require precise timing, so we strongly recommend using a timer. The consistency of risotto is largely a matter of personal taste, so if you prefer a brothy risotto, add extra broth in step 4.
5 cups chicken or vegetable broth
1½ cups water
4 tablespoons unsalted butter
1 large onion, chopped fine
Salt and pepper
1 garlic clove, minced
2 cups Arborio rice
1 cup dry white wine
2 ounces Parmesan cheese, grated (1 cup)
1 teaspoon lemon juice
2 tablespoons chopped fresh parsley
2 tablespoons chopped fresh chives
1. Bring broth and water to boil in large saucepan over high heat. Cover and reduce heat to medium-low to maintain gentle simmer.
2. Melt 2 tablespoons butter in Dutch oven over medium heat. Add onion and ¾ teaspoon salt and cook until onion is softened, about 5 minutes. Stir in garlic and cook until fragrant, about 30 seconds. Stir in rice and cook, stirring often, until grain edges begin to turn translucent, about 3 minutes.
3. Stir in wine and cook, stirring constantly, until fully absorbed, 2 to 3 minutes. Stir in 5 cups hot broth mixture. Reduce heat to medium-low, cover, and simmer until almost all liquid has been absorbed and rice is just al dente, 16 to 19 minutes, stirring twice during cooking.
4. Add ¾ cup hot broth mixture and stir gently and constantly until risotto becomes creamy, about 3 minutes. Stir in Parmesan. Remove pot from heat, cover, and let stand for 5 minutes. Stir in remaining 2 tablespoons butter, lemon juice, parsley, and chives. Season with salt and pepper to taste. Before serving, stir in remaining hot broth mixture as needed to loosen consistency of risotto.
SUMMER ROLLS WITH BASIL AND SPICY ALMOND BUTTER SAUCE
Makes 12 rolls; serves 4
Total time: 30 minutes (plus 1 hour marinating time)
WHY THIS RECIPE WORKS Vietnamese-style summer rolls can be made from a variety of fresh ingredients, including shrimp or chicken and several choices of vegetable. One hallmark and constant, however, is their generous use of fresh herbs. Though you can use a combination of herbs, for our rolls we decided to give sweet basil the starring role. We gathered up a rainbow of healthful veggies—red cabbage, red bell pepper, cucumber, and carrots—to give our rice paper packages color and crunch. Strips of marinated tofu made the rolls hearty enough for lunch. Instead of a thin soy dipping sauce, we whisked up a more satisfying sriracha-spiked almond butter sauce. Thick and rich, it clung easily to our rolls, taking the dish to a new level. You can use smooth or chunky almond or peanut butter for the sauce. Be sure to make one roll at a time to keep the wrappers moist and pliable. Brands of rice paper wrappers vary in the time it takes to soak and become pliable.
SAUCE
3 tablespoons almond or peanut butter
3 tablespoons water
1 tablespoon rice vinegar
1 tablespoon soy sauce
2 teaspoons grated fresh ginger
1 teaspoon sriracha
1 garlic clove, minced
ROLLS
6 tablespoons rice wine vinegar
1 tablespoon soy sauce
2 teaspoons sriracha
2 scallions, sliced thin on bias
½ (14-ounce) package extra-firm tofu, cut into 3-inch-long by ½-inch-thick strips
½ small head red cabbage, halved, cored, and sliced thin (3½ cups)
12 (8-inch) round rice paper wrappers
1 cup fresh basil leaves
1 red bell pepper, stemmed, seeded, and cut into 2-inch-long matchsticks
½ seedless English cucumber, cut into 3-inch matchsticks
2 carrots, peeled and shredded
1. For the sauce Whisk all ingredients in bowl until well combined; set aside.
2. For the rolls Whisk 2 tablespoons vinegar, soy sauce, sriracha, and scallions in shallow dish until combined. Add tofu and let sit for 1 hour. Toss cabbage with remaining ¼ cup vinegar and let sit for 1 hour. Drain cabbage in fine-mesh strainer, pressing gently with back of spatula to remove as much liquid as possible. Transfer to large plate and pat dry with paper towels.
3. Spread clean, damp dish towel on work surface. Fill 9-inch pie plate with 1 inch room-temperature water. Working with 1 wrapper at a time, submerge in water until just pliable, 10 seconds to 2 minutes; lay softened wrapper on towel. Scatter 3 basil leaves over wrapper. Arrange 5 matchsticks each of bell pepper and cucumber horizontally on wrapper, leaving 2-inch border at bottom. Top with 1 tablespoon carrots, then arrange 2 tablespoons cabbage on top of carrots. Place 1 strip tofu horizontally on top of vegetables, being sure to shake off excess marinade.
4. Fold bottom of wrapper over filling, pulling back on it firmly to tighten it around filling, then fold sides of wrapper in and continue to roll tightly into spring roll. Transfer to platter and cover with second damp dish towel.
5. Repeat with remaining wrappers and filling. Serve with almond butter sauce. (Spring rolls are best eaten immediately but can be covered with a clean, damp dish towel and refrigerated for up to 4 hours.)

ROSEMARY AND PARMESAN DROP BISCUITS
Makes 12 biscuits
Total time: 35 minutes
WHY THIS RECIPE WORKS Fresh, piney rosemary and Parmesan cheese make these savory biscuits perfect to accompany simply prepared meats, stews, or soups. We wanted a biscuit that could be easily broken apart and enjoyed piece by buttery piece; too many drop biscuits are dense, gummy, and doughy, or else too lean and dry. While oil-based biscuits are easy to work with, they lack flavor, so butter was a must. Using buttermilk instead of milk gave the biscuits a rich tang and made them crisper on the exterior and fluffier on the interior. For the leavening, we needed a substantial amount, but too much baking powder left a metallic aftertaste. Replacing some of the baking powder with baking soda gave the biscuits the rise they needed without that metallic bitterness. Then we were left with only one problem: Properly combining the butter and buttermilk required that both ingredients be at just the right temperature; if they weren’t, the melted butter clumped in the buttermilk. Since we wanted this to be an easy recipe, we tried making a batch with the lumpy buttermilk. The result was a surprisingly better biscuit, slightly higher and with better texture. The water in the lumps of butter turned to steam in the oven, helping create the additional height.
2 cups (10 ounces) all-purpose flour
1½ ounces Parmesan cheese, grated (¾ cup)
2 teaspoons baking powder
½ teaspoon baking soda
1 teaspoon sugar
¾ teaspoon salt
½ teaspoon minced fresh rosemary
1 cup buttermilk, chilled
10 tablespoons unsalted butter, melted
1. Adjust oven rack to middle position and heat oven to 475 degrees. Line rimmed baking sheet with parchment paper.
2. Whisk flour, Parmesan, baking powder, baking soda, sugar, salt, and rosemary together in large bowl. In separate bowl, stir chilled buttermilk and 8 tablespoons melted butter together until butter forms small clumps. Stir buttermilk mixture into flour mixture until just incorporated and dough pulls away from sides of bowl.
3. Using greased ¼-cup measure, scoop out scant ¼ cup dough and drop onto prepared sheet, spacing dough mounds about 1½ inches apart (you should have 12 mounds). Bake until tops are golden brown and crisp, 12 to 14 minutes, rotating sheet halfway through baking.
4. Brush baked biscuits with remaining 2 tablespoons melted butter, transfer to wire rack, and let cool slightly before serving.
VARIATION
Cheddar and Scallion Drop Biscuits
Substitute ½ cup shredded cheddar cheese for Parmesan and 2 thinly sliced scallions for rosemary.
CLASSIC BREAD STUFFING WITH SAGE AND THYME
Serves 8 to 10
Total time: 2 hours 45 minutes
WHY THIS RECIPE WORKS We usually prefer to cook our stuffing outside the turkey, since a stuffed bird takes longer and often results in overcooked meat by the time the stuffing has reached a safe temperature. For this recipe, we used fresh parsley, sage, thyme, and marjoram to create an herby stuffing with a great balance of flavors and textures. Half-inch cubes of bread made the stuffing pleasantly chunky and allowed the other ingredients to be distributed evenly throughout. Tasters preferred chicken broth to other liquid ingredients, since it gave the stuffing clean, savory flavor; a couple of eggs offered richness, moisture, and structure. The celery and onion boosted the herbs to give the stuffing a traditional flavor profile. Covering the stuffing for only part of the baking time ensured that it was moist throughout, with a crispy, crunchy top. Instead of oven drying in step 1, you can let bread stale overnight at room temperature. This recipe can be doubled and baked in a 15 by 10-inch baking dish for a larger crowd.
1½ pounds hearty white sandwich bread, cut into ½-inch pieces
6 tablespoons unsalted butter
2 celery ribs, minced
1 onion, chopped fine
¼ cup minced fresh parsley
1½ tablespoons minced fresh sage or 1 teaspoon dried
1½ tablespoons minced fresh thyme or ½ teaspoon dried
1½ teaspoons minced fresh marjoram or ½ teaspoon dried
2½ cups chicken broth
2 large eggs, lightly beaten
1 teaspoon salt
1 teaspoon pepper
1. Adjust oven rack to middle position and heat oven to 300 degrees. Grease 13 by 9-inch baking dish. Spread bread onto rimmed baking sheet and bake, stirring occasionally, until bread is dry, 45 minutes to 1 hour. Let bread cool completely on sheet, about 30 minutes.
2. Increase oven temperature to 400 degrees. Melt butter in 12-inch skillet over medium-high heat. Add celery and onion and cook until softened, about 10 minutes. Stir in parsley, sage, thyme, and marjoram and cook until fragrant, about 1 minute. Transfer to very large bowl.
3. Add dried cooled bread, broth, eggs, salt, and pepper to vegetable mixture and toss to combine. Transfer to prepared baking dish.
4. Cover with aluminum foil and bake for 25 minutes. Remove foil and continue to bake until golden, about 30 minutes longer. Let cool for 10 minutes. Serve.