Figure 635: Sample UI, As Initially Launched on Android 4.0
While well-written GUI frameworks are better organized than XKCD’s take on home organization, there are always a handful of tidbits that do, indeed, get categorized as “miscellaneous”.
Understanding this chapter requires that you have read the core chapters of this book. Having an appreciation for XKCD is welcome, but optional.
Full-screen mode, in Android parlance, means removing any system-supplied “bars” from the screen: title bar, action bar, status bar, system bar, navigation bar, etc. You might use this for games, video players, digital book readers, or other places where the time spent in an activity is great enough to warrant removing some of the normal accouterments to free up space for whatever the activity itself is doing.
Lights-out mode, in Android parlance, is where you take the system bar or navigation bar and dim the widgets inside of them, such that the bar is still usable, but is less visually distracting. This is a new concept added in Android 3.0 and has no direct analogue in Android 1.x or 2.x.
To have an activity be in full-screen mode, you have two choices:
Theme.NoTitleBar.Fullscreen (or some
custom theme that inherits from Theme.NoTitleBar.Fullscreen)onCreate() of your activity
before calling setContentView():
requestWindowFeature(Window.FEATURE_NO_TITLE);
getWindow().setFlags(WindowManager.LayoutParams.FLAG_FULLSCREEN,
                     WindowManager.LayoutParams.FLAG_FULLSCREEN);
The first statement removes the title bar or action bar. The second statement indicates that you want the activity to run in full-screen mode, hiding the status bar.
Things got significantly more messy once we started adding in the system bar (and, later, the navigation bar as the replacement for the system bar). Since these bars provide the user access to HOME, BACK, etc., it is usually important for them to be available. Android’s behavior, therefore, varies in how you ask for something to happen and what then happens, based upon whether the device is a phone or a tablet.
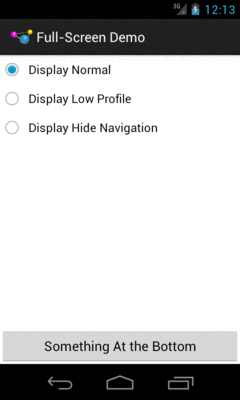
The
Activities/FullScreen
sample project tries to enumerate some of the possibilities. On an Android
4.0 device, we have three RadioButtons:
<RelativeLayout xmlns:android="http://schemas.android.com/apk/res/android"
  xmlns:tools="http://schemas.android.com/tools"
  android:layout_width="match_parent"
  android:layout_height="match_parent">

  <RadioGroup
    android:id="@+id/screenStyle"
    android:layout_width="match_parent"
    android:layout_height="wrap_content">

    <RadioButton
      android:id="@+id/normal"
      android:layout_width="wrap_content"
      android:layout_height="wrap_content"
      android:checked="true"
      android:text="@string/display_normal"/>

    <RadioButton
      android:id="@+id/lowProfile"
      android:layout_width="wrap_content"
      android:layout_height="wrap_content"
      android:text="@string/display_low_profile"/>

    <RadioButton
      android:id="@+id/hideNav"
      android:layout_width="wrap_content"
      android:layout_height="wrap_content"
      android:text="@string/display_hide_navigation"/>
  </RadioGroup>

  <Button
    android:id="@+id/button"
    android:layout_width="match_parent"
    android:layout_height="wrap_content"
    android:layout_alignParentBottom="true"
    android:text="@string/something_at_the_bottom"/>

</RelativeLayout>
Figure 635: Sample UI, As Initially Launched on Android 4.0
…while on Android 4.1 or higher, we have another two possibilities:
<RelativeLayout xmlns:android="http://schemas.android.com/apk/res/android"
  xmlns:tools="http://schemas.android.com/tools"
  android:layout_width="match_parent"
  android:layout_height="match_parent">

  <RadioGroup
    android:id="@+id/screenStyle"
    android:layout_width="match_parent"
    android:layout_height="wrap_content">

    <RadioButton
      android:id="@+id/normal"
      android:layout_width="wrap_content"
      android:layout_height="wrap_content"
      android:checked="true"
      android:text="@string/display_normal"/>

    <RadioButton
      android:id="@+id/lowProfile"
      android:layout_width="wrap_content"
      android:layout_height="wrap_content"
      android:text="@string/display_low_profile"/>

    <RadioButton
      android:id="@+id/hideNav"
      android:layout_width="wrap_content"
      android:layout_height="wrap_content"
      android:text="@string/display_hide_navigation"/>

    <RadioButton
      android:id="@+id/hideStatusBar"
      android:layout_width="wrap_content"
      android:layout_height="wrap_content"
      android:text="@string/hide_status_bar"/>

    <RadioButton
      android:id="@+id/fullScreen"
      android:layout_width="wrap_content"
      android:layout_height="wrap_content"
      android:text="@string/display_full_screen"/>
  </RadioGroup>

  <Button
    android:id="@+id/button"
    android:layout_width="match_parent"
    android:layout_height="wrap_content"
    android:layout_alignParentBottom="true"
    android:text="@string/something_at_the_bottom"/>

</RelativeLayout>
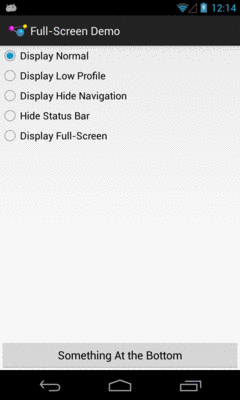
Figure 636: Sample UI, As Initially Launched on a Nexus 4/Android 4.2
Controlling the full-screen and lights-out modes is managed via a call to
setSystemUiVisibility(), a method on View. You pass in a value made up
of an OR’d (|) set of flags indicating what you want the visibility to be,
with the default being normal operation. Hence, in the screenshot above, you
see a Nexus 4 in normal mode. Here is the same UI on a Nexus 10 in normal mode:

Figure 637: Sample UI, As Initially Launched on a Nexus 10/Android 4.2
Lights-out, or low-profile mode, is achieved by calling setSystemUiVisibility()
with the View.SYSTEM_UI_FLAG_LOW_PROFILE flag. This will dim the navigation
or system bar, so the bar is there and the buttons are still active, but that
they are less visually intrusive:
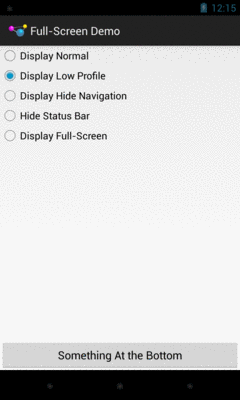
Figure 638: Sample UI, Lights-Out Mode, Nexus 4/Android 4.2
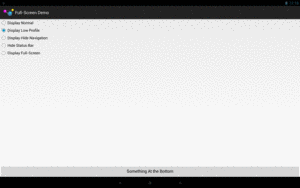
Figure 639: Sample UI, Lights-Out Mode, Nexus 10/Android 4.2
You can temporarily hide the navigation bar (or system bar) by passing
View.SYSTEM_UI_FLAG_HIDE_NAVIGATION to setSystemUiVisibility(). The bar
will disappear, until the user touches the UI, in which case the bar
reappears:
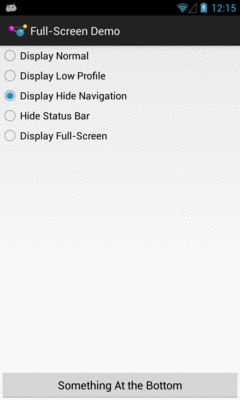
Figure 640: Sample UI, Hidden-Navigation Mode, Nexus 4/Android 4.2
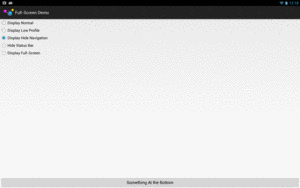
Figure 641: Sample UI, Hidden-Navigation Mode, Nexus 10/Android 4.2
Similarly, you can hide the status bar by passing
View.SYSTEM_UI_FLAG_FULLSCREEN to setSystemUiVisibility(). However,
despite this flag’s name, it does not affect the navigation or system bar:
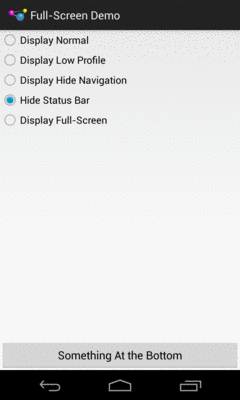
Figure 642: Sample UI, “Full-Screen” Mode, Nexus 4/Android 4.2
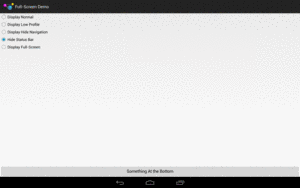
Figure 643: Sample UI, “Full-Screen” Mode, Nexus 10/Android 4.2
Hence, to hide both the status bar and the navigation or system bar, you
need to pass both flags
(View.SYSTEM_UI_FLAG_FULLSCREEN | View.SYSTEM_UI_FLAG_HIDE_NAVIGATION):
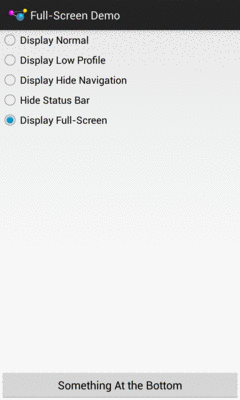
Figure 644: Sample UI, True Full-Screen Mode, Nexus 4/Android 4.2
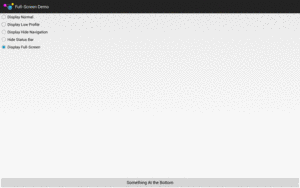
Figure 645: Sample UI, True Full-Screen Mode, Nexus 10/Android 4.2
Note that showing and hiding the ActionBar is also possible, via calls
to show() and hide(), respectively.
Android makes it easy for activities to keep the screen on while the
activity is in the foreground, by means of android:keepScreenOn
and setKeepScreenOn().
However, these are very blunt instruments, and too many developers simply ask to keep the screen on constantly, even when that is not needed and can cause excessive battery drain. That is because it is very easy to always keeps the screen on.
Say, for example, you are playing a game. Keeping the screen on while the game is being played is probably a good thing, particularly if the game does not require constant interaction with the screen. However, if you press the in-game pause button, the game might keep the screen on while the game is paused. This might lead you to press pause, put down your tablet (expecting it to fall asleep in a normal period of time), and then have the tablet keep going and going and going… until the battery runs dead.
Whether you use setKeepScreenOn() or directly use a WakeLock,
it is useful to think of three tiers of user interaction.
The first tier is when your app is doing its “one big thing”: playing the game, playing the video, displaying the digital book, etc. If you expect that there will be periods of time when the user is actively engaged with your app, but is not interacting with the screen, keep the screen on.
The second tier is when your app is delivering something to the user that probably would get used without interaction in the short term, but not indefinitely. For example, a game might reasonably expect that 15 seconds could be too short to have the screen time out, but if the user has not done anything in 5-10 minutes, most likely they are not in front of the game. Similarly, a digital book reader should not try to keep the screen on for an hour without user interaction.
The third tier is when your app is doing anything other than the main content, where normal device behavior should resume. A video player might keep the screen on while the video is playing, but if the video ends, normal behavior should resume. After all, if the person who had been watching the video fell asleep, they will not be in position to press a power button.
The first and third tiers are fairly easy from a programming standpoint.
Just acquire() and release() the WakeLock, or toggle
setKeepScreenOn() between true and false.
The second tier — where you are willing to have a screen timeout, just
not too quickly — requires you to add a bit more smarts to your app.
A simple, low-overhead way of addressing this is to have a postDelayed()
loop, to get a Runnable control every 5-10 seconds. Each time the user
interacts with your app, update a lastInteraction timestamp. The
Runnable compares lastInteraction with the current time, and if
it exceeds some threshold, release the WakeLock or call
setKeepScreenOn(false). When the user interacts again, though, you
will need to re-acquire the WakeLock or call setKeepScreenOn(true).
Basically, you have your own inactivity timing mechanism to control
when you are inhibiting normal inactivity behavior or not.
To see the second tier in action, take a look at the
MiscUI/DelayedTimeout
sample project.
The UI is a simple button. We want to keep the screen awake while the user
is using the button, but let it fall asleep after a period of inactivity that
we control. To accomplish this, we will use a postDelayed() loop, to get
control every 15 seconds to see if there has been user activity:
package com.commonsware.android.timeout;

import android.app.Activity;
import android.os.Bundle;
import android.os.SystemClock;
import android.view.View;

public class MainActivity extends Activity implements Runnable {
  private static int TIMEOUT_POLL_PERIOD=15000; // 15 seconds
  private static int TIMEOUT_PERIOD=300000; // 5 minutes
  private View content=null;
  private long lastActivity=SystemClock.uptimeMillis();

  @Override
  protected void onCreate(Bundle savedInstanceState) {
    super.onCreate(savedInstanceState);
    setContentView(R.layout.activity_main);

    content=findViewById(android.R.id.content);
    content.setKeepScreenOn(true);
    run();
  }

  @Override
  public void onDestroy() {
    content.removeCallbacks(this);

    super.onDestroy();
  }

  @Override
  public void run() {
    if ((SystemClock.uptimeMillis() - lastActivity) > TIMEOUT_PERIOD) {
      content.setKeepScreenOn(false);
    }

    content.postDelayed(this, TIMEOUT_POLL_PERIOD);
  }

  public void onClick(View v) {
    lastActivity=SystemClock.uptimeMillis();
  }
}
In onCreate(), we call setKeepScreenOn(true) to keep the screen on, regardless
of what the user’s default timeout is. Then, we call the run() method from
our Runnable interface (implemented on the activity itself). run() sees
if 5 minutes has elapsed since the last bit of user activity (initially set
to be the time the activity launches). If 5 minutes has elapsed, we revert
to normal screen-timeout behavior with setKeepScreenOn(false). We also
schedule ourselves, as a Runnable, to get control again in 15 seconds, to see
if 5 minutes has elapsed since the last-seen activity. Our button’s onClick()
method simply updates the last-seen timestamp, and onDestroy() cleans up
our postDelayed() loop by calling removeCallbacks() to stop invoking our
Runnable.
The net is that the device’s screen will remain on for 5 minutes since the last time the user taps the button, even if the user’s default screen timeout is set to shorter than 5 minutes. Yet, at the same time, we do not keep the screen on forever, causing unnecessary battery drain.
Note that to test this, you will probably need to unplug your USB cable after installing the app on the device (since many developers have it set up to keep the screen on while plugged in). Also, you will need to set your device’s screen timeout to be under 5 minutes, if it is not set that way already.
This is a primitive implementation, missing lots of stuff that you would want
in production code (e.g., it never calls setKeepScreenOn(true) if we flipped
it to false but then tap the button). And the complexity of determining
if the user interacted with the screen will be tied to the complexity of your
UI.
That being said, by having a more intelligent use of WakeLock and setKeepScreenOn(),
you can deliver value to the user while not accidentally causing
excessive battery drain. Users do not always remember to press the
power button, so you need to make sure that just because the user made
a mistake, that you do not make it worse.