Figure 782: Built-In Sound Recording Activity
Most Android devices have microphones. On such devices, it might be nice to get audio input from those microphones, whether to record locally, process locally (e.g., speech recognition), or to stream out over the Internet (e.g., voice over IP).
Not surprisingly, Android has some capabilities in this area. Also, not surprisingly,
there are multiple APIs, with varying mixes of power and complexity, to allow you
to capture microphone input. In this chapter, we will examine MediaRecorder for
recording audio files and AudioRecord for raw microphone input.
Understanding this chapter requires that you have read the core chapters of this book. Having read the chapter on audio playback is probably also a good idea. And, for the section on playing back local streams, you will want to have read up on content providers, particularly the chapter on provider patterns.
Just as the easiest way to take a picture with the camera is to use the device’s built-in camera app, the easiest way to record some audio is to use a built-in activity for it. And, as with using the built-in camera app, the built-in audio recording activity has some significant limitations.
Requesting the built-in audio recording activity is a matter of calling startActivityForResult()
for a MediaStore.Audio.Media.RECORD_SOUND_ACTION action. You can see this in the
Media/SoundRecordIntent
sample project, specifically the MainActivity:
package com.commonsware.android.soundrecord;

import android.app.Activity;
import android.content.Intent;
import android.os.Bundle;
import android.provider.MediaStore;
import android.widget.Toast;

public class MainActivity extends Activity {
  private static final int REQUEST_ID=1337;

  @Override
  public void onCreate(Bundle savedInstanceState) {
    super.onCreate(savedInstanceState);

    Intent i=new Intent(MediaStore.Audio.Media.RECORD_SOUND_ACTION);

    startActivityForResult(i, REQUEST_ID);
  }

  @Override
  protected void onActivityResult(int requestCode, int resultCode,
                                  Intent data) {
    if (requestCode == REQUEST_ID && resultCode == RESULT_OK) {
      Toast.makeText(this, "Recording finished!", Toast.LENGTH_LONG)
           .show();
    }

    finish();
  }
}
As with a few other sample apps in this book, the Media/SoundRecordIntent uses a
Theme.Translucent.NoTitleBar activity, avoiding its own UI. Instead, in onCreate(), we immediately
call startActivityForResult() for MediaStore.Audio.Media.RECORD_SOUND_ACTION. That will
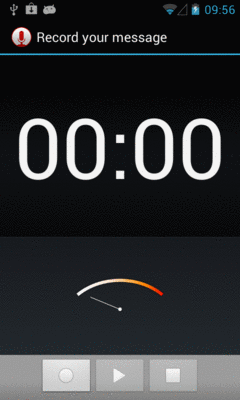
bring up a recording activity:
Figure 782: Built-In Sound Recording Activity
If the user records some audio via the “record” ImageButton (one with the circle icon) and
the “stop” ImageButton (one with the square icon), you will get control back in onActivityResult(),
where you are passed an Intent whose Uri (via getData()) will point to this audio recording
in the MediaStore.
However:
ACTION_VIEW may not be able to play back this audio (leastways, it failed to in testing on a few
devices). Whether that is due to codecs, the way the data is put in MediaStore, or the limits of
the default audio player on Android, is unclear.Hence, in many cases, while this works, it may not work well enough — or controlled enough — to meet your needs. In that case, you will want to handle the recording yourself, as will be described in the next couple of sections.
If your objective is to record a voice note, a presentation, or something along
those lines, then MediaRecorder is probably the class that you want. It will
let you specify what sort of media you wish to record, in what format, and to
what location. It then handles the actual act of recording.
To illustrate this, let us review the
Media/AudioRecording
sample project.
Our activity’s layout consists of a single ToggleButton widget named record:
<ToggleButton xmlns:android="http://schemas.android.com/apk/res/android"
  xmlns:tools="http://schemas.android.com/tools"
  android:id="@+id/record"
  android:layout_width="match_parent"
  android:layout_height="match_parent"
  android:textAppearance="?android:attr/textAppearanceLarge"/>
Our project is set up to record the output to the Environment.DIRECTORY_DOWNLOADS
location on external storage. And, if we have a targetSdkVersion of 23 or higher
(which we do), we need runtime permissions. We also need runtime permissions
for RECORD_AUDIO, since, well, we are recording audio. So our manifest requests
both of those permissions:
<manifest xmlns:android="http://schemas.android.com/apk/res/android"
  package="com.commonsware.android.audiorecord"
  android:versionCode="1"
  android:versionName="1.0">

  <supports-screens
    android:largeScreens="true"
    android:normalScreens="true"
    android:smallScreens="true"/>

  <uses-permission android:name="android.permission.RECORD_AUDIO"/>
  <uses-permission android:name="android.permission.WRITE_EXTERNAL_STORAGE"/>

  <uses-feature
    android:name="android.hardware.microphone"
    android:required="true"/>

  <application
    android:icon="@drawable/ic_launcher"
    android:label="@string/app_name"
    android:theme="@style/Theme.Apptheme">
    <activity
      android:name=".MainActivity"
      android:label="@string/title_activity_main">
      <intent-filter>
        <action android:name="android.intent.action.MAIN"/>

        <category android:name="android.intent.category.LAUNCHER"/>
      </intent-filter>
    </activity>
  </application>

</manifest>And, following in the pattern demonstrated
in the chapter on permissions, we use AbstractPermissionsActivity
to handle all the details of obtaining our runtime. Our launcher activity — MainActivity –
inherits from AbstractPermissionsActivity, which requests our permissions when
the app starts up. MainActivity simply overrides the necessary methods. Two
of these, getDesiredPermissions() and onPermissionDenied(), are specifically
for the permission logic:
  @Override
  protected String[] getDesiredPermissions() {
    return(new String[]{RECORD_AUDIO, WRITE_EXTERNAL_STORAGE});
  }

  @Override
  protected void onPermissionDenied() {
    Toast
      .makeText(this, R.string.msg_sorry, Toast.LENGTH_LONG)
      .show();
    finish();
  }
onReady() serves as our onCreate() replacement, and it will be invoked when
we have our runtime permissions. There, we load the layout and set the activity itself up
as the OnCheckedChangedListener, to find out when the user toggles the button:
  @Override
  public void onReady(Bundle savedInstanceState) {
    setContentView(R.layout.activity_main);

    ((ToggleButton)findViewById(R.id.record)).setOnCheckedChangeListener(this);
  }
Also, in onStart(), we initialize a MediaRecorder, setting the activity up as
being the one to handle info and error events about the recording. Similarly, we
release() the MediaRecorder in onStop(), to reduce our overhead when we are not
in the foreground:
  @Override
  public void onStart() {
    super.onStart();

    recorder=new MediaRecorder();
    recorder.setOnErrorListener(this);
    recorder.setOnInfoListener(this);
  }

  @Override
  public void onStop() {
    recorder.release();
    recorder=null;

    super.onStop();
  }
Most of the work occurs in onCheckedChanged(), where we get control when the user
toggles the button. If we are now checked, we begin recording; if not, we stop
the previous recording:
  @Override
  public void onCheckedChanged(CompoundButton buttonView,
                               boolean isChecked) {
    if (isChecked) {
      output=
        new File(Environment.getExternalStoragePublicDirectory(Environment.DIRECTORY_DOWNLOADS),
          BASENAME);

      recorder.setAudioSource(MediaRecorder.AudioSource.MIC);
      recorder.setOutputFormat(MediaRecorder.OutputFormat.THREE_GPP);
      recorder.setOutputFile(output.getAbsolutePath());

      if (Build.VERSION.SDK_INT >= Build.VERSION_CODES.GINGERBREAD_MR1) {
        recorder.setAudioEncoder(MediaRecorder.AudioEncoder.AAC);
        recorder.setAudioEncodingBitRate(160 * 1024);
      }
      else {
        recorder.setAudioEncoder(MediaRecorder.AudioEncoder.AMR_NB);
      }

      recorder.setAudioChannels(2);

      try {
        recorder.prepare();
        recorder.start();
      }
      catch (Exception e) {
        Log.e(getClass().getSimpleName(),
              "Exception in preparing recorder", e);
        Toast.makeText(this, e.getMessage(), Toast.LENGTH_LONG).show();
      }
    }
    else {
      try {
        recorder.stop();

        MediaScannerConnection
          .scanFile(this, new String[] {output.getAbsolutePath()}, null, null);
      }
      catch (Exception e) {
        Log.w(getClass().getSimpleName(),
              "Exception in stopping recorder", e);
        // can fail if start() failed for some reason
      }

      recorder.reset();
    }
  }
To record audio, we:
File object representing where the recording should be stored, in this
case using Environment.getExternalStoragePublicDirectory() to find a location on
external storageMediaRecorder that we wish to record from the microphone, through a
call to setAudioSource(), that we wish to record a 3GP file via a call to
setOutputFormat(), and that we wish to record the results to our File via a call
to setOutputFile()
setAudioEncoder() and set our requested bitrate to 160Kbps via
setAudioEncodingBitRate() — otherwise, we use setAudioEncoder() to request
AMR narrowbandsetAudioChannels(), such as 2 to
attempt to record in stereoprepare() (to set up the output file)
and record()
Stopping the recording, when the user toggles off the button, is merely a matter
of calling stop() on the MediaRecorder, then using MediaScannerConnection
to get the resulting file indexed by the MediaStore, so it shows up for desktop
users, media apps, etc.
Because we told the MediaRecorder that our activity was our OnErrorListener and
OnInfoListener, we have to implement those interfaces on the activity and implement
their required methods (onError() and onInfo(), respectively). In the normal course
of events, neither of these should be triggered. If they are, we are passed an int
value (typically named what) that indicates what happened:
  @Override
  public void onInfo(MediaRecorder mr, int what, int extra) {
    String msg=getString(R.string.strange);

    switch (what) {
      case MediaRecorder.MEDIA_RECORDER_INFO_MAX_DURATION_REACHED:
        msg=getString(R.string.max_duration);
        break;

      case MediaRecorder.MEDIA_RECORDER_INFO_MAX_FILESIZE_REACHED:
        msg=getString(R.string.max_size);
        break;
    }

    Toast.makeText(this, msg, Toast.LENGTH_LONG).show();
  }

  @Override
  public void onError(MediaRecorder mr, int what, int extra) {
    Toast.makeText(this, R.string.strange, Toast.LENGTH_LONG).show();
  }
Here, we just raise a Toast in either case, with either a generic message or a
specific message for the cases where the maximum time duration or the maximum
file size for our recording has been reached.
The results are that we get a recording on external storage (typically in a
Downloads directory) after we toggle the button on, record some audio, then
toggle the button off.
MediaRecorder is rather fussy about the order of method calls for its
configuration. For example, you must call setAudioEncoder() after the call
to setOutputFormat().
Also, the available codecs and file types are rather limited. Notably, Android lacks the ability to record to MP3 format, perhaps due to patent licensing issues.
The nice thing about recording to files is that Android handles all of the actual file I/O for us. The downside is that because Android handles all of the actual file I/O for us, it can only write files that are accessible to it and our process, meaning external storage. This may not be suitable in all cases, such as wanting to record to some form of private encrypted storage.
The good news is that Android does support recording to streams, in the form of
a pipe created by ParcelFileDescriptor and createPipe(). This follows the
same basic pattern that we saw in the chapter on content provider patterns,
where we served a stream via a pipe. However, as you will
see, there are some limits on how well we can do this.
To demonstrate and explain, let us examine the
Media/AudioRecordStream
sample project. This is nearly a complete clone of the previous sample, so we will only
focus on the changes in this section.
The author would like to thank Lucio Maciel for his assistance in getting this example to work.
The biggest change, by far, is in our setOutputFile() call. Before, we supplied a path
to external storage. Now, we supply the write end of a pipe:
recorder.setOutputFile(getStreamFd());
Our getStreamFd() method looks a lot like the openFile() method of our pipe-providing
provider:
  private FileDescriptor getStreamFd() {
    ParcelFileDescriptor[] pipe=null;

    try {
      pipe=ParcelFileDescriptor.createPipe();

      new TransferThread(new AutoCloseInputStream(pipe[0]),
                         new FileOutputStream(getOutputFile())).start();
    }
    catch (IOException e) {
      Log.e(getClass().getSimpleName(), "Exception opening pipe", e);
    }

    return(pipe[1].getFileDescriptor());
  }
We create our pipe with createPipe(), spawn a TransferThread to copy the recording from
an InputStream to a FileOutputStream, and return the write end of the pipe. However,
setOutputFile() on MediaRecorder takes the actual integer file descriptor, not a
ParcelFileDescriptor, so we use getFileDescriptor() to retrieve the file descriptor
and return that.
Our TransferThread is similar to the one from the content provider sample, except that
we pass over a FileOutputStream, so we can not only flush() but also sync() when
we are done writing:
  static class TransferThread extends Thread {
    InputStream in;
    FileOutputStream out;

    TransferThread(InputStream in, FileOutputStream out) {
      this.in=in;
      this.out=out;
    }

    @Override
    public void run() {
      byte[] buf=new byte[8192];
      int len;

      try {
        while ((len=in.read(buf)) >= 0) {
          out.write(buf, 0, len);
        }

        in.close();

        out.flush();
        out.getFD().sync();
        out.close();
      }
      catch (IOException e) {
        Log.e(getClass().getSimpleName(),
              "Exception transferring file", e);
      }
    }
  }
The biggest limitation of a pipe’s stream is that it is purely a stream. You cannot rewind re-read earlier bits of data. In other words, the stream is not seekable.
That is a problem with MediaRecorder in some configurations. For example, a 3GP file
contains a header with information about the overall file, information that MediaRecorder
does not know until the recording is complete. In the case of a file, MediaRecorder can
simply rewind and update the header with the final data when everything is done. However,
that is not possible with a pipe-based stream.
However, some configurations will work, notably “raw” ones that just have the recorded audio, with no type of header. That is what we use in this sample.
Specifically, we now write to a .amr file:
private static final String BASENAME="recording-stream.amr";
We also set our output format to RAW_AMR, and our encoder to AMR_NB:
      recorder.setAudioSource(MediaRecorder.AudioSource.MIC);
      recorder.setOutputFormat(MediaRecorder.OutputFormat.RAW_AMR);
      recorder.setOutputFile(getStreamFd());
      recorder.setAudioEncoder(MediaRecorder.AudioEncoder.AMR_NB);
      recorder.setAudioChannels(2);
This combination works. Other combinations might also work. But our approach of writing the 3GP file, as in the file-based example, will not work.
Just as AudioTrack allows you to play audio supplied as raw 8- or 16-bit PCM
input, AudioRecord allows you to record audio from the microphone, supplied to
you in PCM format. It is then up to you to actually do something with the raw
byte PCM data, including converting it to some other format and container as needed.
Note that you need the RECORD_AUDIO permission to work with AudioRecord, just as you need it
to work with MediaRecorder.
As noted in the opening paragraph of this chapter, most Android devices have microphones. The key word there is most. Not all Android devices will have microphones, as only some tablets (and fewer Android TV devices) will support microphone input.
As with most of this optional hardware, the solution is to use <uses-feature>.
In that case, you would request the android.hardware.microphone feature, with
android:required="false" if you felt that you do not absolutely need a
microphone. In that case, you would use hasSystemFeature() on PackageManager
to determine at runtime if you do indeed have a microphone.
Note that the RECORD_AUDIO permission implies that you need a microphone.
Hence, even if you skip the <uses-feature> element, your app will still only
ship to devices that have a microphone. If the microphone is optional, be sure
to include android:required="false", so your app will be available to devices
that lack a microphone.