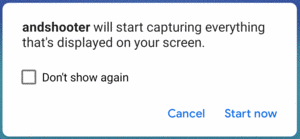
Figure 820: andshooter Permission Dialog
Android 5.0 debuted the ability for Android apps to take screenshots
of whatever is in the foreground. It further allows apps to record
full-resolution video of whatever is in the foreground, for screencasts,
product demo videos, and the like. For whatever reason, this is
called “media projection”, and is based around classes like
MediaProjectionManager.
In this chapter, we will explore how to use the media projection APIs to record screenshots and screencast-style videos.
Understanding this chapter requires that you have read the core chapters.
Having read the chapter on using the camera APIs would not be a bad idea, particularly for video recording, though it is not essential.
Here, “screenshot” (or “screen capture”) refers to generating an ordinary image file (e.g., PNG) of the contents of the screen. Most likely, you have created such screenshots yourself for a desktop OS (e.g., using the PrtSc key on Windows or Linux). Android’s development tools allow you to take screenshots of devices and emulators, and there is a cumbersome way for users to take screenshots using the volume and power keys.
The media projection APIs allow you to take a screenshot of whatever is in the foreground… which does not necessarily have to be your own app. Indeed, you can take screenshots of any app, plus of system-supplied UI, such as the pull-down notification shade.
Not surprisingly, this has privacy and security issues. As such, in order to be able to take screenshots, the user must agree to allow it. In particular, instead of a durable permission that the user might grant once and forget about, the user has to agree to allow your app to take screenshots every time you want to do so.
The
MediaProjection/andshooter
sample project allows you to take screenshots on demand, whether from a Notification
or from a broadcast, such as one triggered from the command line.
To get permission from the user, we get an instance of the MediaProjectionManager
system service and call createScreenCaptureIntent():
package com.commonsware.android.andshooter;

import android.app.Activity;
import android.content.Intent;
import android.media.projection.MediaProjectionManager;
import android.os.Bundle;

public class MainActivity extends Activity {
  private static final int REQUEST_SCREENSHOT=59706;
  private MediaProjectionManager mgr;

  @Override
  protected void onCreate(Bundle savedInstanceState) {
    super.onCreate(savedInstanceState);

    mgr=(MediaProjectionManager)getSystemService(MEDIA_PROJECTION_SERVICE);

    startActivityForResult(mgr.createScreenCaptureIntent(),
      REQUEST_SCREENSHOT);
  }

  @Override
  protected void onActivityResult(int requestCode, int resultCode, Intent data) {
    if (requestCode==REQUEST_SCREENSHOT) {
      if (resultCode==RESULT_OK) {
        Intent i=
            new Intent(this, ScreenshotService.class)
                .putExtra(ScreenshotService.EXTRA_RESULT_CODE, resultCode)
                .putExtra(ScreenshotService.EXTRA_RESULT_INTENT, data);

        startService(i);
      }
    }

    finish();
  }
}
This is designed for use with startActivityForResult(). Starting that
activity brings up a dialog for the user to confirm that we should be allowed
to take screenshots and record screencasts:
Figure 820: andshooter Permission Dialog
In onActivityResult(), if our request for permission was granted,
we pass the details along via Intent extras to a ScreenshotService
that we start using startService().
MainActivity uses Theme.Translucent.NoTitleBar to have no UI, so once
we get our result, we finish() the activty.
The onCreate() method of the ScreenshotService simply obtains access
to the WindowManager and MediaProjectionManager system services, plus
sets up a HandlerThread that the MediaProjectionManager will want:
  @Override
  public void onCreate() {
    super.onCreate();

    mgr=(MediaProjectionManager)getSystemService(MEDIA_PROJECTION_SERVICE);
    wmgr=(WindowManager)getSystemService(WINDOW_SERVICE);

    handlerThread.start();
    handler=new Handler(handlerThread.getLooper());
  }
onStartCommand() performs different work based upon the Intent
action used to start this service:
  @Override
  public int onStartCommand(Intent i, int flags, int startId) {
    if (i.getAction()==null) {
      resultCode=i.getIntExtra(EXTRA_RESULT_CODE, 1337);
      resultData=i.getParcelableExtra(EXTRA_RESULT_INTENT);
      foregroundify();
    }
    else if (ACTION_RECORD.equals(i.getAction())) {
      if (resultData!=null) {
        startCapture();
      }
      else {
        Intent ui=
          new Intent(this, MainActivity.class)
            .addFlags(Intent.FLAG_ACTIVITY_NEW_TASK);

        startActivity(ui);
      }
    }
    else if (ACTION_SHUTDOWN.equals(i.getAction())) {
      beeper.startTone(ToneGenerator.TONE_PROP_NACK);
      stopForeground(true);
      stopSelf();
    }

    return(START_NOT_STICKY);
  }
In the case where there is no action string, this must be the Intent
from the startService() call in MainActivity. So, we grab and hold
onto that result code and result Intent passed in via extras, then call
foregroundify() to set up a the service as a foreground service with
an associated Notification:
  private void foregroundify() {
    NotificationManager mgr=
      (NotificationManager)getSystemService(NOTIFICATION_SERVICE);

    if (Build.VERSION.SDK_INT>=Build.VERSION_CODES.O &&
      mgr.getNotificationChannel(CHANNEL_WHATEVER)==null) {
      mgr.createNotificationChannel(new NotificationChannel(CHANNEL_WHATEVER,
        "Whatever", NotificationManager.IMPORTANCE_DEFAULT));
    }

    NotificationCompat.Builder b=
      new NotificationCompat.Builder(this, CHANNEL_WHATEVER);

    b.setAutoCancel(true)
      .setDefaults(Notification.DEFAULT_ALL);

    b.setContentTitle(getString(R.string.app_name))
      .setSmallIcon(R.mipmap.ic_launcher)
      .setTicker(getString(R.string.app_name));

    b.addAction(R.drawable.ic_record_white_24dp,
      getString(R.string.notify_record),
      buildPendingIntent(ACTION_RECORD));

    b.addAction(R.drawable.ic_eject_white_24dp,
      getString(R.string.notify_shutdown),
      buildPendingIntent(ACTION_SHUTDOWN));

    startForeground(NOTIFY_ID, b.build());
  }

  private PendingIntent buildPendingIntent(String action) {
    Intent i=new Intent(this, getClass());

    i.setAction(action);

    return(PendingIntent.getService(this, 0, i, 0));
  }
That Notification, in turn, has “record” and “shutdown” actions that
will trigger ScreenshotService with custom action strings, to trigger
other branches within onStartCommand().
The downside of relying upon a foreground Notification is that
the user has to interact with that Notification to request
the screenshot. As a result, that Notification — and the rest of the
notification tray — will be visible in the screenshot. While this could be addressed by delaying
the screenshot, we do not know how long to wait. It would be nice to be able
to operate andshooter without affecting the screen.
Fortunately, we can, courtesy of adb.
As is covered in the chapter on ADB,
it is possible to use the adb shell am command to start an
activity, start a service, and send a broadcast. In this case,
since we are using a service for managing the recording process, we
can use adb shell am to trigger the same actions that the
Notification does.
This, however, requires that our ScreenshotService be exported.
For the PendingIntent objects used in the Notification, we would
not need to export the service. Invoking the service from the command
line, however, does require an exported service, since the command line
is not the app itself and therefore is considered to be a third-party
client of the app. Moreover, there is no obvious way to validate that
the commands were sent from adb shell am, which means that
when andshooter is installed, any app could send commands to ScreenshotService.
From a security standpoint, this is not great. The user still has to be
involved to grant permission to record the screen, which limits the security
risk a little bit. However, in general,
you should not run andshooter on your own personal device, due to this
security hole. Or, at minimum, run andshooter, then uninstall it immediately
when you are done with it, so it does not linger where malware might try
to use it.
The andshooter project contains a bash script to invoke
the ScreenshotService. This should be able to be trivially converted
to Windows command file; the proof of this is left as an exercise for
the reader:
#!/bin/bash

adb shell am startservice -n com.commonsware.android.andshooter/.ScreenshotService \
-a com.commonsware.android.andshooter.RECORD
sleep 2s

adb pull /storage/emulated/0/Android/data/com.commonsware.android.andshooter/files/screenshot.png $1
adb shell rm /storage/emulated/0/Android/data/com.commonsware.android.andshooter/files/screenshot.png
NOTE: the backslashes indicate where a line break was added to allow these lines to fit on the width of the page
If the user asks to record a screenshot — via the Notification or
the shell script — startCapture() is called:
  private void startCapture() {
    projection=mgr.getMediaProjection(resultCode, resultData);
    it=new ImageTransmogrifier(this);

    MediaProjection.Callback cb=new MediaProjection.Callback() {
      @Override
      public void onStop() {
        vdisplay.release();
      }
    };

    vdisplay=projection.createVirtualDisplay("andshooter",
      it.getWidth(), it.getHeight(),
      getResources().getDisplayMetrics().densityDpi,
      VIRT_DISPLAY_FLAGS, it.getSurface(), null, handler);
    projection.registerCallback(cb, handler);
  }
We start by asking our MediaProjectionManager to give us a MediaProjection
object, using the permission that we obtained from createScreenCaptureIntent(),
as embodied in the result code and result Intent we were given in onActivityResult().
We then ask the MediaProjection to create
a VirtualDisplay, tied to an ImageTransmogrifier and its ImageReader. We will
see more about the ImageTransmogrifier shortly. The VirtualDisplay
basically is a fake screen which is used for collecting screenshots and screencasts.
To create a VirtualDisplay need to provide:
ImageTransmogrifier
VIRT_DISPLAY_FLAGS), where the magic values that seem
to work are VIRTUAL_DISPLAY_FLAG_OWN_CONTENT_ONLY
and VIRTUAL_DISPLAY_FLAG_PUBLIC: static final int VIRT_DISPLAY_FLAGS=
DisplayManager.VIRTUAL_DISPLAY_FLAG_OWN_CONTENT_ONLY |
DisplayManager.VIRTUAL_DISPLAY_FLAG_PUBLIC;
Surface representing the virtual display, in this case retrieved
from the ImageReader inside the ImageTransmogrifier
VirtualDisplay.Callback to be notified about events
in the lifecycle of the VirtualDisplay (unused here, so we pass null)Handler from a HandlerThread, to be used for that callback
(presumably unused here, but since we have the right Handler anyway,
we use it)We also need to know about events surrounding the MediaProjection
itself, so we create and register a MediaProjection.Callback.
ImageTransmogrifier
ImageTransmogrifier, in its constructor, sets about determining the
screen size (using WindowManager and getDefaultDisplay()). Since
high-resolution displays will wind up with very large bitmaps, and
therefore slow down the data transfer, we scale the width and height
until such time as each screenshot will contain no more than 512K pixels.
ImageTransmogrifier(ScreenshotService svc) {
this.svc=svc;
Display display=svc.getWindowManager().getDefaultDisplay();
Point size=new Point();
display.getRealSize(size);
int width=size.x;
int height=size.y;
while (width*height > (2<<19)) {
width=width>>1;
height=height>>1;
}
this.width=width;
this.height=height;
imageReader=ImageReader.newInstance(width, height,
PixelFormat.RGBA_8888, 2);
imageReader.setOnImageAvailableListener(this, svc.getHandler());
}
Then we create a new ImageReader, which boils down to a class
that manages a bitmap Surface that can be written to, using our
specified width, height, and bit depth. In particular, we are saying
that there are two possible outstanding bitmaps at a time, courtesy
of the 2 final parameter, and that we should be notified when a new
image is ready, by registering the ImageTransmogrifier as the listener.
The Handler is used so that we are informed about image availability
on our designated background HandlerThread.
We find out when a screenshot is available via the ImageReader.Callback
we set up in ImageTransmogrifier, specifically its onImageAvailable()
callback. Since ImageTransmogrifier itself is implementing the
ImageReader.Callback interface, ImageTransmogrifier has the onImageAvailable()
implementation:
@Override
public void onImageAvailable(ImageReader reader) {
final Image image=imageReader.acquireLatestImage();
if (image!=null) {
Image.Plane[] planes=image.getPlanes();
ByteBuffer buffer=planes[0].getBuffer();
int pixelStride=planes[0].getPixelStride();
int rowStride=planes[0].getRowStride();
int rowPadding=rowStride - pixelStride * width;
int bitmapWidth=width + rowPadding / pixelStride;
if (latestBitmap == null ||
latestBitmap.getWidth() != bitmapWidth ||
latestBitmap.getHeight() != height) {
if (latestBitmap != null) {
latestBitmap.recycle();
}
latestBitmap=Bitmap.createBitmap(bitmapWidth,
height, Bitmap.Config.ARGB_8888);
}
latestBitmap.copyPixelsFromBuffer(buffer);
image.close();
ByteArrayOutputStream baos=new ByteArrayOutputStream();
Bitmap cropped=Bitmap.createBitmap(latestBitmap, 0, 0,
width, height);
cropped.compress(Bitmap.CompressFormat.PNG, 100, baos);
byte[] newPng=baos.toByteArray();
svc.processImage(newPng);
}
}
Surface getSurface() {
return(imageReader.getSurface());
This is complex.
First, we ask the ImageReader for the latest image, via acquireLatestImage().
If, for some reason, there is no image, there is nothing for us to do,
so we skip all the work.
Otherwise, we have to go through some gyrations to get the actual bitmap
itself from Image object. The recipe for that probably makes sense
to somebody, but that “somebody” is not the author of this book.
Suffice it to say, the first six lines of the main if block in
onImageAvaialble() get access to the bytes of the bitmap
(as a ByteBuffer named buffer) and determine the width of the bitmap
that was handed to us (as an int named bitmapWidth).
Because Bitmap objects are large and therefore troublesome to allocate,
we try to reuse one where possible. If we do not have a Bitmap
(latestBitmap), or if the one we have is not the right size, we
create a new Bitmap of the appropriate size. Otherwise, we use the
Bitmap that we already have. Regardless of where the Bitmap came
from, we use copyPixelsFromBuffer() to populate it from the
ByteBuffer we got from the Image.Plane that we got from the Image
that we got from the ImageReader.
You might think that this Bitmap would be the proper size. However,
it is not. For inexplicable reasons, on some devices, it will be a bit larger, with
excess unused pixels on each row on the end. This
is why we need to use Bitmap.createBitmap() to create a cropped
edition of the original Bitmap, for our actual desired width.
We then compress() the cropped Bitmap into a PNG file, get the
byte array of pixel data from the compressed result, and hand
that off to the ProjectorService via processImage().
In processImage(), we write the
PNG to a file, update the MediaStore so it knows about the image,
play an acknowledgment tone to let the user know the screenshot is ready,
and call stopCapture():
void processImage(final byte[] png) {
new Thread() {
@Override
public void run() {
File output=new File(getExternalFilesDir(null),
"screenshot.png");
try {
FileOutputStream fos=new FileOutputStream(output);
fos.write(png);
fos.flush();
fos.getFD().sync();
fos.close();
MediaScannerConnection.scanFile(ScreenshotService.this,
new String[] {output.getAbsolutePath()},
new String[] {"image/png"},
null);
}
catch (Exception e) {
Log.e(getClass().getSimpleName(), "Exception writing out screenshot", e);
}
}
}.start();
beeper.startTone(ToneGenerator.TONE_PROP_ACK);
stopCapture();
}
All stopCapture() does is close down the MediaProjection and associated
virtual display, to clean things up in preparation for the next screenshot:
private void stopCapture() {
if (projection!=null) {
projection.stop();
vdisplay.release();
projection=null;
}
}
Here, a “screencast” refers to a full-motion video of what goes on the screen. You can think of it as a series of screenshots all written to one video file (e.g., an MP4). Many apps on the Play Store have screencasts as part of their product profile, so you can see what the app looks like when it is run.
Android’s media projection APIs allow you to capture screencasts,
using a mechanism similar to the one used to take screenshots. You
have to ask permission from the user to be able to record the screen,
and that permission will last for the duration of one screen recording.
During that period of time, you can direct Android to make a duplicate
copy of what goes on the screen to a video file. This winds up using
the MediaRecorder API along with dedicated media projection APIs,
which is a bit awkward, since MediaRecorder is really aimed at using
the device camera to record videos of the world outside the device.
Jake Wharton, with his open source Telecine app, helped blaze the trail in how these APIs are supposed to work, since the documentation, as usual, is limited.
The
MediaProjection/andcorder
sample project offers screen recording through the media projection APIs. In the
end, andcorder does the same basic stuff as does Telecine, with fewer bells
and whistles. Also, the control channel is different: Telecine uses a screen
overlay, while andcorder uses a foreground Notification or the command
line.
As with andshooter, andcorder has a MainActivity that uses
MediaProjectionManager and createScreenCaptureIntent() to get
permission from the user to record the screen, passing the results along
to a RecorderService:
package com.commonsware.android.andcorder;
import android.app.Activity;
import android.content.Intent;
import android.media.projection.MediaProjectionManager;
import android.os.Bundle;
public class MainActivity extends Activity {
private static final int REQUEST_SCREENCAST=59706;
private MediaProjectionManager mgr;
@Override
protected void onCreate(Bundle savedInstanceState) {
super.onCreate(savedInstanceState);
mgr=(MediaProjectionManager)getSystemService(MEDIA_PROJECTION_SERVICE);
startActivityForResult(mgr.createScreenCaptureIntent(),
REQUEST_SCREENCAST);
}
@Override
protected void onActivityResult(int requestCode, int resultCode, Intent data) {
if (requestCode==REQUEST_SCREENCAST) {
if (resultCode==RESULT_OK) {
Intent i=
new Intent(this, RecorderService.class)
.putExtra(RecorderService.EXTRA_RESULT_CODE, resultCode)
.putExtra(RecorderService.EXTRA_RESULT_INTENT, data);
startService(i);
}
}
finish();
}
}
And, as with andshooter, andcorder uses a Notification tied to a foreground
service that manages the actual screen recording, to allow the user to request
to start and stop the screen recording.
We will use action strings, in the Intent used to start the RecorderService,
to indicate what is to be done. Those action strings will be the
application ID plus a segment at the end that is the specific operation
we want:
static final String ACTION_RECORD=
BuildConfig.APPLICATION_ID+".RECORD";
static final String ACTION_STOP=
BuildConfig.APPLICATION_ID+".STOP";
static final String ACTION_SHUTDOWN=
BuildConfig.APPLICATION_ID+".SHUTDOWN";
Here, we use BuildConfig.APPLICATION_ID, a faster, no-Context way
to get our application ID, as part of building up these strings. We
have three actions: to start recording (RECORD), to stop recording
(STOP), and to shut down the RecorderService (SHUTDOWN). An Intent
with no action string will be used on the initial launch of the service,
from MainActivity.
onStartCommand() is where all of these commands, triggered by
startService() calls, will come in:
@Override
public int onStartCommand(Intent i, int flags, int startId) {
if (i.getAction()==null) {
resultCode=i.getIntExtra(EXTRA_RESULT_CODE, 1337);
resultData=i.getParcelableExtra(EXTRA_RESULT_INTENT);
if (recordOnNextStart) {
startRecorder();
}
foregroundify(!recordOnNextStart);
recordOnNextStart=false;
}
else if (ACTION_RECORD.equals(i.getAction())) {
if (resultData!=null) {
foregroundify(false);
startRecorder();
}
else {
Intent ui=
new Intent(this, MainActivity.class)
.addFlags(Intent.FLAG_ACTIVITY_NEW_TASK);
startActivity(ui);
recordOnNextStart=true;
}
}
else if (ACTION_STOP.equals(i.getAction())) {
foregroundify(true);
stopRecorder();
}
else if (ACTION_SHUTDOWN.equals(i.getAction())) {
stopSelf();
}
return(START_NOT_STICKY);
}
If we have no action string, this should be the command from MainActivity,
so we grab the resultCode and resultData out of the Intent and
stash them in simple fields on the service:
private int resultCode;
private Intent resultData;
private boolean recordOnNextStart=false;
We also:
startRecorder() if recordOnNextStart is set to true
foregroundify(), with a boolean that indicates whether we
should give the user the option to begin recording (true) or to
stop existing recording (false)recordOnNextStart flagWe will discuss more about that recordOnNextStart, its role, and why
it exists, later in this chapter.
If, instead, a RECORD action string was on the Intent, then ideally
we should begin recording the screen contents. The “ideally” part is because
there will be scenarios in which the RECORD action is invoked before
we actually have permission from the user to record the screen (more on this
later).
So, if a RECORD action comes in, and we have permission from the user
to record the screen (resultData is not null), we call startRecorder()
to start recording, plus call foregroundify() to put up a Notification
with an action for STOP. If, on the other hand, we do not presently
have permission from the user (resultData is null), we start up
MainActivity to get that permission, plus set recordOnNextStart to
true.
The other two cases are simpler:
STOP Intent, we call stopRecorder(), plus call
foregroundify() to change the foreground service Notification to one
that has an action for RECORD
SHUTDOWN Intent, we call stopSelf() to go away entirelyforegroundify() is invoked for most of those cases, to put the service
in the foreground (if it is not in the foreground already) and show a
Notification with the appropriate mix of actions:
private void foregroundify(boolean showRecord) {
NotificationManager mgr=
(NotificationManager)getSystemService(NOTIFICATION_SERVICE);
if (Build.VERSION.SDK_INT>=Build.VERSION_CODES.O &&
mgr.getNotificationChannel(CHANNEL_WHATEVER)==null) {
mgr.createNotificationChannel(new NotificationChannel(CHANNEL_WHATEVER,
"Whatever", NotificationManager.IMPORTANCE_DEFAULT));
}
NotificationCompat.Builder b=
new NotificationCompat.Builder(this, CHANNEL_WHATEVER);
b.setAutoCancel(true)
.setDefaults(Notification.DEFAULT_ALL);
b.setContentTitle(getString(R.string.app_name))
.setSmallIcon(R.mipmap.ic_launcher)
.setTicker(getString(R.string.app_name));
if (showRecord) {
b.addAction(R.drawable.ic_videocam_white_24dp,
getString(R.string.notify_record), buildPendingIntent(ACTION_RECORD));
}
else {
b.addAction(R.drawable.ic_stop_white_24dp,
getString(R.string.notify_stop), buildPendingIntent(ACTION_STOP));
}
b.addAction(R.drawable.ic_eject_white_24dp,
getString(R.string.notify_shutdown), buildPendingIntent(ACTION_SHUTDOWN));
if (isForeground) {
mgr.notify(NOTIFY_ID, b.build());
}
else {
startForeground(NOTIFY_ID, b.build());
isForeground=true;
}
}
In addition to generic NotificationCompat.Builder configuration, we:
SHUTDOWN
action stringRECORD or STOP the recording, based
upon the boolean passed into foregroundify()
startForeground() to move the service into the foreground
and show the Notification or use NotificationManager to update the
existing Notification (if we are already in the foreground)The latter distinction may not be necessary. Calling startForeground()
multiple times does not seem to have any harm, and it also updates
the foreground Notification. Using NotificationManager directly for
the already-in-the-foreground scenario, though, may be superfluous.
The addAction() calls delegate to a buildPendingIntent() method,
to create the PendingIntent to be triggered when the action
is tapped:
private PendingIntent buildPendingIntent(String action) {
Intent i=new Intent(this, getClass());
i.setAction(action);
return(PendingIntent.getService(this, 0, i, 0));
}
This creates an explicit Intent, tied to RecorderService itself, but
also adds the action string. This Intent will always resolve to our
RecorderService; the action string is just part of the payload.
That foreground Notification provides the visual way of starting
recording:

Figure 821: andcorder Notification, Showing Record and Shutdown Actions
…and stopping recording once started:
Figure 822: andcorder Notification, Showing Stop and Shutdown Actions
In addition, onDestroy() stops the recording and removes us from the
foreground, plus we have the obligatory onBind() implementation:
@Override
public void onDestroy() {
stopRecorder();
stopForeground(true);
super.onDestroy();
}
@Override
public IBinder onBind(Intent intent) {
throw new IllegalStateException("go away");
}
As with andshooter, andcorder is designed to use command-line scripts
to start and stop recording.
The andcorder project contains three bash scripts to invoke
the RecorderService. These should be able to be converted
to Windows command files for those that need them.
All three scripts use adb shell am startservice, and all point to the
same component (-n com.commonsware.android.andcorder/.RecorderService).
What varies is the action string supplied to the -a switch.
NOTE: the shell script code listings are word-wrapped due to
line length limitations in the books; the files themselves have the
adb shell commands all on one line.
So, the record script, for example, passes
com.commonsware.android.andcorder.RECORD as the action string:
#!/bin/bash
adb shell am startservice -n com.commonsware.android.andcorder/.RecorderService
-a com.commonsware.android.andcorder.RECORD
The stop script passes the STOP action string; the shutdown
script passes the SHUTDOWN action string.
These, therefore, replicate the Intent structures used in the
PendingIntent objects for the Notification actions.
However, there is one key usage difference: it would be nice to be
able to run the record script without having to think about whether
or not you ran andcorder from the home screen launcher or not. The
RECORD action cannot actually do the recording without the result
data from the startActivityForResult() call in MainActivity.
This is why the RECORD action logic detects this case and starts
up MainActivity — so we can just run the record script and,
if we do not presently have screen-recording permission, request it from
the user.
The recordOnNextStart flag indicates whether or not RECORD started
up MainActivity. If it did, when we get the result data in the no-action
onStartCommand() call, we should go ahead and begin recording. This
prevents the user from having to run the record script twice, once to
pop up the permission dialog and once to actually begin recording.
The startRecorder() method on RecorderService is called when it is
time to begin screen recording, either because the user asked us to record
just now or the user asked us to record (via the command-line script)
and we just now got permission from the user to do that.
synchronized private void startRecorder() {
if (session==null) {
MediaProjectionManager mgr=
(MediaProjectionManager)getSystemService(MEDIA_PROJECTION_SERVICE);
MediaProjection projection=
mgr.getMediaProjection(resultCode, resultData);
session=
new RecordingSession(this, new RecordingConfig(this),
projection);
session.start();
}
}
Here, as with the andshooter sample, we use a MediaProjectionManager
to turn the resultCode int and resultData Intent into a
MediaProjection. Then, we create a RecordingSession, wrapped
around a RecordingConfig and the MediaProjection, and call start()
on the RecordingSession.
Both RecordingSession and RecordingConfig are classes that are part
of the app, not the Android SDK. RecordingConfig holds onto information
about the nature of what is being recorded (notably, the video resolution)
to capture. RecordingSession handles the stateful work of actually
recording the video.
Of the two, you might expect RecordingSession to be far more complex.
In truth, it is decidedly more straightforward than is RecordingConfig.
Determining the resolution and other information about our screen recording
is annoyingly complicated.
The job of RecordingConfig is to derive and hold onto five pieces
of data regarding the screen recording that we are about to initiate:
These are held in five final int fields, as RecordingConfig
is designed to be immutable:
final int width;
final int height;
final int frameRate;
final int bitRate;
final int density;
All five of these values will be initialized in the constructor (since
they are final). In fact, all the business logic for RecordingSession
is just in the constructor, to derive these five values.
That constructor starts off simple enough:
RecordingConfig(Context ctxt) {
DisplayMetrics metrics=new DisplayMetrics();
WindowManager wm=(WindowManager)ctxt.getSystemService(Context.WINDOW_SERVICE);
wm.getDefaultDisplay().getRealMetrics(metrics);
density=metrics.densityDpi;
Configuration cfg=ctxt.getResources().getConfiguration();
boolean isLandscape=
(cfg.orientation==Configuration.ORIENTATION_LANDSCAPE);
Here, we:
DisplayMetrics data structure, given a WindowManager
final fieldConfiguration and determine if we are in landscape
mode or notWhere things start to get messy is with the other four fields, as they
need to be populated based on the device’s video recording capabilities.
For various reasons, screen recording is actually handled mostly by
MediaRecorder, the same class used to
record videos from a device camera. Hence, we are
limited by not only the actual resolution of the screen but by the
capabilities of the video recording engine.
The classic way to handle this is by using CamcorderProfile
objects. These standardize video recording support for various resolutions.
We can find out which of these profiles the device supports and use that
to help determine our video resolution, frame rate, and bitrate.
However, we also have to take into account the resolution of the screen
itself. If MediaRecorder is capable of 1080p (1920 x 1080) video
recording, but the device has a low-end WXGA (1280 x 800) screen, we will
waste a lot of space recording that screen at 1080p. What we want is
the smallest resolution that is bigger than the screen, to minimize wasted
space while not losing data. If, for some reason, we do not have a
CamcorderProfile that is bigger than the screen, we will have to settle
for one that is as big as we can manage.
To that end, the CAMCORDER_PROFILES static field on RecordingConfig
lists the major CamcorderProfile IDs, in descending order based on resolution:
private static final int[] CAMCORDER_PROFILES={
CamcorderProfile.QUALITY_2160P,
CamcorderProfile.QUALITY_1080P,
CamcorderProfile.QUALITY_720P,
CamcorderProfile.QUALITY_480P,
CamcorderProfile.QUALITY_CIF,
CamcorderProfile.QUALITY_QVGA,
CamcorderProfile.QUALITY_QCIF
};
If we simply iterate over this list and choose either the first one we find,
or one that is smaller yet is bigger than the screen, we will get the
right CamcorderProfile for our use case:
CamcorderProfile selectedProfile=null;
for (int profileId : CAMCORDER_PROFILES) {
CamcorderProfile profile=null;
try {
profile=CamcorderProfile.get(profileId);
}
catch (Exception e) {
// not documented to throw anything, but does
}
if (profile!=null) {
if (selectedProfile==null) {
selectedProfile=profile;
}
else if (profile.videoFrameWidth>=metrics.widthPixels &&
profile.videoFrameHeight>=metrics.heightPixels) {
selectedProfile=profile;
}
}
}
To get a CamcorderProfile given its ID, you call the static get()
method on CamcorderProfile. This is supposed to return the CamcorderProfile
if it is supported or null if it is not. In actuality, it may throw
an exception if the profile is not supported, which is why we have to
wrap the get() call in a try/catch block. Then, if profile exists,
we hold onto it as the selectedProfile if either:
selectedProfile is null, meaning this is the largest available
profile, orIf, after all that is done, we have a null selectedProfile, that
means that none of the CamcorderProfile values were available.
That is very strange, and rather than take a random guess as to what will
work, we just blow up with an IllegalStateException. Obviously, a
production-grade app would need to blow up more nicely.
Otherwise, we can collect our remaining data… which once again is more complex than you might expect:
if (selectedProfile==null) {
throw new IllegalStateException("No CamcorderProfile available!");
}
else {
frameRate=selectedProfile.videoFrameRate;
bitRate=selectedProfile.videoBitRate;
int targetWidth, targetHeight;
if (isLandscape) {
targetWidth=selectedProfile.videoFrameWidth;
targetHeight=selectedProfile.videoFrameHeight;
}
else {
targetWidth=selectedProfile.videoFrameHeight;
targetHeight=selectedProfile.videoFrameWidth;
}
if (targetWidth>=metrics.widthPixels &&
targetHeight>=metrics.heightPixels) {
width=metrics.widthPixels;
height=metrics.heightPixels;
}
else {
if (isLandscape) {
width=targetHeight*metrics.widthPixels/metrics.heightPixels;
height=targetHeight;
}
else {
width=targetWidth;
height=targetWidth*metrics.heightPixels/metrics.widthPixels;
}
}
}
Getting the frame rate and the bitrate are easy enough, as they are just
fields on the CamcorderProfile. Where things start to get strange
is in determining what we should tell the MediaRecorder that we want
recorded in terms of resolution.
Partly, this is a problem of orientation. MediaRecorder thinks that
everything is recorded in landscape, but we may well want to record
the screen held in portrait mode.
Partly, this is a problem of aspect ratios. There is no requirement
that the MediaRecorder advertise support for resolutions that match
the screen size, or even match the screen’s aspect ratio. So, if the
MediaRecorder is capable of recording our full screen, we ask it to
record the full screen (as determined from the DisplayMetrics). If,
however, we are on some odd device whose MediaRecorder is not capable
of recording video at the screen’s own resolution, we try to at least
maintain the aspect ratio of the screen when deriving the resolution
to use for recording.
The net of all that work is that we have the details of how we want
the screen recording to be done, encapsulated in the RecordingConfig
object, ready for use by the RecordingSession.
None of that actually records the screen, though. That is the responsibility
of the RecordingSession.
In the RecordingSession constructor, we:
RecordingConfig and MediaProjection
Context, as we will need a Context later onToneGenerator to use for audible feedback
about the state of the recordingFile object pointing at our desired output: an andcorder.mp4
file in our app’s portion of external storage RecordingSession(Context ctxt, RecordingConfig config,
MediaProjection projection) {
this.ctxt=ctxt.getApplicationContext();
this.config=config;
this.projection=projection;
this.beeper=new ToneGenerator(
AudioManager.STREAM_NOTIFICATION, 100);
output=new File(ctxt.getExternalFilesDir(null), "andcorder.mp4");
output.getParentFile().mkdirs();
}
The actual work to record the video is handled in the start() method
on RecordingSession, where we set up the MediaRecorder and a
VirtualDisplay, the latter being the same thing that we used in the
andshooter sample:
void start() {
recorder=new MediaRecorder();
recorder.setVideoSource(MediaRecorder.VideoSource.SURFACE);
recorder.setOutputFormat(MediaRecorder.OutputFormat.MPEG_4);
recorder.setVideoFrameRate(config.frameRate);
recorder.setVideoEncoder(MediaRecorder.VideoEncoder.H264);
recorder.setVideoSize(config.width, config.height);
recorder.setVideoEncodingBitRate(config.bitRate);
recorder.setOutputFile(output.getAbsolutePath());
try {
recorder.prepare();
vdisplay=projection.createVirtualDisplay("andcorder",
config.width, config.height, config.density,
VIRT_DISPLAY_FLAGS, recorder.getSurface(), null, null);
beeper.startTone(ToneGenerator.TONE_PROP_ACK);
recorder.start();
}
catch (IOException e) {
throw new RuntimeException("Exception preparing recorder", e);
}
}
First, we create an instance of MediaRecorder and configure it. As
is discussed in the chapter on working with the camera,
MediaRecorder is a very fussy class, requiring a fairly specific order
of method calls to configure it without messing things up too bad. The
values for the configuration come from:
RecordingConfig, notably the requested resolution, frame rate,
and bitrateFile created in the RecordingSession constructorOf particular interest is the call to setVideoSource(). Usually,
you would set this to CAMERA, to record from a device-supplied
camera. Here, though, we set it to SURFACE, indicating that
MediaRecorder should supply a Surface onto which we can render
what should get recorded.
We then:
MediaRecorder, which might throw an IOException
if there is some problem with the output fileVirtualDisplay, as we did in andshooter, tied to the
details of the display we got from DisplayMetrics by way of the
RecordingConfig
ToneGenerator to let the user know that recording
has begunstart() on the
MediaRecorder
The VIRT_DISPLAY_FLAGS used here are the same ones used for andshooter:
  static final int VIRT_DISPLAY_FLAGS=
      DisplayManager.VIRTUAL_DISPLAY_FLAG_OWN_CONTENT_ONLY |
      DisplayManager.VIRTUAL_DISPLAY_FLAG_PUBLIC;
And, at this point, the screen is being recorded.
Eventually, we will want to stop that recording, whether triggered via
the Notification or the command-line script. That eventually results
in a call to stopRecorder() on the RecorderService, which just calls
stop on the RecordingSession before setting the field to null:
  synchronized private void stopRecorder() {
    if (session!=null) {
      session.stop();
      session=null;
    }
  }
The stop() method on RecordingSession unwinds everything we set up,
via stop() and release() calls on the MediaProjection, MediaRecorder,
and VirtualDisplay. stop() also calls scanFile() on MediaScannerConnection,
so that our video gets indexed by the MediaStore and therefore can be
seen in on-device video players and via the MTP connection to your developer machine:
  void stop() {
    projection.stop();
    recorder.stop();
    recorder.release();
    vdisplay.release();

    MediaScannerConnection.scanFile(ctxt,
      new String[]{output.getAbsolutePath()}, null, this);
  }

  @Override
  public void onScanCompleted(String path, Uri uri) {
    beeper.startTone(ToneGenerator.TONE_PROP_NACK);
  }
When the scan is complete, another beep signals to the user that the screen recording is finished.
On the plus side, andcorder has no built-in duration limitation, the way
that adb shell screenrecord does.
However, it does not optimize configuration changes. If you rotate the device during the recording, the recording will continue, but the screen will be shrunk to fit within the original dimensions. So, for example, if you start recording in landscape, then rotate the device to portrait, the video will still be landscape, with part of the video showing a small portrait rendition of the screen.