Figure 839: The Activate Device Administrator Screen
Balding authors of Android books often point out that enterprises and malware authors have the same interests: they want to take control of a device away from the person that is holding it and give that control to some other party. Android, being a consumer operating system, is designed to defend against malware, and so enterprises can run into issues.
However, Android does have a growing area of device administration APIs, that allow carefully-constructed and installed applications to exert some degree of control over the device, how it is configured, and how it operates.
Understanding this chapter requires that you have read the core chapters,
particularly the chapter on broadcast Intents.
One might read the phrase “device administration” and assume that somebody, using these APIs, could do anything they want on the device.
That’s not quite what “device administration” means in this case.
Rather, the device administration APIs serve three main roles:
The user, however, has to agree to enable a device administration app. It does not magically get all these powers simply by being installed. What the user gets from agreeing to this is access to something that otherwise would be denied (e.g., to use Enterprise App X, you must agree to allow it to be a device administrator).
There are four pieces for defining and registering a device administration
app: creating the metadata, adding the <receiver> to the manifest,
implementing that BroadcastReceiver, and telling Android to ask the
user to agree to allow the app to a device administrator.
Here, we will take a peek at the
DeviceAdmin/LockMeNow
sample application.
Apps implementing device administrators should add a <uses-feature> element
with a name of android.software.device_admin, indicating whether or not
they require this device feature to exist. This can be used by the Play Store
to filter your app from being available on devices that, for one reason
or another, do not offer this capability.
As with app widgets and other Android facilities, you will need to define a metadata file as an XML resource, describing in greater detail what your device administration app wishes to do. This information will determine what you will be allowed to do once the user approves your app, and what you list here will be displayed to the user when you request such approval.
The DeviceAdminInfo class has a series of static data members
(e.g., USES_ENCRYPTED_STORAGE) that represent specific policies that your
device administrator app could use. The documentation for each of those
static data members lists the corresponding element that goes in this
XML metadata file (e.g., <encrypted-storage>). These elements are wrapped
in a <uses-policies> element, which itself is wrapped in a <device-admin]
element. The range of possible policies is shown in the following sample
XML metadata file:
<device-admin xmlns:android="http://schemas.android.com/apk/res/android">
  <uses-policies>
    <disable-camera />
    <encrypted-storage />
    <expire-password />
    <force-lock />
    <limit-password />
    <reset-password />
    <watch-login />
    <wipe-data />
  </uses-policies>
</device-admin>
Here, we:
Choose which of those policies you need — the fewer you request, the more
likely it is the user will not wonder about your intentions. In your
project’s res/xml/ directory, create a file that looks like the above with
the policies you wish. You can name this file whatever you want
(e.g., device_admin.xml), within standard Android resource naming rules.
In the manifest, you will need to declare a <receiver> element for the
DeviceAdminReceiver component that you will write. This component
not only is the embodiment of the device admin capabilities of your app,
but it will be the one notified of failed logins and other events.
For example, here is the <receiver> element from the LockMeNow sample
app:
    <receiver
      android:name="AdminReceiver"
      android:permission="android.permission.BIND_DEVICE_ADMIN">
      <meta-data
        android:name="android.app.device_admin"
        android:resource="@xml/device_admin"/>

      <intent-filter>
        <action android:name="android.app.action.DEVICE_ADMIN_ENABLED"/>
      </intent-filter>
    </receiver>
There are three things distinctive about this element compared to your
usual <receiver> element:
BIND_DEVICE_ADMIN
permission. Since that permission is protected and can only be held by
apps signed with the firmware’s signing key, you can be reasonably assured
that any events sent to you are real.<meta-data> child element pointing to our device administration
metadata from the previous section.android.app.action.DEVICE_ADMIN_ENABLED broadcasts via
its <intent-filter> — this is the broadcast that will be used to notify
you when your app gains device administration privilegesThe DeviceAdminReceiver itself needs to exist as a component in your
app, registered in the manifest as shown above. At minimum, though, it
does not need to override any methods, such as the implementation from
the LockMeNow sample app:
package com.commonsware.android.lockme;

import android.app.admin.DeviceAdminReceiver;

public class AdminReceiver extends DeviceAdminReceiver {
}
By requesting the DEVICE_ADMIN_ENABLED broadcasts, we could get control
when we are enabled by overriding an onEnabled() method. We could also
register for other broadcasts (e.g., ACTION_PASSWORD_FAILED) and implement
the corresponding callback method on our DeviceAdminReceiver
(e.g., onPasswordFailed()).
Simply having this component in our manifest, though, is insufficient. The user must proactively agree to allow us to administer their device. And, since this is potentially very dangerous, a simple permission was deemed to also be insufficient. Instead, we need to ask the user to approve us as a device administrator from our app, typically from an activity.
In the case of LockMeNow, the UI is just a really big button, tied to a
lockMeNow() method on our LockMeNowActivity:
<?xml version="1.0" encoding="utf-8"?>
<LinearLayout xmlns:android="http://schemas.android.com/apk/res/android"
  android:layout_width="match_parent"
  android:layout_height="match_parent"
  android:orientation="vertical">

  <Button
    android:id="@+id/Button1"
    android:layout_width="match_parent"
    android:layout_height="match_parent"
    android:onClick="lockMeNow"
    android:text="@string/lock_me"
    android:textColor="#FFFF0000"
    android:textSize="40sp"
    android:textStyle="bold"/>

</LinearLayout>
In onCreate() of the activity, in addition to loading up the UI via
setContentView(), we create a ComponentName object identifying our
AdminReceiver component. We also request access to the DevicePolicyManager,
via a call to getSystemService(). DevicePolicyManager is our gateway
for making direct requests for device administration operations, such as
locking the device:
package com.commonsware.android.lockme;

import android.app.Activity;
import android.app.admin.DevicePolicyManager;
import android.content.ComponentName;
import android.content.Intent;
import android.os.Bundle;
import android.view.View;

public class LockMeNowActivity extends Activity {
  private DevicePolicyManager mgr=null;
  private ComponentName cn=null;

  @Override
  public void onCreate(Bundle savedInstanceState) {
    super.onCreate(savedInstanceState);

    setContentView(R.layout.main);
    cn=new ComponentName(this, AdminReceiver.class);
    mgr=(DevicePolicyManager)getSystemService(DEVICE_POLICY_SERVICE);
  }

  public void lockMeNow(View v) {
    if (mgr.isAdminActive(cn)) {
      mgr.lockNow();
    }
    else {
      Intent intent=
          new Intent(DevicePolicyManager.ACTION_ADD_DEVICE_ADMIN);
      intent.putExtra(DevicePolicyManager.EXTRA_DEVICE_ADMIN, cn);
      intent.putExtra(DevicePolicyManager.EXTRA_ADD_EXPLANATION,
                      getString(R.string.device_admin_explanation));
      startActivity(intent);
    }
  }
}In lockMeNow(), we ask the DevicePolicyManager if we have already been
registered as a device administrator, by calling isAdminActive(), supplying
the ComponentName of our DeviceAdminReceiver that should be so
registered. If that returns false, then the user has not approved us as
a device administrator yet, so we need to ask them to do so. To do that,
you:
Intent for the DevicePolicyManager.ACTION_ADD_DEVICE_ADMIN
actionComponentName of our DeviceAdminReceiver as an extra, keyed as
DevicePolicyManager.EXTRA_DEVICE_ADMIN
DevicePolicyManager.EXTRA_ADD_EXPLANATION, which is
some text to show the user as part of the authorization screen, to explain
why we need to be a device adminIntent, via startActivity()
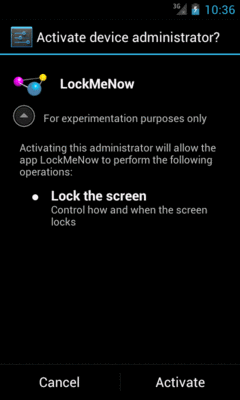
If you run this on a device, then tap the button, the first time you do so the user will be prompted to agree to making the app be a device administrator:
Figure 839: The Activate Device Administrator Screen
The “For experimentation purposes only” is the value of our
DevicePolicyManager.EXTRA_ADD_EXPLANATION extra, loaded from a string
resource.
If the user clicks “Activate”, and you overrode onEnabled() in your
DeviceAdminReceiver, that will be called to let you know that you have
been approved and can perform device administration functions. Your component
will also appear in the list of device administrators in the Settings app:
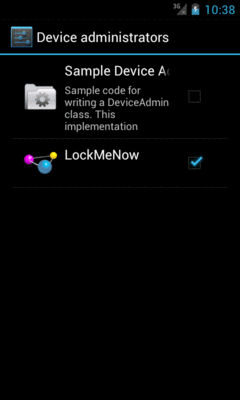
Figure 840: The Device Administrator List
The user can, at any time, uncheck you in this list and disable you. You can
find out about this by having your DeviceAdminReceiver listen for
ACTION_DEVICE_ADMIN_DISABLE_REQUESTED broadcasts and overriding the
onDisableRequested() method, where you can return the text of a message
to be displayed to the user confirming that they do indeed wish to go ahead
with the disable operation. To find out if they go through with it,
your DeviceAdminReceiver can listen for
ACTION_DEVICE_ADMIN_DISABLED broadcasts and override onDisabled().
Given that the user has approved your device administration request,
and given that you requested <force-lock> in your metadata, you
can call lockNow() on a DevicePolicyManager. That will immediately lock
the device and (generally) turn off the screen. It is as if the user pressed
the POWER button on the device. If anything, lockNow() will offer
tighter security.
The LockItNow sample app does this if, when the user clicks the really
big button, it detects that it is already a device administrator. If you
test this on a device, it will behave as though the user pressed POWER; on
an emulator, you will need to press the HOME button to “power on” the screen
and be able to re-enter your emulator.
You can also call:
setCameraDisabled() to disable all cameras, if you requested
<disable-camera> in the metadata. Note that this disables all cameras;
there is no provision at this time to disable individual cameras separately.wipeData(), which performs what amounts to a factory reset — it leaves
external storage alone but wipes the contents of internal storage as part
of a reboot. This requires the <wipe-data> policy in the metadata.setKeyguardDisabledFeatures(), to control whether or not the lockscreen
allows direct access to the camera and/or app widgets (lockscreen app widgets
are described in the chapter on app widgets)For example, the latter feature, while available in the Android SDK, is not built into the Settings app of Android 4.2. As a result, users need a third-party app to toggle on or off lockscreen access to the camera and app widgets. One such third-party app is LockscreenLocker, released as open source by the author of this book.
Basically, the app presents you with two Switch widgets to control the camera
and app widgets on the lock screen. First, though, it shows you a message and
a Button, if the app is not set up as a device administrator:
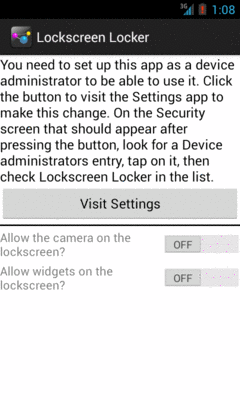
Figure 841: LockscreenLocker, On Initial Run
Once that is complete, the Switch widgets become enabled and usable:
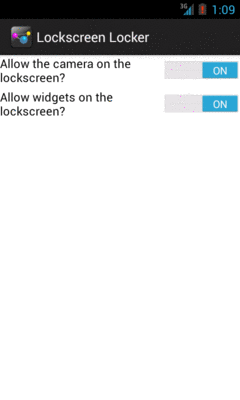
Figure 842: LockscreenLocker, After Being Made a Device Admin
The device admin metadata for this app specifies that we want to control keyguard features:
<device-admin xmlns:android="http://schemas.android.com/apk/res/android">

  <uses-policies>
    <disable-keyguard-features/>
  </uses-policies>

</device-admin>
Note that, at the time of this writing, there is a flaw in the Android
developer documentation — the correct element to have in the metadata is
[disable-keyguard-features/>, not <disable-keyguard-widgets]. You can track
this issue to see
when this documentation bug has been repaired.
Our device admin component, LockscreenAdminReceiver, is empty, because
there are no events that we are trying to listen to:
public class LockscreenAdminReceiver extends DeviceAdminReceiver {
}
However, we still need the LockscreenAdminReceiver, as it is the component
that is tied to our device admin metadata and indicates to the system that we
should be an option in Settings for available device administrators.
Our activity layout contains all the requisite widgets: a TextView for the message,
a Button to jump to the Settings app, a View to serve as a divider,
and a pair of Switch widgets to manage the lockscreen settings:
<?xml version="1.0" encoding="utf-8"?>
<LinearLayout xmlns:android="http://schemas.android.com/apk/res/android"
  android:layout_width="match_parent"
  android:layout_height="match_parent"
  android:orientation="vertical">

  <TextView
    android:id="@+id/setupMessage"
    android:layout_width="match_parent"
    android:layout_height="wrap_content"
    android:text="@string/setup_message"
    android:textAppearance="?android:attr/textAppearanceMedium"
    android:visibility="gone"/>

  <Button
    android:id="@+id/setup"
    android:layout_width="match_parent"
    android:layout_height="wrap_content"
    android:onClick="showSettings"
    android:text="@string/visit_settings"
    android:visibility="gone"/>

  <View
    android:id="@+id/divider"
    android:layout_width="match_parent"
    android:layout_height="2dip"
    android:layout_marginBottom="4dip"
    android:layout_marginTop="4dip"
    android:background="#FF000000"
    android:visibility="gone"/>

  <Switch
    android:id="@+id/camera"
    android:layout_width="match_parent"
    android:layout_height="wrap_content"
    android:text="@string/allow_camera"/>

  <Switch
    android:id="@+id/widgets"
    android:layout_width="match_parent"
    android:layout_height="wrap_content"
    android:layout_marginTop="4dip"
    android:text="@string/allow_widgets"/>

</LinearLayout>
In onCreate() of our activity (MainActivity), we request a DevicePolicyManager,
set up a ComponentName identifying our DeviceAdminReceiver implementation
(LockscreenAdminReceiver), and hook up the activity to know about changes in the
state of the Switch widgets:
  @Override
  protected void onCreate(Bundle savedInstanceState) {
    super.onCreate(savedInstanceState);
    setContentView(R.layout.activity_main);

    mgr=(DevicePolicyManager)getSystemService(DEVICE_POLICY_SERVICE);
    cn=new ComponentName(this, LockscreenAdminReceiver.class);

    camera=(CompoundButton)findViewById(R.id.camera);
    camera.setOnCheckedChangeListener(this);

    widgets=(CompoundButton)findViewById(R.id.widgets);
    widgets.setOnCheckedChangeListener(this);
  }
In onResume(), we check to see if our DeviceAdminReceiver is active — in other
words, whether the user has set us up as being a device administrator or not:
  @Override
  public void onResume() {
    super.onResume();

    if (mgr.isAdminActive(cn)) {
      toggleWidgets(true);

      int status=mgr.getKeyguardDisabledFeatures(cn);

      camera.setChecked(!((status & DevicePolicyManager.KEYGUARD_DISABLE_SECURE_CAMERA) == DevicePolicyManager.KEYGUARD_DISABLE_SECURE_CAMERA));
      widgets.setChecked(!((status & DevicePolicyManager.KEYGUARD_DISABLE_WIDGETS_ALL) == DevicePolicyManager.KEYGUARD_DISABLE_WIDGETS_ALL));
    }
    else {
      toggleWidgets(false);
    }
  }
We toggle the visibility and enabled settings of our widgets based upon whether
we are a device administrator or not, in a toggleWidgets() private method:
  private void toggleWidgets(boolean enable) {
    int visibility=(enable ? View.GONE : View.VISIBLE);

    camera.setEnabled(enable);
    widgets.setEnabled(enable);

    findViewById(R.id.divider).setVisibility(visibility);
    findViewById(R.id.setup).setVisibility(visibility);
    findViewById(R.id.setupMessage).setVisibility(visibility);
  }
onResume() also sets the state of our Switch widgets based upon the current
state of the keyguard features, by calling getKeyguardDisabledFeatures() on the
DevicePolicyManager. This returns a bit set of which features are disabled, with
DevicePolicyManager.KEYGUARD_DISABLE_SECURE_CAMERA and/or
DevicePolicyManager.KEYGUARD_DISABLE_WIDGETS_ALL possibly being set.
At the outset, after being installed, we will not be a device administrator, so
the Switch widgets will be disabled and the Button will be visible. We simply
send the user to the security screen in the Settings app if they click that button:
  public void showSettings(View v) {
    startActivity(new Intent(Settings.ACTION_SECURITY_SETTINGS));
  }
When the user toggles a Switch, our activity will be called with
onCheckedChanged(). There, we need to call setKeyguardDisabledFeatures() with
a new bit set, toggling on or off a bit based on the user’s chosen values in the
UI:
  @Override
  public void onCheckedChanged(CompoundButton buttonView,
                               boolean isChecked) {
    int status=mgr.getKeyguardDisabledFeatures(cn);

    if (buttonView == camera) {
      if (isChecked) {
        mgr.setKeyguardDisabledFeatures(cn, status
            & ~DevicePolicyManager.KEYGUARD_DISABLE_SECURE_CAMERA);
      }
      else {
        mgr.setKeyguardDisabledFeatures(cn, status
            | DevicePolicyManager.KEYGUARD_DISABLE_SECURE_CAMERA);
      }
    }
    else {
      if (isChecked) {
        mgr.setKeyguardDisabledFeatures(cn, status
            & ~DevicePolicyManager.KEYGUARD_DISABLE_WIDGETS_ALL);
      }
      else {
        mgr.setKeyguardDisabledFeatures(cn, status
            | DevicePolicyManager.KEYGUARD_DISABLE_WIDGETS_ALL);
      }
    }
  }
Note that we have the Switch widgets set up for positive statements (e.g.,
“enable the camera”), while the bit set uses negative statements (e.g.,
“disable the camera”). That makes toggling the bit set a “bit” more complicated,
to ensure that we are applying the user’s choices correctly.
One popular facet of the device administration APIs is for an app to mandate a certain degree of password quality. The app might then fail to operate if the current password does not meet the requested quality standard.
You can call various setters on DevicePolicyManager to dictate your
minimum requirements for the password that the user uses to get past
the lock screen. Examples include:
setPasswordMinimumLength()setPasswordQuality() (with an integer flag describing the type of “quality”
you seek, such as PASSWORD_QUALITY_NUMERIC if a PIN is OK, or
PASSWORD_QUALITY_COMPLEX if you require mixed case and numbers and such)setPasswordMinimumLowerCase() (indicating how many lowercase letters
are required at minimum in the user’s password)All of these require the <limit-password> policy be requested in the metadata.
Then, you can call isActivePasswordSufficient() to determine if the current
password meets your requirements. If it does not, you might elect to disable
certain functionality. Or, if you requested the <reset-password> policy
in the metadata, you can call resetPassword() to force the user to come
up with a password meeting your requirements.
Similarly, you can also call getStorageEncryptionStatus() on DevicePolicyManager
to find out whether full-disk encryption is active, inactive, or unavailable
on this particular device. If it is inactive, and you requested the
<encrypted-storage> policy in your metadata, you can call setStorageEncryption()
to demand it, and start the encryption process via starting the
ACTION_START_ENCRYPTION activity.
To see password quality enforcement in action, let us examine the
DeviceAdmin/PasswordEnforcer
sample application.
The activity (MainActivity) is fairly short, and much of its code is based on
the earlier LockMeNow sample:
package com.commonsware.android.pwenforce;

import android.app.Activity;
import android.app.admin.DevicePolicyManager;
import android.content.ComponentName;
import android.content.Intent;
import android.os.Bundle;
import android.widget.Toast;

public class MainActivity extends Activity {
  @Override
  public void onCreate(Bundle savedInstanceState) {
    super.onCreate(savedInstanceState);

    ComponentName cn=new ComponentName(this, AdminReceiver.class);
    DevicePolicyManager mgr=
        (DevicePolicyManager)getSystemService(DEVICE_POLICY_SERVICE);

    if (mgr.isAdminActive(cn)) {
      int msgId;

      if (mgr.isActivePasswordSufficient()) {
        msgId=R.string.compliant;
      }
      else {
        msgId=R.string.not_compliant;
      }

      Toast.makeText(this, msgId, Toast.LENGTH_LONG).show();
    }
    else {
      Intent intent=
          new Intent(DevicePolicyManager.ACTION_ADD_DEVICE_ADMIN);
      intent.putExtra(DevicePolicyManager.EXTRA_DEVICE_ADMIN, cn);
      intent.putExtra(DevicePolicyManager.EXTRA_ADD_EXPLANATION,
                      getString(R.string.device_admin_explanation));
      startActivity(intent);
    }

    finish();
  }
}In onCreate(), after obtaining a DevicePolicyManager, we see if our app
has been designated by the user as a device administrator. If not — which will
be the case when the app is first installed — we use an ACTION_ADD_DEVICE_ADMIN
Intent and startActivity() to steer the user towards making our app be
a device administrator.
If the user does make our app be a device administrator, our AdminReceiver
will get control in onEnabled(), as we have registered it for DEVICE_ADMIN_ENABLED
broadcasts in the manifest. In onEnabled(), we mandate that the password
for the device must be alphanumeric, via a call to setPasswordQuality()
on the DevicePolicyManager:
  @Override
  public void onEnabled(Context ctxt, Intent intent) {
    ComponentName cn=new ComponentName(ctxt, AdminReceiver.class);
    DevicePolicyManager mgr=
        (DevicePolicyManager)ctxt.getSystemService(Context.DEVICE_POLICY_SERVICE);

    mgr.setPasswordQuality(cn,
                           DevicePolicyManager.PASSWORD_QUALITY_ALPHANUMERIC);

    onPasswordChanged(ctxt, intent);
  }
We will see the role of the onPasswordChanged() method, called late in
onEnabled(), later in this chapter.
Back in onCreate() of our MainActivity, if we are a device administrator,
then we know that the setPasswordQuality() call has been made, and so we can check
to see if the current password meets our standards via a call to
isActivePasswordSufficient() on the DevicePolicyManager. The app displays
a Toast showing whether the password is or is not currently “sufficient”.
Via appropriate actions in our <intent-filter> for our DeviceAdminReceiver,
and associated callback methods, we can find out other things that go on with
respect to the password:
ACTION_PASSWORD_CHANGED informs us when the user has changed her
passwordACTION_PASSWORD_FAILED informs us when somebody tries to enter a
password, and the password was incorrectACTION_PASSWORD_SUCCEEDED informs us when the user has successfully
entered the password and unlocked the device… after an attempt
had previously failedThe PasswordEnforcer sample registers for all of these in the manifest:
    <receiver
      android:name="AdminReceiver"
      android:permission="android.permission.BIND_DEVICE_ADMIN">
      <meta-data
        android:name="android.app.device_admin"
        android:resource="@xml/device_admin"/>

      <intent-filter>
        <action android:name="android.app.action.DEVICE_ADMIN_ENABLED"/>
        <action android:name="android.app.action.ACTION_PASSWORD_CHANGED"/>
        <action android:name="android.app.action.ACTION_PASSWORD_FAILED"/>
        <action android:name="android.app.action.ACTION_PASSWORD_SUCCEEDED"/>
      </intent-filter>
    </receiver>
The implementations of the corresponding onPasswordChanged(),
onPasswordFailed(), and onPasswordSucceeded() methods simply display
Toast messages about those events:
  @Override
  public void onPasswordChanged(Context ctxt, Intent intent) {
    DevicePolicyManager mgr=
        (DevicePolicyManager)ctxt.getSystemService(Context.DEVICE_POLICY_SERVICE);
    int msgId;

    if (mgr.isActivePasswordSufficient()) {
      msgId=R.string.compliant;
    }
    else {
      msgId=R.string.not_compliant;
    }

    Toast.makeText(ctxt, msgId, Toast.LENGTH_LONG).show();
  }

  @Override
  public void onPasswordFailed(Context ctxt, Intent intent) {
    Toast.makeText(ctxt, R.string.password_failed, Toast.LENGTH_LONG)
         .show();
  }

  @Override
  public void onPasswordSucceeded(Context ctxt, Intent intent) {
    Toast.makeText(ctxt, R.string.password_success, Toast.LENGTH_LONG)
         .show();
  }
However, these will illustrate some quirks in the behavior of the device administration APIs:
onPasswordSucceeded() is not called on every successful password
entry, only those that come after a prior onPasswordFailed() call.
One imagines that perhaps onPasswordSucceededAfterItHadFailedBefore() was
deemed to be too wordy.isActivePasswordSufficient() will return a value based on the
previous password in onPasswordChanged(), not the newly-changed
password. Since the system will prevent the user from entering a new
password that is insufficient, you should not need to call
isActivePasswordSufficient() from onPasswordChanged().Toast cannot display over the lockscreen, and so the
onPasswordFailed() Toast will never be seen.Bear in mind that you might not be the only device administrator on any given device. If there are multiple administrators, the most secure requirements are in force. So, for example, if Admin A requests a minimum password length of 7, and Admin B requests a minimum password length of 10, the user will have to supply a password that is at least 10 characters long, to meet both device administrators’ requirements.
This also means that certain requests you make may fail. For example, if you
decide to say that you do not need encryption (setStorageEncryption() with
a value of false), if something else needs encryption, the user will still
need to encrypt their device.