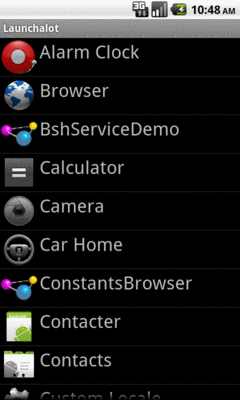
Figure 862: The Launchalot sample application
PackageManager is your primary means of introspection at the component
level, to determine what else is installed on the device and what
components they export (activities, etc.). As such, there are many
ways you can use PackageManager to determine if something you want
is possible or not, so you can modify your behavior accordingly
(e.g., disable action bar items that are not possible).
This chapter will outline some ways you can use PackageManager to
find out what components are available to you on a device.
Understanding this chapter requires that you have read the core chapters of this book.
The ways to find out whether there is an activity that will respond
to a given Intent are by means of queryIntentActivityOptions() and
the somewhat simpler queryIntentActivities().
The queryIntentActivityOptions() method takes the caller
ComponentName, the “specifics” array of Intent instances, the
overall Intent representing the actions you are seeking, and the
set of flags. It returns a List of Intent instances matching the
stated criteria, with the “specifics” ones first.
If you would like to offer alternative actions to users, but by means
other than addIntentOptions(), you could call
queryIntentActivityOptions(), get the Intent instances, then use
them to populate some other user interface (e.g., a toolbar).
A simpler version of this method, queryIntentActivities(), is used
by the
Introspection/Launchalot
sample application. This presents a
“launcher” — an activity that starts other activities —
but uses a ListView rather than a grid like the Android default
home screen uses.
Here is the Java code for Launchalot itself:
package com.commonsware.android.launchalot;

import android.app.ListActivity;
import android.content.ComponentName;
import android.content.Intent;
import android.content.pm.ActivityInfo;
import android.content.pm.PackageManager;
import android.content.pm.ResolveInfo;
import android.os.Bundle;
import android.view.View;
import android.view.ViewGroup;
import android.widget.ArrayAdapter;
import android.widget.ImageView;
import android.widget.ListView;
import android.widget.TextView;
import java.util.Collections;
import java.util.List;

public class Launchalot extends ListActivity {
  AppAdapter adapter=null;

  @Override
  public void onCreate(Bundle savedInstanceState) {
    super.onCreate(savedInstanceState);
    setContentView(R.layout.main);

    PackageManager pm=getPackageManager();
    Intent main=new Intent(Intent.ACTION_MAIN, null);

    main.addCategory(Intent.CATEGORY_LAUNCHER);

    List<ResolveInfo> launchables=pm.queryIntentActivities(main, 0);

    Collections.sort(launchables,
                     new ResolveInfo.DisplayNameComparator(pm));

    adapter=new AppAdapter(pm, launchables);
    setListAdapter(adapter);
  }

  @Override
  protected void onListItemClick(ListView l, View v,
                                 int position, long id) {
    ResolveInfo launchable=adapter.getItem(position);
    ActivityInfo activity=launchable.activityInfo;
    ComponentName name=new ComponentName(activity.applicationInfo.packageName,
                                         activity.name);
    Intent i=new Intent(Intent.ACTION_MAIN);

    i.addCategory(Intent.CATEGORY_LAUNCHER);
    i.setFlags(Intent.FLAG_ACTIVITY_NEW_TASK |
                Intent.FLAG_ACTIVITY_RESET_TASK_IF_NEEDED);
    i.setComponent(name);

    startActivity(i);
  }

  class AppAdapter extends ArrayAdapter<ResolveInfo> {
    private PackageManager pm=null;

    AppAdapter(PackageManager pm, List<ResolveInfo> apps) {
      super(Launchalot.this, R.layout.row, apps);
      this.pm=pm;
    }

    @Override
    public View getView(int position, View convertView,
                          ViewGroup parent) {
      if (convertView==null) {
        convertView=newView(parent);
      }

      bindView(position, convertView);

      return(convertView);
    }

    private View newView(ViewGroup parent) {
      return(getLayoutInflater().inflate(R.layout.row, parent, false));
    }

    private void bindView(int position, View row) {
      TextView label=(TextView)row.findViewById(R.id.label);

      label.setText(getItem(position).loadLabel(pm));

      ImageView icon=(ImageView)row.findViewById(R.id.icon);

      icon.setImageDrawable(getItem(position).loadIcon(pm));
    }
  }
}In onCreate(), we:
PackageManager object via getPackageManager()
Intent for ACTION_MAIN in CATEGORY_LAUNCHER, which
identifies activities that wish to be considered “launchable”queryIntentActivities() to get a List of ResolveInfo
objects, each one representing one launchable activityResolveInfo objects via a
ResolveInfo.DisplayNameComparator instanceAppAdapter and set that to be the
contents of our ListView
AppAdapter is an ArrayAdapter subclass that maps the icon and
name of the launchable Activity to a row in the ListView, using a
custom row layout.
Finally, in onListItemClick(), we construct an Intent that will
launch the clicked-upon Activity, given the information from the
corresponding ResolveInfo object. Not only do we need to populate
the Intent with ACTION_MAIN and CATEGORY_LAUNCHER, but we also
need to set the component to be the desired Activity. We also set
FLAG_ACTIVITY_NEW_TASK and FLAG_ACTIVITY_RESET_TASK_IF_NEEDED
flags, following Android’s own launcher implementation from the Home
sample project. Finally, we call startActivity() with that
Intent, which opens up the activity selected by the user.
The result is a simple list of launchable activities:
Figure 862: The Launchalot sample application
There is also a resolveActivity() method that takes a template
Intent, as do queryIntentActivities() and
queryIntentActivityOptions(). However, resolveActivity() returns
the single best match, rather than a list.
NOTE: On modern versions of Android, there is a
LauncherApps class that simplifies a lot of this and takes
things like Android Work profiles into account. For really
implementing a home screen-style launcher, you will probably want
to use LauncherApps. However, using PackageManager to find
what can handle certain Intent structures is used for other
purposes beyond home screen launchers.
Users, when presented with a default activity chooser, usually have
the option to make
their next choice be the default for this action for now on. The next
time they do whatever they did to bring up the chooser, it should go
straight to this default. This is known in the system as the “preferred
activity” for an Intent structure, and is stored in the system
as a set of pairs of IntentFilter objects and the corresponding
ComponentName of the preferred activity.
To find out what the preferred activities are on a given device,
you can ask PackageManager to getPreferredActivities(). You pass
in a List<IntentFilter> and a List<ComponentName>, and Android fills
in those lists with the preferred activity information.
To see this in action, take a look at the
Introspection/PrefActivities
sample application. This simply loads all of the information into a
ListView, using android.R.layout.simple_list_item_2 as a row layout
for a title-and-description pattern.
The PackageManager logic is confined to onCreate():
  @Override
  public void onCreate(Bundle savedInstanceState) {
    super.onCreate(savedInstanceState);

    PackageManager mgr=getPackageManager();

    mgr.getPreferredActivities(filters, names, null);
    setListAdapter(new IntentFilterAdapter());
  }
In this case, the two lists are data members of the activity:
  ArrayList<IntentFilter> filters=new ArrayList<IntentFilter>();
  ArrayList<ComponentName> names=new ArrayList<ComponentName>();
Most of the logic is in formatting the ListView contents. IntentFilter,
unfortunately, does not come with a method that gives us a human-readable
dump of its definition. As a result, we need to roll that ourselves.
Compounding the problem is that IntentFilter tends to return Iterator
objects for its collections (e.g., roster of actions), rather than
something Iterable. The activity leverages an Iterator-to-Iterable
wrapper culled from
a Stack Overflow answer
to help with this. The
IntentFilterAdapter and helper code looks like this:
  // from http://stackoverflow.com/a/8555153/115145

  public static <T> Iterable<T> in(final Iterator<T> iterator) {
    class SingleUseIterable implements Iterable<T> {
      private boolean used=false;

      @Override
      public Iterator<T> iterator() {
        if (used) {
          throw new IllegalStateException("Already invoked");
        }
        used=true;
        return iterator;
      }
    }
    return new SingleUseIterable();
  }

  class IntentFilterAdapter extends ArrayAdapter<IntentFilter> {
    IntentFilterAdapter() {
      super(PreferredActivitiesDemoActivity.this,
            android.R.layout.simple_list_item_2, android.R.id.text1,
            filters);
    }

    @Override
    public View getView(int position, View convertView, ViewGroup parent) {
      View row=super.getView(position, convertView, parent);
      TextView filter=(TextView)row.findViewById(android.R.id.text1);
      TextView name=(TextView)row.findViewById(android.R.id.text2);

      filter.setText(buildTitle(getItem(position)));
      name.setText(names.get(position).getClassName());

      return(row);
    }

    String buildTitle(IntentFilter filter) {
      StringBuilder buf=new StringBuilder();
      boolean first=true;

      if (filter.countActions() > 0) {
        for (String action : in(filter.actionsIterator())) {
          if (first) {
            first=false;
          }
          else {
            buf.append('/');
          }

          buf.append(action.replaceAll("android.intent.action.", ""));
        }
      }

      if (filter.countDataTypes() > 0) {
        first=true;

        for (String type : in(filter.typesIterator())) {
          if (first) {
            buf.append(" : ");
            first=false;
          }
          else {
            buf.append('|');
          }

          buf.append(type);
        }
      }

      if (filter.countDataSchemes() > 0) {
        buf.append(" : ");
        buf.append(filter.getDataScheme(0));

        if (filter.countDataSchemes() > 1) {
          buf.append(" (other schemes)");
        }
      }

      if (filter.countDataPaths() > 0) {
        buf.append(" : ");
        buf.append(filter.getDataPath(0));

        if (filter.countDataPaths() > 1) {
          buf.append(" (other paths)");
        }
      }

      return(buf.toString());
    }
  }
The resulting activity shows a simple description of the IntentFilter
along with the class name of the corresponding activity in each row:
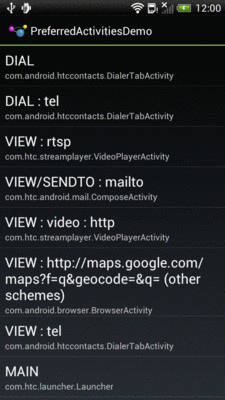
Figure 863: Preferred Activities on a Stock HTC One S
Another way to think about preferred activities is to determine what
specific activity will handle a startActivity() call on some Intent.
If there is only one alternative, or the user chose a preferred activity,
that activity should handle the Intent. Otherwise, the activity
handling the Intent should be one implementing a chooser. The
resolveActivity() method on PackageManager can let us know what will
handle the Intent.
To examine what resolveActivity() returns, take a look at the
Introspection/Resolver
sample application.
The activity — which uses Theme.Translucent.NoTitleBar and so has no UI of its
own — is fairly short:
package com.commonsware.android.resolver;

import android.app.Activity;
import android.content.Intent;
import android.content.pm.PackageManager;
import android.content.pm.ResolveInfo;
import android.net.Uri;
import android.os.Bundle;
import android.widget.Toast;

public class ResolveActivityDemoActivity extends Activity {
  @Override
  public void onCreate(Bundle savedInstanceState) {
    super.onCreate(savedInstanceState);

    PackageManager mgr=getPackageManager();
    Intent i=
        new Intent(Intent.ACTION_VIEW,
                   Uri.parse("https://commonsware.com"));
    ResolveInfo ri=
        mgr.resolveActivity(i, PackageManager.MATCH_DEFAULT_ONLY);

    Toast.makeText(this, ri.loadLabel(mgr), Toast.LENGTH_LONG).show();

    startActivity(i);
    finish();
  }
}We get a PackageManager, create an Intent to test, and pass the
Intent to resolveActivity(). We include MATCH_DEFAULT_ONLY so we
only get activities that have CATEGORY_DEFAULT in their <intent-filter>
elements. We then use loadLabel() on the resulting ResolveInfo
object to get the display name of the activity, toss that in a Toast,
and invoke startActivity() on the Intent to confirm the results.
On a device with only one option, or with a default chosen, the
Toast will show the name of the preferred activity (e.g., Browser).
On most devices with more than one option, the startActivity()
call will display a chooser, and the Toast will show the display
name of the chooser (e.g., “Android System”).
However, on some devices — notably newer models from HTC distributed
in the US — resolveActivity() indicates that HTCLinkifyDispatcher
is the one that will handle ACTION_VIEW on a URL… even if there
is more than one browser installed and no default has been specified.
This is part of a workaround that HTC added in 2012 to help deal with
a patent dispute with Apple.
The PackageManager class offers much more than merely
queryIntentActivities() and queryIntentActivityOptions(). It is
your gateway to all sorts of analysis of what is installed and
available on the device where your application is installed and
available. If you want to be able to intelligently connect to
third-party applications based on whether or not they are around,
PackageManager is what you will want.
Packages are what get installed on the device — a package is the in-device representation of an APK. An application is defined within a package’s manifest. Between the two, you can find out all sorts of things about existing software installed on the device.
Specifically, getInstalledPackages() returns a List of
PackageInfo objects, each of which describes a single package.
Here, you can find out:
versionCode) and the display name (versionName)Similarly, getInstalledApplications() returns a List of
ApplicationInfo objects, each providing data like:
In addition to those methods, you can call:
getApplicationIcon() and getApplicationLabel() to get the icon
and display name for an applicationgetLaunchIntentForPackage() to get an Intent for something
launchable within a named packagesetApplicationEnabledSetting() to enable or disable an
applicationYou can access resources from another application, apparently without any security restrictions. This may be useful if you have multiple applications and wish to share resources for one reason or another.
The getResourcesForActivity() and getResourcesForApplication()
methods on PackageManager return a Resources object. This is just
like the one you get for your own application via getResources() on
any Context (e.g., Activity). However, in this case, you identify
what activity or application you wish to get the Resources from
(e.g., supply the application’s package name as a String).
There are also getText() and getXml() methods that dive into the
Resources object for an application and pull out specific String
or XmlPullParser objects. However, these require you to know the
resource ID of the resource to be retrieved, and that may be
difficult to manage between disparate applications.
Not only does Android offer “query” and “resolve” methods to find activities, but it offers similar methods to find other sorts of Android components:
queryBroadcastReceivers()queryContentProviders()queryIntentServices()resolveContentProvider()resolveService()For example, you could use resolveService() to determine if a
certain remote service is available, so you can disable certain UI
elements if the service is not on the device. You could achieve the
same end by calling bindService() and watching for a failure, but
that may be later in the application flow than you would like.
There is also a setComponentEnabledSetting() to toggle a component
(activity, service, etc.) on and off. While this may seem esoteric,
there are a number of possible uses for this method, such as:
BroadcastReceiver registered in the
manifest is hooked into the system or not, replicating the level of
control you have with registerReceiver() while still taking
advantage of the fact that a manifest-registered BroadcastReceiver
can be started even if no other component of your application is
running