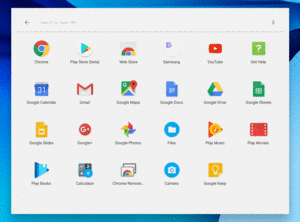
Figure 1059: Chrome OS App Launcher/Finder, As Initially Launched
Ever since Android and Chrome were moved under the same executive within Google, rumors abounded that Android and Chrome OS would merge in one form or fashion.
In 2015, Google started down that path, offering the ability for developers to start packaging Android apps to run on Chrome OS. And — albeit via a different mechanism — some Chrome OS devices now offer the Play Store and users can install compatible apps from there.
The exact number of Chromebooks that have been sold is subject to some debate. One analyst pegged business (B2B) Chromebook sales in the first half of 2015 at around 2 million, with an upbeat, pro-Chromebook spin. Another analyst indicated that total sales for Chromebooks in 2014 were 6 million, a tiny percentage of PC/laptop sales. In mid-2016, IDC estimated that Chromebook sales for the first quarter of 2016 were around 2 million, exceeding the sales of Apple’s line of Mac notebooks. But one analyst is predicting 17 million Chromebooks to be sold in 2023, which suggests that growth will be modest.
Understanding this chapter requires that you have read the core chapters of this book.
From the user’s standpoint, Android apps appear alongside their Chrome OS counterparts. For example, the Play Store will be in their app launcher:
Figure 1059: Chrome OS App Launcher/Finder, As Initially Launched
Android apps appear in floating windows, similar to their Chrome OS counterparts:
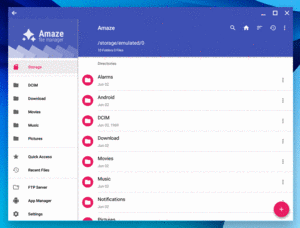
Figure 1060: Chrome OS, Showing Amaze File Manager
The classic form factor for Chrome OS devices was the “Chromebook”. This is a notebook/netbook-style device, with a keyboard and touchpad. Many Chromebooks support touchscreens, and some Chromebooks have 180-degree hinges, allowing the screen to be folded over such that the Chromebook forms a chunky tablet.
Nowadays, there are other Chrome OS form factors that are getting attention:
As a result, Chrome OS really opens up the range of possible ways that the user can interact with your app. In particular, not all Chrome OS devices offer touchscreens, as some Chromebooks and all Chromeboxes are limited to keyboard and mouse input. So not only do you need to consider how best to support Chrome OS overall, you need to consider how best to support keyboard/mouse-based user input. While Android can do a reasonable job of that “out of the box”, some amount of additional work may be needed before your app feels natural when the user is clicking with a mouse rather than tapping on a screen.
For lightweight use, Google publishes a Chrome OS emulator that is integrated into the Android SDK emulator system used by Android Studio. As with the regular SDK emulator images, the Chrome OS emulator attempts to show you what your app will be like on a Chrome OS device. However, it will have a variety of gaps, particularly tied to hardware. Just as a developer should never ship an Android app based solely on testing in an Android emulator, a developer should never ship a Chrome OS Android app based solely on testing in the Chrome OS emulator.
For real testing, you will want to test on hardware, which is the focus of this section.
All Chrome OS devices shipped in 2017 and beyond are supposed to ship with Android support.
Select older devices will get Android support as well. This page lists the official status of Chrome OS for various older devices. Any device not listed there is unlikely to get Chrome OS, and even many of the “Planned” ones might drop off.
You will need a Google account to set up your Chrome OS device or the Chrome OS emulator.
If you want to test your app in the Play Store, it may be already enabled for you, in which case you can just install your app and try it out.
If it is not already enabled, but the device is already shipping in production form with Android support, you may need to enable it in Chrome OS’s Settings app. You may also need to do this for the Chrome OS emulator. To do that:

Figure 1061: Chrome OS Status Bar
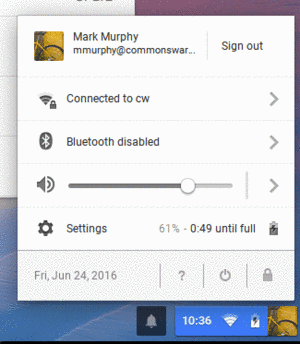
Figure 1062: Chrome OS Configuration Panel
The exact look of this panel will vary by device and Chrome OS version.
The exact look of the Settings window will also vary by device and Chrome OS version.
Towards the bottom of this Settings page, you should see an “Android Apps” or “Google Play Store” section:
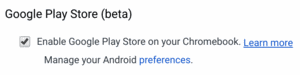
Figure 1063: Chrome OS Android Apps Checkbox
Click the “Enable Android Apps to run on your Chromebook” checkbox or the “Enable Google Play Store on your Chromebook” checkbox, whichever one you have. At this point, you should gain access to the Play Store and be able to install apps from there.
Also, note the “App Settings” or “Manage your Android preferences” link below that checkbox. This will bring up the Android Settings application, which is separate and distinct from the Chrome OS Settings page that you are on. There is no icon for the Android Settings app in the regular Chrome OS app launcher; you have to know to come here to adjust the Android settings.
Some of the devices listed on that Chrome OS/Android status page indicate that the status is “Stable Channel”. Such devices either ship with Android support or will get it with a regular Chrome OS update, and so the instructions in the preceding section should be sufficient for you to test a production app. Similarly, the Chrome OS emulator ships with Android support directly.
For devices whose status is “Beta Channel” or “Dev Channel”, you will need to switch your Chrome OS device to that channel. This works much like the “canary channel” for Android Studio releases, or the dev channel for Chrome/Chromium releases. It configures the device to pull from a different update source, one that pushes updates more aggressively than it does to normal users.
To do this:
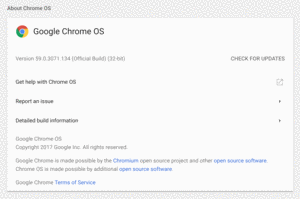
Figure 1064: Chrome OS About Screen
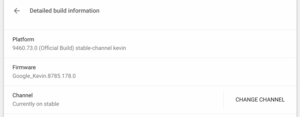
Figure 1065: Chrome OS Detailed Build Information Screen
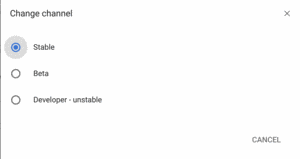
Figure 1066: Chrome OS Channel Options
This should apply a new round of updates, pulled from your chosen channel, then require you to reboot the Chrome OS device.
Those steps are sufficient to allow you to download and run apps from the Play Store. For seeing if your already-shipping app works on Chrome OS, that may be sufficient.
Those steps are also sufficient for getting the Chrome OS emulator working — you should be ready to go from there, with Logcat access and everything else already set up.
However, on hardware, at this point you have no
access to Logcat, and you have no means of running debug builds or
otherwise testing anything other than your already-shipping app.
For hardware, to access these things, you need to enable Chrome OS developer
mode. There is no direct analogue for this in the Android world. The
closest match is enabling fastboot, perhaps as part of installing
an Android developer preview ROM or some other custom ROM.
Unfortunately, the instructions for enabling developer mode are hardware-specific and arcane. Also note that doing this will factory-reset your Chrome OS device, so make sure there is nothing on the device that you need.
For Chromebooks, try this:
For Chrome OS tablets — where you will not have a keyboard — do this instead:
For a Chromebox (desktop-style Chrome OS device), look for a “reset” or “recovery” pinhole in the case. If you have one:
From this point forward, your device will be developer mode. However, on subsequent reboots, that recovery screen will always appear. There, you have three choices:
At this point, you will need to go through some standard steps for doing development in an Android environment, via the Android edition of the Settings app. You get to this via that “App Settings” or “Manage your Android preferences” link in the “Android Apps” (or “Google Play Store”) category of the Chrome OS Settings page.
There, you can:
Note that those options may already be enabled, once you enable “Developer options” via the seven-taps technique.
At this point, you can try out custom builds of your app, by installing them manually (a.k.a., “side-loading”).
Unfortunately, Chrome OS knows nothing about APK files, so you cannot use the Chrome OS Files app to install an APK file.
The simplest way to side-load apps is to have an Android app do it:
As mentioned earlier, the Downloads folder in Chrome OS is shared
with the same folder on external storage in Android. So, you can also
copy an APK over via a USB flash drive, put it in Downloads using
Chrome OS, then use a file manager to install it from Downloads.
However, you still do not have access to Logcat, or any ability to use development tools like Android Studio to work on apps on the Chrome OS device (though the emulator will work at this point).
Some devices support adb over USB.
Most do not. Setting up adb access is possible but
a bit complicated, based on the
official instructions.
NOTE: You will need a keyboard to complete this process. While most Chrome OS devices have a keyboard, Chrome OS tablets might not. You will need to use your own keyboard (Bluetooth or USB), and you will want to get that set up and working before continuing.
Press Ctrl-Alt-T to open crosh, a quasi-shell provided in Chrome OS.
At that command prompt, run
the shell command to get to bash, a full Linux-style shell.
Then, execute the following statements:
sudo crossystem dev_boot_signed_only=0
sudo /usr/libexec/debugd/helpers/dev_features_rootfs_verification
sudo reboot
This will reboot your Chrome OS device. If you run into errors running the
dev_features_rootfs_verification command, try rebooting after the
crossystem, then dropping back into the shell and running the
dev_features_rootfs_verification command again.
Then, go back into bash via crosh, and execute:
sudo /usr/libexec/debugd/helpers/dev_features_ssh
This enables an SSH daemon and presumably makes corresponding adjustments
to the iptables-based firewall.
NOTE: You will need to execute this dev_features_ssh script
after every reboot of your Chrome OS device. Whereas the other portions
of this step persist after a reboot, this portion does not. However,
after a firmware update, you may need to do all of these steps.
In the bash shell, you can use ifconfig to get details of your TCP/IP
settings — wlan0 probably has your IP address. However, this is mostly
for people with Linux experience. Everyone else may prefer using the Chrome OS
UI to determine the IP address.
Go into Settings (e.g., tap on the time/WiFi/battery/account bar in the lower-right, then tap the gear icon). Towards the top of the Settings page, there will be an “Internet connection” section.
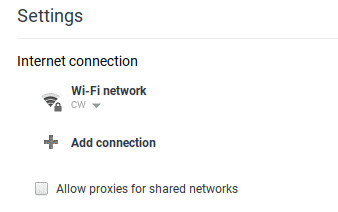
Figure 1067: Chrome OS Settings, Internet Connection Section
If you are using WiFi, tap on the “Wi-Fi network” item, then tap on the WiFi network that you are using. That should bring up a three-tab dialog with details about this network connection.
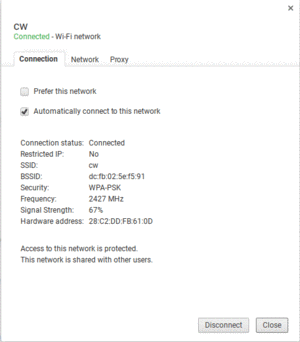
Figure 1068: Chrome OS Settings, Internet Connection Dialog
The middle tab — Network — will show your IP address:
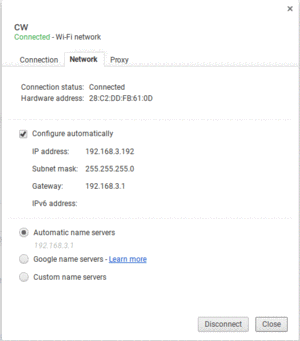
Figure 1069: Chrome OS Settings, Internet Connection Dialog, Network Tab
Make note of this address.
When you want to develop using the Chrome OS device as the target,
execute adb connect <IP>:22,
where <IP> is the same IP address that you used previously. Note that
the official docs drop off the connect part, which does not work.
This should trigger the standard Android debugging authorization dialog, akin to what you see when you first try USB debugging on a phone or tablet. You will need to accept this dialog before continuing.
At this point, adb devices should show your connection, and you should
be able to run apps on the Chrome OS device akin to how you do so for
locally-connected devices, emulators, etc.
If the Chrome OS device goes to sleep, it will disable its WiFi connection.
You will need to wake up the device and run adb connect again to be
able to work with it from Android Studio.
If you reboot the Chrome OS device, you will need to agree once more
to the Play Store terms of service and (try) to sign into the Play Store.
The Play Store UI may appear to get stuck, with a never-ending progress
bar. However, once you have gotten to that point, you should be able
to use adb connect to re-connect to the Chrome OS device.
Some dev channel updates will wipe out your Android environment, deleting all apps and files. Hence, do not store things on the test devices that you will regret losing. Also, you will need to re-do Step #4, and possibly Step #6, to re-establish a developer environment.
For example, in June 2017, Google started releasing an update to the Android environment that replaced Android 6.0 with Android 7.1.1. This required redoing some of the above steps, such as the seven-taps technique to enable “Developer options”. However, installed apps were unaffected.
You may find that you go through Step #1 and Step #2 above — thereby enabling Android apps for the Chrome OS device — and find that your app is not available on the Play Store.
Or, perhaps you go through those steps, and do find that your app is on the Play Store… but you would prefer that it not be there.
There is a long list
of <uses-feature> elements that, if present in your manifest with the wrong values, will cause
your app to not be distributed to Chrome OS devices.
For example, if you have a <uses-feature> element stating that you require
android.hardware.telephony — that the device have telephony capability — your
app might not be distributed to Chrome OS devices. You would need to relax this requirement.
Conversely, not all Chrome OS devices have touchscreens. Ideally, you test your app using a keyboard and mouse or trackpad and confirm that it works well without a touchscreen. Then, add this to your manifest:
  <uses-feature
    android:name="android.hardware.touchscreen"
    android:required="false" />
This advertises that you are willing to support non-touchscreen environments and therefore can be installed on non-touchscreen Chrome OS devices. The default is that you need a touchscreen; you have to specifically opt out of that requirement to reach the full range of Chrome OS devices.
Perhaps you are not in position to fully support Chrome OS. In that case, you could
add one of the proscribed <uses-feature> elements to block distribution to
Chrome OS devices.
However, this approach will also block your app from other devices that happen
to lack that hardware feature.
Sometimes, that is really what you want. So, for example, if you need USB host
mode, you should have a <uses-feature> element for android.hardware.usb.host,
so that any device that lacks USB host mode support will not install your app.
There is no manifest setting, though, that will block your app from Chrome OS devices and not affect any other device type. Google wants you to support Chrome OS and does not make it easy to opt out without also losing access to other hardware.
On the surface, Android apps will perceive Chrome OS as just another Android device. Other than the manifest entries listed above, there is nothing that you absolutely need to do in your app to run on Chrome OS.
That being said, Chrome OS is going to be somewhat different than a normal Android device. Those differences may be something that you want to try to take into account.
Chrome OS is presently running API Level 25 (Android 7.1), though it contains some elements of Android 8.0’s multi-window functionality.
We can tell what the API level is by logging Build.VERSION.SDK_INT, along with other values,
as seen in the
Introspection/EnvDump
sample app. This has a single activity, designed to collect a bunch of
device data and dump it to Logcat:
package com.commonsware.android.envdump;

import android.app.Activity;
import android.app.ActivityManager;
import android.content.pm.FeatureInfo;
import android.content.res.Configuration;
import android.os.Build;
import android.os.Bundle;
import android.util.DisplayMetrics;
import android.util.Log;
import android.widget.TextView;

public class MainActivity extends Activity {
  private static final String TAG="EnvDump";
  private final StringBuilder buf=new StringBuilder();

  @Override
  public void onCreate(Bundle savedInstanceState) {
    super.onCreate(savedInstanceState);
    setContentView(R.layout.main);

    logBuildValues();
    logSystemFeatures();
    logActivityManagerStuff();
    logDisplayMetrics();
    logConfiguration();

    TextView tv=(TextView)findViewById(R.id.text);

    tv.setText(buf.toString());
  }

  private void logBuildValues() {
    log("Build.VERSION.SDK_INT="+Build.VERSION.SDK_INT);

    log("Build.BRAND="+Build.BRAND);
    log("Build.DEVICE="+Build.DEVICE);
    log("Build.DISPLAY="+Build.DISPLAY);
    log("Build.HARDWARE="+Build.HARDWARE);
    log("Build.ID="+Build.ID);
    log("Build.MANUFACTURER="+Build.MANUFACTURER);
    log("Build.MODEL="+Build.MODEL);
    log("Build.PRODUCT="+Build.PRODUCT);

    if (Build.VERSION.SDK_INT>=Build.VERSION_CODES.LOLLIPOP) {
      StringBuilder buf=new StringBuilder();

      for (String abi : Build.SUPPORTED_ABIS) {
        if (buf.length() > 0) {
          buf.append(',');
        }

        buf.append(abi);
      }

      log("Build.SUPPORTED_APIS=" + buf);
    }
    else {
      log("Build.CPU_API="+Build.CPU_ABI);
      log("Build.CPU_API2="+Build.CPU_ABI2);
    }
  }

  private void logSystemFeatures() {
    for (FeatureInfo feature :
        getPackageManager().getSystemAvailableFeatures()) {
      log("System Feature: "+feature.name);
    }
  }

  private void logActivityManagerStuff() {
    ActivityManager mgr=(ActivityManager)getSystemService(ACTIVITY_SERVICE);

    log("heap limit="+mgr.getMemoryClass());
    log("large-heap limit="+mgr.getLargeMemoryClass());
  }

  private void logDisplayMetrics() {
    DisplayMetrics dm=new DisplayMetrics();

    getWindowManager().getDefaultDisplay().getMetrics(dm);

    log("DisplayMetrics.densityDpi="+dm.densityDpi);
    log("DisplayMetrics.xdpi="+dm.xdpi);
    log("DisplayMetrics.ydpi="+dm.ydpi);
    log("DisplayMetrics.scaledDensity="+dm.scaledDensity);
    log("DisplayMetrics.widthPixels="+dm.widthPixels);
    log("DisplayMetrics.heightPixels="+dm.heightPixels);
  }

  private void logConfiguration() {
    Configuration cfg=getResources().getConfiguration();

    log("Configuration.densityDpi="+cfg.densityDpi);
    log("Configuration.fontScale="+cfg.fontScale);
    log("Configuration.hardKeyboardHidden="+cfg.hardKeyboardHidden);
    log("Configuration.keyboard="+cfg.keyboard);
    log("Configuration.keyboardHidden="+cfg.keyboardHidden);
    log("Configuration.locale="+cfg.locale);
    log("Configuration.mcc="+cfg.mcc);
    log("Configuration.mnc="+cfg.mnc);
    log("Configuration.navigation="+cfg.navigation);
    log("Configuration.navigationHidden="+cfg.navigationHidden);
    log("Configuration.orientation="+cfg.orientation);
    log("Configuration.screenHeightDp="+cfg.screenHeightDp);
    log("Configuration.screenWidthDp="+cfg.screenWidthDp);
    log("Configuration.touchscreen="+cfg.touchscreen);
  }

  private void log(String msg) {
    Log.d(TAG, msg);
    buf.append(msg);
    buf.append('\n');
  }
}The following sections outline some settings of note to Android developers.
Most Chrome OS devices should advertise support for the following system
features (e.g., PackageManager and hasSystemFeature()):
android.hardware.audio.outputandroid.hardware.bluetoothandroid.hardware.bluetooth_leandroid.hardware.faketouchandroid.hardware.locationandroid.hardware.location.networkandroid.hardware.screen.landscapeandroid.hardware.screen.portraitandroid.hardware.type.pcandroid.hardware.wifiandroid.software.backupandroid.software.freeform_window_managementandroid.software.printandroid.software.voice_recognizersandroid.software.webviewcom.google.android.feature.GOOGLE_BUILDcom.google.android.feature.GOOGLE_EXPERIENCEorg.chromium.arcorg.chromium.arc.device_managementPortable Chrome OS devices (not Chromeboxes) should also support:
android.hardware.cameraandroid.hardware.camera.anyandroid.hardware.camera.frontandroid.hardware.microphoneandroid.hardware.sensor.accelerometerandroid.hardware.touchscreenandroid.hardware.touchscreen.multitouchandroid.hardware.touchscreen.multitouch.distinctandroid.hardware.touchscreen.multitouch.jazzhandOthers will be hit-or-miss:
android.hardware.audio.low_latencyandroid.hardware.audio.proandroid.hardware.opengles.aepandroid.hardware.sensor.gyroscopeandroid.hardware.vulkan.levelandroid.hardware.vulkan.versionandroid.software.midiThe Build.SUPPORTED_APIS value indicates what CPU architectures are supported
for NDK binaries:
| Device | Value |
|---|---|
| Acer Chromebook R11 C738T | x86,armeabi-v7a,armeabi |
| Acer Chromebook Tab 10 D651N-K9WT | armeabi-v7a,armeabi |
| HP Chromebox x2 | x86_64,x86,armeabi-v7a,armeabi |
If the device has an x86 CPU, that will be listed. All Chrome OS devices
appear to support ARM NDK binaries, presumably through libhoudini or
similar technology.
The heap limit seems to be generally set to 192MB with the large-heap limit set to 512MB, though they might be lower on very low-end Chrome OS devices.
For devices with their own screens,
DisplayMetrics and Configuration should report appropriate values
for screen density, based on the screen size and resolution. Chromeboxes may be
less reliable, in large part because they do not know the physical size of the
display.
The user can toggle between three different states for your activity’s window:
Your activity will undergo configuration changes, as you might expect, when the user switches between these.
Lifecycle events behave more or less as you might expect:
onResume() has been called).onPause() and onStop(), as your activity is no longer
visible.Chrome OS remembers your last window size (floating or full-screen). On the next launch of your app, you will return to that size.
One oddity: if another window takes over the full screen, even though your window is no longer visible, your activity is not stopped. It is paused — that will happen once the window loses the focus. The only time you are stopped is if the window is minimized (or the activity is being destroyed).
As noted earlier, not all Chrome OS devices have touchscreens. Chromebooks will have trackpads; Chromeboxes will rely on mice. And pretty much all Chrome OS devices will have full keyboards.
For touchscreen-equipped Chromebooks, the full suite of gestures should be available to developers. However, for devices lacking a touchscreen, using Android apps becomes… interesting.
For example, to scroll a ListView or RecyclerView, you cannot
simply drag a scrollbar, because there is no scrollbar. Even if
you putter around and arrange for scrollbars to become visible,
they do not respond to touch input. Instead, users need to know
to press a meta key (e.g., Ctrl) while “swiping” the list with
the mouse to be able to scroll. This is somewhat easier with a
trackpad, as a two-finger swipe will scroll the list.
However, you really need to consider optimizing your app for keyboards and mice, rather than assuming touchscreens or trackpads with Chrome OS.
Internal and external storage both work fine on Chrome OS. However, outside of debugging tools, you do not have any ability to work with the files themselves as a developer, much like how you are limited in accessing files that are part of an emulator image.
The exception, as noted earlier in this chapter, is the Downloads
directory on external storage. This is also available to Chrome OS
users via the Files app.
Note that the Storage Access Framework works, for things like
ACTION_OPEN_DOCUMENT and ACTION_CREATE_DOCUMENT. You do not have
access to removable storage, though, even through the Storage
Access Framework.
Notifications work… at least to some extent.
Their look and feel gets normalized to Chrome OS styling, so they will not look like standard Android notifications:
Figure 1070: Android Notification with Two Actions on Chrome OS
Also, actions seem to automatically cancel the Notification, even
if that is not what you intended.
On the whole, HTTP access “just works”, whether you are using WebView
or HttpUrlConnection.
SSL also “just works”, subject to the same sorts of limitations that
you see in normal Android development, such as what root certificates
are available for validating the SSL certificate for a particular https://
URL.
The author has not tested lower-level socket operations at this time.
Theme.Translucent.NoTitleBar does not work, insofar as you will
still wind up with a window in Chrome OS, one with an all-black
background:
Figure 1071: “Invisible” Activity on Chrome OS
Android apps cannot work with external displays
plugged into the Chrome OS device, using Presentation or similar techniques.
It is possible that this is because some Chrome OS devices do not have
their own built-in displays (e.g., ChromeBoxes) and rely on an external
display as their primary display.
Obviously, with the right manifest settings, you can distribute your app via the Play Store.
However, at the present time, sideloading is not an option, except for people who have gone through the steps outlined in this chapter to turn their Chrome OS devices into developer machines. Few users will be doing this. Hence, the Play Store is your only practical distribution channel right now.
The official support point is the #AndroidAppsOnChromeOS hashtag
on the Android developer Google+ community.
There is an equivalent tag on Stack Overflow,
which briefly was an official support point before being replaced
by Google+.
If you encounter bugs, you are supposed to be able to file issues through this link on the Chromium issue tracker.