Figure 235: Android Studio New Activity Wizard
Of course, it would be nice if those “Help” and “About” menu choices that we added in the previous tutorial actually did something.
In this tutorial, we will define another activity class, one that will be responsible for displaying simple content like our help text and “about” details. And, we will arrange to start up that activity when those action bar items are selected. The activity will not actually display anything meaningful yet, as that will be the subject of the next few tutorials.
This is a continuation of the work we did in the previous tutorial.
You can find the results of the previous tutorial and the results of this tutorial in the book’s GitHub repository.
First, we need to define the Java class for our new activity,
SimpleContentActivity.
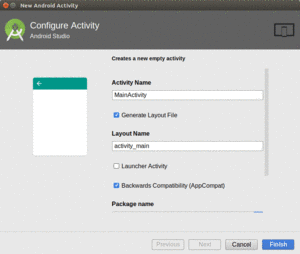
Right-click on your main/ source set directory in the project explorer, and
choose New > Activity > Empty Activity from the context menu. This will bring
up a new-activity wizard:
Figure 235: Android Studio New Activity Wizard
Fill in SimpleContentActivity in the “Activity Name” field and
uncheck the “Generate Layout File” checkbox. Leave “Launcher Activity”
unchecked, and uncheck the “Backwards Compatibility (AppCompat)” checkbox.
If the package name drop-down is showing the app’s package
name, leave it alone. On the other hand, if the package name drop-down
is empty, click on it and choose
the app’s package name. Leave the source language drop-down set to Java.
Then click on Finish.
At this point, your SimpleContentActivity class should look like:
package com.commonsware.empublite;

import android.app.Activity;
import android.os.Bundle;

public class SimpleContentActivity extends Activity {

  @Override
  protected void onCreate(Bundle savedInstanceState) {
    super.onCreate(savedInstanceState);
  }
}
Now that we have declared that the activity exists and can be used, we can start using it.
Go into EmPubLiteActivity and modify onOptionsItemSelected() to add in
some logic in the R.id.about and R.id.help branches, as shown below:
  @Override
  public boolean onOptionsItemSelected(MenuItem item) {
    switch (item.getItemId()) {
      case R.id.about:
        Intent i=new Intent(this, SimpleContentActivity.class);
        startActivity(i);

        return(true);

      case R.id.help:
        i=new Intent(this, SimpleContentActivity.class);
        startActivity(i);

        return(true);
    }

    return(super.onOptionsItemSelected(item));
  }
In those two branches, we create an Intent, pointing at our new
SimpleContentActivity. Then, we call startActivity() on that Intent. Right
now, both help and about do the same thing — we will add some smarts to
have them load up different content later in this book.
You will need to add an import for android.content.Intent to get this to
compile.
If you run this app in a device or emulator, and you choose either the Help
or About menu choices… nothing much appears to happen.
In reality, what happens is that our SimpleContentActivity
appeared, but empty, as we have not given it a full UI yet.
… we will begin using fragments in our tutorial project.