
Figure 12: Android Studio Create-Project Wizard, First Page
When you work on creating an app for Android, you will do so by working in a “project”. The project is a directory containing your source code and other files, like images and UI definitions. Your IDE or other build tools will take what is in your project and generate an Android app (APK) as output.
The details of how you get started with a project vary based upon what IDE you are using, so this chapter goes through the various possibilities.
With Android Studio, to work on a project, you can either create a new project from scratch, you can copy an existing Android Studio project to a new one, or you can import an existing Android project into Android Studio. The following sections will review the steps needed for each of these.
You can create a project from one of two places:
This brings up the new-project wizard:
Figure 12: Android Studio Create-Project Wizard, First Page
The first page of the wizard is where you can specify:
com.commonsware.empublite). This
package name will be used for generating some Java source code, and it also is used as
a unique identifier of this app, as was mentioned earlier in this book.Nothing that you choose here is permanent; you can revise everything later on if needed. The most painful to change is the package name, so ideally you choose a good value up front.
By default, the package name will be made up of two pieces:
If this is not what you want, click the “Edit” button on the far right side of the proposed package name, which will now allow you to edit the package name directly:
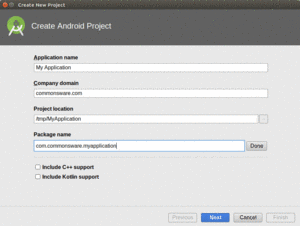
Figure 13: Android Studio Create-Project Wizard, First Page, with Editable Package Name
Clicking “Next” will advance you to a wizard page where you indicate what sort of project you are creating, in terms of intended device type (phones/tablets, TVs, etc.) and minimum required SDK level:
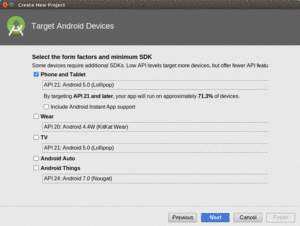
Figure 14: Android Studio Create-Project Wizard, Second Page
The “Minimum SDK” refers to how far back in Android’s version history you are willing to support. The lower the value you specify here, the more Android devices can run your app, but the more work you will have to do to test whether your app really does support those devices.
Developers just starting out on Android should only check “Phone and Tablet” as the device type, leaving the other checkboxes unchecked. The default “Minimum SDK” value also usually is a good choice, and it can be changed readily in your project, as we will see later in the book.
Clicking “Next” advances you to the third page of the wizard, where you can choose if Android Studio should create an initial activity for you, and if so, based on what template:
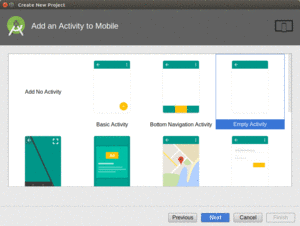
Figure 15: Android Studio Create-Project Wizard, Third Page
None of these templates are especially good, as they add a lot of example material that you will wind up replacing. “Empty Activity” is the best of the available options for first-time Android developers, simply because it adds the least amount of this “cruft”.
If you choose any option other than “Add No Activity”, clicking “Next” will advance you to a page in the wizard where you can provide additional details about the activity to be created:
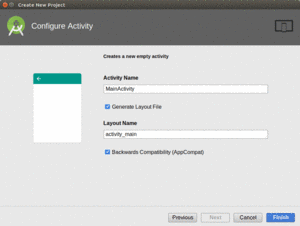
Figure 16: Android Studio Create-Project Wizard, Fourth Page
What options appear here will vary based upon the template you chose in the previous page. Common options include “Activity Name” (the name of the Java class for your activity) and “Layout Name” (the base name of an XML file that will contain a UI definition of your activity).
The “Backwards Compatibility (AppCompat)” checkbox indicates if you want to use a library known as AppCompat. We will discuss using libraries later in the book, as well as what this “AppCompat” is. Unless you know for certain that you want to use AppCompat — and few of this book’s example apps do — uncheck this checkbox.
Clicking “Finish” will generate your project files.
Android Studio projects are simply directories of files, with no special metadata held elsewhere. Hence, to copy a project, just copy its directory.
You can import a project from one of two places:
Then, choose the directory containing the project to be imported.
What happens now depends upon the nature of the project. If the project was already set up for use with Android Studio, or at least with the Android Gradle Plugin, the Android Studio-specific files will be created (or updated) in the project directory.
However, if the project was not set up for Android Studio (or at least for the Android Gradle Plugin), but does
have Eclipse project files (or at least a project.properties file),
you will be led through an Eclipse import wizard. This will be fairly uncommon
nowadays.