Figure 333: Android Studio Per-Method Test Option
Presumably, you will want to test your code, beyond just playing around with it yourself by hand. Android offers several means of testing your app, covered in this next series of chapters.
The first Android SDK testing solution we will examine is the JUnit test framework.
This is a standard Java unit testing framework. Originally, Android
itself “baked in” a copy of JUnit3. This has since been deprecated,
and modern Android testing is done with a separate copy of JUnit4,
in the form of a AndroidJUnitRunner class.
In this chapter, we will review how to apply the AndroidJUnitRunner
to run JUnit4 tests for our Android apps.
Understanding this chapter requires that you have read the core chapters of the book.
This chapter also assumes you have some familiarity with JUnit, though you certainly do not need to be an expert. You can learn more about JUnit at the JUnit site.
There are two places in Android app development where we use JUnit4:
instrumentation tests and unit tests. Both serve the same objective:
confirm that our code runs as expected. What differs in where the
code lives (androidTest versus test source sets) and where the
code runs (inside of Android or on your development machine directly).
The following sections outline the differences between the two, though there is a separate chapter dedicated to unit testing, with the bulk of this chapter focused on instrumentation testing.
One common problem with testing is determining where the test code should reside, relative to the production code being tested. Ideally, these are not intermingled, as that would increase the odds that you might accidentally ship the testing code as part of your production app — at best, this increases your APK size; at worst, it could open up security flaws.
With Gradle-based projects, including those created for Android Studio,
we have a dedicated source set for our instrumentation tests, named
androidTest, where
the code for those tests would reside.
As with any source set, androidTest can have Java code, resources,
etc. It does not
need an AndroidManifest.xml file, though, as that will be auto-generated.
Unit tests, by contrast, will go in a test source set.
Ordinarily, each code base (e.g., project) is packaged in its own APK and is executed in its own process.
In the case of instrumentation tests, your test code and your production code are combined into a single process in a single copy of the virtual machine.
This will allow your JUnit test methods to access objects from your production code, such as your activities and their widgets.
However, this does limit instrumentation testing to be run from a developer’s computer. You cannot package JUnit tests to be initiated from the device itself, except perhaps on rooted devices.
Unit tests, on the other hand, bypass Android and run straight on your development machine. As a result, they cannot use much of the Android SDK, and so these tests are limited in terms of what they can test. However, they will run much more quickly, and so it may be worthwhile to set up a subset of your tests as unit tests.
As noted in the intro to the chapter, modern Android testing — both instrumentation testing and unit testing — is done through JUnit4.
This book does not attempt to cover all aspects of JUnit4. For that, you are encouraged to read the JUnit documentation or other books on Java testing. This chapter will cover some of the basics of using JUnit4 tests, plus some of the issues with using JUnit4 tests in Android.
In JUnit terminology, “test case” is a Java class that represents a set of tests to run.
Any Java class can serve as a test case, so long as it has a zero-argument
public constructor and is known to the test runner that it contains tests
to be run. In the case of JUnit4 on Android, that comes via a
@RunWith(AndroidJUnit4.class) annotation on the class, to signal that
this class contains tests:
@RunWith(AndroidJUnit4.class)
public class ICanHazTests {
  // test code goes here
}
In JUnit, a “test method” is a method, in a test case, that tests something in some production code base.
In JUnit4, a test method is any public method that is annotated
with the @Test annotation:
@RunWith(AndroidJUnit4.class)
public class ICanHazTests {
  @Test
  public void kThxBye() {
    // do some testing
  }
}
A test method can then execute code to see if it works, and “assert”
some conditions (“the response from the foo() method should be 1”).
JUnit4 supplies an Assert class with static assertion
methods that we can employ:
@RunWith(AndroidJUnit4.class)
public class SillyTest {
  @Test
  public void thisIsReallySilly() {
    Assert.assertEquals("bit got flipped by cosmic rays", 1, 1);
  }
}
assertEquals() takes either two parameters of the same type
for comparison (e.g., two int values), or three parameters,
where the first is a custom assertion failure message.
There are countless other methods on Assert (e.g., assertNotNull())
for testing objects, collections, etc.
A JUnit test case can also have methods that represent “setup” and “teardown” work. A “setup” method is one that executes before test methods and helps establish a common environment to be used by all of the test methods. A “teardown” method is one that is run after test methods and is used to clean up things created by the “setup” method. The objective is to ensure that each test method has a consistent and expected environment (e.g., contents of databases).
In JUnit4, you can annotate methods with @Before and @After
for per-test-method setup and teardown work. The @Before method will
be invoked before each test method is called; the @After method will
be invoked after each test method is called.
JUnit4 also offers static @BeforeClass
and @AfterClass methods, which are invoked once for the entire test
case, designed for setting up immutable starter data for test methods
and avoiding the overhead of doing that work on each test method
invocation.
The Testing/JUnit4
sample project illustrates the basics of setting up JUnit4 instrumentation
tests.
We start off with a test case that is, well, silly:
package com.commonsware.android.abf.test;

import android.support.test.runner.AndroidJUnit4;
import junit.framework.Assert;
import org.junit.After;
import org.junit.AfterClass;
import org.junit.Before;
import org.junit.BeforeClass;
import org.junit.Test;
import org.junit.runner.RunWith;

@RunWith(AndroidJUnit4.class)
public class SillyTest {
  @BeforeClass
  static public void doThisFirstOnlyOnce() {
    // do initialization here, run once for all SillyTest tests
  }

  @Before
  public void doThisFirst() {
    // do initialization here, run on every test method
  }

  @After
  public void doThisLast() {
    // do termination here, run on every test method
  }

  @AfterClass
  static public void doThisLastOnlyOnce() {
    // do termination here, run once for all SillyTest tests
  }

  @Test
  public void thisIsReallySilly() {
    Assert.assertEquals("bit got flipped by cosmic rays", 1, 1);
  }
}All we have is a single test method — thisIsReallySilly() — that validates that 1 really
does equal 1. Fortunately, this test usually succeeds. Our SillyTest
also implements @Before, @After, @BeforeClass, and @AfterClass
methods for illustration purposes,
as there is little preparation needed for our rigorous and demanding test method.
JUnit4 offers “test rules”, which are packaged bits of reusable code for
testing certain scenarios. For example, the Android rules artifact
has an ActivityTestRule to help you test your activities.
For example, DemoActivityRuleTest tests an activity from the main
app, where the activity has a ListView with 25 Latin words in it:
package com.commonsware.android.abf.test;

import android.support.test.rule.ActivityTestRule;
import android.support.test.runner.AndroidJUnit4;
import android.widget.ListView;
import com.commonsware.android.abf.ActionBarFragmentActivity;
import junit.framework.Assert;
import org.junit.Before;
import org.junit.Rule;
import org.junit.Test;
import org.junit.runner.RunWith;

@RunWith(AndroidJUnit4.class)
public class DemoActivityRuleTest {
  private ListView list=null;
  @Rule public final ActivityTestRule<ActionBarFragmentActivity> main
      =new ActivityTestRule(ActionBarFragmentActivity.class, true);

  @Before
  public void init() {
    list=main.getActivity().findViewById(android.R.id.list);
  }

  @Test
  public void listCount() {
    Assert.assertEquals(25, list.getAdapter().getCount());
  }
}The @Rule annotation tells JUnit4 that this data member represents
a JUnit4 rule that should be applied to the tests in this test case.
ActivityRuleTest takes over the work of creating and destroying
an instance of our ActionBarFragmentActivity as part of standard
@Before and @After processing. The true in the ActivityTestRule
constructor simply indicates that we want the activity to start off in
touch mode.
We then use a @Before method to retrieve the ListView itself.
We retrieve the activity created by the rule by calling getActivity()
on the rule itself (here called main). Anything that is public
on our activity — including most of the methods that we inherit from
Activity — is usable here, such as findViewById().
Our test method — listCount() — just confirms that our ListAdapter
has 25 items in it.
Sometimes, you do not need an activity, just some Context, for testing
code that takes one as input (e.g., file I/O, database I/O, resources,
assets).
In those cases, you can just create a plain JUnit4 test case, but
use the InstrumentationRegistry to get at a suitable Context for
your test methods.
Specifically, wherever you need a Context tied to your app that
you are testing, call
InstrumentationRegistry.getTargetContext().
The InstrumentationRegistry also has getInstrumentation()
(which returns the Instrumentation object that
we are using for testing) and
getContext() (which returns the Context for our test code’s package).
DemoContextTest demonstrates this:
package com.commonsware.android.abf.test;

import android.support.test.InstrumentationRegistry;
import android.support.test.runner.AndroidJUnit4;
import android.test.AndroidTestCase;
import android.test.UiThreadTest;
import android.view.LayoutInflater;
import android.view.View;
import com.commonsware.android.abf.R;
import junit.framework.Assert;
import org.junit.Before;
import org.junit.Test;
import org.junit.runner.RunWith;

@RunWith(AndroidJUnit4.class)
public class DemoContextTest {
  private View field=null;
  private View root=null;

  @Before
  public void init() {
    InstrumentationRegistry.getInstrumentation().runOnMainSync(new Runnable() {
      @Override
      public void run() {
        LayoutInflater inflater=LayoutInflater
            .from(InstrumentationRegistry.getTargetContext());

        root=inflater.inflate(R.layout.add, null);
      }
    });

    root.measure(800, 480);
    root.layout(0, 0, 800, 480);

    field=root.findViewById(R.id.title);
  }

  @Test
  public void exists() {
    Assert.assertNotNull(field);
  }

  @Test
  public void position() {
    Assert.assertEquals(0, field.getTop());
    Assert.assertEquals(0, field.getLeft());
  }
}Here, we manually inflate the contents of the res/layout/add.xml resource, and lay them
out as if they were really in an activity, via calls to measure() and layout() to
simulate a WVGA800 display. At that point, we can start testing the widgets inside
of that layout, from simple assertions to confirm that they exist, to testing their
size and position.
Note that the act of inflating the layout is performed inside a
Runnable, which itself is passed to runOnMainSync() on an Instrumentation.
runOnMainSync() says “run this code on the main application thread,
then block the current thread until that code has completed”. On some versions
of Android, layout inflation needs to happen on the main application thread,
and therefore the test is more reliable if we do that inflation via
runOnMainSync(). Test methods themselves run on a background thread,
not the main application thread.
Beyond having test code, we also need to provide some configuration information to Gradle to allow us to run these tests, eventually.
First, you need to add a test dependency — a dependency that will
only be used as part of instrumentation testing. That can be accomplished
via an androidTestImplementation statement in the dependencies closure,
instead of a implementation statement, to limit the scope of the dependency to
the case where the androidTest source set is in use.
Specifically, we need the
com.android.support.test:rules artifact from the Android
Support Repository:
dependencies {
    implementation "com.android.support:support-fragment:27.0.2"
    androidTestImplementation 'com.android.support.test:rules:1.0.1'
    androidTestImplementation 'com.android.support.test.espresso:espresso-core:3.0.1'
}
However, the rules artifact also depends upon some other artifacts available
in public repositories, like Maven Central or Bintray’s JCenter. If
you have one of those set up already — and a typical Android Studio
project will via the top-level build.gradle file — then Gradle will
be able to search those repositories for the dependencies.
A “test runner”, in JUnit terms, is a piece of code that knows how to plug into JUnit, execute tests, and collect any exceptions or assertion failures that result from those tests.
JUnit4 uses a test runner named AndroidJUnitRunner, which we gain access
to through the aforementioned test dependency.
In the defaultConfig closure, we can teach Gradle to use that test runner,
via the testInstrumentationRunner value:
android {
    compileSdkVersion 27
    buildToolsVersion '27.0.3'

    defaultConfig {
        minSdkVersion 15
        targetSdkVersion 27
        testApplicationId "com.commonsware.android.gradle.hello.test"
        testInstrumentationRunner "android.support.test.runner.AndroidJUnitRunner"
    }
}
That defaultConfig closure also specifies a testApplicationId. This
is a replacement value for our applicationId when we are running our
tests. This allows our test build to run without disturbing any other
builds (e.g., standard debug builds) on our test device or emulator.
The convention is to have the testApplicationId be your regular
applicationId (or package from your <manifest>) with .test on
the end, but that is merely a convention.
Writing tests is nice. Running tests is nicer. Hence, it would be useful if we could run our JUnit4 tests.
You have few options for quickly running one of your instrumentation tests.
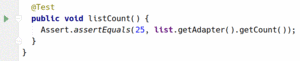
In the Android Studio editor for your test case, each test method will have a green “run” icon in the gutter. Clicking that will run that test method on your chosen device or emulator:
Figure 333: Android Studio Per-Method Test Option
You can also right-click over a test case class, or a Java package containing test cases, and choose to run the tests cases from the context menu:
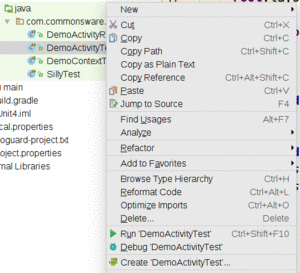
Figure 334: Android Studio Per-Class or Per-Package Test Option
You will see your ad-hoc runs appear in the drop-down list to the left of the run button in the Android Studio toolbar. That drop-down list represents your “run configurations”, and you can set one of those up yourself directly if you wish.
To do that, choose Run > “Edit Configurations” from the main menu. That will bring up a dialog showing your current run configurations:
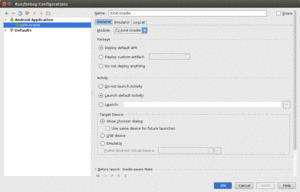
Figure 335: Android Studio Run Configurations Dialog
Towards the upper-left corner of the dialog, you will see a green plus sign. Tapping that will drop down a list of configuration types to choose from:
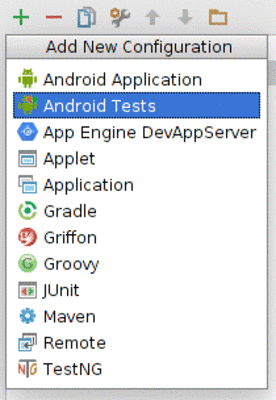
Figure 336: Android Studio, Adding a New Run Configuration
Choose “Android Instrumented Tests”, and a new empty configuration will be set up for you.
You can name it whatever you want via the “Name” field (e.g., “Instr Tests”).
Choose your project’s module that you wish to test in the “Module” drop-down
(e.g., app). You can also choose the scope of the testing (e.g., “All in Module”),
where to run the tests (e.g., “Show chooser dialog”), plus other settings.
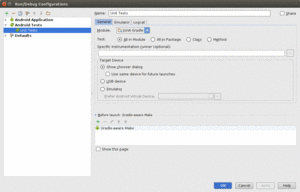
Figure 337: Android Studio, Showing New “Tests” Run Configuration
At that point, you can choose your run configuration from the drop-down to the left of the “play” button in the toolbar:

Figure 338: Android Studio Toolbar, Showing “Tests” Run Configuration
Note that the context menu for a class or package containing test cases has a “Create …” option for creating a test run configuration specific for that class or package.
Regardless of how you run the tests, the output will be shown in the Run view, normally docked in the bottom of your IDE window:
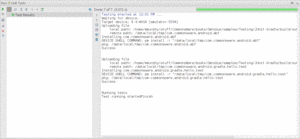
Figure 339: Android Studio, Showing Run Unit Tests Results
If a test fails an assertion or crashes, the test results will show the test case and test method that failed, along with the associated stack trace:
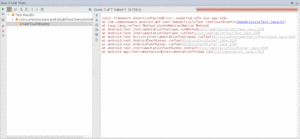
Figure 340: Android Studio, Showing Run Unit Tests Results With a Failure
The primary Gradle task that you will use related to testing is connectedCheck.
This task will build the main app, then, build the test app
(using a generated manifest to go along with the code from your
androidTest source set).
At that point, the task will iterate over all compatible connected devices and running emulator instances. For each such Android environment, the task will install both apps, run the tests, and uninstall both apps.
Raw test results, in XML format, will be written to
build/outputs/androidTest-results/connected. These will primarily be of interest
to toolsmiths, such as those adding support for Android Gradle-based builds
to continuous integration (CI) servers.
For others, the HTML reports will be of greater use. These will be
written to build/outputs/reports/androidTests/connected, with an index.html
file serving as your entry point. These will show the results of all
of your tests, with hyperlinked pages to be able to “drill down” into the
details, such as to investigate failed tests.
The above procedures are aimed at testing Android application projects. If you are creating an Android library project, you can also use JUnit for testing.
A Gradle-built Android library project can have an androidTest source set,
just like a regular app. And, a Gradle-built Android library project can
be tested via the connectedCheck task. However, that task will create and
install a single APK, consisting of the code from the androidTest
source set combined with the library project’s own code.
From the standpoint of what you do as a developer, though, it works just
like testing an app: add your test cases to the androidTest source
set and use connectedCheck to run the tests.
Android 6.0 added the concept of runtime permissions, where permissions with
a protectionLevel of dangerous are not granted automatically, but instead
need to be requested at runtime. Those requests result in a system-supplied
dialog appearing, one that the user is supposed to tap on to grant or deny
your request.
Our instrumentation tests cannot interact with this dialog. Moreover, our test code is its own separate app, and the first time it is installed, it will not have the runtime permissions yet. Hence, if we try testing code that needs those permissions, our tests fail.
There are two major approaches for dealing with this. If you wish to test the actual UI flow of your runtime permission request logic, you will need to use UiAutomator to simulate user clicks on the permission dialog. If, however, your instrumentation tests are focused on logic beneath the UI layer, you can grant the permissions yourself in your test code, bypassing any need for the dialog.
This is merely a matter of having the following code snippet in your test classes:
if (Build.VERSION.SDK_INT>=Build.VERSION_CODES.M) {
  InstrumentationRegistry
    .getInstrumentation()
    .getUiAutomation()
    .executeShellCommand(String.format("pm grant %s android.permission.READ_EXTERNAL_STORAGE",
      target.getPackageName()));
}
Here, you would replace READ_EXTERNAL_STORAGE with whatever runtime permission you need,
and execute multiple commands if you need to grant multiple permissions.
If you put this in @BeforeClass-annotated methods on your test case classes
that need runtime permissions, you will minimize the amount of time spent
executing this command, while ensuring that the runtime permissions are granted
by the time your test methods exercise code that needs those permissions.
Note that there is a GrantPermissionsRule in the Android Support Library (and AndroidX)
that handles this shell command for you, but as of January 2019, it was described as
“currently in beta”.
By default, when we run our instrumentation tests, Android forks a single process and runs all the tests in that process. This has two problems:
static field were not
initialized… and it was initialized in some earlier test.Quietly released in 2017, the
Android Test Orchestrator
addresses this by running
each test method in its own separate process. This clears up these two problems,
though it adds quite a bit of overhead. In particular, anything that you do in
a custom Application subclass, such as in its onCreate() method, now happens
for every test method, rather than just once for each run of your tests.
For Android Studio and Gradle-based tests, setting up the Android Test Orchestrator is fairly straightforward:
1.0.1 or higher of the
com.android.support.test:runner libraryandroidTestUtil 'com.android.support.test:orchestrator:1.0.1' to your
dependencies, where the version number should match that of the
com.android.support.test:runner dependency:dependencies {
implementation "com.android.support:support-fragment:27.1.1"
androidTestImplementation 'com.android.support.test:runner:1.0.1'
androidTestUtil 'com.android.support.test:orchestrator:1.0.1'
androidTestImplementation 'com.android.support.test.espresso:espresso-core:3.0.1'
}
testOptions closure to the android closure of your module’s
build.gradle file, requesting the execution of
ANDROID_TEST_ORCHESTRATOR:android {
compileSdkVersion 27
buildToolsVersion '27.0.3'
defaultConfig {
minSdkVersion 15
targetSdkVersion 27
testApplicationId "com.commonsware.android.gradle.hello.test"
testInstrumentationRunner "android.support.test.runner.AndroidJUnitRunner"
}
testOptions {
execution 'ANDROID_TEST_ORCHESTRATOR'
}
}
And that’s it. There are no Java code changes required — you write your tests normally.
The Testing/Orchestrator
sample project is cloned from the JUnit4 sample, with the aforementioned changes,
plus a custom Application class:
package com.commonsware.android.abf;

import android.app.Application;
import android.util.Log;

public class ScrapApp extends Application {
  @Override
  public void onCreate() {
    super.onCreate();

    Log.e("Frosty the Snowman", "Happy Birthday!");
  }
}
Without the Android Test Orchestrator, the “Happy Birthday!” message would appear once in LogCat for the entire test suite. With the Android Test Orchestrator, the message appears once for each test method… and, inexplicably, an eighth time as well:
12-18 07:38:11.356 11131-11131/com.commonsware.android.abf E/Frosty the Snowman: Happy Birthday!
12-18 07:38:12.438 11159-11159/com.commonsware.android.abf E/Frosty the Snowman: Happy Birthday!
12-18 07:38:14.023 11213-11213/com.commonsware.android.abf E/Frosty the Snowman: Happy Birthday!
12-18 07:38:15.358 11260-11260/com.commonsware.android.abf E/Frosty the Snowman: Happy Birthday!
12-18 07:38:18.454 11316-11316/com.commonsware.android.abf E/Frosty the Snowman: Happy Birthday!
12-18 07:38:19.809 11366-11366/com.commonsware.android.abf E/Frosty the Snowman: Happy Birthday!
12-18 07:38:20.711 11392-11392/com.commonsware.android.abf E/Frosty the Snowman: Happy Birthday!
12-18 07:38:21.635 11418-11418/com.commonsware.android.abf E/Frosty the Snowman: Happy Birthday!
The downside comes in the speed of the tests. Running this short suite under the Android Test Orchestrator is noticeably slower than running the suite without the Orchestrator. A test suite measuring in the thousands of test methods will result in a fair bit of additional overhead, forking thousands of processes instead of just one.