Figure 459: ChronoDemo, As Initially Launched, on Android 7.1
Generally speaking, modal dialogs are considered to offer poor UX, particularly on mobile devices. You want to give the user more choices, not fewer, and so locking them into “deal with this dialog right now, or else” is not especially friendly. That being said, from time to time, there will be cases where that sort of modal interface is necessary, and to help with that, Android does have a dialog framework that you can use.
Understanding this chapter requires that you have read the core chapters of this book.
Android has a pair of built-in dialogs that handle the common operations of allowing
the user to select a date (DatePickerDialog) or a time (TimePickerDialog).
These are simply dialog wrappers around the DatePicker
and TimePicker widgets, as
are described in this book’s Widget Catalog.
The DatePickerDialog allows you to set the starting date for
the selection, in the form of a year, month, and day of month value. Note
that the month runs from 0 for January through 11 for December. Most
importantly, both let you provide a callback object (OnDateChangedListener
or OnDateSetListener) where you are informed of a new date selected by the
user. It is up to you to store that date someplace, particularly if you are
using the dialog, since there is no other way for you to get at the chosen
date later on.
Similarly, TimePickerDialog lets you:
0
through 23) and a minute (0 through 59)OnTimeChangedListener or
OnTimeSetListener) to be notified of when the user has chosen a new
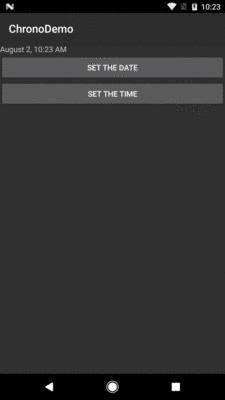
time, which is supplied to you in the form of an hour and minuteFor example, from the Dialogs/Chrono sample project, here’s a trivial layout containing a label and two buttons — the buttons will pop up the dialog flavors of the date and time pickers:
<?xml version="1.0" encoding="utf-8"?>
<LinearLayout
  xmlns:android="http://schemas.android.com/apk/res/android"
  android:orientation="vertical"
  android:layout_width="match_parent"
  android:layout_height="match_parent"
  >
  <TextView android:id="@+id/dateAndTime"
    android:layout_width="match_parent"
    android:layout_height="wrap_content"
    />
  <Button android:id="@+id/dateBtn"
    android:layout_width="match_parent"
    android:layout_height="wrap_content"
    android:text="Set the Date"
    android:onClick="chooseDate"
    />
  <Button android:id="@+id/timeBtn"
    android:layout_width="match_parent"
    android:layout_height="wrap_content"
    android:text="Set the Time"
    android:onClick="chooseTime"
    />
</LinearLayout>
The more interesting stuff comes in the Java source:
package com.commonsware.android.chrono;

import android.app.Activity;
import android.app.DatePickerDialog;
import android.app.TimePickerDialog;
import android.os.Bundle;
import android.text.format.DateUtils;
import android.view.View;
import android.widget.DatePicker;
import android.widget.TextView;
import android.widget.TimePicker;
import java.util.Calendar;

public class ChronoDemo extends Activity {
  TextView dateAndTimeLabel;
  Calendar dateAndTime=Calendar.getInstance();

  @Override
  public void onCreate(Bundle state) {
    super.onCreate(state);
    setContentView(R.layout.main);

    dateAndTimeLabel=(TextView)findViewById(R.id.dateAndTime);

    updateLabel();
  }

  public void chooseDate(View v) {
    new DatePickerDialog(this, d,
                          dateAndTime.get(Calendar.YEAR),
                          dateAndTime.get(Calendar.MONTH),
                          dateAndTime.get(Calendar.DAY_OF_MONTH))
      .show();
  }

  public void chooseTime(View v) {
    new TimePickerDialog(this, t,
                          dateAndTime.get(Calendar.HOUR_OF_DAY),
                          dateAndTime.get(Calendar.MINUTE),
                          true)
      .show();
  }

  private void updateLabel() {
    dateAndTimeLabel
      .setText(DateUtils
                 .formatDateTime(this,
                                 dateAndTime.getTimeInMillis(),
                                 DateUtils.FORMAT_SHOW_DATE|DateUtils.FORMAT_SHOW_TIME));
  }

  DatePickerDialog.OnDateSetListener d=new DatePickerDialog.OnDateSetListener() {
    public void onDateSet(DatePicker view, int year, int monthOfYear,
                          int dayOfMonth) {
      dateAndTime.set(Calendar.YEAR, year);
      dateAndTime.set(Calendar.MONTH, monthOfYear);
      dateAndTime.set(Calendar.DAY_OF_MONTH, dayOfMonth);
      updateLabel();
    }
  };

  TimePickerDialog.OnTimeSetListener t=new TimePickerDialog.OnTimeSetListener() {
    public void onTimeSet(TimePicker view, int hourOfDay,
                          int minute) {
      dateAndTime.set(Calendar.HOUR_OF_DAY, hourOfDay);
      dateAndTime.set(Calendar.MINUTE, minute);
      updateLabel();
    }
  };
}
The “model” for this activity is just a Calendar instance, initially set to be the
current date and time. In the updateLabel() method, we take the current
Calendar, format it using DateUtils and formatDateTime(), and put it in the
TextView. The nice thing about using Android’s DateUtils class is that it will
format dates and times using the user’s choice of date formatting,
determined through the Settings application.
Each button has a corresponding method that will get control when the
user clicks it (chooseDate() and chooseTime()). When the button is clicked,
either a DatePickerDialog or a TimePickerDialog is shown. In the case of the
DatePickerDialog, we give it an OnDateSetListener callback that updates the
Calendar with the new date (year, month, day of month). We also give the
dialog the last-selected date, getting the values out of the Calendar. In the
case of the TimePickerDialog, it gets an OnTimeSetListener callback to update
the time portion of the Calendar, the last-selected time, and a true
indicating we want 24-hour mode on the time selector
With all this wired together, the resulting activity looks like this:
Figure 459: ChronoDemo, As Initially Launched, on Android 7.1
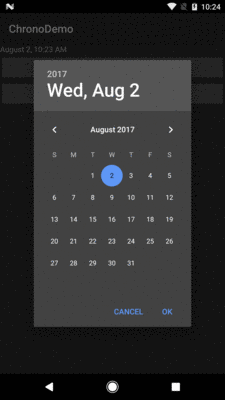
Figure 460: ChronoDemo, Showing DatePickerDialog
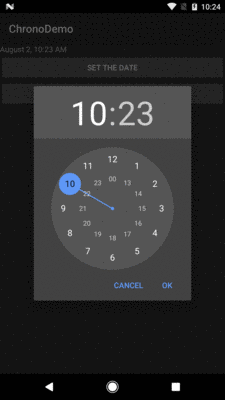
Figure 461: ChronoDemo, Showing TimePickerDialog
Android 4.1 through 4.4 have some changes in behavior from what came before and what came after.
First, the “Cancel” button was removed, unless you specifically add a negative
button listener to the underlying DatePicker or TimePicker widget:
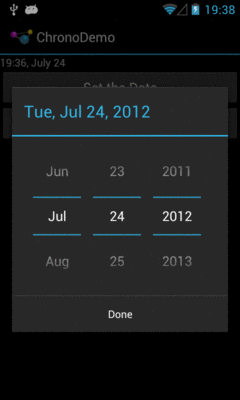
Figure 462: ChronoDemo, Showing DatePickerDialog, on Android 4.1
The user can press BACK to exit the dialog, so all functionality is still there, but you may need to craft your documentation to accommodate this difference. And, on Android 5.0+, the Cancel button returned.
Second, your OnDateSetListener or OnTimeSetListener will be called an extra time.
If the user presses BACK to leave the dialog, your onDateSet() or onTimeSet()
will be called. If the user clicks the positive button of the dialog, you are
called twice. There is a workaround
documented on Stack Overflow.
This too was repaired in Android 5.0.
For your own custom dialogs, you could extend the Dialog base class, as do
DatePickerDialog and TimePickerDialog. More commonly, though, developers
create custom dialogs via AlertDialog, in large part due to the existence
of AlertDialog.Builder. This builder class allows you to construct a custom
dialog using a single (albeit long) Java statement, rather than having to create
your own custom subclass. Builder offers a series of methods to
configure an AlertDialog, each method returning the Builder for easy
chaining.
Commonly-used configuration methods on Builder include:
setMessage() if you want the “body” of the dialog to be a simple
textual message, from either a supplied String or a supplied string
resource ID.setTitle() and setIcon(), to configure the text and/or icon to
appear in the title bar of the dialog box.setPositiveButton(), setNeutralButton(), and setNegativeButton(),
to indicate which button(s) should appear across the bottom of the
dialog, where they should be positioned (left, center, or right,
respectively), what their captions should be, and what logic should
be invoked when the button is clicked (besides dismissing the
dialog).Calling create() on the Builder will give you the AlertDialog, built according
to your specifications. You can use additional methods on AlertDialog itself to
perhaps configure things beyond what Builder happens to support.
Note, though, that calling create() does not actually display the dialog.
The modern way to display the dialog is to tie it to a DialogFragment, as will
be discussed in the next section.
One challenge with dialogs comes with configuration changes, notably screen rotations. If they pivot the device from portrait to landscape (or vice versa), presumably the dialog should remain on the screen after the change. However, since Android wants to destroy and recreate the activity, that would have dire impacts on your dialog.
Pre-fragments, Android had a “managed dialog” facility that would attempt to help
with this. However, with the introduction of fragments came the DialogFragment,
which handles the configuration change process.
You have two ways of supplying the dialog to the DialogFragment:
onCreateDialog() and return a Dialog, such as
AlertDialog created via an AlertDialog.Builder
onCreateView(), as you would with an ordinary fragment,
and the View that you return will be placed inside of a dialogThe
Dialogs/DialogFragment
sample project demonstrates the use of a DialogFragment in conjunction with
an AlertDialog in this fashion.
Here is our DialogFragment, named SampleDialogFragment:
package com.commonsware.android.dlgfrag;

import android.app.AlertDialog;
import android.app.Dialog;
import android.content.DialogInterface;
import android.os.Bundle;
import android.support.v4.app.DialogFragment;
import android.util.Log;
import android.view.View;
import android.widget.EditText;
import android.widget.Toast;

public class SampleDialogFragment extends DialogFragment implements
    DialogInterface.OnClickListener {
  private View form=null;

  @Override
  public Dialog onCreateDialog(Bundle savedInstanceState) {
    form=
        getActivity().getLayoutInflater()
                     .inflate(R.layout.dialog, null);

    AlertDialog.Builder builder=new AlertDialog.Builder(getActivity());

    return(builder.setTitle(R.string.dlg_title).setView(form)
                  .setPositiveButton(android.R.string.ok, this)
                  .setNegativeButton(android.R.string.cancel, null).create());
  }

  @Override
  public void onClick(DialogInterface dialog, int which) {
    String template=getActivity().getString(R.string.toast);
    EditText name=(EditText)form.findViewById(R.id.title);
    EditText value=(EditText)form.findViewById(R.id.value);
    String msg=
        String.format(template, name.getText().toString(),
                      value.getText().toString());

    Toast.makeText(getActivity(), msg, Toast.LENGTH_LONG).show();
  }

  @Override
  public void onDismiss(DialogInterface unused) {
    super.onDismiss(unused);

    Log.d(getClass().getSimpleName(), "Goodbye!");
  }

  @Override
  public void onCancel(DialogInterface unused) {
    super.onCancel(unused);

    Toast.makeText(getActivity(), R.string.back, Toast.LENGTH_LONG).show();
  }
}
In onCreateDialog(), we inflate a custom layout (R.layout.dialog) that consists
of some TextView labels and EditText fields:
<?xml version="1.0" encoding="utf-8"?>
<LinearLayout xmlns:android="http://schemas.android.com/apk/res/android"
  android:layout_width="match_parent"
  android:layout_height="wrap_content"
  android:orientation="vertical">

  <LinearLayout
    android:layout_width="match_parent"
    android:layout_height="wrap_content"
    android:layout_margin="4dp"
    android:orientation="horizontal">

    <TextView
      android:layout_width="wrap_content"
      android:layout_height="wrap_content"
      android:text="@string/display_name"/>

    <EditText
      android:id="@+id/title"
      android:layout_width="match_parent"
      android:layout_height="wrap_content"
      android:inputType="text"/>
  </LinearLayout>

  <LinearLayout
    android:layout_width="match_parent"
    android:layout_height="wrap_content"
    android:layout_margin="4dp"
    android:orientation="horizontal">

    <TextView
      android:layout_width="wrap_content"
      android:layout_height="wrap_content"
      android:text="@string/value"/>

    <EditText
      android:id="@+id/value"
      android:layout_width="match_parent"
      android:layout_height="wrap_content"
      android:inputType="number"/>
  </LinearLayout>

</LinearLayout>We then create an instance of AlertDialog.Builder, then start configuring the
dialog by calling a series of methods on the Builder:
setTitle() to supply the text to appear in the title bar of the dialogsetView() to define the contents of the dialog, in the form of our inflated View
setPositiveButton() to define the caption of one button (set here to the
Android-supplied “OK” string resource) and to arrange to get control when that button is clicked
(via this as the second parameter and our activity implementing
DialogInterface.OnClickListener)setNegativeButton() to define the caption of the other button (set here to the
Android-supplied “Cancel” resource)We do not supply a listener to setNegativeButton(), because we do not need one in
this case. Whenever the user clicks on any of the buttons, the dialog will be
dismissed automatically. Hence, you only need a listener if you intend to do something
special beyond dismissing the dialog when a button is clicked.
At that point, we call create() to construct the actual AlertDialog instance
and hand that back to Android.
If the user taps our positive button, we are called with onClick() and can collect
information from our form and do something with it, in this case displaying a Toast.
We also override:
onCancel(), which is called if the user presses the BACK button to exit the
dialogonDismiss(), which is called whenever the dialog goes away for any reason
(BACK or a button click)Our activity (MainActivity), has a big button tied to a showMe() method,
which calls show() on a newly-created instance of our SampleDialogFragment:
  public void showMe(View v) {
    new SampleDialogFragment().show(getSupportFragmentManager(), "sample");
  }
The second parameter to show() is a tag that can be used to retrieve this
fragment again later from the FragmentManager via findFragmentByTag().
When you click the big button in the activity, our dialog is displayed:
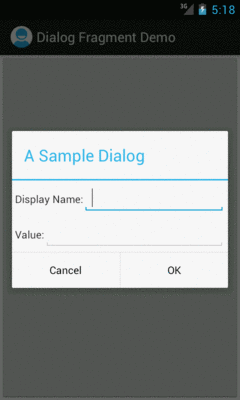
Figure 463: SampleDialogFragment, As Initially Launched, on Android 4.0.3
Android will handle the configuration change, and so long as our dialog uses
typical widgets like EditText, the standard configuration change logic will
carry our data forward from the old activity’s dialog to the new activity’s dialog.
If you do not override onCreateDialog(), Android will assume that you want
the View returned by onCreateView() to be poured into an ordinary Dialog,
which DialogFragment will create for you automatically.
One advantage of this approach is that you can selectively show the fragment as a dialog or show it as a regular fragment as part of your main UI.
To show the fragment as a dialog, use the same show() technique as was outlined
in the previous section. To display the fragment as part of the main UI,
use a FragmentTransaction to add() it, the way you would for any other
dynamic fragment.
This is one alternative to the normal fragment approach of having dedicated activities for each fragment on smaller screen sizes.
We will also see this approach used when we try to apply fragments to display
content on a secondary screen using Android 4.2’s Presentation class,
covered elsewhere in this book.
Dialogs in Android are modal in terms of UI. The user cannot proceed in your activity until they complete or dismiss the dialog.
Dialogs in Android are not blocking in terms of the programming model. When you
call show() to display a dialog — either directly or by means of adding a
DialogFragment to the screen — this is not a blocking call. The dialog will
be displayed sometime after the call to show(), asynchronously. You use callbacks,
such as the button event listeners, to find out about events going on with respect
to the dialog that you care about.
This runs counter to a couple of GUI toolkits, where displaying the dialog blocks
the thread that does the displaying. In those toolkits, the call to show() would
not return until the dialog had been displayed and dealt with by the user.
That being said, most modern GUI toolkits take the approach Android does and have
dialogs be non-blocking. Some developers try to figure out some way of hacking a
blocking approach on top of Android’s non-blocking dialogs — their time would be
far better spent learning modern event-driven programming.