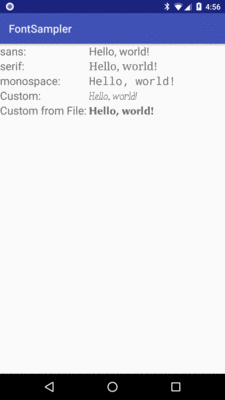
Figure 525: The FontSampler application
Inevitably, you’ll get the question “hey, can we change this font?” when doing application development. The answer depends on what fonts come with the platform, whether you can add other fonts, and how to apply them to the widget or whatever needs the font change.
Android is no different. It comes with some fonts plus a means for adding new fonts. Though, as with any new environment, there are a few idiosyncrasies to deal with.
Understanding this chapter requires that you have read the core chapters, particularly the one on files.
Android natively knows three fonts, by the shorthand names of “sans”, “serif”, and “monospace”. For Android 1.x, 2.x, and 3.x, these fonts are actually the Droid series of fonts, created for the Open Handset Alliance by Ascender. A new font set, Roboto, is used in Android 4.x and beyond, though the look of the font changed somewhat in Android 5.0.
For those fonts, you can just reference them in your layout XML, if you
choose, such as the following layout from the
Fonts/FontSampler
sample project:
<?xml version="1.0" encoding="utf-8"?>
<TableLayout xmlns:android="http://schemas.android.com/apk/res/android"
  android:layout_width="match_parent"
  android:layout_height="match_parent"
  android:stretchColumns="1">

  <TableRow>

    <TextView
      android:layout_marginRight="4dip"
      android:text="@string/label_sans"
      android:textSize="20sp" />

    <TextView
      android:id="@+id/sans"
      android:text="@string/hello_world"
      android:textSize="20sp"
      android:typeface="sans" />
  </TableRow>

  <TableRow>

    <TextView
      android:layout_marginRight="4dip"
      android:text="@string/label_serif"
      android:textSize="20sp" />

    <TextView
      android:id="@+id/serif"
      android:text="@string/hello_world"
      android:textSize="20sp"
      android:typeface="serif" />
  </TableRow>

  <TableRow>

    <TextView
      android:layout_marginRight="4dip"
      android:text="@string/label_monospace"
      android:textSize="20sp" />

    <TextView
      android:id="@+id/monospace"
      android:text="@string/hello_world"
      android:textSize="20sp"
      android:typeface="monospace" />
  </TableRow>

  <TableRow>

    <TextView
      android:layout_marginRight="4dip"
      android:text="@string/label_custom"
      android:textSize="20sp" />

    <TextView
      android:id="@+id/custom"
      android:text="@string/hello_world"
      android:textSize="20sp" />
  </TableRow>

  <TableRow android:id="@+id/filerow">

    <TextView
      android:layout_marginRight="4dip"
      android:text="@string/label_custom_from_file"
      android:textSize="20sp" />

    <TextView
      android:id="@+id/file"
      android:text="@string/hello_world"
      android:textSize="20sp" />
  </TableRow>
</TableLayout>
This layout builds a table showing short samples of five fonts. Notice
how the first three have the android:typeface attribute, whose value
is one of the three built-in font faces (e.g., “sans”).
The three built-in fonts are very nice. However, it may be that a designer, or a manager, or a customer wants a different font than one of those three. Or perhaps you want to use a font for specialized purposes, such as an image font instead of a series of PNG graphics.
The easiest way to accomplish this is to package the desired font(s)
with your application. To do this, simply create an assets/ folder in
the project root, and put your TrueType (TTF) fonts in the assets. You
might, for example, create assets/fonts/ and put your TTF files in
there. Note that Android has some support for OpenType (OTF) fonts, as well.
Then, you need to tell your widgets to use that font. Unfortunately, you can no longer use layout XML for this, since the XML does not know about any fonts you may have tucked away as an application asset. Instead, you need to make the change in Java code:
package com.commonsware.android.fonts;

import android.app.Activity;
import android.graphics.Typeface;
import android.os.Bundle;
import android.os.Environment;
import android.view.View;
import android.widget.TextView;
import java.io.File;

public class FontSampler extends Activity {
  @Override
  public void onCreate(Bundle state) {
    super.onCreate(state);
    setContentView(R.layout.main);

    TextView tv=(TextView)findViewById(R.id.custom);
    Typeface face=
      Typeface.createFromAsset(getAssets(), "fonts/HandmadeTypewriter.ttf");

    tv.setTypeface(face);

    File font=
      new File(Environment.getExternalStorageDirectory(), "MgOpenCosmeticaBold.ttf");

    if (font.exists()) {
      tv=(TextView)findViewById(R.id.file);
      face=Typeface.createFromFile(font);

      tv.setTypeface(face);
    }
    else {
      findViewById(R.id.filerow).setVisibility(View.GONE);
    }
  }
}
Here we grab the TextView for our “custom” sample, then create a
Typeface object via the static createFromAsset() builder method.
This takes the application’s AssetManager (from getAssets()) and
a path within your assets/ directory to the font you want.
Then, it is just a matter of telling the TextView to setTypeface(),
providing the Typeface you just created. In this case, we are using
the
Handmade Typewriter font.
You can also load a font out of a local file and use it. The benefit is
that you can customize your fonts after your application has been
distributed. On the other hand, you have to somehow arrange to get the
font onto the device. But just as you can get a Typeface via
createFromAsset(), you can get a Typeface via createFromFile().
In our FontSampler, we look in the root of “external storage”
(typically the SD card) for the MgOpenCosmeticaBold TrueType font file,
and if it is found, we use it for the fifth row of the table.
Otherwise, we hide that row.
The results?
Figure 525: The FontSampler application
Note that Android does not seem to like all TrueType fonts. When
Android dislikes a custom font, rather than raise an Exception, it
seems to substitute Droid Sans (“sans”) quietly. So, if you try to
use a different font and it does not seem to be working, it may be that
the font in question is incompatible with Android, for whatever reason.
One common complaint with font handling in Android is that you have to apply a custom font on a per-widget basis in Java code.
This gets old quickly.
It is not too bad with just a single TextView. But for a whole
activity, or a whole application, changing all of the relevant
TextView widgets (and descendents, like Button) gets to be a bit
tedious.
While there are “traverse the widget hierarchy and fix up the fonts” code snippets available, you are probably better served using a third-party library, like Christoper Jenkins’ Calligraphy, which lets you define custom fonts in layout XML files or style resources.
TrueType fonts can be rather pudgy, particularly if they support an extensive subset of the available Unicode characters. The Handmade Typewriter font used above runs over 70KB; the DejaVu free fonts can run upwards of 500KB apiece. Even compressed, these add bulk to your application, so be careful not to go overboard with custom fonts, lest your application take up too much room on your users’ phones.
Conversely, bear in mind that fonts may not have all of the glyphs that you need. As an example, let us talk about the ellipsis.
Android’s TextView class has the built-in ability to “ellipsize”
text, truncating it and adding an ellipsis if the text is longer than
the available space. You can use this via the android:ellipsize
attribute, for example. This works fairly well, at least for
single-line text.
The ellipsis that Android uses is not three periods. Rather it uses an
actual ellipsis character, where the three dots are contained in a
single glyph. Hence, any font that you use in a TextView where you also use the
“ellipsizing” feature will need the ellipsis glyph.
Beyond that, though, Android pads out the string that gets rendered
on-screen, such that the length (in characters) is the same before and
after “ellipsizing”. To make this work, Android replaces one character
with the ellipsis, and replaces all other removed characters with the
Unicode character ‘ZERO WIDTH NO-BREAK SPACE’ (U+FEFF). This means
the “extra” characters after the ellipsis do not take up any visible
space on screen, yet they can be part of the string.
However, this means any custom fonts you use for TextView widgets
that you use with android:ellipsize must also support this special
Unicode character. Not all fonts do, and you will get artifacts in the
on-screen representation of your shortened strings if your font lacks
this character (e.g., rogue X’s appear at the end of the line).
And, of course, Android’s international deployment means your font must handle any language your users might be looking to enter, perhaps through a language-specific input method editor.
Hence, while using custom fonts in Android is very possible, there are many potential problems, and so you must weigh carefully the benefits of the custom fonts versus their potential costs.
Text comes in all lengths.
Sometimes, when showing text in a TextView, we can allow that text to word-wrap
and extend vertically. Other times, though, that proves to be impractical, such
as when using a TextView as a label for another widget. However, even in those
times, the text to be shown may vary in length by a significant amount. Translations
of the label’s text might range from a couple of kanji in Japanese to a 20-letter
word in German or Icelandic.
One long-standing solution to that problem has been to use an auto-sizing TextView.
Here, what is being “auto-sized” is the size of the font used for the text,
to keep the TextView at a fixed dimension regardless of translation. It is up
to the developer to ensure that for a given screen size and translation that the
font does not wind up being too small to be read.
However, Android itself never had a widget for this, so developers would rely instead upon third-party or home-grown implementations.
Android 8.0 adds this sort of auto-sizing capability to TextView itself (and,
by extension, subclasses like Button). You have two main approaches for
implementing this:
android:autoSizeTextType="uniform" on the TextView to engage auto-size
capability. Then, use android:autoSizeMinTextSize and android:autoSizeMaxTextSize
to set the lower and upper bounds for the text size, where Android can choose
any size in between those. If you also add android:autoSizeStepGranularity, you
can choose the increments in which Android will move between the ends of the
text size range (the default is 1px).android:autoSizeTextType="uniform" on the TextView, as in the above
option. Then, instead of providing the starting and ending values of a range,
use an <array> resource to define specific sizes that you want to support,
then use android:autoSizePresetSizes to point to that resource. This is a bit
more difficult to set up, as you need to define the array resource, but it
may simplify testing, as you are in complete control over the possible sizes.To make this work, you need to constrain the size of the TextView, so that
it does not expand to fill all available space. That might be through having
both axes set to wrap_content, but have the container holding the TextView
limit how big the TextView can get. It might be through TextView-specific
configuration, such as android:maxLines. Or, it might be through setting the
size of the axes to be some specific dimension or match_parent.
The Basic/AutoSize
sample project illustrates the use of both forms of android:autoSizeTextType.
The activity’s layout consists of an EditText, a pair of TextView widgets,
and a pair of divider lines (horizontal View widgets with background and margin),
all inside of a vertical LinearLayout:
<?xml version="1.0" encoding="utf-8"?>
<LinearLayout xmlns:android="http://schemas.android.com/apk/res/android"
  xmlns:tools="http://schemas.android.com/tools"
  android:layout_width="match_parent"
  android:layout_height="match_parent"
  android:orientation="vertical"
  tools:context="com.commonsware.android.autosize.MainActivity">

  <EditText
    android:id="@+id/input"
    android:layout_width="match_parent"
    android:layout_height="wrap_content"
    android:layout_margin="4dp"
    android:hint="@string/hint_input" />

  <View
    android:layout_width="match_parent"
    android:layout_height="2dp"
    android:layout_margin="4dp"
    android:background="@android:color/black" />

  <TextView
    android:id="@+id/granular"
    android:layout_width="match_parent"
    android:layout_height="wrap_content"
    android:layout_margin="4dp"
    android:autoSizeMaxTextSize="40sp"
    android:autoSizeMinTextSize="5sp"
    android:autoSizeStepGranularity="5sp"
    android:autoSizeTextType="uniform"
    android:maxLines="1" />

  <View
    android:layout_width="match_parent"
    android:layout_height="2dp"
    android:layout_margin="4dp"
    android:background="@android:color/black" />

  <TextView
    android:id="@+id/steps"
    android:layout_width="match_parent"
    android:layout_height="wrap_content"
    android:layout_margin="4dp"
    android:autoSizePresetSizes="@array/autosize_sizes"
    android:autoSizeTextType="uniform"
    android:maxLines="1" />

</LinearLayout>
Both TextView widgets have android:autoSizeTextType set to uniform. The top
one uses android:autoSizeMinTextSize, android:autoSizeMaxTextSize, and
android:autoSizeStepGranularity to allow the text size to float between
5sp and 40sp in 5sp increments. The bottom one uses android:autoSizePresetSizes
to tie in an array resource for the valid sizes to use:
<?xml version="1.0" encoding="utf-8"?>
<resources>
  <array name="autosize_sizes">
    <item>10sp</item>
    <item>12sp</item>
    <item>14sp</item>
    <item>16sp</item>
    <item>18sp</item>
    <item>20sp</item>
  </array>
</resources>Here, the size can float between 10sp and 20sp in 2sp increments. However,
there is no requirement that the sizes increment in a uniform fashion when using
the array approach.
The MainActivity that uses the layout sets up a TextWatcher on the EditText
and copies what you enter into the two TextView widgets, to allow you to experiment
in real time with changes in the text size:
    EditText input=(EditText)findViewById(R.id.input);
    final TextView granular=(TextView)findViewById(R.id.granular);
    final TextView steps=(TextView)findViewById(R.id.steps);

    input.addTextChangedListener(new TextWatcher() {
      @Override
      public void beforeTextChanged(CharSequence charSequence, int i, int i1,
                                    int i2) {
        // unused
      }

      @Override
      public void onTextChanged(CharSequence charSequence, int i, int i1,
                                int i2) {
        // unused
      }

      @Override
      public void afterTextChanged(Editable editable) {
        granular.setText(editable.toString());
        steps.setText(editable.toString());
      }
    });
  }
}
When you run the app, initially the EditText and corresponding TextView
widgets have no text. If you start typing, you will see your text appear in
the TextView widgets:
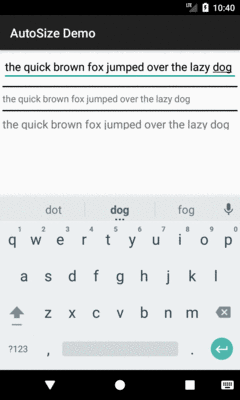
Figure 526: Auto-Sizing TextViews, with Some Text
As you continue typing, the text size decreases:

Figure 527: Auto-Sizing TextViews, with Some More Text
If you are using appcompat-v7, there are equivalent capabilities added to
its wrapper backport of TextView.
If you are reading the PDF edition of this book, its paragraphs do not use justified text. If you are reading the Kindle edition of this book — at least when using the Amazon Kindle app for Android — its paragraphs do use justified text.
Justified text is when text (e.g., in the middle of a paragraph) fills the entire line, usually with bits of extra space added between the words to get them to neatly fill the available horizontal space.
For years, TextView never supported justified text, though you could get it through
third-party libraries.
In Android 8.0+, you can now enable justified text on a TextView via setJustificationMode().
Android 9.0 adds android:justificationMode to be able to configure this
from a layout resource or theme.