The Droid 2 features a 5-megapixel camera, located on the back of the phone, in the upper-left corner. Because it’s a camera wrapped inside a computer, it offers plenty of extras, such as multi-shot feature (taking six pictures, one after another), a self-portrait mode, and a panoramic assist that takes multiple photos of a wide area and stitches them together into a panorama. And there’s a lot more as well.
To launch the camera, hold down the Droid 2’s Camera key—the small black button on its bottom right. (If you’re holding the Droid 2 horizontally, the button is on the upper right.) If you prefer, you can tap the Camera icon in the Application Tray.
Note
You have to unlock the Droid 2 before you can use the camera. So if you press the camera when the Droid 2 is locked, it won’t respond.
Frame your shot on the screen. You can use the camera either in the normal vertical orientation, or turn it 90 degrees for a wider shot. In the middle of the viewfinder, you see a white box. The Droid 2 uses that area for its focus, to figure out the photo’s best overall brightness (its exposure), and to calculate the overall white balance, what is often called the color cast.

Sometimes, though, the exact center of the screen is not necessarily the most important part of the photo. If that’s the case, simply drag the square to the area of the screen that’s most important. The Droid 2 then uses that area to determine focus, brightness, and white balance.
Zoom in and out by using the Droid 2’s volume keys, which are on the same side as the Camera key. When you’ve got everything the way you want it, there are two ways to take your photo:
Press the Camera key halfway, which tells the camera it’s time to focus. The white box turns green when the photo is in focus. Then press the key down all the way to take the shot.
To forgo having the Droid 2 focus for you, just tap the onscreen shutter button.
No matter which method you choose, you’ll hear the familiar snap sound of a photo being taken. As soon as you take the photo, a message flashes onscreen: “Touch image for more options”. Tap the screen, and a screen with four options appears: Share, Set as, Quick upload, and Delete. These are a subset of the options you can choose from when you’re viewing a photo in the Gallery and you press the Menu key. For details, see Editing Photos, Sharing Photos, and More.

Note
The Droid 2 doesn’t save your photo to the SD card until the message disappears from the screen, once you’ve chosen your options.
If you keep the photo, a small thumbnail of it stays in the lower left-hand corner of the viewfinder. Tap the thumbnail to get to the Camera Roll—all the photos you’ve taken on the Droid 2. (The Camera Roll doesn’t include any photos you’ve transferred from your computer.)
Note
To learn how to transfer photos between your Droid 2 and your computer, turn to Connecting Your Droid 2 to Your Computer.
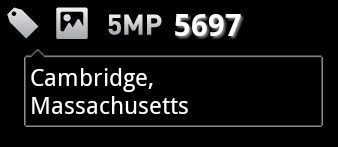
When you turn on the camera, you see a group of icons and numbers on the upper-left portion of the screen, if you’re holding the Droid 2 horizontally. If you hold it vertically, they range along the upper-right part of the screen. Once you decipher them, they give you useful information about the camera and the photo you’re about to take (or have just taken):
Location information
 . If you let your Droid 2 use location services (Backup Assistant), this option tells it to find your current location and add it as a tag to your photo. The tag displays here and then quickly fades away. Adding the location tag is commonly known as geotagging.
GPS indicator
 . When this icon appears, it means that your GPS is on.
Camera indicator
 . When you see this icon, it means that you’re using the still camera. (An icon of a video camera appears when you’re using video instead.)
Auto location tag
 . When you see this icon, it means that you’ve told the Droid 2 to automatically put the location tag into your photo. To turn it off (or back on again), press the Menu key, select Tags, and turn off the checkbox next to “Auto location tag”.
Resolution
 . Tells you the resolution at which you’re going to take the photo.
Number of photos left
 . Tells how many more photos will fit onto your SD card (if you take them using the current resolution).