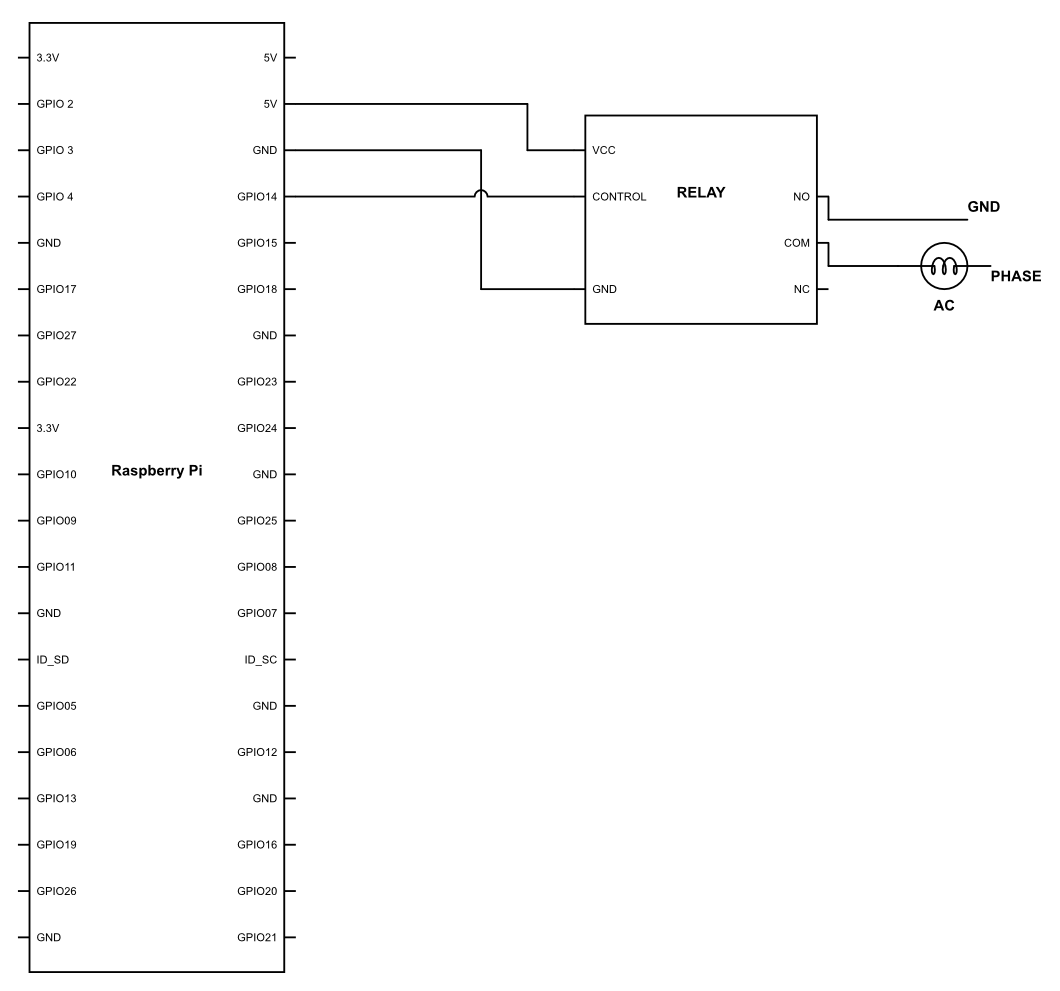
Finally, using the following diagram, make the connections and upload the following code:
import time
import paho.mqtt.client as paho
import RPi.GPIO as GPIO
GPIO.setmode(GPIO.BCM)
GPIO.setup(14,GPIO.OUT)
broker="broker.hivemq.com"
sub_topic = light/control
client = paho.Client()
def on_message(client, userdata, message):
    print('message is : ')
    print(str(message.payload))
    data = str(message.payload)
    if data == "on":
        GPIO.output(3,GPIO.HIGH)
    elif data == "off":
        GPIO.output(3,GPIO.LOW)

def on_connect(client,userdata, flag, rc):
    print("connection returned" + str(rc))
    client.subscribe(sub_topic)
client.connect(broker,port)
client.on_connect = on_connect
client.on_message=on_message
client.loop_forever()
Now, there is not much I need to tell you in this code; it's pretty straightforward. We are sending the data just like we did last time. However, this time we are using a new function. So, let's see what this code is all about:
def on_message(client, userdata, message):

       print('message is : ')
       print(str(message.payload))
       data = str(message.payload)

       if data == "on":
           GPIO.output(3,GPIO.HIGH)

       elif data == "off":
           GPIO.output(3,GPIO.LOW)
Here we are defining what the on_message() function is doing. There are three arguments to the function over which the message would be working on. This includes client, which we have already declared previously; userdata, which we are not using right now; and finally, message, which we will be sending through our smartphones over the internet.
Once you look inside the program, this function will print the message using the lines print('message is : ') and print(str(message.payload)). Once this is done, the value of data will be set as the message sent by the subscriber.
This data will be evaluated by our conditions. If the data is kept on, then the GPIO port number 3 will be set to HIGH, and if the string is off, then the GPIO port number 3 will be set to LOW—in simple words, switching your device on or off your device.
def on_connect(client,userdata, flag, rc):
    print("connection returned" + str(rc))
    client.subscribe(sub_topic)
We have defined the on_connect() function previously as well. However, this time it is slightly different. Rather than just printing the connection returned with the value of rc, we are also using another function called client.subscribe(sub_topic), which will let us get connected to the broker on the specific topic that we have defined earlier in this program.
client.on_message=on_message
As we know that the entire algorithm is based on an event-driven system, this client.on_message function will keep waiting for a message to be received. Once received, it will then execute the on_message function. This will decide whether to turn the appliance on or off.
To use it, just go ahead and send the data based on the topic and it will be received by your Raspberry Pi.

Once received, the decision-making function, on_message(), will decide what data is being received by the MyMQTT app. If the data received is on, then the lights will be turned on. If the data received is off, then the lights will be turned off. It's as simple as that.