Now that Raspberry Pi is set up and we are ready to make it IoT enabled let's see how we are going to connect the system to the internet and make things work. Firstly, we need to connect Raspberry Pi to the devices, which we want to control using the IoT technology. So go ahead and use the following diagram to make the connection:

Once you have set up all the components, let's go ahead and upload the following code:
import time
import paho.mqtt.client as mqtt
import RPi.gpio as gpio
pir = 23
gpio.setmode(gpio.BCM)
gpio.setup(pir, gpio.IN)
client = mqtt.Client()
broker="broker.hivemq.com"
port = 1883
pub_topic = "IntruderDetector_Home"
def SendData():
  client.publish(pub_topic,"WARNING : SOMEONE DETECTED AT YOUR PLACE")

def on_connect(client, userdata, flag,rc):
  print("connection returned" + str(rc))
  SendData()
while True:
  client.connect(broker,port)
  client.on_connect = on_connect
  if gpio.output(pir) == gpio.HIGH :
    SendData()
  client.loop_forever()
This code, unlike the other chunks of code that we have seen so far, will be quite new to you. So I will be explaining every part of it except for a few obvious parts. So, let's see what we have here:
import paho.mqtt.client as mqtt
In this part, we are importing the pho.mqtt.client library as mqtt. So whenever this library needs to be accessed, we simply need to use the line mqtt instead of the entire name of the library.
client = mqtt.Client()
We are defining a client using the client method of the mqtt library. This can be called using the client variable.
broker="broker.hivemq.com"
So we are defining the broker in our program. For this program, we are using the broker as broker.hivemq.com, which is providing us the broker services.
port = 1883
Now as we have done earlier, we will once again define the port at which the protocol will be working, which in our case is 1883.
pub_topic = "IntuderDetector_Home"
Here, we are defining the value of the variable called pub_topic, which is IntruderDetector_Home. This will be the final topic to which one can subscribe once the code is running.
def SendData():
    client.publish(pub.topic, "WARNING : SOMEONE DETECTED AT YOUR PLACE")
Here, we are defining a function called SendData(), will publish the data Warning : SOMEONE DETECTED AT YOUR PLACE to the broker with the topic which we had declared previously.
def on_message(client, userdata, message):

  print('message is : ')
  print(str(message.payload))
In this line, we are defining a function named on_message(), which will print a value message is : followed by whatever the data is. This will be done using the line print(str(message.payload)). What this is doing is, it is printing whatever is being passed on in the arguments of the function.
 def on_connect(client, userdata, flag,rc):

     print("connection returned" + str(rc))
     SendData()
In this line, we are defining the on_connect() function, which will print the line connection returned followed by the value of rc. rc stands for return code. So, whenever the message is delivered, a code is generated, even if it is not, then the specific code will be returned notifying the error. So, consider this as an acknowledgement. After this is done, the SendData() function that we defined earlier will be used to send the data to the broker.
client.connect(broker,port)
connect() is a function of the MQTT library which connects the client to the broker. Doing this is very simple. All we need to do is pass on the arguments of the broker which we want to connect to and the port which would be used. In our case, broker = broker.hivemq.com and port = 1883. So when we call the function, Raspberry Pi gets connected to our broker.
client.on_connect = on_connect
This is the heart of the program. What the client.on_connect function is doing is that every time Raspberry Pi gets connected to the broker, it starts executing the on_connect function defined by us. This in-turn will send the data continuously to the broker after every 5 seconds, exactly the way in which we have defined in the function. This process is also called callback, which makes it event driven. That is, if it is not connected, it will not try to send the data to the broker.
    if gpio.output(pir) == HIGH :
        sendData()
the sendData() function is called when the PIR sensor gets high or whenever the motion is detected the message is sent on the broker with the warning that someone is detected at your place.
client.loop_forever()
This is my favorite function, especially because of the lovely name it has. As you can expect, the client.loop_forver() function will keep looking for any event and whenever it is detected it will trigger the data to be sent to the broker. Now comes the part where we will see this data. For this, we'll have to download the MyMQTT app from App Store if you are running iOS or from Playstore if you are running android.
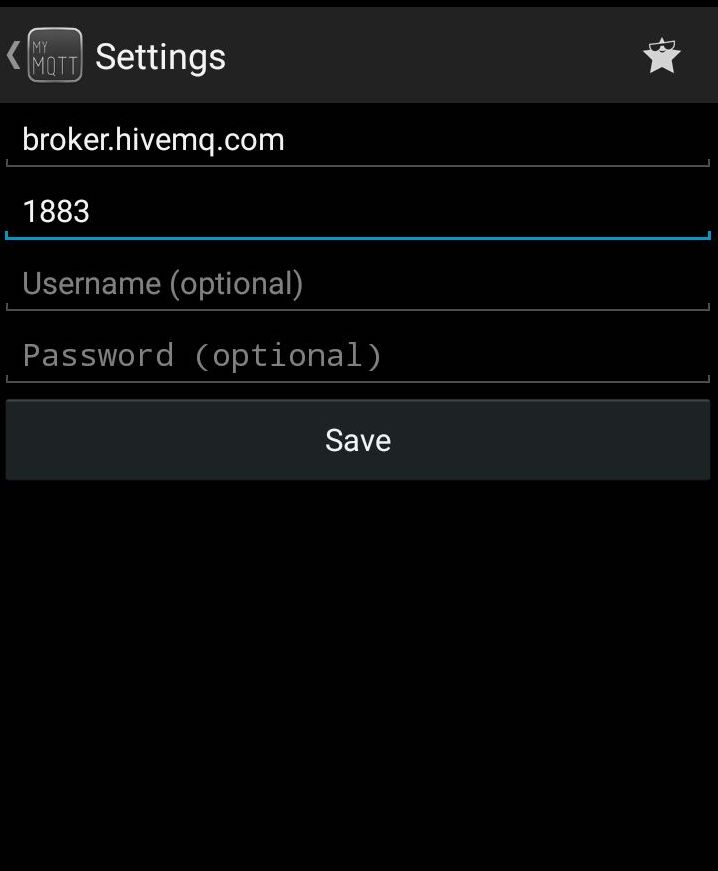
Once you start the app, you will be presented with the preceding screen. You need to fill in the name of the broker URL, which in our case is broker.hivemq.com. Then, fill in the port, which in our case is 1883.
Once this is done, you will see a screen similar to the following:

Simply add the name of the subscription you need, which is IntruderDetector_Home. Once done, you'll see the magic!
In the next section, we will be controlling things based on IoT; see you then.