The robotic arm kit is a fairly easy one to procure from eBay or Amazon. This is not very difficult to assemble and will require a few hours to prepare. Some of the robotic arm kits might not ship with servo motors, in which case, you may have to order it separately. I would say go for the kit that comes bundled with the servos, as there can be compatibility issues if you choose to order servos separately.
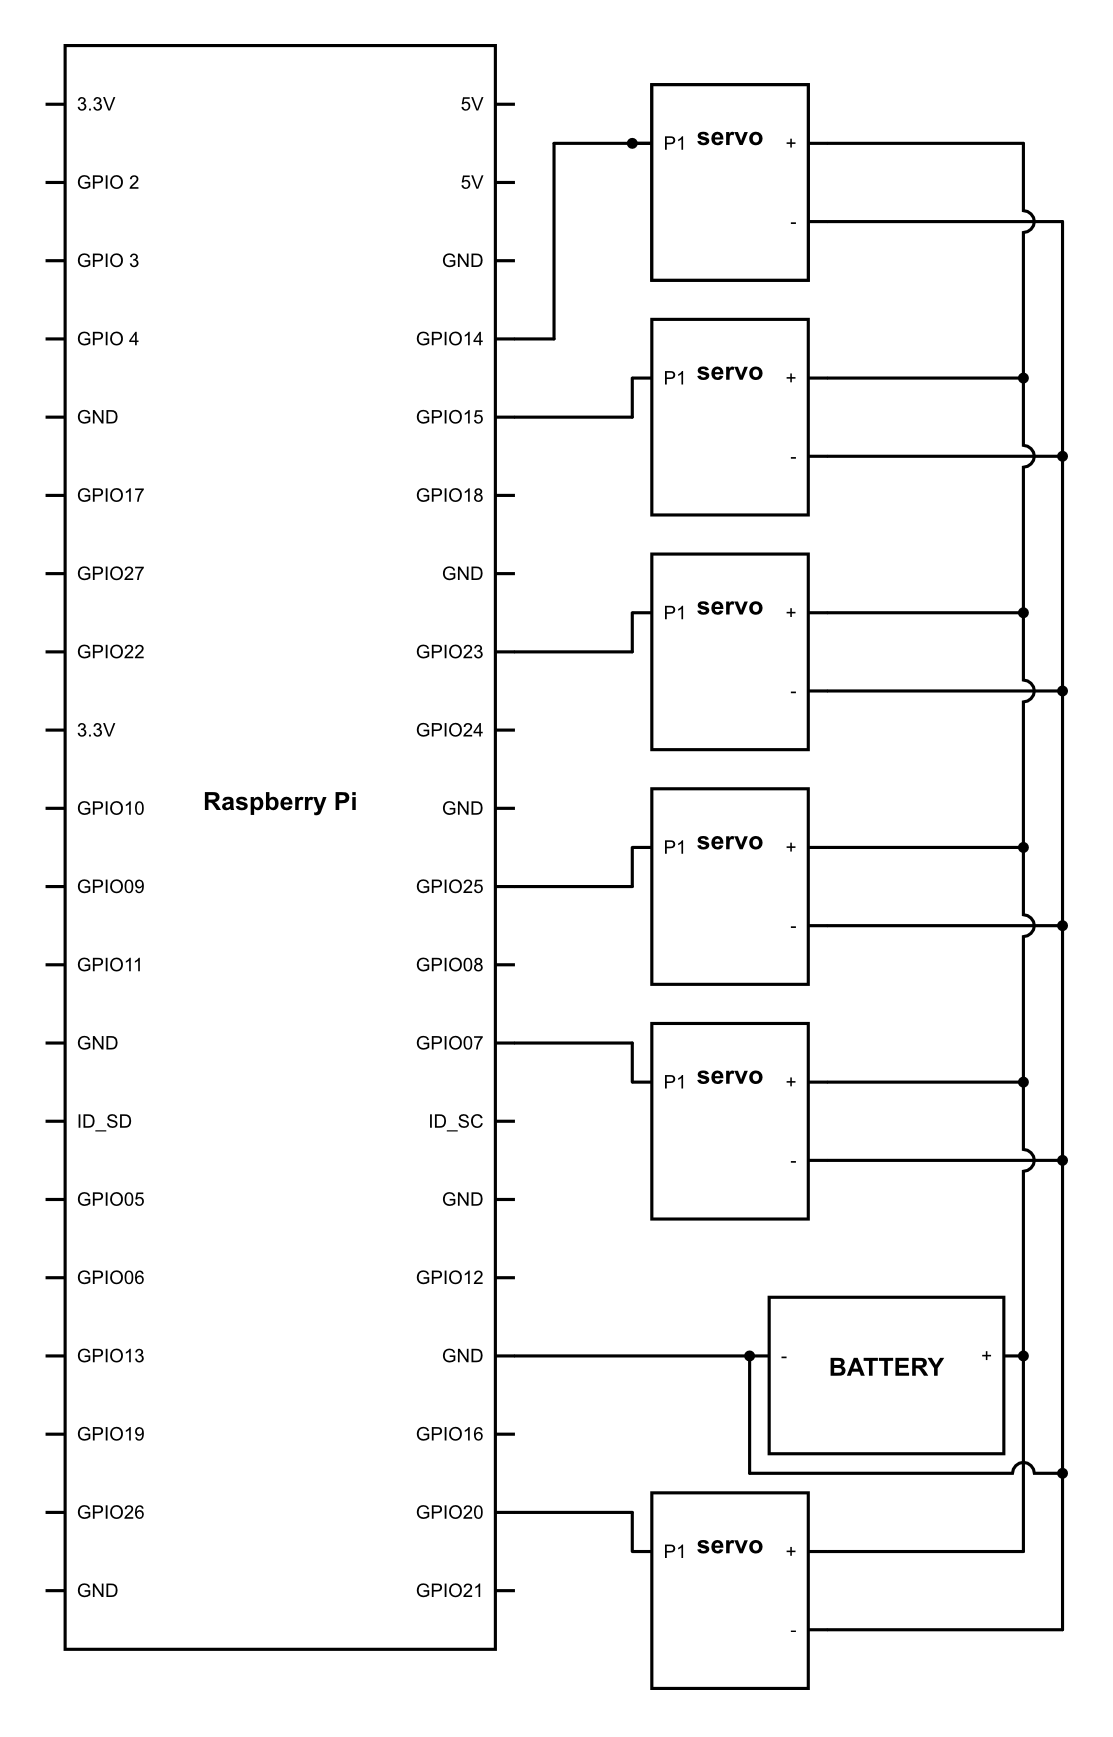
As you know, these servos will work using PWM and it's not hard to control them either. So, let's go straight onto it and see what we can do. Once you have assembled the robotic arm kit, connect the wires of the servos as follows:
Now, firstly, we need to know what are the maximum physical limits of every single servo connected on our robot. There are various techniques to do that. The very basic one is to measure it physically. This method can be good but you won't be able to ever utilize the full potential of the servo motor as you would be having some degree of error in measuring. Hence, the value you put in the servo will be slightly less than what you think it can go to. The second method is by manually feeding the data and finding out the exact angle. So, let's go ahead with the second way of doing things and upload the following code:
import RPi.GPIO as GPIO
import time

GPIO.setmode(GPIO.BCM)
GPIO.setup(14,GPIO.OUT)
GPIO.setup(16,GPIO.OUT)
GPIO.setup(18,GPIO.OUT)
GPIO.setup(20,GPIO.OUT)
GPIO.setup(21,GPIO.OUT)
GPIO.setup(22,GPIO.OUT)


GPIO.setwarnings(False)

pwm1 = GPIO.PWM(14, 50)
pwm2 = GPIO.PWM(16, 50)
pwm3 = GPIO.PWM(18, 50)
pwm4 = GPIO.PWM(20, 50)
pwm5 = GPIO.PWM(21, 50)
pwm6 = GPIO.PWM(22, 50)

pwm1.start(0)
pwm2.start(0)
pwm3.start(0)
pwm4.start(0)
pwm5.start(0)
pwm6.start(0)

def cvt_angle(angle):
    dc = float(angle/90) + 0.5
    return dc

while 1:

 j = input('select servo')

 if j == 1:

  i = input('select value to rotate')
  pwm1.ChangeDutyCycle(cvt_angle(i))
  time.sleep(2)
  pwm1.ChangeDutyCycle(cvt_angle(90))

 elif j ==2:

  i = input('select value to rotate')
  pwm2.ChangeDutyCycle(cvt_angle(i))
  time.sleep(2)
  pwm2.ChangeDutyCycle(cvt_angle(90))


 elif j ==3:

 i = input('select value to rotate')
 pwm3.ChangeDutyCycle(cvt_angle(i))
 time.sleep(2)
 pwm3.ChangeDutyCycle(cvt_angle(90))

 elif j ==4:

 i = input('select value to rotate')
 pwm4.ChangeDutyCycle(cvt_angle(i))
 time.sleep(2)
 pwm4.ChangeDutyCycle(cvt_angle(90))

 elif j ==5:

 i = input('select value to rotate')
 pwm5.ChangeDutyCycle(cvt_angle(i))
 time.sleep(2)
 pwm5.ChangeDutyCycle(cvt_angle(90))

 elif j ==6:

 i = input('select value to rotate')
 pwm6.ChangeDutyCycle(cvt_angle(i))
 time.sleep(2)
 pwm6.ChangeDutyCycle(cvt_angle(90)) }
Now, let's see what this code is doing. This code may look pretty elaborate, but what it is doing is extremely simple.
j = input('select servo from 1-6')
Using the preceding line of code, we are printing the statement for the user select servo from 1-6. When the user enters a value of the servo, this value gets stored in a variable j:
 if j == 1:

  i = input('select value to rotate')
  pwm1.ChangeDutyCycle(cvt_angle(i))
  time.sleep(2)
  pwm1.ChangeDutyCycle(cvt_angle(90))
This if condition here checks for the value of j. If in this line, j=1, then it will run the code corresponding to the servo number 1. Inside this code, the first line will print select value to rotate. Once this is done, the program will then wait for user input. Once the user inputs any value, then it will be stored in a variable called I. Thereafter, using the cvt_angle(i) function, the value which the user has input into the system will be converted to its corresponding duty cycle value. This duty cycle value will be fetched to the pwm1.ChangeDutyCycle() argument thereby giving the robot that very certain angle in the particular joint that you want. Due to the time.sleep(2) function, the servo will wait to go over to the next line. Thereafter, we are using the line pwm1.ChangeDutyCycle(cvt_angle(90)), which will bring it back to 90 degrees.
You may ask, why are we doing this? This is for a very important reason. Let's say you have given it a command to go beyond its physical limit. If that's the case, then the servo will keep on trying to move in that direction no matter what. However, due to the physical constrain, it will not be able to go ahead. Once this happens, then, within a few seconds, you will see blue smoke coming out of your servo indicating its death. The problem is that making such type of errors is very easy and the loss is quite noticeable. Hence, to prevent this, we quickly bring it back to the central position where it does not have any possibility of burning up.
Now, as per the preceding code, the same is done for servos 1-6 through the robot. Now that you know what is happening, it's time to take a pen and a paper and start giving servos the angular values. Do remember that the final goal of this code is to find out the maximum limits. So, let's start doing it starting from 90 degrees onwards. Give it a value on either side and not down until which value you can take it. Make a list on a paper as we will require it for our next code.