In the previous chapter, we discussed interfacing outputs to the Raspberry Pi's GPIO. Let's discuss an example where a simple push button is pressed. A button press is detected by reading the GPIO pin state. We are going to make use of conditional statements to execute a task based on the GPIO pin state.
Let us connect a button to the Raspberry Pi's GPIO. All you need to get started are a button, pull-up resistor, and a few jumper wires. The figure given later shows an illustration on connecting the push button to the Raspberry Pi Zero. One of the push button's terminals is connected to the ground pin of the Raspberry Pi Zero's GPIO pin.
The schematic of the button's interface is shown here:
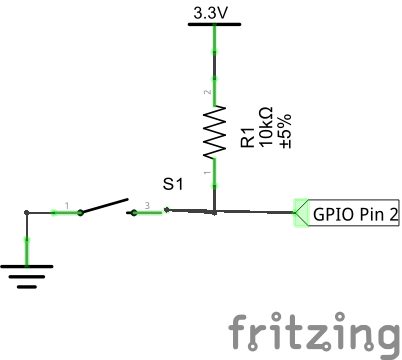
The other terminal of the push button is pulled up to 3.3V using a 10 K resistor. The junction of the push button terminal and the 10 K resistor is connected to the GPIO pin 2 (refer to the BCM GPIO pin map shared in the earlier chapter).

Let's review the code required to review the button state. We make use of loops and conditional statements to read the button inputs using the Raspberry Pi Zero.
We will be making use of the gpiozero library introduced in the previous chapter. The code sample for this section is GPIO_button_test.py and available for download along with this chapter.
In a later chapter, we will discuss object-oriented programming (OOP). For now, let's briefly discuss the concept of classes for this example. A class in Python is a blueprint that contains all the attributes that define an object. For example, the Button class of the gpiozero library contains all attributes required to interface a button to the Raspberry Pi Zero's GPIO interface. These attributes include button states and functions required to check the button states and so on. In order to interface a button and read its states, we need to make use of this blueprint. The process of creating a copy of this blueprint is called instantiation.
Let's get started with importing the gpiozero library and instantiate the Button class of the gpiozero library (we will discuss Python's classes, objects, and their attributes in a later chapter). The button is interfaced to GPIO pin 2. We need to pass the pin number as an argument during instantiation:
from gpiozero import Button

#button is interfaced to GPIO 2
button = Button(2)
The gpiozero library's documentation is available at http://gpiozero.readthedocs.io/en/v1.2.0/api_input.html. According to the documentation, there is a variable named is_pressed in the Button class that could be tested using a conditional statement to determine if the button is pressed:
if button.is_pressed:
    print("Button pressed")
Whenever the button is pressed, the message Button pressed is printed on the screen. Let's stick this code snippet inside an infinite loop:
from gpiozero import Button

#button is interfaced to GPIO 2
button = Button(2)

while True:
  if button.is_pressed:
    print("Button pressed")
In an infinite while loop, the program constantly checks for a button press and prints the message as long as the button is being pressed. Once the button is released, it goes back to checking whether the button is pressed.