Chapter 2
Engineering
In the modern world, people are surrounded by all kinds of structures built by engineers and architects. Some of those structures are stationary, such as buildings, bridges, and towers. Other structures have parts that move or rotate, such as mechanical structures that use motors.
This chapter explores the design ideas and the thought processes behind many types of engineering projects. The chapter also includes descriptions of some of the engineering jobs that are essential in an industrial society.
ACTIVITY: Building a Motor
A motor is a machine that can make objects rotate. An electric motor’s input is electricity and its output is mechanical movement in the form of rotation. That may sound a little complicated, but you’re about to find out how simple it is to make a homemade electric motor. We’ll focus on building a direct current (or DC) motor that uses batteries. Most of the materials needed can be purchased from a hardware store and a craft store.
Materials Needed:
- 20" length of enameled copper wire, 26 gauge (AWG)
- 2 connecting wires with alligator clip ends
- 6-volt battery
- Cylindrical neodymium magnet 1⁄2" in diameter and 1⁄2" in height
- 2 large safety pins
- Smooth Styrofoam disk
- Dowel with 1⁄2" diameter and 4" in length
- Sandpaper
- Pliers
Procedure:
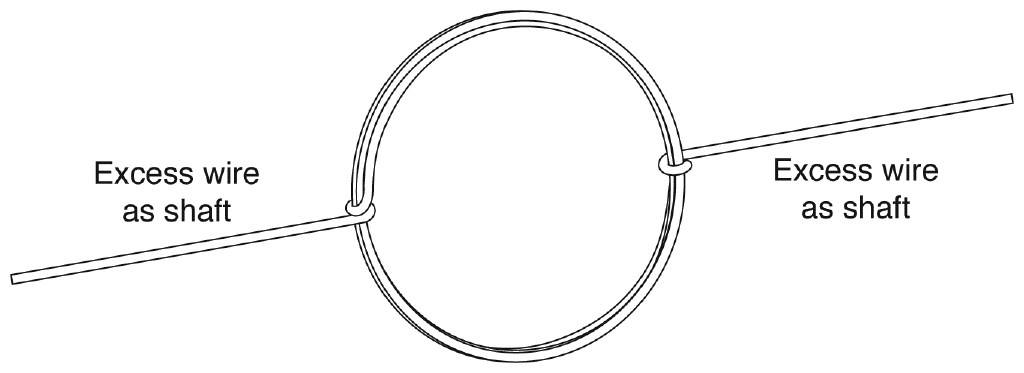
- Assist your child in taking the stretch of copper wire and winding it around the dowel 4–5 times. Once he has 4–5 turns of wire, tell him to remove the dowel and wrap the loose end of the wire around the looped wires twice to make a knot and tighten the loops together, as shown in the following picture. Have him do the same at the other loose end of the copper wire. Make sure the excess straight wire on either end is along a straight line. This will serve as a shaft, about which the motor will rotate.
- Use sandpaper to entirely remove the enamel from one end of the straight copper wire. Lay the loop flat on a surface, and use the sandpaper to remove the enamel only from the top face of the other straight wire that’s not yet sanded (see the following illustration).

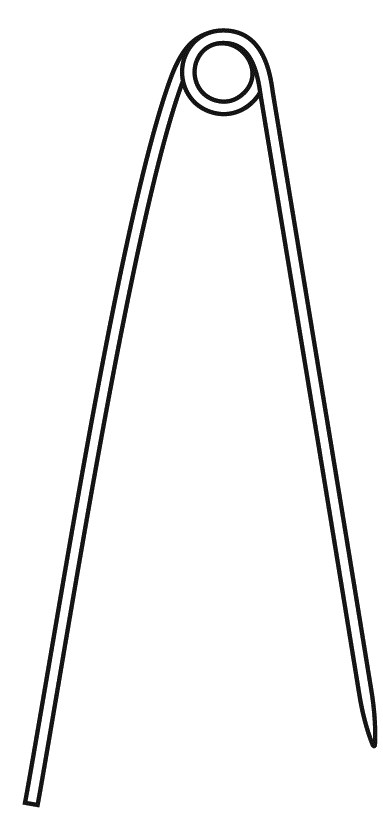
- Use a pair of pliers to clip off the fastening end of two safety pins (see the following illustration).
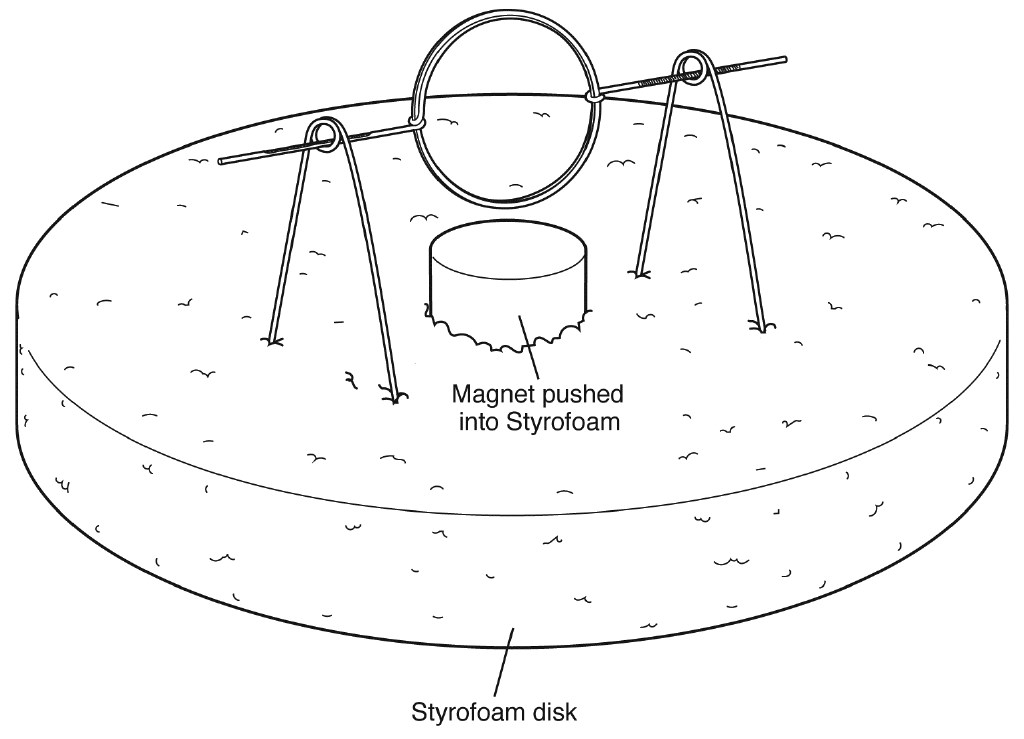
- Now have your child push the neodymium magnet halfway into the Styrofoam disk so that it sticks slightly above the Styrofoam surface level. Place the safety pins down on either side of the magnet so that each forms a triangle pointing up. Place the looped copper wire in such a way that its shaft rests inside the holes of the safety pins (see the following illustration). Note: You might need to push the safety pins farther into the Styrofoam in order to bring the looped copper wire very close to the magnet (without touching it).
- Next, ask your child to use an alligator clip wire to connect the base of one safety pin to the positive terminal of the battery, and another alligator clip wire to connect the base of the other safety pin to the negative terminal of the battery (see the following illustration).
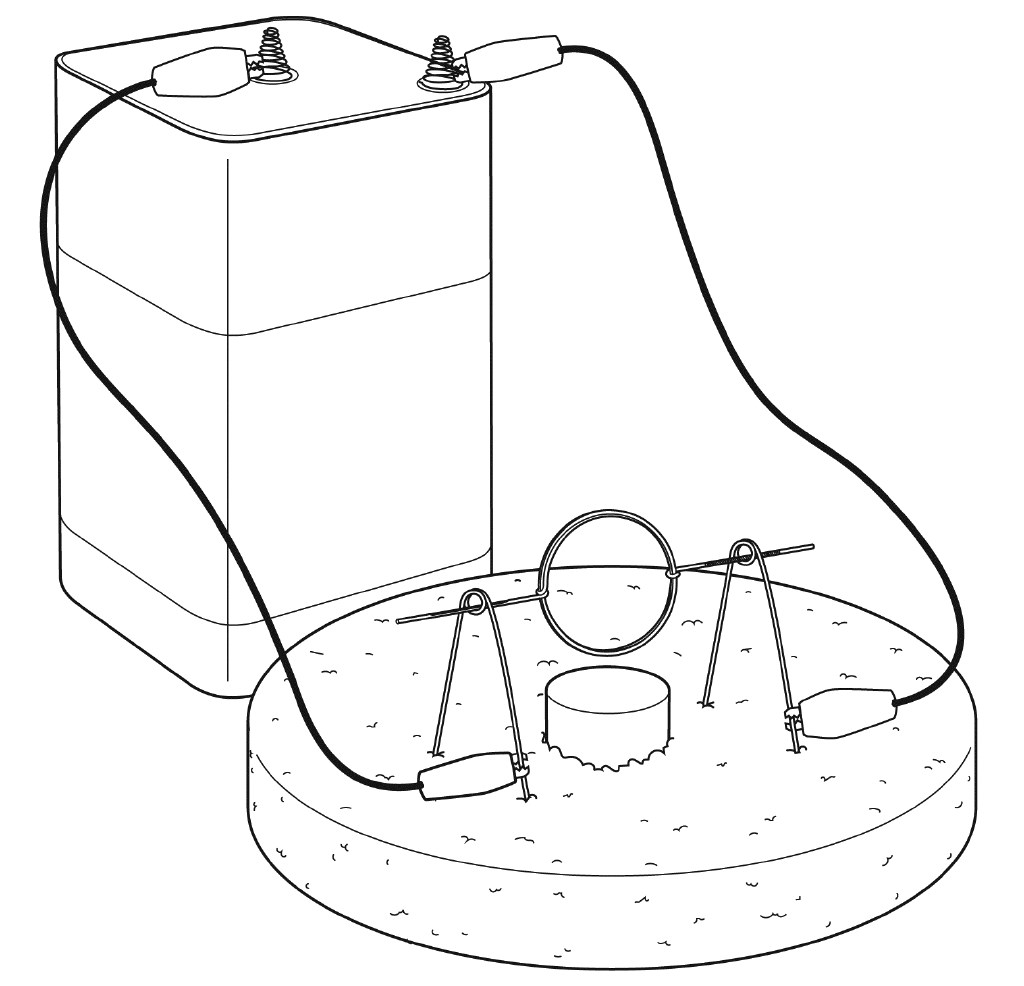
Use your forefinger to give the copper loop a little spin and watch it spin around on its own afterward!
The little motor you created may not power a car—or even a food processor—but it will surely delight the young person who built it!
ACTIVITY: Building a Truss
Trusses are found in virtually every modern building. They’re used to provide support for the structure so it can withstand heavy loads. Trusses can be seen in the roofs of large stores, in bridges, and in football stadiums—among countless other places.
What exactly is a truss? What’s the simplest way to construct a truss? Who uses trusses and for what purpose? What are trusses made of?
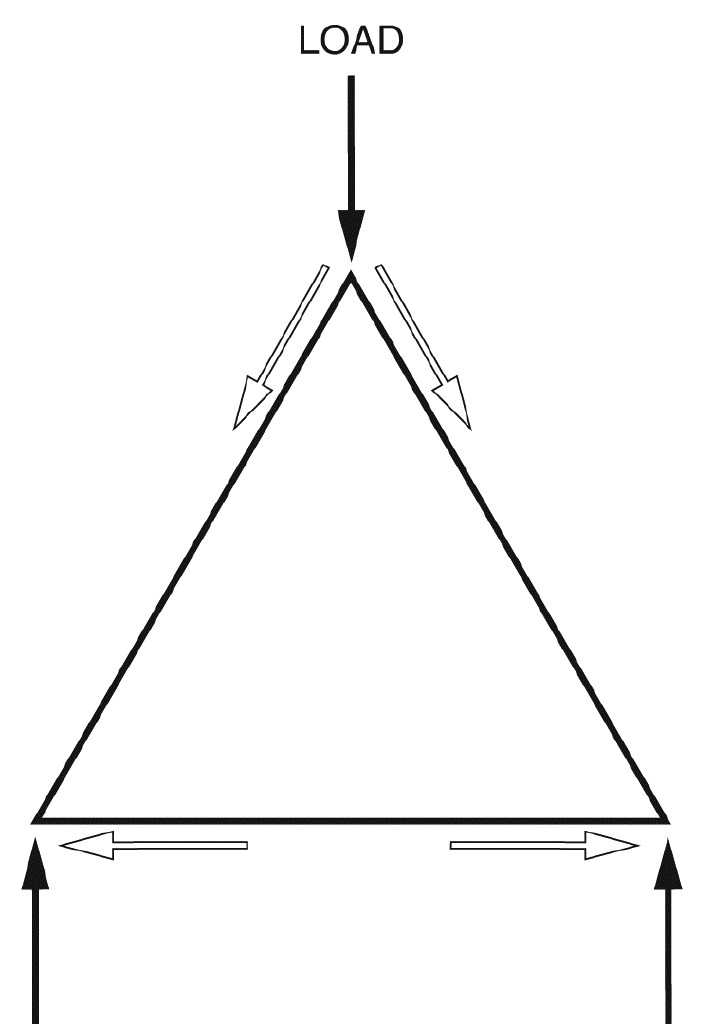
A truss is a two-dimensional structure (a plane) made of straight segments of wood or metal connected together to form triangles. In terms of stability and strength, a triangle can keep its shape under a heavy load better than a square can. In the following diagram, you can see how a load on the triangle is distributed through its sides such that the structure of the triangle holds its shape firmly and doesn’t collapse.
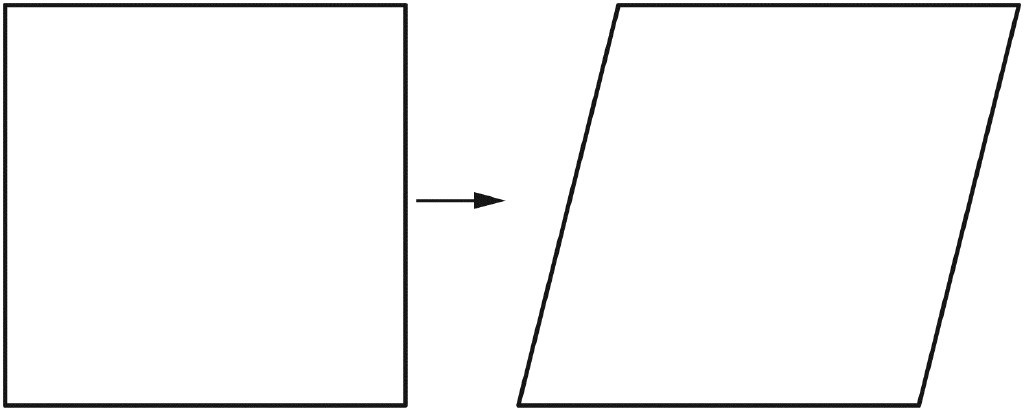
In contrast, when a square structure is loaded, the square will change its shape into a rhombus where its angles are no longer right angles, as shown in the next diagram. Such a structure doesn’t hold its shape, and it collapses when loaded.
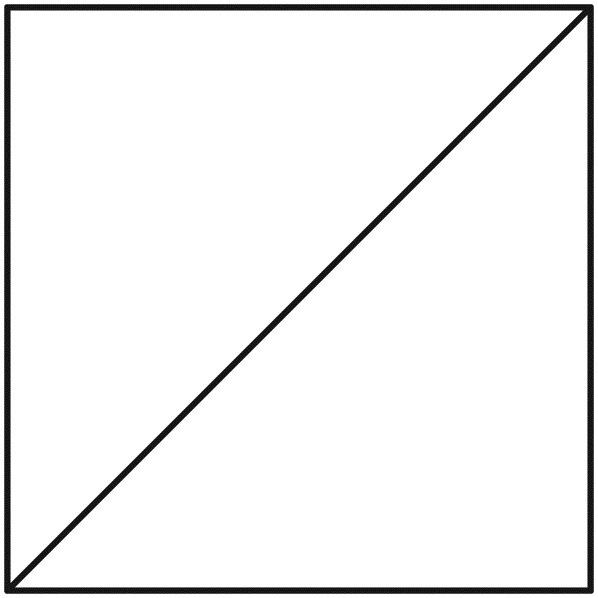
One way a square can be supported so that it doesn’t lose its structure is to connect the two opposite corners with a diagonal line, turning the square into two triangles, as shown in the following diagram. This demonstrates how essential the shape of a triangle is in building stable structures.
A truss is made of connecting triangles. The simplest such truss can be constructed of two adjacent triangles that have a connecting line on top, as shown here.
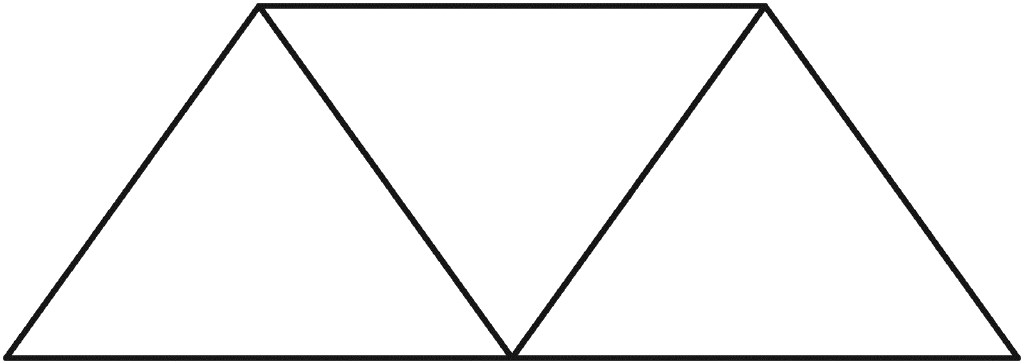
Such a truss is historically known as a Warren truss. The shape of this truss was patented by the British engineer James Warren in 1848. When many of these triangles are connected to form a longer truss, they can be used in building a bridge, as shown in the following diagram.

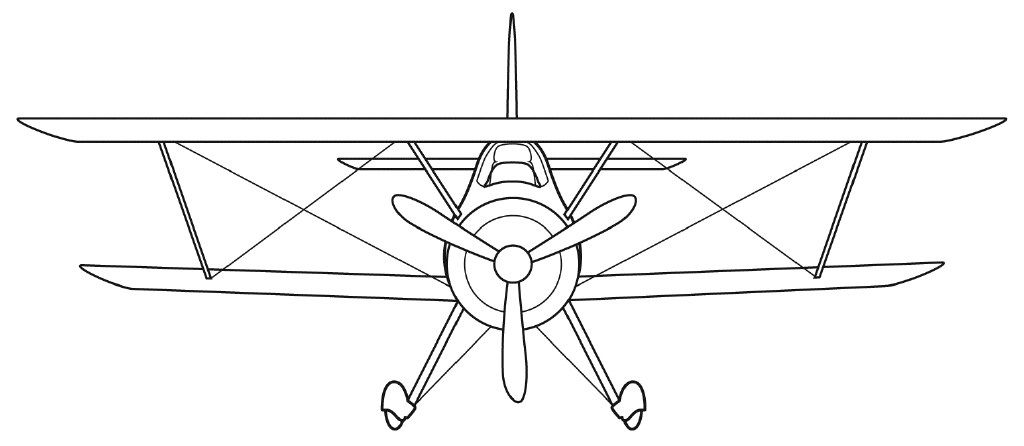
Another example of the support abilities of triangles can be seen in the wings of old propeller biplanes. The wings of many of those planes were stacked on top of one another, supported by trusses.
Here’s an easy way to construct a truss at home.
Materials Needed:
- 15–19 Popsicle sticks
- Glue gun
- Glue sticks (for glue gun)
Procedure:
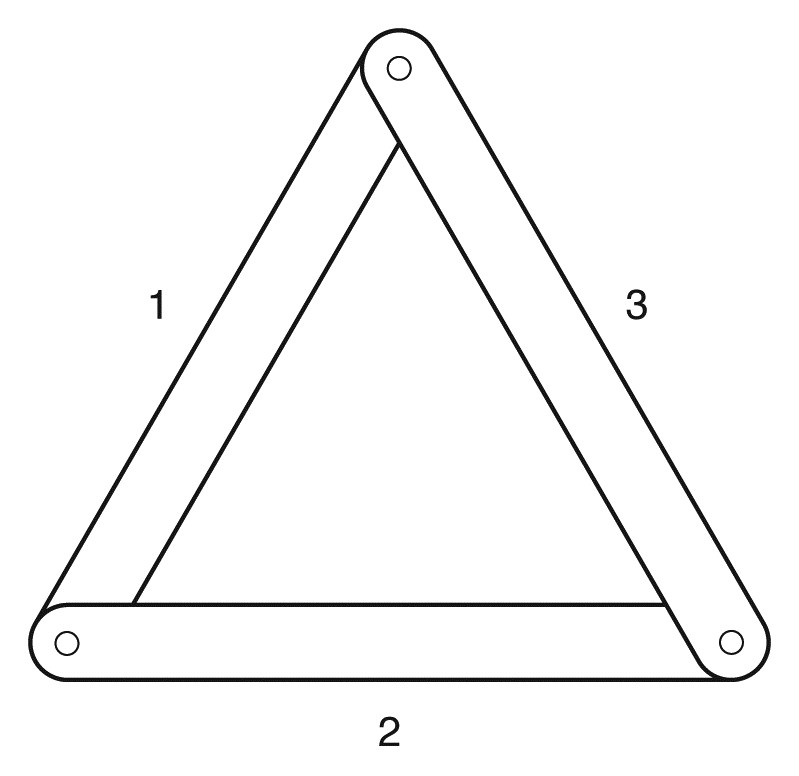
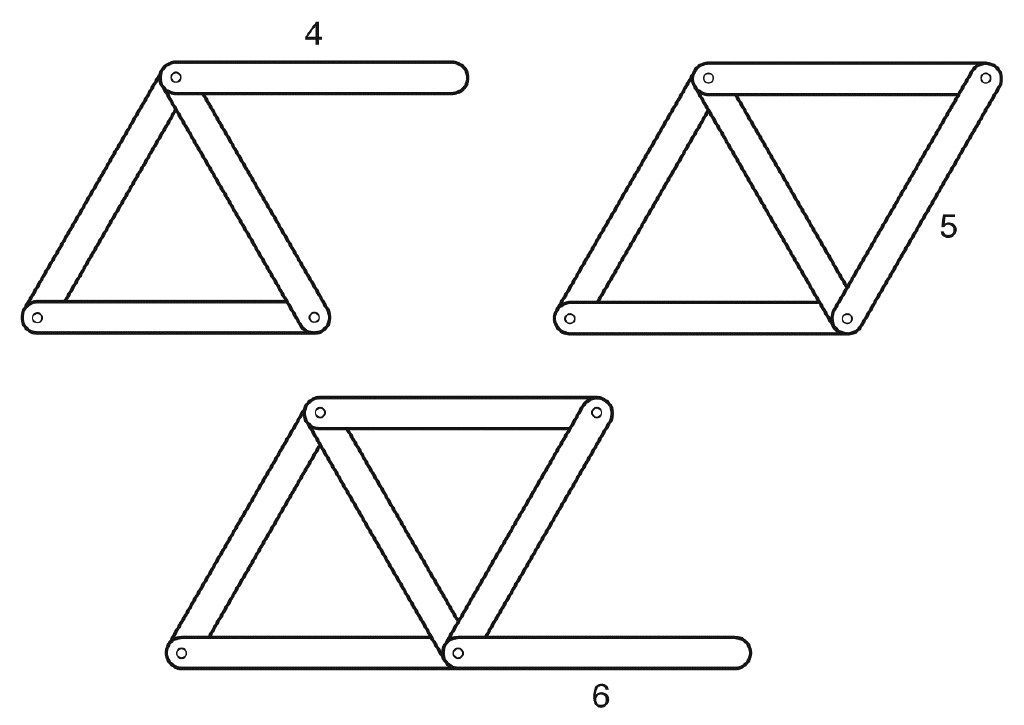
- Assist your child in using the glue gun. Ask her to form a triangle by gluing together the ends of 3 Popsicle sticks, as shown in the following diagram.
- Using the glue gun, have your child attach a fourth Popsicle stick horizontally at the top corner of the triangle, as shown in the next diagram.
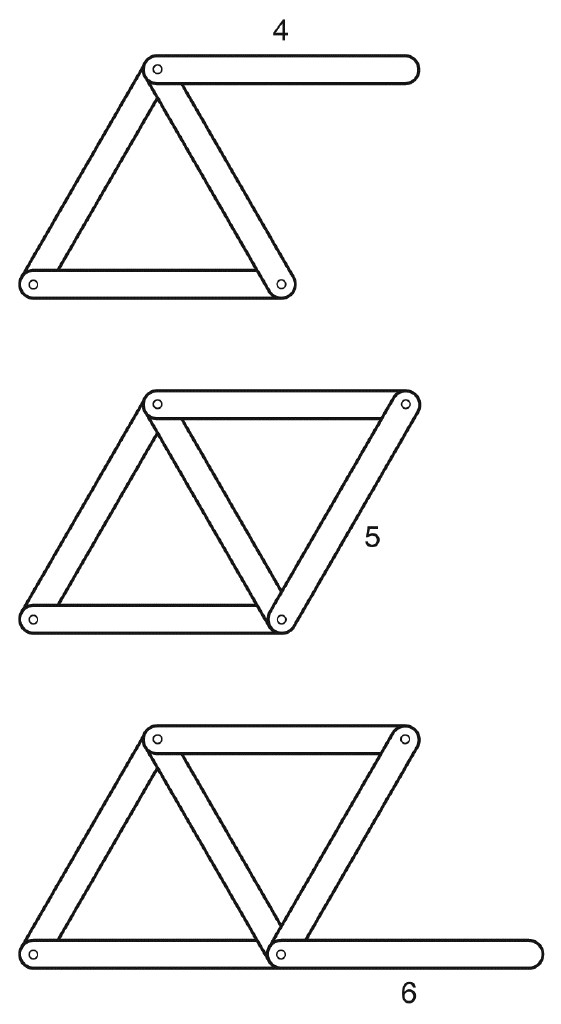
- Next, have your child glue a fifth Popsicle stick diagonally to form the second (upside-down) triangle.
- Have your child glue a sixth Popsicle stick horizontally on the bottom. Ask her to continue to repeat the steps of adding a diagonal then a horizontal stick each time, until she uses all 15 sticks. If she is excited about making a longer truss, she can use all 19 sticks.
When your child is done gluing all the sticks according to the diagram, ask her what kind of truss she now has. Does it look like a famous truss that is named after someone? Of course, it is a Warren truss, as described earlier.
There are other types of trusses besides the Warren truss. Other known trusses are shown in this next diagram. Try to spot all the triangles in each truss. Some trusses use equilateral triangles, like the Warren truss. Other trusses use right-angle triangles, like the Howe and the Pratt trusses. There’s also the K truss, which uses triangles making the shape of the letter K. 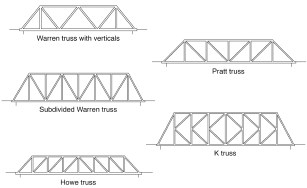
There are many other types of trusses, most of which you can see via a simple Internet search.
Architectural and civil engineers rely heavily on trusses in constructing buildings, bridges, towers, etc. They understand the usefulness of those sturdy triangles for construction purposes.
STEM Career Choices
Civil Engineer
Civil engineering is the oldest of the engineering disciplines. A civil engineer designs and builds construction projects. This includes roads, bridges, dams, buildings, airports, tunnels, railway systems, water supply systems, and wastewater treatment plants. Civil engineers also work on projects such as designing facilities for disposal of hazardous waste and building diversions to control floods. Civil engineers also supervise and maintain construction projects.
Civil engineers work both indoors and outdoors. They are often found at construction sites supervising and monitoring operations, and solving any problems that may arise at the site. Civil engineers learn a lot about soil mechanics because they have to work with soil directly—for example, when building foundations.
ACTIVITY: Building a Bridge
Seeing a bridge is a common, everyday occurrence for most people. When crossing a river or any waterway, you have to drive on or walk along a bridge. You might even walk along a people bridge constructed between buildings in a large hospital or company complex.
Bridges are often supported by trusses. As discussed in the previous section, a truss is a structure formed of connected segments of triangles, usually made of a material such as steel or wood. A truss is most commonly two-dimensional, meaning flat, like a board. In order to construct a bridge—which is three-dimensional—many trusses are incorporated into the bridge design.
Regardless of the kind of bridge—its style, its purpose, whether it supports people or vehicles—all truss bridges rely on trusses to support their load-carrying structures.
The simplest design for a truss is the Warren truss. Although the design of such a bridge is simple, it still can hold a large load. You can build a simple bridge by constructing two Warren trusses and a walkway. In order to find out how strong your bridge is, you’ll need a luggage scale to test how much force your bridge can support.
Materials Needed:
- Bag of Popsicle sticks
- Glue gun
- Glue sticks (for glue gun)
- Bag of cable ties
- Scissors
- Digital luggage scale
- 2' length of twisted nylon rope 1⁄2" in diameter
Procedure:
- Assist your child in using the glue gun. Ask him to form a triangle by gluing together the ends of three Popsicle sticks, as shown in the diagram.
- Using the glue gun, have your child attach other Popsicle sticks, one at a time, in the order of the numbering shown in the diagram. Tell him to add the sticks with care, making sure the top horizontal sticks and the bottom horizontal sticks line up along as straight a line as possible.
- Ask your child to glue together as many as 19 sticks following the pattern described, until his truss looks like the one in the next diagram.
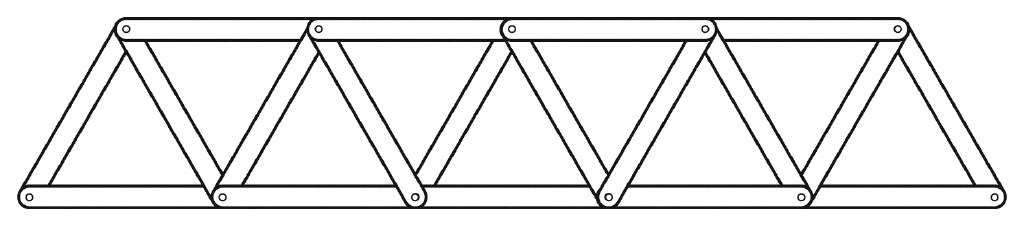
- Tell your child to assemble the same shape truss again, using the same number of sticks. He should have two such Warren trusses that will form the sides of his bridge when he finally assembles it.
- Now it’s time for your child to make the bottom walkway of the bridge. Ask him to glue together 4 Popsicle sticks in one long straight line. Have him make two such long lines of sticks.
- Tell your child to set the two long lines of sticks on the table parallel to each other, so that the distance between the two lines is the length of one Popsicle stick.
- Ask your child to place more Popsicle sticks perpendicular to the two long lines in such a way that they look like a ladder, and to secure them in place with glue. Lay the perpendicular sticks very close to each other, so that they are about 1⁄4" apart.
- Now have your child reinforce the bottom walkway with diagonal Popsicle sticks, as shown in the diagram. Remind him to secure the additional Popsicle sticks in place with glue.
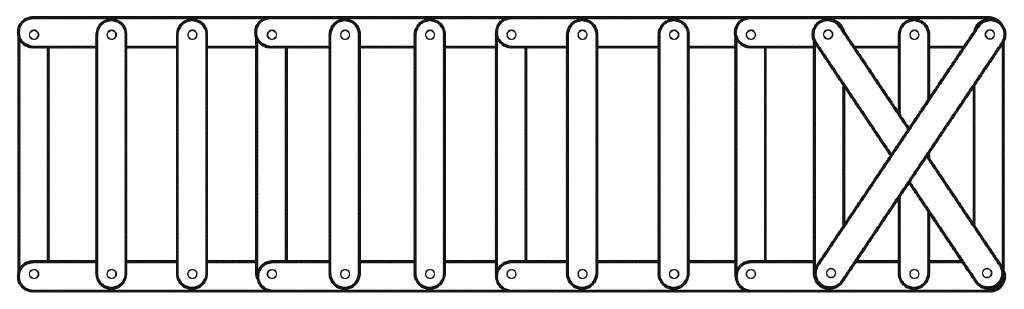
- Tell your child to place diagonal Popsicle sticks along the entire length of the bottom walkway.
- It’s now time to assemble the bridge. Tell your child to place the Warren trusses he built earlier along either side of the bottom walkway. Let the top lengths of the two trusses touch, like the two sides of a house roof meet to form a triangular shape.
- Using the cable ties, tie the side of the bottom walkway to the bottom of one truss. Do so at both ends, and every couple of inches along the length of the truss. Do the same for the other truss. Finally, tie the two top lengths of the trusses together and secure them every couple of inches along the length of the bridge top.
- Now it’s time to test the strength of the bridge Place the ends of the bridge on the edges of two tables situated side by side so that there is only air underneath the bridge. Using the nylon rope, make a vertical loop around the bridge. So you should have two trusses and a walkway. The two trusses connect together on top, forming a triangular shape like the roof of a house, and the walkway in the base of the triangular shape. Hang the luggage scale from it.
- Using his own strength, have your child pull the luggage scale down and note the reading on the scale. How much downward force can his bridge support?
If your child’s bridge can support 50 or 60 pounds of force, then he’s constructed a pretty sturdy bridge out of Popsicle sticks, using trusses and triangles.
There have been other famous bridges built to last. Some are supported by pillars on the bottom of the bridge and cantilevers that extend horizontally, such as the Forth Bridge in the east of Scotland, just a little west of the city of Edinburgh. Some bridges are suspension bridges that are hung by suspension cables, such as the famous Golden Gate Bridge. But a bridge, whether it’s a suspension bridge or not, wouldn’t be nearly as strong without trusses.
ACTIVITY: Building a Circuit
Electric circuits are everywhere in our lives. When you turn on your desk lamp, it lights up because it’s connected to an electric circuit. For the same reason, the burner on your electric stove gets hot and turns red when you switch it on. Your cell phone flashlight comes on and the phone’s other normal functions are possible because of the massive electrical circuitry housed within it.
These examples may make it sound as if electric circuits are very complicated, but they don’t always have to be. You can build a simple electric circuit out of pretty basic items at home.
Materials Needed:
- 5 miniature light bulbs rated 2.5V 0.3A
- 5 miniature bulb holders with circular plastic bases
- 3 size-D batteries
- Electrical tape
- 6 alligator clip wires
Procedure:
- Using the electrical tape, assist your child in securing the 3 D batteries in a row, end to end. Make sure the positive end (labeled +) of one battery is snuggled tightly against the negative end (labeled –) of the next battery before you secure them with the electrical tape. Now the battery pack is ready.
- Assist your child in taping one end of an alligator clip wire to one end of the battery pack. Then help her tape another alligator clip wire to the other end of the battery pack.
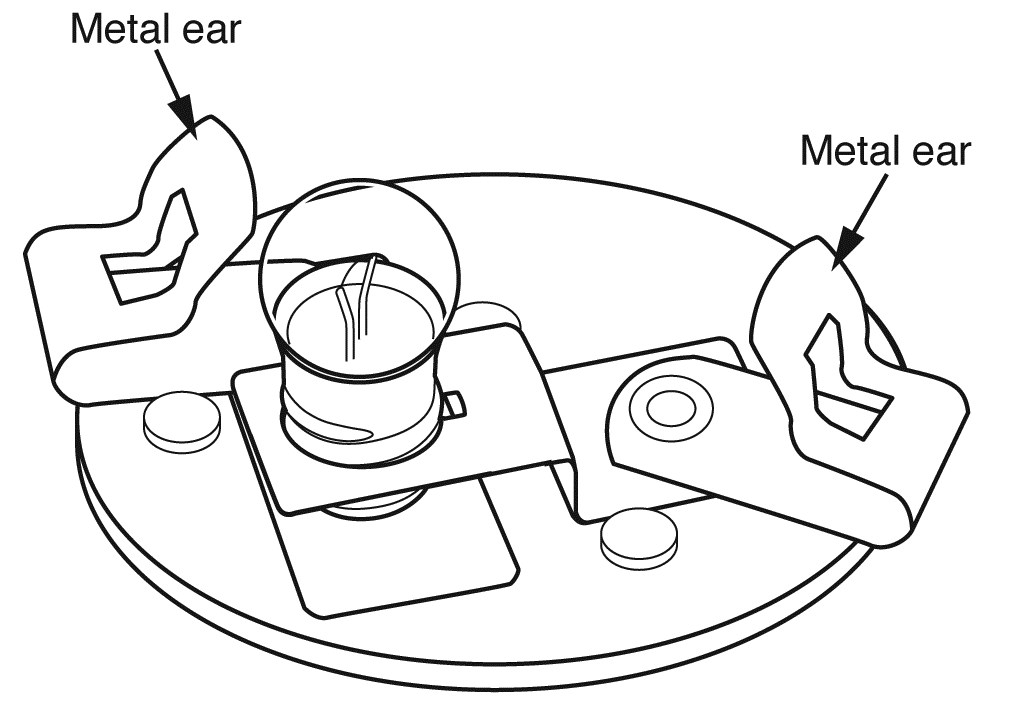
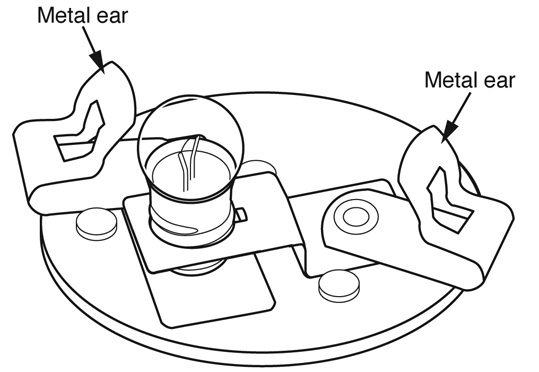
- Ask your child to screw each light bulb into the bulb holders so they can be ready for use. Assist her in noticing how each bulb holder has two metal ears (as shown in the following figure) where alligator clip wires can be attached.
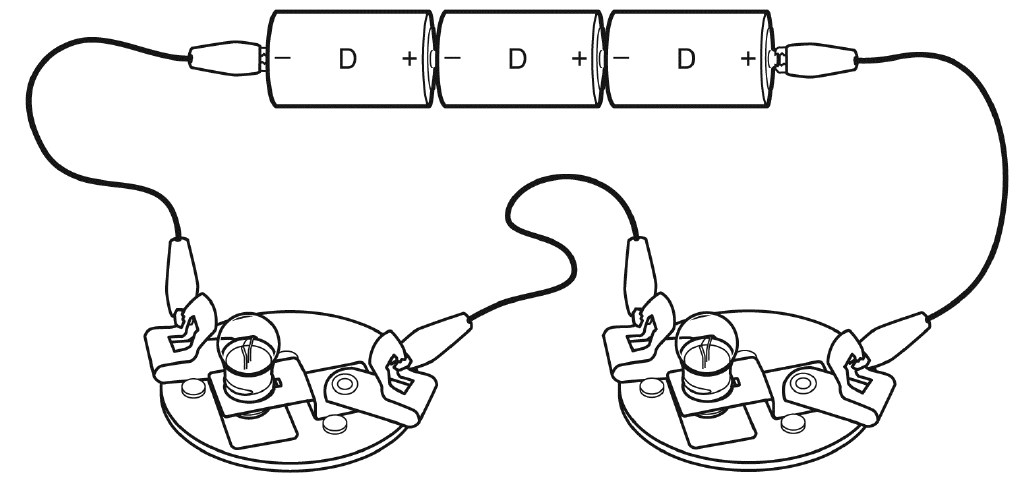
- Using the wire attached to the positive side of the battery pack, clip the loose end of that wire onto a metal ear of the bulb holder.
- Now use another alligator clip wire to connect the other metal ear of the bulb holder to a second bulb holder, as shown in the next diagram.
- Next, connect the loose wire on the negative side of the battery pack to the second bulb holder. What do you observe? Do both light bulbs light up?
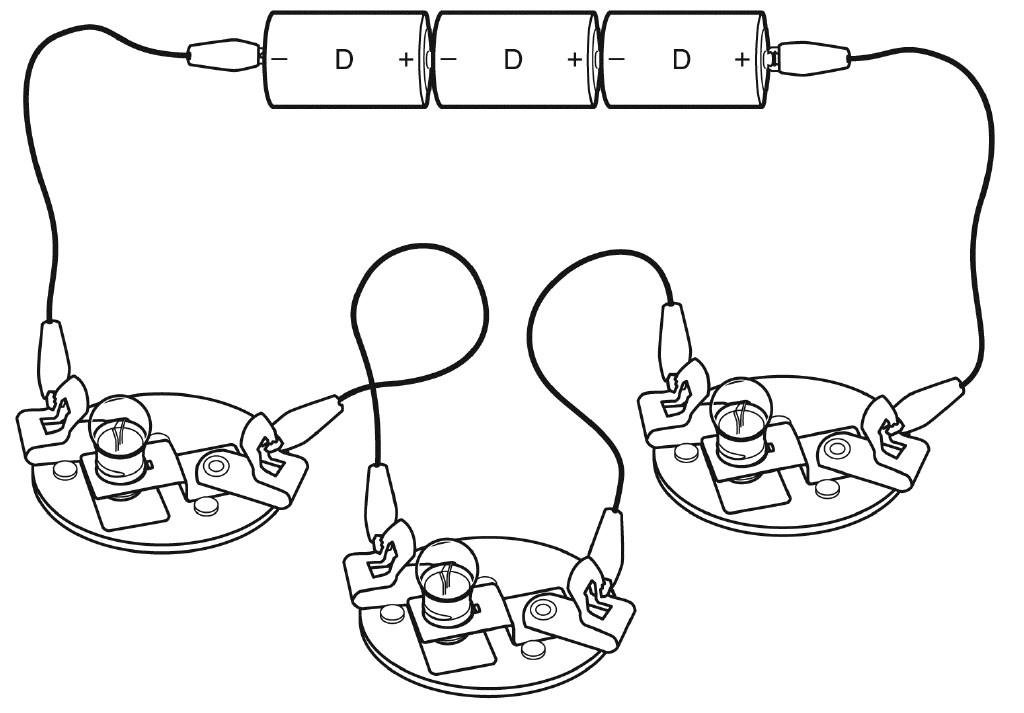
- Now disconnect the wire between the two bulb holders.
- Ask your child to connect a third light bulb with its holder in between the other two, as shown in the diagram. Notice what happens to the brightness of all bulbs compared to when there were two bulbs.
- Suggest to your child to add yet a fourth bulb in the same fashion she added the third one. What do you observe regarding the brightness of all bulbs compared to when there were three bulbs?
- Finally, go ahead and add a fifth bulb. What do you observe regarding the brightness of all the bulbs compared to when there were four bulbs?
Did you observe the bulbs getting dimmer and dimmer as you added more bulbs into the circuit?
A connected electric circuit allows electric charges (such as electrons) to move inside the wires in a fashion similar to traffic. Notice how the bulbs allowed you to “see” that traffic in motion. This traffic of electric charges is known as electric current. In a way it is like the current in a river, except the river current is moving water. Electric current is moving charges.
What do you think the light bulbs do to that traffic (or current)? Do you think they help the traffic move faster or slower? Do they help that traffic speed up or slow down? (Remember that the bulbs got dimmer as you added more.)
If your child concluded that the bulbs act as obstacles to the electron traffic flow, then she was right on. The light bulbs create resistance to the flow of electrons in the wires, slowing them down. It’s similar to having more accidents along the highway that slow down traffic.
The flashlight in your cell phone works in a similar fashion. This is only one example of many other more complicated electric circuits. Even though the circuits can get more complex, they all operate under the same principles with respect to moving electrons.
The Difference Between Electric Circuits and Static Electricity
There are several differences between electric circuits and static electricity. One difference is that electrons move inside the wires in electric circuits, but they remain stationary—not moving—when static electricity builds up. Also, all parts of an electric circuit must be connected and able to allow electrons to move through, so they must be made of conductors such as metal, while static electricity can only stay put on insulated material, such as plastic. Another important difference is that a power source, like a battery, is needed for an electric circuit, but is not needed to build up static electricity on an object.
The next time you turn on a burner in your stove and watch it get bright red, remember that you’re watching electrons in motion inside the stove’s electric circuits as those electrons “light up” the burner.
ACTIVITY: Insulator versus Conductor
There are always warnings against letting a small child stick his finger in an electric socket. The danger of an electric shock is definitely no joke. But what is it about the human body that allows one to be electrically shocked? Is there a way to prevent one from being shocked when touching a live electrical wire?
The property that allows an object to let electricity move through it is called conductivity. A conductor is an object that allows electricity to move through it—i.e., it conducts electricity. As you might guess, the human body is one example of a conductor. There’s a category of objects that do not allow electricity to move through. Those objects are known as insulators. Rubber is a good example of an insulator.
Is there a safe way to test which materials are conductors and which are insulators (without being electrically shocked)? Absolutely, there is.
Materials Needed:
- 2 miniature light bulbs rated 2.5V 0.3A
- 2 miniature bulb holders with plastic circular bases
- 3 size-D batteries
- Electrical tape
- 4 alligator clip wires
- Sewing needle
- Plastic lid
- Styrofoam peanut
- Pencil lead
- Human fingernail (after cutting your nails)
- Human hair
- Stainless steel pot
- Drinking glass
- Ceramic plate
- Wooden toothpick
- Tap water
- Salt
Procedure:
- Using the electrical tape, assist your child in securing the 3 D batteries in a row, end to end. Make sure the positive end (labeled +) of one battery is snuggled against the negative end (labeled –) of the next battery.
- Assist your child in taping one end of an alligator clip wire to one end of the battery pack. Then help her tape another alligator clip wire to the other end of the battery pack.
- Ask your child to screw each light bulb into the bulb holders so they can be ready for use. Notice how each bulb holder has two metal ears (as shown in the following figure) where alligator clip wires can be attached.
- Using the wire attached to the positive side of the battery pack, clip the loose end of that wire onto a metal ear of the bulb holder.
- Next, connect the loose wire on the negative side of the battery pack to the second bulb holder.
- Now tell your child to use another alligator clip wire to connect to the other metal ear of the bulb holder, leaving that wire loose. Do so for both bulbs, as shown in the following diagram.
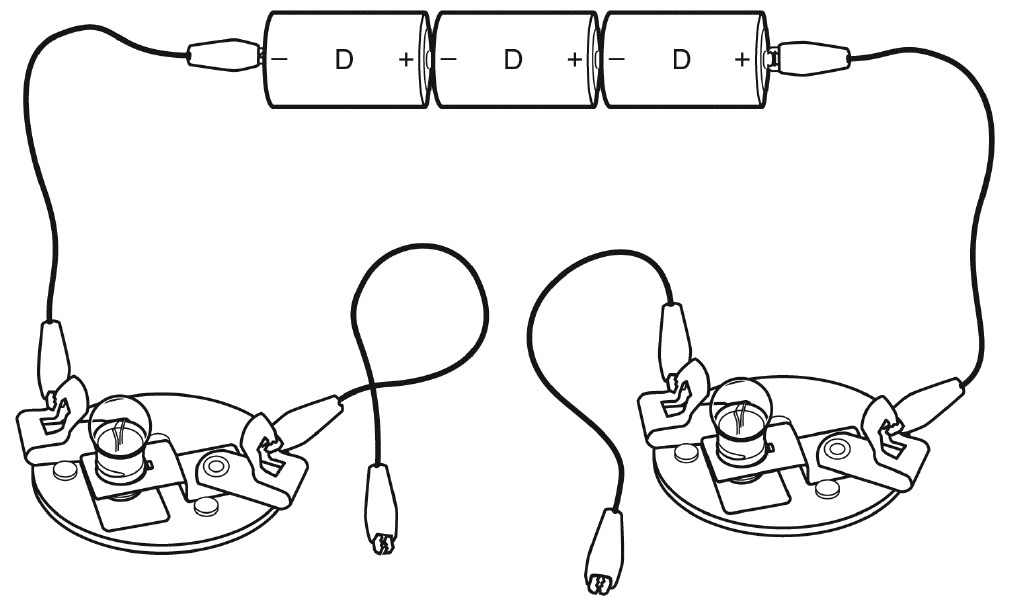
- Tell your child to connect the two loose wire ends to either side of the sewing needle by clipping them. What happens to the light bulbs? Do the bulbs light up or stay off?
- Assist your child in organizing the results of her observations by recording them in the second column in the following table.
- Ask your child to remove the sewing needle, and connect the plastic lid between the two loose wire ends. What happened? Did the bulbs light up? Tell her to record her observation in the table.
- Ask your child to test each of the materials in the list and record her observation of the light bulbs for each item in the table.
- If your child wants to test other materials that come to mind, she can add those to the table.
| Bulbs Light Up (Yes/No) | |
|---|---|---|
| Material Used | Insulator | Conductor |
Sewing needle | ||
Plastic lid | ||
Styrofoam peanut | ||
Pencil lead | ||
Human fingernail | ||
Human hair | ||
Stainless steel pot | ||
Drinking glass | ||
Ceramic plate | ||
Wooden toothpick | ||
Salted water (add 1 teaspoon of salt in any cup, and fill to the top) | ||
Help her recognize the two categories of materials she used: those that allowed the light bulbs to light up, and those that didn’t. Now ask her to think about which of those materials she used in the circuit would count as conductors. In other words, which are the conductors and which are the insulators? Have her go through the list, checking the appropriate box—insulator or conductor—for each material she tested.
The electric circuit is closed when you connect a conducting object between the two loose wires. In such a closed circuit, the light bulbs light up when every part of the circuit is made of a conductor. If there is one insulator along the path, the bulbs won’t light up.
Conductors allow electric charges to flow through them like traffic flows on the highway. This flow of charges is known as an electric current. When an insulator is present, it’s like reaching a road that’s not finished: No cars could go down such a road. The electric charges can’t move along such a path, and there’s no electric current in the circuit.
STEM Q&A
Q: What makes charges move in an electric circuit?
A: A power source is what makes charges flow in a circuit. A battery is an example of a power source. The battery “kicks” the charges and moves them through it, like a soccer player kicks a ball as he passes it on. The charges maintain this current flow in the circuit as long as the battery is not dead.
Your daughter might have thought of testing human skin in the circuit, and may have found out that the bulbs didn’t light up. Even though the human body is a conductor (because it’s made of mostly water that has electrolytes), it’s a poor conductor when using a power source like a battery. That’s why it’s safe to place a finger in this circuit. Do not use a power source like an electric outlet.
STEM Words to Know
electrolyte
An electrolyte is a substance that has an electric charge because it has ions. For example, when dissolving table salt in water, the sodium and chlorine atoms (which were sharing an electron) dissociate from each other, creating a positively charged sodium ion and a negatively charged chlorine ion. Such a solution is called an electrolyte.
The reason a 4.5V battery pack doesn’t cause a shock but a 110V electric outlet does lies in the strength of the electric current generated by these power sources. When connecting to the battery pack that’s connected to the two light bulbs, the batteries generate a very small current that’s harmless. When connecting to the electric outlet, the current generated is much, much greater and could be lethal.
STEM Career Choices
Electrical Engineer
Electrical engineers work on electrical equipment. They design equipment such as communication systems, navigation systems, energy production systems, motors, and radar, as well as equipment that is directly related to power generation and distribution. In addition, they develop the equipment, oversee its manufacturing process, and then test it before it is made available to the consumer.
Different careers are available for electrical engineers. For example, in communications systems they would develop equipment that transmits digital signals to cell phones. They would also design electrical grids that would help conserve energy. In energy production systems, they would develop sustainable energy technology for harvesting power.
ACTIVITY: Electricity and Magnetism: The Two Sisters
Some phenomena in nature can’t occur without some associated effect happening at the same time. For example, every time the sun comes up over the eastern horizon at sunrise, it’s automatic that there’ll be light everywhere. The sunrise and the lighting effect are associated because of the very nature of the sun, which is to illuminate.
Electricity and magnetism constitute a similar example. When we have electricity moving in wires, magnetic effects show up immediately. The two are like sisters that can’t be separated. How can such a phenomenon be observed, and can it be useful in some everyday life application?
Materials Needed:
- 2 miniature light bulbs rated 2.5V 0.3A
- 2 miniature bulb holders with plastic circular bases
- 3 size-D batteries
- Electrical tape
- 3 alligator clip wires
- Liquid-filled compass
- Clear tape
Procedure:
- Using the electrical tape, assist your child in securing the 3 D batteries in a row end to end. Make sure the positive end (labeled +) of one battery is snuggled tightly against the negative end (labeled –) of the next battery. Now the battery pack is ready.
- Assist your child in taping one end of an alligator clip wire to one end of the battery pack. Then help her tape another alligator clip wire to the other end of the battery pack.
- Ask your child to screw each light bulb into the bulb holders so they can be ready for use. Assist her in noticing how each bulb holder has two metal ears (as shown in the following figure) where alligator clip wires can be attached.
- Using the wire attached to the positive side of the battery pack, clip the loose end of that wire onto the metal ear of one of the bulb holders.
- Next, connect the loose wire on the negative side of the battery pack to the metal ear of the other bulb holder.
- Now tell your child to use the third alligator clip wire and connect it to the other metal ear of the bulb holder on the right. Leave the other side of this wire loose for the time being.
- Now it’s time for your child to use the compass. Ask her to place the compass flat on the table, beside the bulbs. Tell her to place the loose wire on top of the compass. Assist her in lining up the loose wire exactly parallel to the compass needle, as shown in the following diagram. Once the loose wire and the compass needle are in alignment, use the clear tape to tape the wire onto the compass needle. Also tape both wire and compass onto the table so they don’t move.
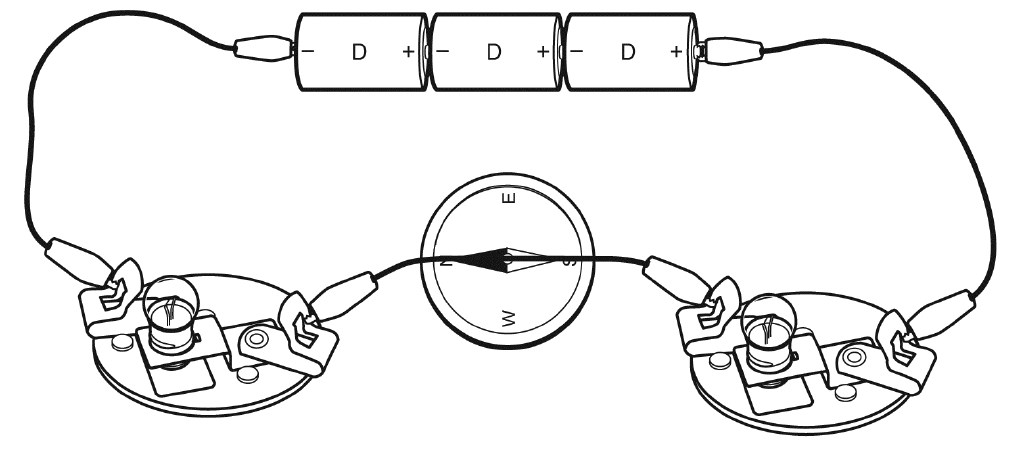
- Tell your child that she’s now ready to connect the loose end of the wire to the left bulb holder’s empty ear that’s not connected to the battery. Before she does that, tell her to focus on the compass. Once she connects that wire, both light bulbs should light up. What do you both observe happening to the compass needle the instant she connects the wire?
The light bulbs light up, showing that electricity is indeed moving through the wires. But there’s another effect associated with the moving electricity. This other effect shows up in the compass needle that moves (or deflects)!
But isn’t a compass used to detect a magnetic field? After all, people carry compasses so they can find the direction they need to travel in, especially if they’re hiking in the wilderness. The compass responds to the presence of the earth’s magnetic field, aligning its needle with the direction north. Some people even like to play with the compass needle by bringing a magnet nearby and watching the needle respond to the magnet. So what does a battery and a bunch of wires and bulbs have to do with magnetism? After all, your child didn’t bring a magnet near the compass.
STEM Words to Know
magnetic field
When a magnet is present, it alters the space around it. This altering of the surrounding space that some nearby objects can sense is called a magnetic field. For example, if you bring two south poles of two magnets near each other, they “sense” the magnetic field of the other magnet and refuse to come closer to touch.
Every time there’s electricity moving in the wires, there’s automatically a magnetic field that shows up at the same time. Electricity and magnetism can’t be separated. The magnetic field shows up right around the wires. That’s why the wire had to be laid right on top of the compass. Since the compass responds to the presence of a magnetic field (as it does to Earth’s magnetic field), it can actually detect the magnetic field close by in the wires.
Can this phenomenon be put to good use? Can a magnetic field generated by electricity be fashioned into something useful? One very important and useful tool is an electromagnet (as in electric magnet). All one needs in order to make an electromagnet is to wrap the wire many times around an object made of iron, such as an iron nail, and connect the two ends of the wire to a battery. It’s as simple as that!
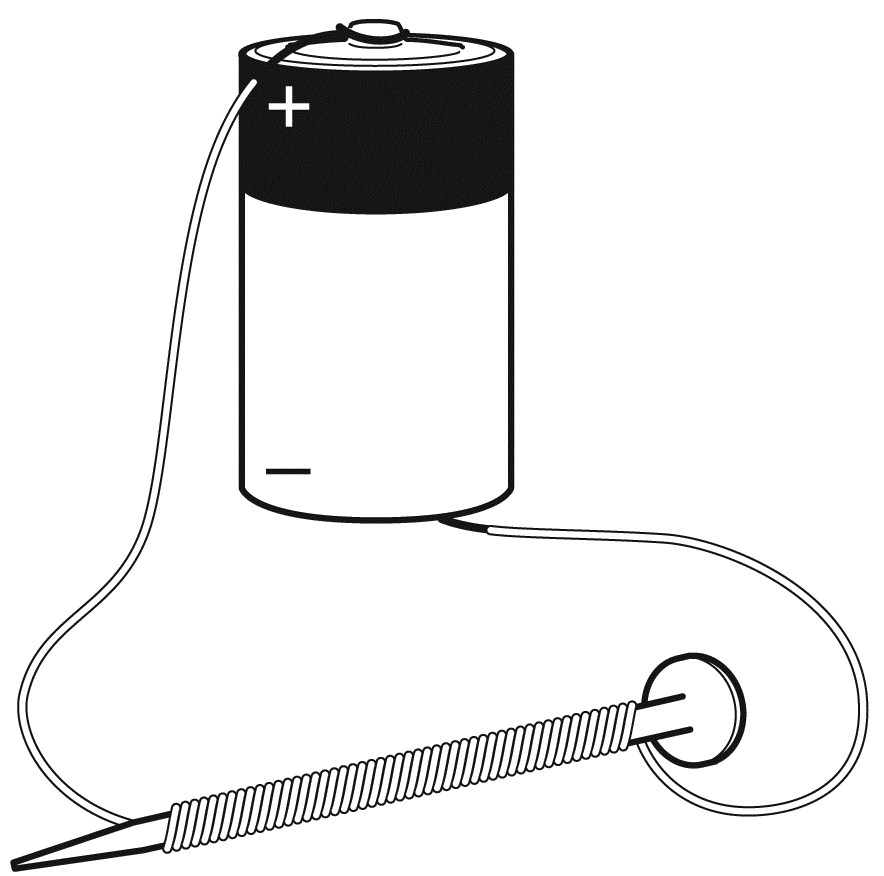
Simple electromagnet
Electromagnets
Electromagnets are used in many places. For example, if one needs to have a magnet he can turn on or off when needed, he uses an electromagnet. Electromagnets are used in junkyards when heavy objects such as cars need to be lifted and moved around. The electromagnet is turned on when the car is ready to be lifted. When the electromagnet is turned off, the car drops into the location it needs to sit. If a permanent magnet were used, it would be near impossible to “peel” the car off that giant permanent magnet once the magnet was fastened to it.
STEM Career Choices
Mechanical Engineer
Mechanical engineers design devices such as machines and tools. A mechanical engineer has the role of taking an idea and developing it into a product that is ready for the marketplace. Examples of machines that mechanical engineers build include cars, engines, generators, turbines, elevators, escalators, refrigeration and air conditioning systems, and robots used in manufacturing, among many others. In addition, mechanical engineers are involved in the process of developing the machines and tools they design and seeing them through the manufacturing process, as well as testing them afterward.
Mechanical engineering is one of the broadest fields of engineering. The skills mechanical engineers would have acquired upon graduation with a bachelor’s degree make them immediately hirable.
ACTIVITY: Balloon-Powered Car
Vehicles today are powered in so many different ways. There are gasoline-fueled automobiles, and ones that run on diesel. Solar cars do exist, even if they’re mostly student projects in university-level engineering classes. Electric cars have been making their way onto the scene, and hydrogen fuel cell cars are also a reality.
Since the invention of the wheel, earlier people have relied on animals to supply the power for movement. But today new transportation technologies are being developed that would’ve seemed like science fiction only a few decades ago.
Are there simpler ways to power a vehicle—even simpler than using an animal? The answer is yes. You can actually use your own breath; but, of course, the vehicle would have to be a toy car in order for it to move. The idea behind this experiment is that you and your child can build a car from scratch and use an “alternative source of energy” to power it.
Materials Needed:
- Balloon
- 1 regular drinking straw
- 2 acrylic straws 9" in length
- Tape
- 3"-wide double-sided tape
- 4 blank CDs
- 8 identical plastic caps or lids (from juice bottles or milk containers)
- Wooden skewers 10" in length
- Rectangular balsa wood sheet (1⁄4" thick) 10" × 4"
- Awl, or other hole-poking tool
- Ruler or tape measure
- Utility knife
- Glue gun
- Glue sticks (for glue gun)
Procedure:
- If the balsa wood sheet is longer than 10", use the utility knife to cut a 10" length of that 4"-wide sheet. This is the body of the car.
- Cut the acrylic straws to 6" each.
- Using the glue gun, demonstrate to your child how to attach the first acrylic straw to the front edge of the balsa wood sheet. Make sure to center the straw along that edge. Assist your child as he attaches the other thick-walled straw to the back edge of the balsa wood sheet.
- Assist your child in poking holes through the centers of the plastic caps.
- Using the hot-glue gun, help your child glue a plastic cap (with the open side of the cap facing the CD) onto the center of the CD. Make sure the hole in the center of the cap is lined up with the center of the CD. The plastic cap is like a hubcap. Ask your child to place another plastic cap on the other side of the same CD, so that the CD has a hubcap on each side.
- Place the remaining 6 plastic caps on the other 3 CDs in the same fashion. The wheels of the car are ready.
- Using the skewers, push one skewer through the holes of the “hubcaps” of one of the wheels. The holes poked into the plastic lids should be just big enough to allow the skewer to go through snugly.
- Tell your child to slide the skewer through the straw mounted along the front of the body of his car (the front edge of the balsa wood sheet).
- Next, ask your child to push the other end of the skewer into the holes of another one of the wheels, so that he has both front wheels mounted. The skewer should fit snugly onto the second hubcap. Push the two wheels close to the straw ends, but leave just enough wiggle room for the skewer to rotate freely inside the straw.
- Ask your child to follow the same steps to mount the rear wheels onto the body of his car. Trim off the excess skewer length outside the front and rear “hubcaps,” leaving about 1⁄2".
- Next, tell your child to slide the regular straw slightly into the balloon, then tape the balloon securely onto the straw.
- Using the double-sided tape, ask your child to wrap the tape once all the way around the width of the balsa wood (the body of the car) and fasten the two ends of the tape on the back side.
- To perform the experiment, find a long, smooth floor surface (such as a wooden or smooth concrete floor). Have your child place the car on the floor at one end of the long surface.
- It is testing time! Tell your child to blow into the balloon through the straw until it is fully inflated. Tell him to place his thumb at the end of the straw to cover it until he’s ready to launch the car. Have him place the balloon with the attached straw onto the sticky tape on the car so that the balloon itself touches the tape and the straw lines up along the length of the car. When he’s ready, tell him to let go of the straw and observe what happens to the car.
How far does the car go? Is the room long enough to allow for the balloon to deflate fully?
This type of car is obviously not meant to keep going very long like the ones that use batteries, but hopefully your child will have a good time with this car he created himself.
ACTIVITY: Powering a Boat with Soap
Boats can be powered by a person rowing tirelessly until he gets to his destination. Boats can also be powered by the wind, or by gasoline.
Believe it or not, you can power a boat using something as simple as soap, and it’s all related to the surface tension of water. A liquid like water has surface tension when it is in contact with the air. The molecules in the water are much more attracted to each other (they stick together) than to the air around them. The water molecules pull so strongly toward each other that they act as if there is an elastic sheet stretched around them. When an object is placed in water, the surface tension of the water surrounding the object is all the same, so the object doesn’t move. But if something can make the surface tension in the rear of a boat smaller than in the front of it, the greater surface tension in the water in the front can pull the boat forward.
This idea was demonstrated by scientists using soap. Soap lowers the surface tension of water. That’s why soap feels slippery on the skin, and spreads easily. If there is a reservoir in the rear of a light boat that releases soap into the water behind the boat, the spreading soap lowers the surface tension behind the boat, allowing the water in front of the boat (with higher tension) to pull the boat forward.
Materials Needed:
- 1⁄8" polystyrene foam sheet
- Scissors or a craft knife
- Dishwasher soap
- Small glass
- Teaspoon
- Liquid dropper
- Long basin filled with water (about 25"–30" in length)
- Rubbing alcohol
Procedure:
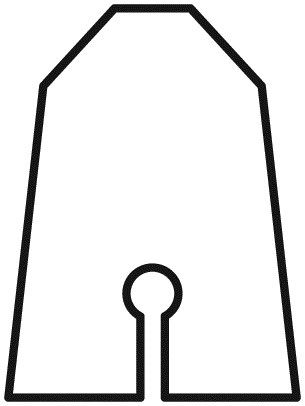
- Using the following drawing as a template, assist your child in cutting a piece of the polystyrene foam in the exact shape and size of the diagram (you might suggest to your child to trace the exact shape onto a piece of paper, then use that paper to draw the shape onto the polystyrene foam). This is the small boat that will be powered by soap. The boat should be about 1.5" in length and 1" in width at the base.
- Fill the basin with water. Ask your child to place her polystyrene mini boat on the surface of the water.
- Tell your child to pour about 4 tablespoons of the dishwasher soap into the small glass and add some water, then stir with the spoon. This will create a liquid soap that she can add to the boat with the dropper.
- Draw some of the liquid soap into the dropper and then squeeze the liquid soap into the hole in the back of the boat. The hole acts like the soap reservoir for the boat. What does the boat do? Does it move forward for a short spurt? Does the boat then stop afterward?
You just witnessed how the difference in surface tension between the water in front and behind the boat propelled it forward. This difference in surface tension was created by the soap. Unfortunately, the soap acts like a surfactant, spreading over the water and lowering the water’s surface tension all around the boat. That’s why the boat stops. In order to make the boat move forward again, you’d have to replace the water in the basin with new water that has no soap in it.
That’s not fun! Is there another way to make the boat move forward constantly? In 2013, a team in the United Kingdom demonstrated that other liquids besides soap can be used to lower the surface tension of water behind the boat. They used rubbing alcohol!
Have your child repeat the experiment again. This time, tell her to use a clean dropper to add a couple of drops of rubbing alcohol into the hole in the rear end of the boat. Does the boat move forward? If so, tell her to add another couple of drops into the boat’s reservoir (the hole). Is the boat propelled forward again? Tell her to keep adding more drops of alcohol, and notice that she doesn’t need to replace the water in the basin like she did when she used soap.
The reason alcohol works better than soap is because the alcohol lowers the surface tension behind the boat, but—unlike the soap—alcohol doesn’t spread over the surface of the water all around the boat; rather, it mixes with the water. This way the water can keep its higher surface tension.
STEM Q&A
Q: What are visible signs of water surface tension?
A: A water droplet is spherical in shape. This is due to the strong attraction between water molecules. The molecules in a water drop pull inwardly toward each other with an equal amount of force, creating a spherical shape to the water drop, and tension on its surface. So the fact that a water droplet is a sphere is a visible sign of water surface tension.
It’s true the boat is a miniature, but it serves the purpose of demonstrating yet another scientific principle. Surface tension of a liquid like water is an important phenomenon behind why water droplets are spherical in shape. It’s also the reason some bugs are able to “glide” on the surface of water.
ACTIVITY: Mousetrap Car Race
Moving objects that are powered usually have some form of stored energy that can be converted into motion (and often heat). For example, when you push a heavy object in order to move it, you’re able to do so only because you gave your body food earlier that day. The source of the energy behind the work you did was stored in the food you ate. In other words, energy is constantly transforming from one form into another.
The gasoline you put into your car’s tank has stored energy in it. Once that gasoline is ignited inside the engine, the stored energy in the gasoline transforms into work that eventually turns the car’s axles. There are other ways energy can be stored to power vehicles. One such way is the energy stored in the wound torsion spring of a mousetrap. It’s true that you can only power a small vehicle with a mousetrap spring, but the principle is the same. You’re transforming the stored energy in the wound spring into power for the toy car.
Materials Needed:
- Old-fashioned spring-loaded mousetrap
- 4 blank CDs
- 8 identical plastic caps or lids (from juice bottles or milk containers)
- 2 jumbo-sized safety pins
- 1 acrylic straw
- Wooden skewers (1⁄8" diameter)
- Rectangular balsa wood sheet (1⁄4" thick) 14" × 4"
- Plastic clothes hanger
- Fishing line
- Cable ties
- Awl, or other hole-poking tool
- Ruler or tape measure
- Utility knife
- Wire cutter
- Scissors
- Athletic tape
- Glue gun
- Glue sticks (for glue gun)
Procedure:
- If the balsa wood sheet is longer than 14", then use the utility knife to cut a 14" length of that 4"-wide sheet. This is the body of the car.
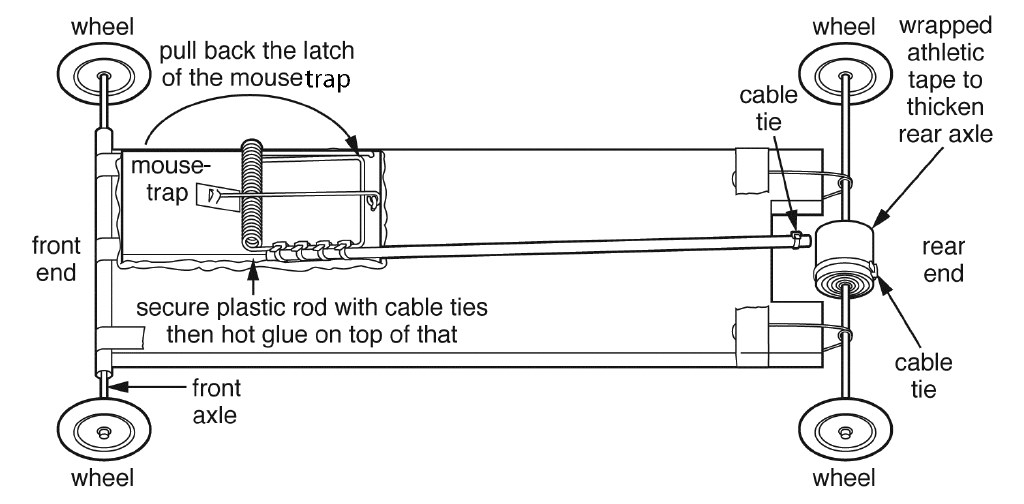
- Using the utility knife, cut out a rectangular notch from the rear end of the balsa wood frame. The notch should be 1" deep and 2" wide, as shown in the following diagram.
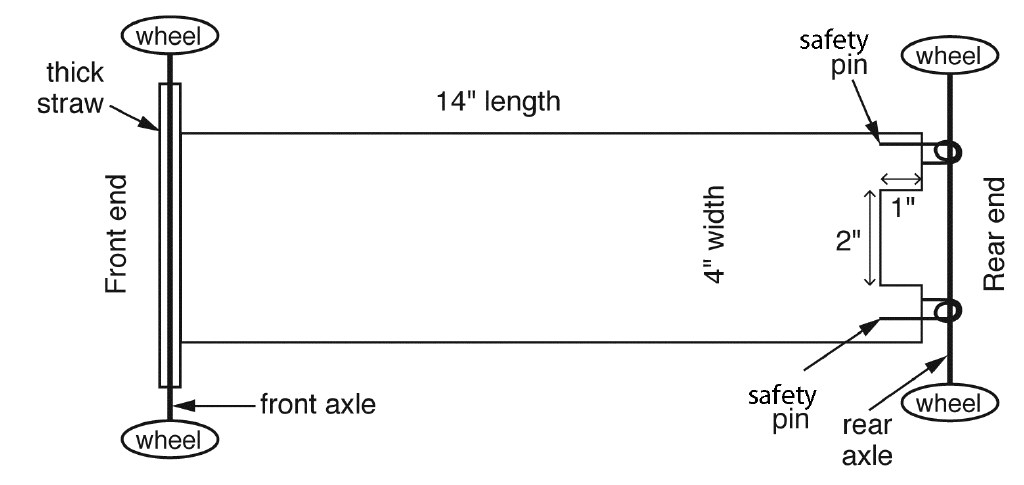
- Using the glue gun, assist your child in securing the acrylic straw to the front edge of the balsa wood sheet. Make sure to center the straw along that edge.
- Using the wire cutter, cut off the fastening ends of the jumbo safety pins. This will take some force, so you might want to do that task yourself.
- Now use the hot-glue gun to securely fasten the long ends of each safety pin on the top and the bottom of the rear end of the car frame. IMPORTANT: Make sure the holes of the pins line up perfectly face-to-face. The rear axle will slide through those two holes.
- Now it’s time to make the wheels of the car. Assist your child in poking holes through the centers of the plastic caps.
- Using the hot-glue gun, glue a plastic cap (with the open side of the cap facing the CD) onto the center of the CD. Make sure the center of the cap is lined up with the center of the CD. The plastic cap is like a hubcap. Ask your child to place another plastic cap on the other side of the same CD, so that the CD has a hubcap on each side.
- Place the remaining 6 plastic caps on the other 3 CDs in the same fashion. The wheels of the car are ready.
- Using one of the skewers, push the end of that skewer through the hole in the hubcap of one of the wheels. The hole poked into the plastic caps should be just big enough to allow the skewer to go through snugly.
- Tell your child to slide the free end of the skewer through the straw mounted on the front end of his car.
- Next, ask your child to push the other end of that skewer into the hole of another one of the wheels, so that he has both front wheels mounted. The skewer should fit snugly onto the second hubcap. Push the two wheels toward the straw ends, but leave just enough wiggle room for the skewer to rotate freely inside the straw.
- Ask your child to slide the second skewer through the mounted safety pins in the rear of the car, and center it. This skewer will serve as the rear axle that will be powered by the mousetrap. NOTE: Do not mount the rear wheels yet.
- Using the athletic tape, cut a foot-length of the tape and wind it around the center of the rear axle until the tape makes a thick padding that’s 1⁄4" in thickness.
- Secure a cable tie strongly over the center of the athletic tape, then cut the excess cable with scissors. The tie will serve as a notch to loop the fishing line around. Use the glue gun to further secure the cable tie over the tape so that the tie does not move, wiggle, slide, or rotate. Make sure to not cover the tie notch with any glue, so that the notch sticks out.
- Next, have your child place the rear wheels onto the rear axle as he did with the front wheels.
- Now it’s time to make a few adjustments to the mousetrap. Using the utility knife, cut out the bottom horizontal part of the plastic hanger. You need about a 12" length plastic rod. This is something you might want to do yourself, since it will take a lot of effort.
- It’s now critical to figure out where to attach the plastic rod onto the mousetrap. After loading the mousetrap, hold it so that the metal latch is close to you, and the side the latch will snap onto is on the far side. The plastic rod will need to be attached to the left arm of the latch, as shown in the diagram. Assist your child in tying the plastic rod onto the left metal arm of the mousetrap using cable ties. Cut off the excess cables, and secure the cable ties onto the mousetrap arm using hot glue.
- Next, fasten a cable tie about an inch from the tip of the plastic rod. Cut off the excess cable and hot glue the cable tie onto the rod securely.
- Now it’s time to secure the mousetrap to the frame of the car. Using the hot-glue gun, place the loaded mousetrap plus plastic rod at the front right corner of the car frame, as shown in the diagram.
- Carefully release the load from the mousetrap so the plastic rod faces forward, toward the front of the car. This will help your child assess how much fishing line to use. Tell him to tie one end of the fishing line around the plastic rod below the cable tie. Tell him to tie the fishing line a couple of times, then secure it to the rod with hot glue.
- Ask your child to extend the fishing line all the way to the rear axle where the cable tie is. Tell him to cut his line a little longer than where it reaches the axle so that he has enough excess line to make a loop. Make a loop at the end of the fishing line.
- Now it’s time for your child to power his car with the mousetrap. With the plastic rod facing the front of the car, tell your child to put the fishing line loop around the cable-tie notch in the rear axle. Assist him in turning the rear wheels so that the fishing line starts winding around the wrapped athletic tape on the rear axle. This should start lifting the plastic rod that’s extended from the mousetrap arm. Tell him to keep winding the fishing line around the rear axle until the plastic rod moves all the way back and it is lying down along the frame of the car. Tell him to hold the rear wheels so that he prevents them from rotating. His car is now ready to be tested.
- Tell your child to stand at one end of a long hallway with a smooth surface and place the car on the floor.
- It is testing time! Tell your child to let go of the rear wheels.
How far does his car travel before it stops? Measure the distance and record it.
Ask your child to make another mousetrap car, but use a shorter plastic rod (perhaps 8" long). Have him race both cars side by side. Do they both travel just as far? Which one travels the farthest? He probably found out that the car with the longer rod travels farther.
These investigations can become the entry point into the world of design that has intrigued engineers for centuries. The mousetrap car can be the first of many design projects that engage your child for a long time to come.
STEM Career Choices
Automotive Engineer
Automotive engineering is one branch of mechanical engineering. Automotive engineers are involved in the design and development of cars, trucks, motorcycles, and any other vehicles that use motors. They also see such vehicles through the manufacturing and testing process.
This is a very specialized field, and few universities offer bachelor degrees in automotive engineering. In general, students start by majoring in mechanical engineering, and choose an emphasis in automotive engineering by taking classes in this area. Such courses might include internal combustion engines, diesel engine theory, and powertrain dynamics. There are many more universities that offer master’s degrees in automotive engineering for those interested in earning a graduate degree in the field.
ACTIVITY: Water Rocket Launch
Rockets are a fascination for many. Some people become interested in rockets early in childhood, and they never lose the fascination. Some people end up studying rockets, and even building them to send into space.
Is there an easy way to make a rocket that’s safe to launch in your own neighborhood park? Absolutely. The best such rocket is a water-air rocket. When air is compressed inside a partially filled water bottle, the built-up pressure inside the bottle becomes too large at some point, and the bottle launches into the air like a rocket.
Try this experiment outside on a warm day where there’s plenty of open space around you.
Materials Needed:
- Empty 1-liter soda bottle
- Bicycle pump with hose (one that can stand upright)
- Electrical tape
- 6"-long PVC pipe (3" in diameter)
- Hacksaw
Procedure:
- Assist your child in covering the outside edge of the loose end of the bicycle pump hose with electrical tape so that it can fit tightly into the mouth of the soda bottle.
- Using the hacksaw, help your child cut out a small square window at one end of the PVC pipe right at the edge, so only three cuts need to be made. The PVC pipe will serve as a vertical launcher for the bottle rocket. The window will allow your child to insert the hose of the bicycle pump into the PVC pipe.
- Tell your child to fill 1⁄3 of the bottle with water.
- Ask your child to thread the bicycle pump hose into the PVC pipe through the little cut-out window and out the other end. Tell her to stand the PVC pipe on the ground so that the window is resting on the ground. The PVC pipe should be standing upright on its end.
- Assist your child in tightly fitting the bicycle hose into the mouth of the bottle without spilling any of its water content. Make sure the hose fits really tightly, so you can pump enough air into the bottle to build up plenty of pressure for the launch.
- Now place the bottle (hose attached) onto the PVC pipe such that the bottle is standing vertically with the mouth of the bottle inserted into the PVC pipe. Make sure the bicycle pump stands on the ground about a foot from where the PVC pipe is standing.
- Tell your child to start pumping air into the rocket. She’ll start to see bubbles form in the water inside the rocket. Make sure she’s standing off to the side of the bottle and not looking directly down at it. You might want to assist her in pumping air into the bottle. How many pumps does it take before the rocket launches? Can she estimate how high it flew?
- Your child will want to repeat the launch of her rocket. See if you can wind a few more turns of electrical tape around the end of the pump hose so that you can fit the hose even more tightly into the bottle. The tighter the connection between hose and bottle, the higher the air pressure builds inside the bottle, and the higher the rocket goes. This is a fun activity that may launch your child into rocket science!
STEM Career Choices
Aerospace Engineer
Aerospace engineers research, design, develop, and test aircraft (such as planes and jets), spacecraft (such as space vehicles and satellites), and missiles. Their main focus is on the aerodynamics of vehicles that fly within Earth’s atmosphere and beyond its boundaries. They can specialize in areas such as structural design, navigation, propulsion, and guidance and control systems. Aerospace engineers can work in private commercial companies or in the military.
There are many specializations in aerospace engineering. Examples include expertise in aerodynamics, thermodynamics, and celestial mechanics, among others. Those who concentrate on aircraft are known as aeronautical engineers, while those who study spacecraft are astronautical engineers.
ACTIVITY: Mini Pyramids—Many Triangles
Lots of young learners are given the opportunity to build miniature pyramids as part of a social studies class project. If your child’s teacher doesn’t assign the Giza project, you might consider doing it at home as a family learning activity. Building pyramids is a lot of fun, and it provides you with a perfect opportunity to review triangles with your child.
Materials Needed:
- Several sheets of card stock
- Ruler
- Scissors
- Glue
- Scotch tape
- Crayons or markers
- Sand (optional)
It’s not difficult to build the pyramids. There are many approaches you and your child can use. First, you’ll have to make some basic decisions: How big do you want your pyramids to be? How many pyramids will you build? (The Giza Necropolis has three major pyramids.) How will you decorate your pyramids? Once you’ve made your choices, the rest is fairly straightforward. The basic purpose of this activity is to use it as an opportunity to review the geometry of triangles with your child.
Triangle Basics
The three interior angles of a triangle always add up to 180 degrees. An equilateral triangle has three equal sides and three equal angles (each interior angle is 60 degrees). An isosceles triangle has two equal sides and two equal interior angles. A scalene triangle has no equal sides and no equal angles.
A triangle can also be categorized based on the measurements of its interior angles. For an acute triangle, all of its interior angles are less than 90 degrees. A right triangle has one interior angle that’s exactly 90 degrees. A right triangle also has one side that’s longer than the other two sides. It’s the side of the triangle opposite from the right angle. That side, the longest side of the right triangle, is known as the hypotenuse. An obtuse triangle has an interior angle that’s greater than 90 degrees.
Back to the Build
To build a miniature pyramid, you’ll need four equilateral triangles and a square base. It’s best if you measure and draw the pieces on card stock before cutting them out. Help your child measure out and draw four equilateral triangles and a square base. (Note that the square base should be the same width as the bottom edge of the triangles.)
After you’ve drawn the pieces on card stock, cut them out and assemble them using glue. You may need to use Scotch tape on the inside of the pyramid so that the pieces hold together while the glue is drying. Also, if your child is planning to decorate the pyramid using crayons or markers, it’s best that he do that before the pieces are assembled.
Another approach to decorating the pyramid is to cover the sides in glue after the pieces are assembled, and coat the pyramid with real sand. This approach can get messy, so you’ll want to do it outside or over a large piece of cardboard or plastic. The sand approach, though messy, results in a more realistic-looking miniature pyramid.
STEM Q&A
Who was Pythagoras?
Pythagoras was a famous mathematician and philosopher who lived in Greece around 500 B.C. Sometimes referred to as the first “true” mathematician, Pythagoras believed that geometry was the highest form of mathematics, and that mathematics could help people understand the world around them. He believed that numbers have personalities. Although he and his followers contributed several important ideas to the study of mathematics, Pythagoras is most famous for the Pythagorean theorem, a formula that applies to all right triangles.
More Pyramid Activities
Ask your child if he thinks he could build a pyramid using an isosceles or scalene triangle. Encourage him to test his prediction by attempting to build a mini pyramid utilizing these other triangle shapes.
Either while building or after the initial build, you can help your child find the area of one of the triangles used in the pyramid construction. The area of a triangle is found by multiplying the base by the height and dividing the product in half. For example, if your triangle has a base of 4" and a height of 4", the triangle’s area is 8 sq." (4 × 4 = 16, half of which is 8).
STEM Words to Know
Pythagorean theorem
The Pythagorean theorem states that, for a right triangle, the square of the hypotenuse is equal to the sum of the squares of the other two sides. The theorem can be written in equation form as a2 + b2 = c2, where c is the length of the hypotenuse, and a and b are the lengths of the triangle’s other two sides.
In addition to being a great geometry activity, the mini pyramid project also provides you with an opportunity to discuss ancient Egyptian history with your child. He may find it interesting to know that, although experts have proposed many theories, no one has quite figured out how the ancient Egyptians constructed the actual pyramids. One thing is certain, however: Those ancient builders had a supreme understanding of geometry.
STEM Career Choices
Industrial Engineer
Industrial engineering is a profession that is old and very broad in its focus. It is concerned with optimizing systems that include equipment, people, materials, energy, and information, as well as money. The work of industrial engineers involves identifying where wastefulness occurs in a system, then finding solutions to reduce it.
Many people who work in the field of industrial engineering may have earned other engineering degrees, such as mechanical engineering or manufacturing engineering. Industrial engineers often work in manufacturing and technical services. When they are identifying problems they need to optimize, they are likely to be found, for example, observing workers assembling parts of a product in a factory. They later move to their offices in order to find optimization solutions to the problems they identified.