GARDENING 101

Unfortunately, plants are not “plug-and-play.” They don’t thrive if you ignore them, and they require a lot of follow-up, which is why some people love gardening and others avoid it. As with anything worth doing for the long haul, it helps to start with a good foundation. For plants, that would be the essential three elements of sun, soil, and water. Of those three, sun is the one element you will have the least control over, and it’s something you should wisely consider before you plan or plant.

Vegetables vary in their need for sun. Those grown for their leaves and roots, such as spinach, lettuce, radishes, and beets, do not demand a full day of sunshine. They can be happy with the respite of some afternoon shade. Fruits and fruiting vegetables, such as tomatoes, squash, eggplants, and peppers, need lots of sun to be productive.
Garden books and nurseries usually specify a plant’s requirement for sunlight in three particular ways: full sun, partial sun or partial shade, and full shade. Here’s a quick breakdown of what these terms mean.
 Full sun: At least 6 full hours of sun each day. Heat-loving vegetables such as eggplants, okra, and melons want as much sun as they can get. If you’ve spent long periods of time out in the sun, you know that 6 hours in the morning can be cooler than 6 hours in the afternoon. It’s all considered full sun, but keep in mind that if your plants are being exposed to sunlight during the hottest parts of the day, they will also need more water.
Partial sun or partial shade: There is no explicit definition here and little agreement about how to make the distinction. In general, this encompasses 3 to 6 hours of sunlight each day, with partial sun at the high end and partial shade at the low end. Plants requiring partial sun are more tolerant of the accompanying heat. Plants requiring partial shade tend to prefer some protection from the afternoon sun. Dappled sunlight that filters through tree canopies and trellises can be treated as partial shade.
Full shade: When it comes to plants, full shade means less than 3 hours of sunlight each day and dappled sunlight the rest of the day. It does not mean no sunlight at all.
Before you choose a location for your vegetable garden, watch the movement of the sun across your yard to get a clue of where the sunlight falls at what time of day: for example, a bright, sunny spot at 6 a.m. might be shaded by your neighbor’s fence by 10 a.m. Many gadgets are available to measure the amount of sunlight your yard receives—from disks filled with light-sensitive dyes to electronic meters. The low-tech way to calculate your garden’s sunlight exposure is to make an hourly chart. Start around sunrise and check at the beginning and end of each hour, noting whether the area receives full or partial sunlight and when it is totally shaded. Then add up the total hours of sunshine. By tracking the sun throughout the day, you’ll notice the shading effect of nearby buildings, fences, and other tall structures.
Another circumstance to consider is the growth rate of nearby trees. The maple you planted last year will become a shade tree within 10 years. (It will also send its roots into your well-watered and fertilized vegetable garden.) When it comes to deciding whether to move an established vegetable garden or cut down a mature tree, the tree usually wins.
One final complication for gauging sunlight involves where and when you are gardening. Not all sunlight is equal. The days don’t just go from short spring days, to long, lingering summer days, and back to short again. As the sun rotates, it gets closer to the Earth during the summer, and the North Pole is tilted toward the sun. Northern latitudes have the most hours of sunlight in the summer. So, for example, a garden in Bangor, Maine, will receive 15:36 hours of sunlight on the summer solstice, the longest day of the year. Its counterpart in Harrisburg, Pennsylvania, will receive 15:03 hours of sunlight on the same day. This is just the opposite at the winter solstice, when southern gardens see more sunshine than those in the north. Because plants respond to day length, the hours of sunlight become really important, especially if you are trying to get plants to mature in the fall or keep things going with protection in the winter. To take the best advantage of all the available sunlight, position your garden and cold frames to make the most of the sun.
You’ve chosen the perfect location, and the sun is out and shining down upon you, but your plants are languishing rather than thriving. Why? The missing ingredient could be heat. Some vegetables, such as tomatoes and peppers, are actually semitropical plants that need plenty of heat to ripen. So even if your packet of seeds says that fruit will be ready to harvest in 75 days, during a cool season, you may have to wait a little longer.
Many plants do not start actively growing until temperatures reliably remain at 50°F or warmer. The agriculture industry measures heat as growing degree days (GDDs). In a nutshell, they take the average of the daily highest and lowest temperatures and subtract it from 50, the baseline minimum temperature for growth. Warm-season vegetables such as tomatoes and peppers need a certain amount of these heat units to ripen and develop their sugars and flavor. If you have a long string of cool days, warm-season plants are going to bide their time. On the other hand, vegetables that prefer cooler temperatures such as spinach and radishes will throw in the towel when temperatures rise too high.
Once summer gets going, the NE is assured of having more than enough GDDs to ripen tomatoes. But this concept will become more important to you as you try to stretch your growing season by planning late fall harvests and gardening under cover throughout the winter.
Professional gardeners are taught early that garden soil is never called dirt. Soil is the foundation and future of your garden plants. Dirt is what gets on your clothes. Don’t treat your soil like dirt.
It is almost impossible to have healthy plants without healthy soil. Don’t be fooled by its inert appearance; there’s a party going on down there. Soil is an ecosystem that provides a home for all sorts of insects and microorganisms that, in turn, provide air and nutrients for your plants to uptake. These organisms feed on the organic matter in the soil, such as compost, manure, and decaying plants and insects, and turn it into humus, which improves the soil’s texture, retains moisture, and is rich in the many nutrients plants need.
Most soil is made up of organic matter along with crumbling rocks, which are in plentiful supply in the NE. Rock provides the inorganic material in soils, and the predominant type of rock in your area will factor into what type of soil you have. For example, limestone creates soil high in calcium with a slightly alkaline pH. Shale often results in a clay soil with an acidic pH. The minerals in the rock also play a role. Rock with lots of quartz can produce the more irregularly shaped grains of soil found in sand. Even topography and climate get involved—for example, smaller grains of soil wash off slopes, excessive rain leaches nutrients, and arid, baked soil is no place for earthworms.
Given the diversity of our topography, it is no wonder that no single type of soil predominates. In my small area, the glaciers left one town with a surplus of shale, the next with sand, and then carried the rich, black sediment into the next county.
Building good soil is an ongoing task and not a quick one. Soil is constantly in transition and can become depleted by rain, chemicals, and even the plants growing in it. If you live in farm country, your soil has probably been amended over the years. However, if you live in some type of housing development, you can bet that the topsoil was removed and sold off during initial construction. A soil test will tell you everything you need to know about your soil. The good news is that any type of soil can be amended and made suitable for gardening.
Good soil is a combination of texture, structure, and fertility.
Texture refers to the size of the soil particles.
Sandy soil is comprised of large, irregularly shaped particles. This makes it feel coarse in your hand and prevents it from compacting easily, so water and nutrients percolate right through it. Sandy soils are usually low in fertility.
Clay is made up of flat microscopic particles that pack together, preventing water and air from circulating. Add heat, and clay soils become bricklike. On the plus side, most clay soils are highly fertile.
Loam is considered a balanced soil, and this is what you are striving for in your garden. It is rich in organic matter, has a healthy structure, and attains the elusive moist but well-draining quality preferred by most plants.
Structure refers to how well the soil holds together. A good soil structure is crumbly and allows plant roots to branch out and water to drain but not run off. Grab a handful of damp soil and form it into a ball. If the ball totally falls apart with a slight tap, the soil is sandy. If it stays intact, you have clay. You want something in between.
Fertility is the most dynamic aspect of soil. The nutrients in your soil are the measure of its fertility, and nutrients are continually being used up by plants. Luckily, the means by which you replace nutrients are the same as those you use to improve your soil’s texture and structure—adding organic matter. Organic matter refers to decomposing plant and animal materials, and in our gardens that generally is compost, composted manure, and green manures (cover crops). Adding organic matter gives substance to sandy soil and lightens clay. It feeds the microorganisms and insects in the soil and even makes plants’ roots more permeable so they can take up more nutrients and water.
Nothing you do for your soil will make an appreciable difference if the pH is too high or too low to sustain your plants. Soil pH matters because plants can access nutrients from the soil only if it is within a specific pH range; if the soil pH is too far out of that range, the nutrients will sit idly in the soil and will never become available to the plants.
pH is shorthand for potential hydrogen, which is a measurement of hydrogen ions in a solution. Don’t worry if this means nothing to you; just know that the pH scale, with a range of 0 to 14, is used to determine the relative acidity or alkalinity of a substance—in our case, soil. A pH of 7.0 is considered neutral. Anything below a 7.0 is considered acidic, or sour, and everything above 7.0 is alkaline, or sweet. You might think it’s no big deal if your soil’s pH is only 1 point above 7.0, but this is a logarithmic scale, so each number represents a power of ten. That means that a pH of 8.0 is ten times more alkaline than a pH of 7.0.
As gardeners, we need to be concerned with pH, because different plants prefer different soil pH levels; in general, plants are happy in soils between pH 6.2 and 7.0. I wish I could tell you that all NE soils fall into this range, but most tend to be on the acidic side (below 7.0) of the scale. Luckily, you can change that.

DO-IT-YOURSELF SOIL TEST
You can get a sense of the quality of your soil just by looking at it and observing how well plants grow in it, but periodically testing for nutrient levels will give you a better idea of its fertility and what amendments might be needed. You can start with this simple home test to determine your soil’s texture. A predominately loamy soil—a balance of sand, clay, and silt—is a gardener’s dream; it will retain water and provide a base of organic matter.
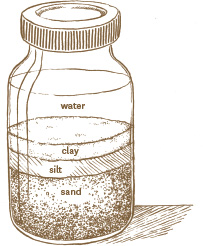
Know the percentage of sand, silt, and clay in your soil, and you can estimate its water- and nutrient-holding ability and determine what needs improving.
WHAT YOU’LL NEED
Small scoop or trowel
Clean jar with straight sides and a tight-fitting lid
Water
1 Tbsp. powdered dishwashing detergent
Soil sample
STEPS:
1 Collect small soil samples from three or four sections of your garden and mix them together.
2 Sift the sample to remove stones and debris.
3 Fill the jar about halfway with the soil.
4 Add the detergent to the jar; this will prevent the soil particles from clumping together.
5 Fill the jar about three-quarters full with water and tighten the lid.
6 Shake vigorously, making sure that all clumps are broken, nothing is stuck to the bottom, and everything is well mixed.
7 Set the jar on a level surface and check back periodically over the next couple of days to see how everything has settled.
Sand is heaviest and will settle to the bottom of the jar.
Silt will form a layer on top of the sand and will be a bit darker than sand.
The tiny clay particles can take days to settle. This layer will be lighter than the silt.
Any stray organic matter should float to the top.
But before you can adjust your soil’s pH, you need to know what its pH actually is. Many home-testing kits are available, and some are more accurate than others. You can also bring a sample into your local cooperative extension office and have them test it. Armed with that knowledge, you can start making adjustments. You can improve an acidic soil by applying lime. For alkaline soils, you can add some type of sulfur (usually elemental sulfur), aluminum sulfate, or iron sulfate. These are not instant fixes, however. The best time to amend the soil to improve its pH level is in the fall; this allows the lime or sulfur time to work its way into the soil in time for spring planting. These are also not one-time fixes. You will need to monitor your soil pH continually and make adjustments as needed.
Plants are living things, which means that just like you, they have to eat. They do pull some nutrition from the soil we have taken great pains to build, but these nutrients will become depleted if they are not replenished. You can add plant food, or fertilizer, to amend the soil and provide the plants with the nutrition they need so that they can do the same for us.
Good things come in threes, and when it comes to plant food, the big three are nitrogen (N), phosphorus (P), and potassium (K). Every bag of fertilizer comes labeled with the amount by weight of each of these key elements, always in the same order: N-P-K. If you see 5-1-1, for example, you know immediately that the fertilizer in the bag contains 5 percent nitrogen, 1 percent phosphorus, and 1 percent potassium.
A balanced fertilizer, in which the percentages of all the elements are fairly equal, such as 5-4-4, is recommended for general use. However, you’ll find specialty fertilizers with higher ratios of a particular element that target a particular plant’s needs. For instance, leafy vegetables need a fertilizer high in nitrogen. Phosphorus encourages more flowering and fruiting, an obvious benefit to many garden edibles. These elements are all vital and work together, but each has its own strengths.
Nitrogen assists in the development of chlorophyll and protein and is necessary for healthy green leaves. Without enough nitrogen, leaves will slowly turn yellow and the plant’s growth will be stunted. Too much nitrogen will encourage a lot of leafy growth and little flowering and fruiting. Nitrogen is the most rapidly depleted element in the soil.
Phosphorus contributes to many plant functions, including root growth, overall health, and the setting of flower buds and the resulting fruits. Phosphorus depletes slowly, but is it accessible to plants only when the soil is warm and when the soil pH is within a 5.0 to 7.0 range. Working it into the soil near the plant’s root zone helps the plant access it more easily. Phosphorus deficiency can manifest as excessively dark green leaves, purplish leaves or stems, and fruits that drop before they mature.
Potassium, sometimes referred to as potash, is essential for a plant’s overall healthy functioning—from strong growth, to disease resistance, to the quality and flavor of the fruits and vegetables. It tends to stay put in the soil, so you do not need to apply it often. But when you do, apply it near the roots and work it into the soil. Some signs of potassium deficiency are yellowing along the leaf veins and leaves that roll up or crinkle.
Assisting this triumvirate of nutrients are many micronutrients required for healthy plant growth, including calcium, magnesium, sulfur, iron, and zinc. Most of these micronutrients are supplied by fertilizer mixes or compost, so let’s talk about choosing a fertilizer.
Every year, new choices in plant food appear on the store shelves, and most are moving toward organic. Using organic, slow-release fertilizer in the vegetable garden is a win-win situation. You don’t have to worry about what you’re putting into your future food, and the organic materials actually feed the soil in addition to the plants. Most synthetic fertilizers contain salts that wash away in the soil and can harm that ecosystem you worked so hard to develop. They do nothing to build up healthy soil, so they must be continually reapplied. Applying an inorganic fertilizer is similar to trying to survive on vitamin supplements instead of eating food. Organic fertilizers enrich and amend the soil, releasing their nutrients slowly so that they are available when the plant needs them.
You can find complete slow-release organic fertilizers to work into your garden beds a couple of times a year. In addition, water-soluble organic fertilizers can be used through a drip irrigation system or as a quick feed from a watering can. Fish emulsion and manure tea, for example, can be applied to provide a shot of nitrogen for plants that need it.
Because soil varies greatly from region to region, many gardeners prefer to have a complete soil nutrient level test done to learn exactly what their soil needs and then add just those amendments. (You can get your soil tested at a lab or via your local cooperative extension office.) Once you know exactly what you need, you can find organic amendments at a good garden center. Most are by-products reclaimed from the farming and fishing industries. Keep in mind that when it comes to feeding plants, more is not better. Follow the recommended doses.
Alfalfa meal (2-1-2) usually comes in pellet form. Alfalfa is a nitrogen-fixing legume—which means it holds onto nitrogen in nodules on the roots. In addition to adding some nitrogen to the soil, alfalfa meal provides potassium and many trace minerals and growth stimulants.
Blood meal (12-0-0) is a slaughterhouse by-product. It is one of the highest nitrogen supplements you will find, but use it with caution, because applying too much at one time can burn plants. Don’t let it come in contact with leaves. Blood meal also makes a decent deterrent for herbivores such as rabbits and groundhogs, but it can attract dogs.
Bone meal (3-15-0) is ground animal and fish bones. A great source of phosphorus and calcium, it also adds some nitrogen and micronutrients. Like blood meal, it can attract dogs and also rodents. Some studies suggest that the phosphorus in bone meal is available to plants only in soils with a pH lower than 7.0.
Cottonseed meal (6-0.4-1.5) is another good source of nitrogen. Be sure the product is labeled organic, because pesticide residue stays in the cotton seed.
Feather meal (12-0-0) is another slaughterhouse by-product. It is very high in insoluble nitrogen, which is released into the soil slowly, so not all of it washes away in the spring rainy season.
Fish by-products are rich sources of nitrogen. Fish emulsion (5-2-2) is a balanced, water-soluble food with the misfortune of smelling rather foul. The odor fades, but it can attract fish lovers such as bears to your garden. Fish meal (10-6-2), made from dried, ground fish, is not as foul smelling but is slower to work.
Greensand (0-0-3) is mined from prehistoric marine deposits in New Jersey. Containing 3 percent potassium and many micronutrients, it breaks down very slowly and makes an excellent long-term soil conditioner.
Kelp/seaweed (1-0-2) amendments made from dried, ground seaweed are valuable for their micronutrient content. Liquid kelp is often mixed with fish emulsion to create a complete fertilizer.
Oyster shell flour (NPK is negligible) is a mix of coarse and finely ground oyster shells. It contains 96 percent calcium carbonate and a healthy dose of micronutrients. The nutrients are released slowly and do all kinds of wonderful things for your plants and your soil, including assisting with the uptake of fertilizer, aiding cell growth, regulating pH levels, and improving soil texture. It also makes a beneficial amendment to compost heaps and worm bins.
Rock phosphate (0-3-0) is also known as colloidal phosphate. It is made by encasing clay particles with insoluble phosphate and provides a slow release of 2 to 3 percent phosphate throughout the growing season. It also adds micronutrients to the soil. Another form, called hard rock phosphate, has a higher percentage of phosphorous (0-33-0), but more of it is released into the soil and it isn’t as beneficial to the home gardener.
Soybean meal (7-2-1) is an excellent source of nitrogen and phosphorus and can usually be purchased where livestock feed is sold. Soybean meal is a nice alternative if you do not or cannot use fish products.
I find mulching a tedious chore, but I’m always glad I did it, because it makes such a difference. Mulching a 2- to 4-inch layer of material around your plants helps prevent weed seeds from germinating, conserves water, and keeps the soil and plant roots cool. Mulch also keeps soil from splashing up onto your plants when it rains. One hour spent spreading mulch will save you many hours of weeding and watering later in the season.
Inorganic and organic mulches are readily and inexpensively available throughout the NE. Inorganic mulches range from plastic sheeting to stone. Even better, organic mulches will slowly decompose and feed the soil and are made of almost any available plant material, including straw, pine needles, shredded leaves, compost, and wood chips. Because you will be starting from scratch each spring, straw makes excellent vegetable garden mulch that can be easily moved aside for planting and seeding. It lasts the entire season, and you can turn it into the soil to decompose. It also attracts spiders that hide out and eat insect pests.
Compost makes a great mulch and adds a great deal to the soil by improving its water-holding ability; it also helps maintain a balanced ecosystem and makes for healthier plants. But it can be expensive to buy if you haven’t made enough of your own to cover your entire garden. And weed seeds will eventually germinate in it.
The composting process in a compost pile helps speed up the decomposition of organic matter. Build a pile of all your garden debris and watch it turn into a sweet smelling, crumbly, free enhancement for your soil. You have to weed, prune, and clean out your garden anyway, so why waste all that free fertilizer?
You can actively compost by maintaining the right balance of ingredients and moisture so that the pile heats up and decomposes quickly, or take the passive approach of simply piling up your garden trimmings and allowing them to decompose naturally, over time. With an active compost pile, you’ll need to add alternating layers of brown, carbon-rich materials such as dried leaves, and green, nitrogen-rich debris such as kitchen scraps and grass trimmings (2 parts brown to 1 part green). Don’t be concerned about having to keep the right balance of brown to green; sooner or later, it all has to be mixed together anyway, so if your preferred method is to dump in whatever is handy at the moment, that will work, too—but it may take a little longer to become finished compost. Here are the basics of composting to get you started.
CREATE AN ENCLOSURE
This is not absolutely necessary, but containing the material will help it heat up and decompose faster. The enclosure can be constructed from wood or it can be as simple as a circle of wire fencing, such as chicken wire. You can even compost in a garbage can if you drill some holes for air to get through and water to drain. Whatever you choose, it should be large enough to accommodate a pile of at least 3-by-3 feet so the pile will heat up sufficiently—but don’t be tempted to make it much taller than 4 feet or it will be too heavy for airflow, not to mention turning.
CHOOSE A LOCATION
Choose a warm location that gets plenty of air circulation but not too much direct sunlight.
WHAT TO ADD
Brown material: Leaves, straw, shredded paper, and small twigs.
Green material: Grass clippings, garden debris, vegetable kitchen scraps, coffee grounds, and eggshells.
Air: Oxygen will speed the decomposition and help prevent the buildup of odors.
Water: Keep the pile slightly moist. It should hold about as much moisture as a wrung-out sponge. Compost that is excessively wet will have an unpleasant odor and will leach nutrients.
CREATE THE PILE
1 To create layers, start with about 4 to 6 inches of brown material, such as leaves.
2 Top with 2 or 3 inches of green material.
3 Repeat steps 1 and 2.
4 When your pile reaches about 3 feet tall, stop adding new material.
Use a garden fork to stab and twist through the compost to mix it up, and flip the outer portions of the pile into the center. Mixing the pile, or turning it over, will add oxygen and drain excess water, speeding up the composting process. How often you choose to do this is up to you.
If your pile develops an unpleasant odor, it has become anaerobic (oxygen deprived) and needs more oxygen and/or less water. An unpleasant odor is a sure sign that the pile needs to be turned. On the flip side, you may need to add moisture to the pile during hot, dry weather, especially if your compost is exposed to the sun. Covering it with black plastic helps hold in moisture and prevents rain from leaching off nutrients, but getting the right amount of moisture without making the pile anaerobic is a balancing act.
As the pile decomposes, it will start to heat up. Microbes such as bacteria and fungi oxidize and break down the high-carbon brown matter, generating substantial heat as a by-product. The center of a pile with a good balance of ingredients can reach temperatures of 140 to 160°F. As the heat increases, it creates an environment for more efficient microbes to take over and speed up decomposition. Turning the pile will make sure that the microbes are getting sufficient oxygen and that the whole pile heats up. Compost piles that are not actively maintained probably won’t get hot, but they’ll still decompose eventually. The benefits of a hot pile go beyond speed, however. A hot compost pile will also kill off insect eggs, plant diseases, and most weed seeds.
FINISHED COMPOST
When the pile cools off, your compost is ready to use. This can take a couple of months to a year. It should be dark brown in color and should smell fresh and feel crumbly in your hand. If a few chunks of branches remain, you can sift the compost before applying it to your garden. Use finished compost to amend the soil in the spring and to side dress around plants while they are growing. You’ll never have enough compost, so start making a new pile as soon as you can.
COMPOSTING RULES OF THUMB
Layers should be about 2 parts brown to 1 part green.
Cover smelly kitchen scraps with a layer of brown or another type of green to deter pests.
Do not compost meat, fish, dairy, fats, or human or pet waste.
Avoid diseased plants, weeds going to seed, and anything that was treated with an herbicide.

Alternating layers of green and brown materials in your compost pile speeds up the composting process.
Plants need water even more than we do. They use it to access nutrients in the soil, and they need lots of it to plump up their fruits and roots. Plants in drought situations become stressed, making them susceptible to diseases and pests. Badly stressed plants go into survival mode by dropping their flowers and fruits, stopping growth, and focusing all their reserves on keeping themselves alive.
Although rain or snowfall is generally plentiful in the NE from fall through spring, we have had more than our share of summer droughts. Many northeastern gardeners rely on home wells for all their water needs, and they must be judicious in how they use it. During long dry spells, the water level in wells can get precariously low, with no relief in sight. Soaking the garden may not be a water use priority. But even folks who pay for city water are getting it from a well: all water comes from the ground and is a limited resource, so there is no reason to waste it.
We can let our lawns go dormant and choose drought-tolerant ornamental plants, but all vegetables and fruits need lots of water. Luckily, there are plenty of sensible options to help keep your plants watered without racking up a brain-exploding utility bill or depleting your well.
Rain barrels connected to your home’s gutter downspouts can collect and store rainwater. Barrels are fairly easy to connect and can fill up surprisingly fast. They come in assorted capacities, with 60 gallons being the most commonly available. Make sure your barrel has a screen on the top to filter debris and keep breeding mosquitoes out. You’ll need a way to access the water, and a built-in spigot with a hose attachment will make this much easier.
Although they are not an efficient means of watering an entire vegetable garden, watering cans are sometimes indispensable, such as when you need to water a couple of containers or distribute water mixed with fertilizer. I recommend you have a couple cans, because it’s easier to walk while balancing one in each hand. I prefer a watering can with a long handle that extends from the front of the top opening to the bottom of the can; I can slide my hand along the handle, making it easier to pour. A removable rose is also handy; a rose with small holes creates a fine stream of water for watering young seedlings, but you can remove it when you want the water to pour out in a stream.
Garden hoses are a necessary evil; they are heavy and difficult to roll up, and if you are not careful, a hose will flatten every plant in its path as you drag it around. But hoses are the most efficient and flexible way to get water to your garden. Do yourself a favor and invest in a high quality, kink-resistant hose. And if you’ll be leaving it outdoors all year, get a “no freeze” hose. Good quality rubber is heavier than vinyl but it lasts much longer. You might also invest in several quick-connect fittings; they snap together and apart in seconds. You’ll also need a nozzle with at least two settings: a fine mist or shower for watering, and a strong spray for obliterating pests.
Sprinklers are quick and easy water distributors. I leave a sprinkler in the garden and snap on the hose when needed. If an extended dry spell is expected, you can use a timer to distribute water to the sprinkler during the hottest parts of the day. All sorts of sprinklers are available, but I prefer those that offer various watering patterns. When choosing a sprinkler, keep in mind that overhead watering is not ideal: it wets the leaves, which can make them susceptible to fungus, plus a lot of water is lost to evaporation and poor aim.
Drip irrigation and soaker hoses distribute water slowly and can be placed so that water is delivered directly at the plants’ roots. Drip irrigation kits and parts are available in garden centers and hardware stores, and most are simple to pop together to create any layout to suit your needs. If you set up your garden in the same pattern year after year, you can configure your system, keep it intact, and lay it out quickly in the spring. Because the ground freezes throughout much of the NE, you’ll need to set it up in the spring and pack it away in the fall, which is a lot of effort, but once you’ve set up an irrigation system, you can use a timer and forget about it. Soaker hoses—perforated hoses that ooze water—can be moved around easily, and this provides more flexibility than a drip system.