GARDEN PLANNING

Complaining about the weather is winter sport for Northeasterners, but our long, cold winters are really a mixed blessing. Although they keep us indoors, we have plenty of time to plan our gardens, and it’s easy to get carried away. If this is your first vegetable garden, you can be realistic or be overwhelmed. If it’s not your first garden, think back to last season’s tomato plants that flopped over their stakes and the cabbage your kids refused to eat. Do you want a repeat of that? Instead of fantasizing, grab a cup of tea and a seat by the window and ask yourself, How much time do I have to spend in the garden? How much space can I spare? What vegetables do I like to eat? Your answers lay the foundation for your garden plan.

The best location for a vegetable garden is a sunny spot that is free of tree roots and other obstructions and preferably near a source of water. Somewhere close to the kitchen is ideal but not always possible. Traditionally, vegetable gardens have been tucked out of sight in the backyard, but vegetable gardens in front yards are becoming more popular these days, and front yards often receive more sunlight than backyards. Remember, however, that it may take extra work to maintain a front-yard vegetable garden to keep it looking good for curb appeal. You’ll probably need to install some type of fencing if your yard doesn’t already have it, because whether you garden in the back or front, animals will find your cucumbers wherever you plant them.
After you settle on the perfect spot for your garden, be honest with yourself about how much time you can devote to its maintenance. In addition to the initial prepping of the soil and planting, you will need to commit to staking, weeding, reseeding, harvesting, and monitoring continually. Vegetables do not wait until you have time to pick them. Will you have time to harvest before dinner? Are you willing to spend Saturday mornings weeding and feeding, even in 90-percent humidity? If your answer is a resounding yes, take the plunge. If work, carpool, and committees make your schedule unpredictable, don’t give up; just start small, with a few tomatoes, some lettuce, and a carefree pumpkin or squash.
Making choices about what to grow is probably the most important of your garden planning tasks, because it will determine how much space and time will be required. Everyone tries to plant more than their space can hold. That is a gardening given, and it really doesn’t get any better with experience. However, you can make your decisions easier by considering a few things.
This should be common sense, but seed catalogs are seductive. Looking at a photo of backlit Swiss chard might make it seem tempting to grow, even if you’ve never really cared for cooking greens. Heirloom eggplants look very inviting, but who wants to eat eggplant every week during August? Think about how you already eat, not an idealized version of what the back-to-the-earth gardener eats. If your kids love carrots, leave space to plant more carrots every couple of weeks. If you are really interested in salad vegetables, start with tomatoes, lettuce, cucumbers, and radishes. You can always add more.
Sweet corn is grown up and down the East Coast, and the start of sweet corn season is a regionally celebrated event. The idea of growing your own sweet corn is alluring, but corn takes up a lot of space in the garden, and caring for it consumes a good deal of time and resources. You may be better off forgoing the corn, because farmers’ markets and stands will be overflowing with it.
Asparagus, another NE farmers’ market staple, is a perennial crop. To grow asparagus, you’ll need to create a space where it can grow undisturbed for 20 years or more. That might mean a trade-off: are you willing to sacrifice a section of your garden to be able to snap off spears minutes before dinner, or would it be more practical to stop at the farm stand for asparagus and leave space for more tomatoes?
On the other hand, matchstick French green beans are rarely grown commercially and taste their snappy best when eaten fresh from the garden. Home gardeners can grow thousands of vegetable varieties that will never make it to the produce aisle. Planting something new and different every year is a great way to expand your culinary horizon as well as your gardening chops.
Most of the Northeast gets enough warm growing days to sustain just about anything. However, some crops, such as okra, sweet potatoes, melons, and eggplant, need a long growing season. Most melons require several months of hot weather before they even start setting fruits. If you live in zone 5 or lower, you can try a short-season variety, or you can leave the melon growing to the professionals.
In addition to climate considerations, pests and diseases are perennial problems. Colorado potato beetles seem to have potato radar. Powdery mildew will seek out your squash and cucumber plants. Multiple leaf-spot disease spores will lie dormant in the soil, waiting for the perfect conditions to infect your tomatoes. Look for vegetable varieties that are labeled as resistant to recurring problems in your area. Choosing resistant varieties does not guarantee immunity, but it does give you an edge when weather conditions are right for troubles to take hold. There are plenty of choices, and I have included a good assortment of varieties in the “Edibles A to Z” section.
Another part of your garden planning process is deciding whether you will plant seeds or purchase seedlings. The NE gardening year is too short to sow seeds directly in the garden for plants that require 4 to 5 months to mature. We would never see a harvest of tomatoes, peppers, onions, Brussels sprouts, or parsley if we waited until May to sow seed. Gardeners solve this problem by starting their seeds indoors under lights or by purchasing seedlings.
You can start sowing seed indoors in February, and this is a nice way to get your hands back in some soil, even if the soil outside is buried under a foot of snow. Starting plants from seed allows you to choose exactly the varieties you want to grow and greatly expands your options. Even so, not everyone enjoys the months-long process of growing plants indoors, and not everyone has the room for it. Thankfully, nurseries and farmers’ markets spill over with seedlings throughout the spring. You can roll through, scoop up some seedlings, and no one will be the wiser as the plants thrive in your garden. If you start with seedlings, look for a reputable nursery or seller that offers locally grown plants. Many pick-your-own farms also offer vegetable seedlings in the spring; they sell the same plants they have chosen for their gardens, based on what grows well in the area.
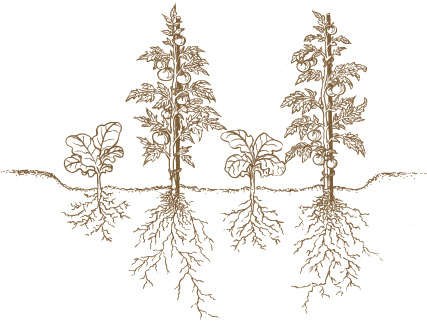
Unfortunately, not all vegetables transplant well from pot to garden soil. Some will have to be started from seed sown directly in the garden. Plants grown for their roots, such as carrots and radishes, and those with long taproots, such as corn, do not like to be disturbed while they are growing, so direct sowing is best. Peas, beans, squash, and other quick-growing vegetables do not benefit from starting their seeds early, either. Plant these seeds in the garden, and they’ll catch up to transplanted seedlings in very little time.
DIRECT SOWING VERSUS TRANSPLANTING
PLANTS USUALLY DIRECT SOWN | PLANTS THAT TRANSPLANT WELL |
Beans | Asian greens |
Beets | Basil |
Carrots | Broccoli |
Corn | Brussels sprouts |
Cucumbers | Cabbage |
Lettuce | Cauliflower |
Melons | Celery |
Parsnips | Chives |
Peas | Eggplant |
Radishes | Kale |
Squash | Kohlrabi |
(including pumpkins) | Leeks |
Turnips | Mustard |
| Okra |
| Onions |
| Parsley |
| Peppers |
| Swiss chard |
| Tomatoes |
You know that edible plants need rich, healthy soil with lots of organic matter worked in and at least 6 hours of sun each day. And you have found the perfect spot to create your garden. Now what? Although aesthetics play a major role in ornamental garden design, an edible garden requires a few different design considerations. Vegetable gardens can be attractively designed, but they are always in a state of flux, so pairing plants based on what looks good together is not particularly important. Your two main concerns should be making sure your plants have the room and sunlight they need to grow and providing adequate access for harvesting them.
Thinking about adequate space for your plants takes some finagling. Looking at the tiny seed and seedling, you might lose sight of how large the plant will be when it reaches maturity. It helps to have some idea of plant spacing before you venture out into the garden. You can do this in your head or, even better, on paper. Planning is nothing fancy—just use graph paper and divide your garden plot into square-foot increments based on the printed lines. Large plants such as tomatoes need an entire square foot per plant. Plants that keep their basic footprint but fan out, such as chard and basil, can be planted four to a square. Plants started from scattering seeds can be grown a little closer and possibly thinned out as they grow.
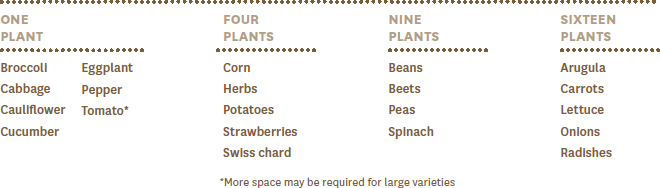
The accompanying table provides a space guideline for vegetables using one, four, nine, and sixteen plants per square foot.
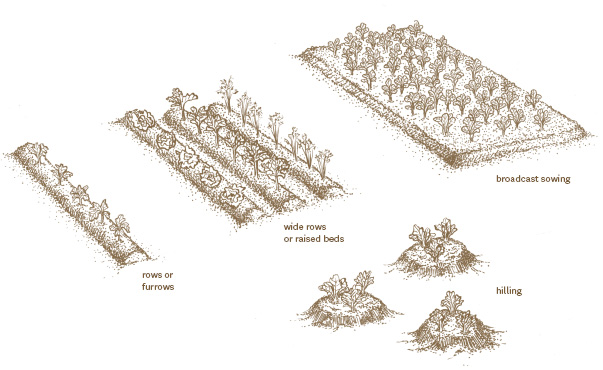
Gardeners never have enough space for all the plants they grow, and squeezing everything in requires some layout logistics. A handful of plating options let you make efficient use of whatever space you have, while still offering your plants enough light and air and giving you enough room to get in there and harvest.
Growing vegetables in straight rows allows easy access for tending, staking, and harvesting, and you can weed with a hoe instead of bending over to work between plants. By planting in rows, you can reconfigure your garden each season and customize it according to what you want to plant. And sometimes it just makes sense to plant in rows, such as when you need a deep trench for planting leeks so you can easily backfill as the leeks grow. The only downside to planting in rows is that a lot of space remains unplanted to provide access paths between each row.
Planting in blocks can solve the unplanted space issue. Rather than planting a long, single row, you can consolidate the plants into a wider area and sow seeds closer together, either by scattering them or creating multiple rows within the block. Either way, you won’t need space for excess paths. Continual harvesting prevents the block from becoming overcrowded, and the plants can continue growing without taking up too much space. Rows can be as wide as you like, but avoid making them so large that you can’t reach into them to weed and harvest. Blocks and wide rows are especially good for cut-and-come-again crops such as salad and cooking greens. The downside is that plants can become crowded, limiting air and sunlight and leaving them damp and susceptible to fungal diseases.
In the garden, hills are not mounds of soil; they are a circle of seeds. Happily, the vegetables that need to be planted in hills also like being planted in mounds, so we don’t have to sweat the definitions. Squash, cucumbers, and melons need warm, dry soil, and mounds provide just that. They also need lots of flowers for good pollination; planting a circle of 3 to 5 seeds in each mound should produce enough flowers for a good yield.
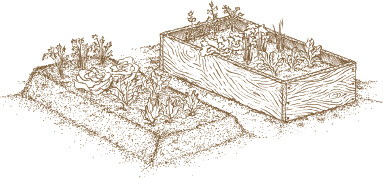
Raised beds are wide rows that are elevated from the ground by several inches to several feet. They can be as simple as soil lifted from the path and piled onto a bed, or they can have some type of retaining walls, such as lumber. Raised beds are generally just wide enough to allow you to reach the center of the bed from any side—usually no wider than 4 feet.
Raised beds have a number of advantages, especially for NE gardeners. Even a 6- to 8-inch depth will help the soil dry out and warm faster in the spring and will improve drainage all season. Because you will not be walking on the beds, the soil will not compact, and no tilling is required. You can amend just the soil within the bed, and there will be less nutrient run-off. And if you make your beds high enough, you can sit on the wall edges while working.
Permanent beds also make planning easier. You know exactly how much space you have and how plants will be laid out—in rows or big blocks of the same vegetable, or mix things up within each bed. You can, for example, place a pole bean teepee in the center of the bed, with a block of beets on one side, a block of lettuce on another, and a row of pepper plants occupying the remaining space.
Raised beds can be permanent structures or temporary fixes, such as a mound of soil, although mounds have a tendency to flatten out. You don’t, however, want to use anything that might contaminate the soil in which your vegetables are growing.
Wood and resin lumber. Although any type of wood can be used, red cedar and redwood are top choices for garden structures. Wooden bed structures can be held together using screws, nuts and bolts, rods of rebar, or easy slide-in corners marketed specifically for raised beds. Resin lumber, a recycled plastic product often used for decking, can also be used. Pros: Easy to assemble. Rot resistant. Lasts for years. Cons: Can be expensive. Real wood will eventually need replacing.
Natural stone. If you live in a rocky area and are constantly digging up large stones in the garden, you can put them to good use as the walls lining a raised bed. Pros: Durable. No maintenance. Beds can be created in any shape. Cons: Heavy to work with and takes considerable effort to build.
Blocks and bricks. Recycled bricks can be repurposed as sturdy walls. Many types of prefabricated blocks are available for building walls, and the interlocking types are especially easy to install. Pros: Beds can be created in any shape. Good heat retention. If buried below soil level, can prevent tunneling animals. Cons: Heavy to work with.
Poured concrete. If you have identified a location for a raised bed and are committed to it indefinitely, poured concrete is a sturdy and durable option. Pros: Little or no maintenance. Retains heat and prevents tunneling animals. Cons: Initial installation requires time and effort. Cannot be moved.
Straw bales. One of the quickest, easiest ways to build a raised bed is with stacked bales of straw or hay. Pros: Quick and easy to build. Can be reused in the garden as mulch. Cons: Will eventually decompose. Large bales can be difficult to reach over and into the garden.
If you decide to create raised beds, keep a few things in mind:
 Consider accessibility and height. Beds for folks who have difficulty bending could be as tall as waist height.
Leave room for paths and access.
Several small beds can be easier to maintain and access than one large bed.
Whether your raised beds are permanent structures or simply mounded soil, make sure you can reach to the center of the bed.
A row of potted herbs on the windowsill may be a common sight, but vegetables outside in containers are becoming equally familiar. Planting in containers can be a solution for a lot of garden dilemmas. If you have poor soil, or no soil, grab some pots and start a garden on your balcony, porch, or driveway. You can locate containers to make the most of the sun. Another big bonus: your fruits and vegetables are up off the ground, where they are less likely to rot or be eaten by assorted creatures.
There is almost nothing you can grow in the ground that cannot be grown in containers. From a tray of salad greens, to a vat of potatoes, to a columnar apple tree, plants will happily perform in confinement if you give them enough space for their roots to spread. Most will need a pot at least 12 inches deep. Larger plants, such as tomatoes and vining squash, will need twice that depth. Five-gallon buckets are a good option, but a half whiskey barrel is my recommendation for large plants like beefsteak tomatoes.
A few words about container size:
The larger the container, the less often you will need to water it.
Large containers filled with soil can be very heavy, especially when wet. Either fill your containers in their final resting spot or place them on a plant dolly with sturdy wheels.
If you are gardening on a deck or rooftop, make sure the structure is capable of bearing the extra load.
Use a good quality potting soil and mix in a granular, organic fertilizer before planting. Granular fertilizers are slowly released and not water soluble, so they do not leach out of the soil every time you water. Depending on the length of your growing season, after one fertilizer application, you may not need to feed your plants again. For heavy-producing vegetables such as tomatoes, however, you might feed them either some water-soluble organic fertilizer when they start setting fruits, or add a little more granular fertilizer to the top inch of soil around midseason.
If you don’t have the space or site conditions to grow vegetables at home, you still have options. Check with area garden clubs or with local government to find out if community vegetable gardens are available in your area. Some let you rent your own space and other spaces are grown and tended communally, with each gardener getting a share of the harvest.
Many small farms offer community supported agriculture (CSA) projects. You purchase a share in the community area of the farm, and each week you receive a box full of whatever crops are in season. Most of these farms allow you to volunteer to work at the farm and offer a discount in the price of the share for your efforts.
Another option is to join forces with a group such as a church, local school, hospital, or nursing home to plant a garden in unused space. Involving your community is a great way to ensure the garden’s success. You could do the same thing on the neighborhood level. Share the chores and the bounty by making one large garden with your neighbors, rather than each of you growing more zucchini than anyone wants to eat.
Take advantage of the open spaces between tall plants by intercropping quick growers such as lettuce and other greens.
Whatever the size of your garden, you can produce a steady supply of fruit and vegetable favorites by using a few techniques.
Succession planting. Stagger harvest times by planting a short row of the same vegetable every 2 or 3 weeks. Fastgrowing vegetables, such as peas, radishes, beets, and bush beans, are easy to reseed; as you finish up harvesting the first planting, a new crop will be ready to eat.
Plant varieties that mature at different times. Extend the season by planting an early season cabbage such as Fast Ball (45 days) along with a midseason variety such as Chieftain (88 days) and maybe a Late Flat Dutch (110 days). This will keep you in coleslaw without overwhelming you.
Intercropping. Planting more than one vegetable in the same space sounds like a recipe for overcrowding, but if you plant something that matures quickly, such as beets, next to something that doesn’t get growing until midsummer, such as eggplant, you have created a good partnership. Or plant lettuce, radishes, and other vegetables that prefer some shade and cooler temperatures in peak summer in the shadow of taller corn or tomato plants.
Keep seeds handy. Fill in any vacant spots as early-season vegetables fade.
Keeping track of what and when you plant, where you plant it, and how well it grew is a great way to learn what works best in your garden. Each year, you can indicate which vegetables did well and those that did not thrive. This information can help as you plan for the next growing season.
Ideally, your garden journal will list several factors.
Dates when seed was started, seedlings were hardened off, plants were put in the ground, first flowering began, first fruits appeared, first harvest started, and last harvest ended
Notes on the vigor of the plants and the quality and quantity of the yield
Problems encountered, such as insect pests, diseases, slow growth, and animal problems
Notes on flavor, special needs such as staking or pruning, and things you want to remember if you plant it again, such as starting the seeds earlier or later
I also like to keep notes on the weather, the amount of rainfall, and some phenological factors. (Phenology is the study of when things in nature reoccur each year.) Make note of these natural indicators and you’ll have a good guideline for when to plant or when to be on the alert for certain pests and problem. For instance, dandelions tend to bloom when the soil is warm enough to plant potatoes. Squash vine borers usually lay their eggs about the same time that chicory blooms along the roadside. Our variable weather means we can’t always gauge our planting dates by the calendar. Plants and animals react to day length and average temperatures, and they can provide a more accurate sense of when it is time to get things in the ground—barring events such as a freak May snowstorm. Common sense is still your best gardening tool.
You can keep track of all this information in many different ways, from a spreadsheet to a bag full of plant tags with notes on them. Two easy, organized ways to keep notes are via online programs and with a digital photo journal. Online journal resources are easy to use and many are free. You still have to make the effort to use them—after all, reports are only as good as the information you put into them.
As a time-crunched record keeper, I find it easiest to keep my camera handy. I take lots of photos throughout the growing season. Because digital photos are timestamped, I can use the photos later to see when tomatoes ripened and when powdery mildew set in. I even photograph the labels for a record of what I planted. I keep each year in its own folder on my computer, subdivided by month. I also keep all my tags and seed packets of new varieties, so I know what I grew each year. It’s not a perfect method, but it’s one I can keep up with; plus, the more time I spend in my garden, the more I can intuitively know what to expect.
Life would be easier if we could lay out our vegetable garden plan once and simply replant the same things each spring. Unfortunately, planting crops in the same spot each year allows problems to multiply. Pest insects will lay their eggs nearby or directly in the soil, ready to hatch and start feeding the minute you put your seedlings out in the spring. The spores from fungal diseases can easily overwinter, even under snow cover, and reinfect your plants in the dampness of spring.
Even if we could control these lurking problems, repetitive planting depletes the soil nutrients in areas where heavy-feeding vegetables such as corn, cucumbers, and broccoli are planted. Alternating what you grow in each bed allows you to build up the soil’s fertility and structure.
Crop rotation is an established organic gardening practice and one of the easiest ways to keep your vegetables growing healthy. Many experts suggest rotating plants by family, since pests and diseases often favor all the relatives in a plant family. For example, cabbage worms enjoy dining on cabbage, but they’re also fond of broccoli and kale. Early blight is not just a concern for tomatoes and potatoes; it can affect their nightshade cousins, eggplants and peppers, too. But the length of time and distance of separation for this type of rotation can be impractical for small backyard vegetable gardens. Who can find a new spot to grow tomatoes every year for 10 years?
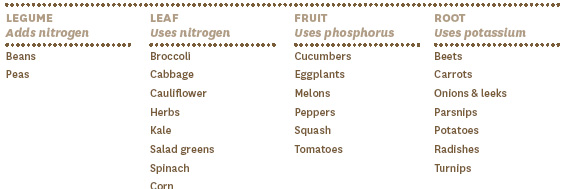
A much easier approach that still offers the benefits of preventing pest build-up and soil depletion is to group your plants according to the part of the plant you eat. This also roughly organizes them by their feeding requirements: leafy vegetables (nitrogen), fruiting plants (phosphorous), root crops (potassium), and legumes such as beans and peas (nitrogen-fixing). Corn is included with the leafy crops because it is a heavy nitrogen user. Grouping plants with similar nutrient needs also simplifies adding fertilizer and amendments.
YEARLY ROTATION PLAN