GETTING ORGANIZED AND STARTED

February’s main purpose is to test the patience of NE gardeners. During this month, there may be a brief reprieve from the frigid temperatures. Spring bulbs wake up, green shoots start poking through, and you’ll be tempted to start working in the garden. But it is always short-lived. Use this time to read about new plants you want to grow, and perhaps stretch your skills and take a couple of local classes. Content yourself with pruning dormant berries and fruit trees, and then turn your attention indoors, where the real action is happening. This is the time to make sure all your seed-starting equipment is assembled and in working order. Tear open your potting mix and inhale the familiar scent of warm, wet soil. Gardeners, get ready to start your seeds!
PLAN
 Order or purchase seed
Organize seed-starting supplies
Attend garden shows
PREPARE AND MAINTAIN
EVERYONE
Dormant prune berry bushes and apple trees
Check fruit trees for damage and for signs of overwintering insects
Check on vegetables in storage
Prepare cold frame
ZONES 5, 6, AND 7
Check compost; if it’s not frozen, turn the pile and spread finished compost on beds
Amend soil in garden, as necessary
Allocate space in the garden for perennial vegetables
Remove mulch from strawberries
ZONES 5 AND 6
Sow indoors (late in month): artichokes, celery, leeks, mint, onions, oregano, and thyme
ZONE 7
Sow indoors (midmonth): artichokes, broccoli, Brussels sprouts, cabbage, cauliflower, celery, eggplant, fennel, kale, kohlrabi, leeks, lettuce, mint, oregano, peppers, and tomatoes
Direct sow (late in month): peas, radishes, spinach, and Swiss chard
TIP Plant only if soil is workable.
HARVESTING NOW…
FROM STORAGE
Garlic
Parsnips
Potatoes
Onions
Squash
Turnips
FROM HOOP HOUSE
Arugula
Beets
Brussels sprouts
Carrots
Herbs
Kale
Leeks
Parsnips
Swiss chard
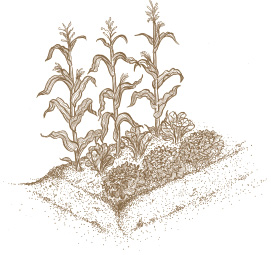
Not all vegetables can be planted as soon as the soil can be worked, and not all vegetables enjoy the heat of summer. Many crops thrive within certain temperature ranges only, including cool-season crops and warmseason crops; others bridge the gap.
Cool-season crops, such as kale, broccoli, and chard, prefer the damp weather of spring and fall. Some crops, such as carrots and lettuce, can be injured by frost. They can be planted early, but you’ll need to provide some cover or protection if a frost is expected. Warmer temperatures can actually change their flavors and textures, making them bitter and woody. As temperatures climb above 70°F or so, cool-season crops can bolt, which means the plant stops growing and puts its energy into sending up a seed stalk. During warm months, you can extend the season for cool-season crops by growing them in a shady spot or in the shade cast by corn, tomatoes, or other tall-growing vegetables. Cool-season plants will need more water during hot spells to keep the soil temperature low.
Warm-season crops are frost tender. Even if cold weather does not kill them, it can shock them and stunt their growth. There is nothing to be gained by putting out warm-season crops too early. The plants you hold back until the ground warms up will quickly catch up to earlier seedlings and will probably be stronger and more productive. Wait until after your area’s last frost date to plant warm-season crops in the garden. If it’s a particularly cool or damp spring, wait even longer. Low temperatures should reliably remain at 50°F or warmer before you plant these crops outside.
Make the most of the growing seasons by using the shade of taller plants to grow coolloving vegetables such as lettuce, radishes, and spinach.
VEGETABLES BY SEASON
COOL-SEASON | WARM-SEASON |
Asparagus | Beans |
Broad beans | Corn |
Broccoli | Cucumber |
Brussels sprouts | Eggplant |
Cabbage | Melon |
Carrot* | Pepper |
Kale | Squash |
Lettuce* | Tomato |
Onion |
|
Parsnip* |
|
Pea |
|
Potato* |
|
Radish |
|
Rhubarb |
|
Spinach |
|
Swiss chard* |
|
Turnip |
*Cool-season crops injured by frost

GROW AN INDOOR GARDEN FOR WINTER
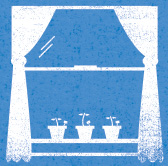
All kinds of seeds can be started indoors, and although you will be moving most of them out into the garden as soon as the soil is warm enough, you can also start a few plants to continue growing indoors to use throughout the winter. Microgreens and herbs such as chives, basil, parsley, mint, rosemary, and thyme are good candidates for growing on a bright, sunny windowsill. Microgreens are young lettuces and other leafy edibles, such as arugula, beet greens, Asian greens, endive, kale, mustard, and spinach. Use them when they are a couple of inches tall for a tangy topping for salads, soups, and stir-fries. You can buy microgreens seed blends, use a mesclun mix, or put together your own blend. Because you will be harvesting microgreens when they are too tiny to recover, they’ll yield only one harvest. To keep a steady supply, start new pots of microgreens every week.
SKILL SET 
STARTING SEEDS INDOORS
Growing your favorite varieties of vegetables usually means starting some of them from seed, because you can’t count on garden centers to offer a tremendously wide selection of seedlings. Starting seeds indoors requires a bit more effort than planting them outside. You must faithfully keep them watered and place them under an artificial light source for most of the day. Some seeds won’t sprout without bottom heat from a heating mat. The payoff is well worth the effort, both in getting exactly the flavors you have been longing for and for the indulgence of vegetable gardening in midwinter.
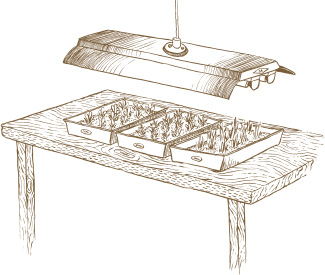
For strong seedlings, fluorescent grow lights should be no more than 3 to 5 inches away, which means you’ll have to adjust the height of the light or seedlings as they grow.
Containers. You’ll find many pots and seed-starting kits at garden centers, but you can use various types of containers for starting seeds. Look around your kitchen and recycling bin. Egg cartons, yogurt containers, take-out trays, and paper cups are all popular seed-starting containers. And don’t forget that newspapers can be turned into biodegradable pots.
Potting mix. Do not use soil from the garden for starting seeds. It can contain fungus spores and other diseases that will attack young seedlings, and it is heavy and compacts when wet, rather than allowing air and water to flow through. A good potting mix, whether purchased or handmade, will contain a soil substitute, preferably ground bark, and most contain peat plus vermiculite or perlite to lighten and aerate the soil. Avoid mixes that contain water-holding materials and fertilizer, which seeds do not need.
Seeds. If you procrastinated making your catalog seed order, most garden centers offer a good assortment to choose from.
Labels or markers. Seedlings can look nothing like their mature counterparts. Label each container with the plant name and the date planted.
Plastic covers or bags. Place these loosely over a pot to hold in heat and moisture.
Light source. Seedlings need bright light. You’ll need to provide an artificial light source during the short days of winter.
Heating mat. This is an optional item. Some seeds, such as tomatoes, need warm soil for germination. Rubber heating mats placed under the seedling containers or trays keep the soil at a constant temperature.
STEPS:
1 It is easier to dampen your potting mix before you put it into the containers, rather than adding water after they are filled. Either place the mix in a large container or on a tarp, and slowly add water, mixing it in until it reaches the consistency of damp sand. It should not be dripping with water and there should be no dry lumps.
2 Fill the containers with the dampened potting mix, and then tap the containers on the table and gently press the mix down to settle it.
3 Now start planting. Check the seed packet for planting depth and any special instructions. Count out larger seeds to plant, or sprinkle in smaller seeds. Either way, add about two or three seeds per container. You can always thin the plants later if you need to.
4 Cover the seeds with more of the damp potting mix. If the mix has dried out, use a very diffused watering can rose or a fine spray to sprinkle the top of the soil while not disturbing the seeds.
5 Place the containers in a warm spot, 65 to 75°F. They do not need light at this point.
6 Loosely cover the containers with plastic wrap or bags. If you’re using seed-starting trays, top them with their plastic covers.
7 Check the soil daily to ensure that it stays moist. If you see mold forming on top of the soil, remove the plastic covering and allow some air to circulate.
8 As soon as you see a green sprout, remove the plastic and provide a source of light. Seedlings will need 12 to 18 hours of light each day. Because we don’t get that much daylight during winter and typical home lighting doesn’t offer the full light spectrum that plants need, you’ll need to supply some type of supplemental lighting. You can purchase special plant or grow lights, but a less expensive option is an ordinary shop light with one warm and one cool fluorescent bulb, or full-spectrum fluorescent bulbs. Fluorescent lights need to be close to the seedlings, ideally within 3 to 5 inches. You can either hang the lights from adjustable chains or cords or prop the seedlings on boxes or boards, removing or lowering them as the plants grow. If you use grow lights that give off heat, they should be a little further away from the plants—about 4 to 6 inches. Then do yourself a huge favor and use an automatic timer to turn the lights on and off.
9 When you see the first true leaves (they resemble the leaves of the mature plant), you can start feeding the plants. (The first leaves to appear are not actually leaves at all. Those elongated, oval leaves are actually part of the seed and help feed the seedling until true leaves appear.)
10 Depending on the size of the containers and the length of time before you’ll be transplanting seedlings outside, you can either leave the seedlings in their original containers or pot them up into something larger. If too many seeds have sprouted in a single container, thin seedlings to the healthiest one and allow it to grow without being crowded. You can repot the extra seedlings, but cutting them off at the soil line is the safest way to avoid disturbing the roots of the seedling you are keeping.
11 Keep the seedlings watered and under the lights. Feed them with your favorite liquid organic fertilizer at about a quarter the rate and dilution recommended for mature plants.