PROBLEMS HAPPEN

July’s weather can be challenging: muggy with frequent harsh storms, punctuated by periods of drought. This seems to be a big attraction for insects, however, as they move in seemingly overnight and set up camp in the garden. It’s also perfect weather for perking up every dormant fungus spore in the soil and every exposed weed seed. Plant diseases can sneak into the garden, especially when the weather is damp or humid—ideal conditions for many types of diseases. All of this makes for stressful conditions for your plants. No matter how well you have planned and how many precautions you take, your garden will experience some problems—we are dealing with nature, after all. July presents less-than-ideal gardening conditions, but we have to learn to work with them. Stay vigilant.
PLAN
 Make notes of planting dates and weather influences in your garden journal
Make plans for your fall garden
PREPARE AND MAINTAIN
Side dress with compost or fertilize
Look for cabbage worms, corn borers, slugs, squash vine borers, and whiteflies
Hill potatoes and dig out a few new potatoes for dinner
Prune tomato suckers
Thin and eat beet, carrot, and salad greens
Pinch back basil
Keep an eye out for cutworms, flea beetles, and leaf miners
EVERYONE
Fill in vacant spots in the garden
Sow indoors: Asian greens, broccoli, Brussels sprouts, cabbage, cauliflower, kale, and Swiss chard
ZONES 3 AND 4
Direct sow: beets, carrots, green onions, kale, lettuce, and radishes
Continue succession planting: beans, beets, cucumbers, and lettuce
ZONES 5, 6, AND 7
Make final succession plantings of bush beans
HARVESTING NOW…
Basil
Beans
Beets
Blueberries
Cherries
Chicory
Cucumbers
Early greens and herbs
Eggplant
Endive
Garlic
Lettuce
Melons
Onions
Peaches
Peas
Peppers
Potatoes
Raspberries
Rhubarb
Green onions
Summer squash
Tomatoes
In the NE, water is often in short supply during the summer. When the lawns turn brown, you can bet water restrictions are at least being considered by your town. To avoid losing your vegetables during dry spells, follow some guidelines.
Water appropriately. Plants need water at regular intervals; they don’t have reservoirs for storing up extra water until they need it. Try to give your vegetable garden at least 1 inch of water every week. Check to make sure that the soil gets wet at least 6 inches below the surface. A slow soaking with drip irrigation, a soaker hose, or a fine mist sprinkler can accomplish this.
Add mulch. We position our vegetable gardens to take advantage of as much sun as possible. That’s great for the plants, but it can bake the soil. A 3- to 4-inch layer of organic mulch, such as straw or shredded leaves, will shade and cool the soil and conserve moisture. Plastic mulches are also beneficial in the vegetable garden, but they tend to warm up faster than organic mulches, and you may need to water more often.
Don’t water at midday. Water when it is hot and sunny, and you waste a significant percentage of the water to evaporation before it even reaches the ground. Morning watering is best: it hydrates the plants and makes them ready to face the day ahead. Early evening watering is better than midday watering, but watering in the evening can leave plants damp in the cooler night air, which can promote fungal diseases.
Improve poor soil. Water runs right through sandy soil and runs right off of clay. To keep the water where plant roots can access it, regularly work compost and other organic materials into the soil. These amendments act as sponges to hold water in.
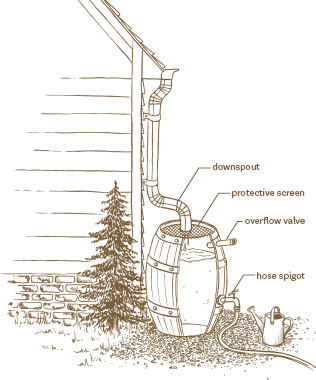
Be prepared for drought by saving water when it is available. The simplest way to do that is to install a rain barrel or two. Collecting water in rain barrels is rapidly regaining popularity with gardeners as a way to ensure that water is available for plants even when there’s no rain in sight.
Consider that it takes about ½ gallon of water per square foot to get to that required 1 inch of water per week. That means that a 10-by-10-foot garden would need 50 gallons of water each week, or about 600 gallons during the three summer months. That’s water you have to pay for or water from the well you rely on for drinking. By attaching rain barrels to your gutter downspouts, you can store thousands of gallons of water during the times when the rain does fall. One inch of rain on a 1000-square-foot roof can provide 600 gallons of water that is soft and virtually chemical-free. And in the NE, you can be assured that you’ll be getting a lot more than 1 inch of rainfall every year.
Rain barrels are sold at garden centers, hardware stores, and online, with styles for every taste; most require minimal assembly and installation. Most rain barrels will store 55 to 80 gallons and can easily be filled during a single rain storm. Consider adding two or more barrels to store even more water. You withdraw water from a spigot near the bottom of the barrel, which can be connected to a garden hose.
To make the most of a rain barrel, make note of a few guidelines.
Choose a barrel made from food-grade plastic that offers ultraviolet stability (UV stable).
Be sure to place your rain barrel on level ground.
Make sure the cover fits tightly to prevent kids and animals from falling in.
All barrel openings should be fitted with screening so that the water does not become a mosquito breeding ground.
Use the water or disconnect the downspout when the barrel is full. Overflow can seep into basements and damage foundations.
Disconnect the rain barrel, empty it, and store it upside down for the winter. Repeated freezing and thawing will cause cracking.
No plant is more prone to problems than the everpopular tomato, especially in the humid NE. We simply have to assume that something will affect our precious plants at some point during the growing season. Very often it’s a cultural problem: too hot, too cold, too wet. Disease can also affect tomato plants. Fortunately, insects aren’t much of a problem for tomatoes, except for one: the tomato hornworm.
You can check for a few causes before you look for a cure. Most tomato problems first start showing symptoms on the leaves—usually as spotting. If you can stay alert and watch for symptoms of problems early, most of them can be controlled long enough to keep the plant growing throughout the season. A few diseases, however, have no controls, so pulling out and destroying the plant as soon as you notice the problem is your best bet at saving the remaining tomato plants.
Here’s a roundup of common NE tomato problems, starting with diseases.
Early blight. Also known as Alternaria leaf spot, this fungal disease causes dark spots on the leaves, starting with the older leaves. If left unchecked, it will also affect the fruits. Remove affected leaves and water the plant only at soil level. Fungicides containing sulfur can slow the spread.
Fusarium wilt. This fungal disease clogs the plant’s vascular system and blocks the flow of water and nutrients. Older leaves start to turn yellow and droop. There’s not much you can do after plants are infected. Next year, choose a variety that is resistant to Fusarium wilt.
Late blight. This fast-spreading disease can quickly kill tomato and potato plants. On tomatoes, leaves and then fruits develop irregularly shaped gray spots and a greasy appearance. A ring of white mold may appear around the spots and stems may blacken. Because there is no cure, destroy infected plants—do not compost them. Notify your local cooperative extension office, because late blight can spread for hundreds of miles and wipe out commercial fields. If you hear that late blight has been verified in your area, but your plants are not yet affected, spray them with a copper fungicide or a botanical fungicide called Serenade, which seems to provide some resistance.
Septoria leaf spot. One of the most common fungal diseases appears on the leaves as white or gray spots with darker borders. As with early blight, sulfur sprays can slow the spread of the fungus.
Verticillium wilt. Yet another fungal disease, Verticillium wilt can cause the plant to wilt during the day, with recovery at night; or the leaves may turn yellow and dry up. There is no cure, and the spores persists in the soil for years, so the best advice is to choose resistant varieties.
Tomatoes aren’t bothered by many insects in the NE, but the major insect pest, tomato hornworms, are so obnoxious that they will devour whole plants in a short time. The larvae of the hawk or sphinx moth, also known as hummingbird moth, are large, green caterpillars as big as your pinky finger. They are large enough to remove by hand, and you can also encourage predatory wasps or use Bacillus thuringiensis (Bt), a biological insecticide used to control caterpillars. The bacterium affects only moth and butterfly larvae, so other insects are not harmed. (Keep in mind that Bt is a pesticide and should be used only when pest populations are out of control, and always follow label instructions.) Aphids and whiteflies can also infest tomatoes if air circulation is poor. You can blast them off the plant with a strong spray of water.
Problems caused by less than optimal growing conditions, such as too much or too little water, sunshine, or heat, can be the most frustrating to deal with. We can’t control prolonged rains or heat waves, but we will need to compensate for them by turning off the irrigation system in wet weather or giving the plants extra water when they’re parched. Pay attention and stay on top of the situation, because most cultural problems don’t become apparent until the fruits start to mature, when it’s too late to correct them.
Catfacing. This term refers to distorted, misshapen fruits. The most likely culprit is a cold spell that occurs while the plant is in bloom. Don’t be tempted to set your seedlings out too early.
Blossom end rot. Dark, sunken blotches at the blossom end of the fruit are caused by a combination of conditions. Excessive hot or cold weather while the flowers are setting and fluctuation in the amount of watering combine to limit the amount of calcium distributed throughout the plant. The problem starts as the fruit is forming but doesn’t show up until it’s too late to stop it. Again, don’t rush to get your seedlings out. Be consistent about watering, and make sure you fertilize the plants appropriately.
Cracking. Inconsistent watering is the problem here. If your tomatoes go from the dry side to being heavily watered, the pulp inside the tomato plumps up faster than the outside skin can stretch. The fruit will crack open, but they’re still good for eating. Use them as soon as possible, however, or the cracks could invite other problems, such as mold.
Green shoulders. Sometimes tomatoes never seem to ripen all the way around. Green at the stem end could be the result of hot temperatures—or it might just be a characteristic of the tomato variety; several heirlooms naturally have green shoulders.
Sunscald. Sun is good for tomatoes, to a degree. When the fruits are exposed to excessive sun, however, they can actually burn. This often happens when another condition has caused the loss of too many leaves. Sunscald looks like light, papery patches on the green fruits.
I know. You’ve just gotten things under control and you’re really starting to enjoy your garden. Why do you need to prepare for fall? It’s months away. But it’s really not too soon to prepare—at least not if you want your garden to continue on past the peak of summer. You can sow more vegetables now to mature and harvest in the fall.
If you don’t plan on protecting your garden crops after frost, you’ll need to check for your first fall frost date and determine how long it takes the vegetables to mature; then count backward to determine when to plant. Most plants require at least a couple months to mature, which means that planting in July will give you a harvest in September. (And if you get your cold frame up, you could still be dining from the garden at Christmas.)
Add some compost and organic fertilizer to replenish the soil, and get planting. This is also the time to resume succession planting of cool-season vegetables. If you don’t want to plant a fall vegetable garden, July is a great time to start seeds for a cover crop.
PLANT MATURITY
PLANTS THAT MATURE IN 30 DAYS | PLANTS THAT MATURE IN 60 DAYS | PLANTS THAT MATURE IN 90 DAYS |
Arugula | Basil* | Brussels sprouts |
*Plants killed by frost
Nothing tests your patience like a vegetable garden, but there is no sense in rushing things. As the old saying goes, “It takes as long as it takes.” Picking vegetables and fruits before they are fully ripe will only disappoint you. On the other hand, you do not want to wait too long so that cabbages split down the center and beans get stringy. Harvesting our crops at their peak is more art than science, but you will get the hang of it. Watch for definite signals, such as a fruit reaching full color and size, having a sweet aroma and a crisp or tender texture, and a feeling of weight. You’ll need all five senses, a little good judgment, and a few tips.
Asparagus should be picked while pencil thin, when the stalks snap off easily.
Beans (snap) should look smooth and firm and should snap off the vine. Don’t wait until you see seeds bulging through the pods.
Beets, radishes, and carrots usually poke their shoulders above the soil when mature, but you can gently poke around under the soil to see how they’re doing.
Berries take their time ripening, dramatically changing color and getting larger, softer, and more sweetly scented. But you’ll still need to taste some to know for sure.
Broccoli is ready when the head looks and feels firm.
Cabbage heads should feel solid when squeezed.
Cauliflower should be harvested while the curds (the heads) are still smooth, not grainy.
Corn is easy. When the silks turn dry and brown, open a husk to see if the kernels exude a milky substance when pricked.
Cucumbers and summer squash should be firm, smooth, glossy, and tender enough to poke a fingernail through. Don’t wait for them to get large. Oversized fruits become tough, bitter, and seedy. Harvesting while they are young and tender will encourage the plants to keep setting more fruit.
Greens can be harvested when young and tender or allowed to reach their mature size and crispness.
Melons will change color and the fruits will smell sweet. Muskmelons (cantaloupes) will slip right off the vine.
Pea ripeness can be judged by how full the pod feels, but tasting truly tests peas for readiness.
Potatoes offer two ripeness choices. New potatoes can be scavenged when the plant flowers. For full-size potatoes, hang on until the plants begin to dry out and turn brown.
Pumpkins and winter squash will fully change color and the vines will start turning brown, with no new growth.
Tomatoes send out three cues: ripe fruits should be fully colored, aromatic, and soft to the touch.
Watermelon is an enigma. Thumping for ripeness can take a lifetime to master. Instead, check for when the white spot on the bottom of the melon changes to a rich yellow color.
The best time to harvest most vegetables is in the morning. Plants are still filled with water and will not wilt before you can get them indoors. Staying on top of harvesting while trying to pick only what you can eat fairly quickly can be a challenge. Greens and root vegetables will store well if they’re kept slightly damp and in the refrigerator. Juicier fruits and vegetables stay freshest when stored on a cool counter; refrigeration diminishes their flavor.
LEARNING TO IDENTIFY PEST PROBLEMS
Tomatoes are not the only vegetables that attract unsavory characters to your garden. Although you know that not all insects are bad guys, some are definitely up to no good. You will never control them all, but you can take steps to keep them in check.
The first thing to do is be on guard. Keep a watchful eye on the garden and catch problems when they are small. When you spot a suspect insect, try to identify what it is. Is it a bad guy? Is it an insect that will be gone in a few days or weeks, or is it looking to invite its extended family for a feast?
Even if it’s the latter, don’t panic. Your garden is a balanced ecosystem with living soil, healthy plants, and beneficial insects that will prey on them, right? I hope so. Unfortunately, however, that’s not quite enough. We are not the only creatures who find the NE a welcoming place to live. In addition to the opportunistic insect, several diseases love to linger here. Sometimes you will need to take action to protect your plants. Instead of indiscriminately reaching for the first available spray can, good gardeners approach these problems methodically. Start by assessing the enemy by the damage it is causing.
THE WORST NORTHEAST VEGETABLE GARDEN OFFENDERS
TYPE OF DAMAGE | THE USUAL SUSPECTS |
Holes in leaves, chewed leaf edges | Chewing insects: larvae (cabbage looper, cabbage worm, cutworm, squash borer, corn borer, and hornworm), beetles (asparagus beetle, Colorado potato beetle, flea beetle, Mexican bean beetle, and striped cucumber beetle), slugs, and snails |
Plant cut off at the base | Cutworms |
Scarred, stippled leaves (and possibly sticky honeydew and black sooty mold) | Sucking pests: aphids, squash bugs, thrips, and whiteflies |
Tunneling on root crops, plants wilt despite watering | Root-eating pests: cabbage maggot, carrot rust fly larvae, and squash vine borers |
Tunnels within leaves | Leaf miners |
White, powdery coating on leaves and stems | Powdery mildew and downy mildew |
Dark spots on leaves or stems that may spread to fruits | Any of several fungal diseases |

