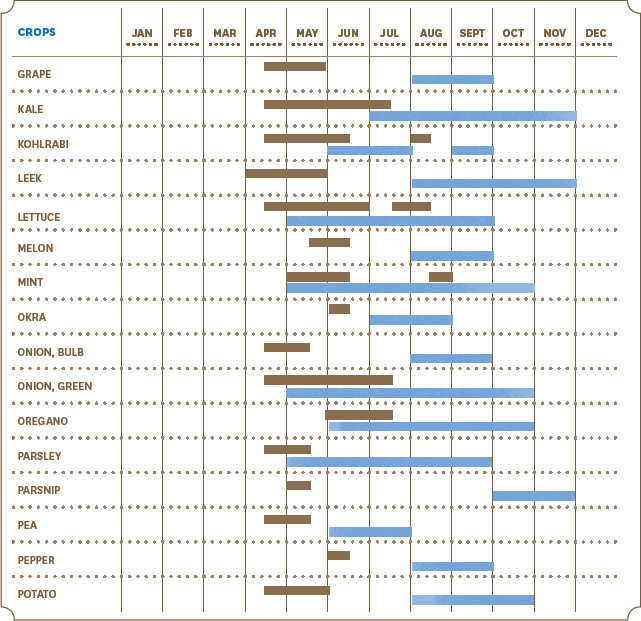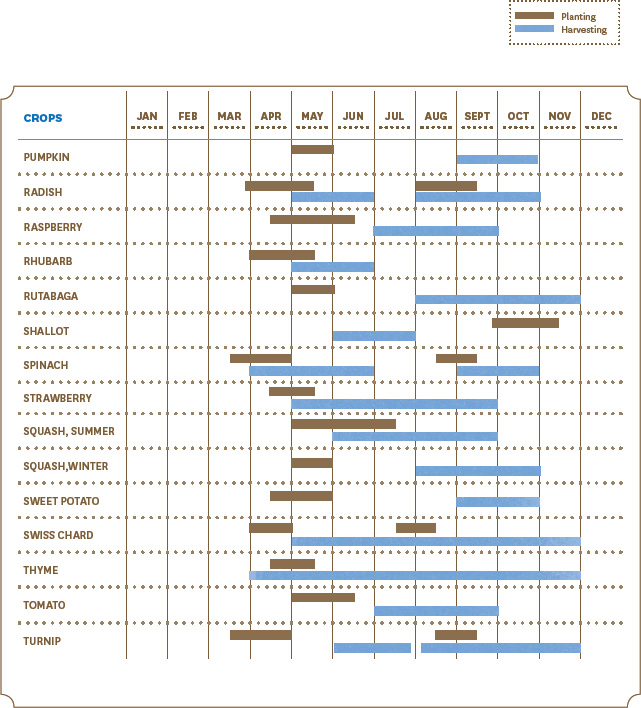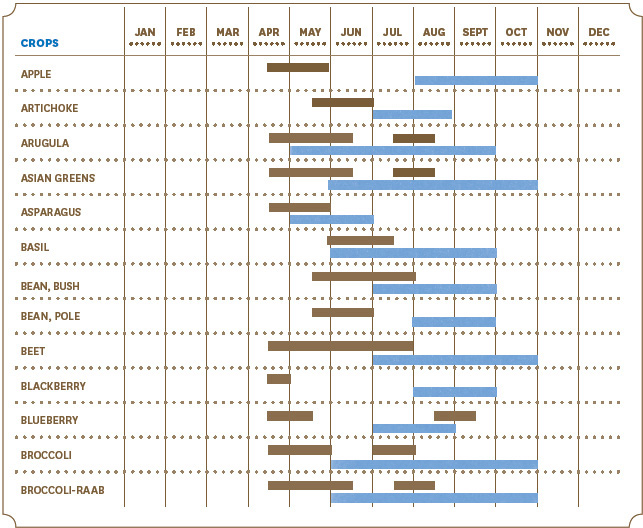
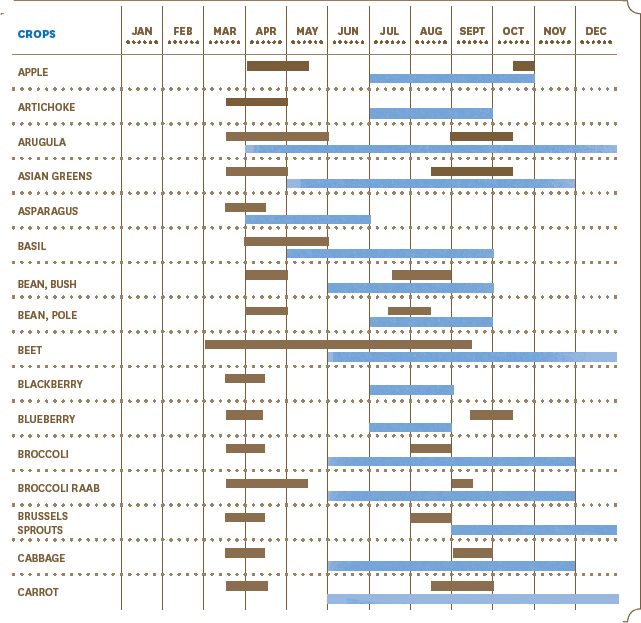
These charts show the planting and harvesting periods for the plants included in this section. You’ll find more information about starting seeds indoors, which vegetables to direct sow and succession plant, and planning for fall, in the following profiles of specific vegetables. When to start planting is a balancing act between average frost dates, yearly weather fluctuations, and our own impatience. While it is tempting to start seeds early, you won’t gain any advantage if the weather does not cooperate. The dates on these charts are a good guideline, but you will need to be prepared to make seasonal adjustments.

The Northeast is not often associated with growing artichokes. We might not have ideal conditions, but don’t let that stop you from planting them. Fresh artichokes are more tender and flavorful than the seasonal offerings that pop up in grocery stores around Thanksgiving. They will require a little extra finesse and some winter protection if you want to grow them as perennials, but they are handsome plants—and what a treat it is to harvest your own baby artichokes to sauté.
GROWING Artichokes have a long growing season. Start seeds indoors in February or March. They germinate best in a warm (70°F) location. They are tender perennial plants that need a period of exposure to cool, but not freezing, weather—this is known as vernalization. To complicate things further, artichokes tend not to bloom until their second year of growth. To get around this, you can start plants from dormant roots, grow varieties that have been specially bred to set buds their first year, or fool them into thinking they’ve already gone through a winter and are starting their second growing season.
To fool first-year seedlings, move them to a cold but protected area about 2 weeks before your last frost date. A cold frame or tunnel is perfect. Keep them at 40 to 50°F for 3 to 6 weeks. After this little shock to their systems, you can transplant them to a sunny spot in the garden, where they will hopefully go to work setting tasty buds.

Artichokes are heavy feeders. Start with a rich soil and some supplemental organic fertilizer. Side dress with compost midseason. Plenty of sunshine and at least 1 inch of water per week will keep them growing. These are large plants, so space them at least 4 feet apart.
To overwinter established artichoke plants, you can either give them some extra protection with mulch or pot them up and bring them indoors. Bringing them inside is the safest option for colder climates, but this is a bit cumbersome with large plants. If you decide to bring them in, cut off the top of the plants, leaving 10 to 12 inches. Keep plants in a cool spot that receives some sunlight, and water lightly when the soil feels dry. Replant in the garden in May.
HARVESTING We eat the artichoke flower buds, and they should start forming sometime in July. The plants send up stalks with one central bud. Harvest this while the bracts are still tight but the bud feels dense. Don’t wait until the flower to starts to open or it will be tough. Slice the stem a couple of inches below the bud. Side shoots will form and more buds will follow.
VARIETIES Green Globe (90 to 100 days) is probably the hardiest variety. Imperial Star (80 to 90 days) was bred to set buds in its first year, but I expose it to an early chill. It starts producing early and is reliable. Opera (90 to 100 days), a purple hybrid, is very prolific. Violetto de Chioggia (80 to 90 days) has a short season for an Italian heirloom variety and is good for northern areas. Cardoons (60 to 65 days) are similar to artichokes in flavor, but you eat the stems, not the buds. With a short growing season and no need for vernalization, they are a tempting alternative.
This cool-season green, with a fresh, peppery punch tempered by a sweet nuttiness, can dress up an everyday salad or stand on its own. You can eat the loose rosette of leaves fresh or lightly cooked, like spinach. Toss it into stir-fries, soups, and stews at the last minute, or add it to your favorite egg dish for some zip. It’s a quick grower, and we can get several harvests in both spring and fall. During the hot summer, arugula turns bitter and bolts to seed.
GROWING Direct sow your first batch of arugula a couple of weeks before your last frost date. Broadcast the seed and cover with about ¼ inch of soil. Soil rich in organic matter will help it grow lush and green. Since it’s a leafy green, arugula needs plenty of water, which shouldn’t be a problem in spring and fall, although zone 7 gardeners may have better luck growing arugula in the fall. Succession sowing every 2 or 3 weeks will guarantee a long harvest season.
HARVESTING Begin harvesting by thinning plants spaced too closely together. Then start harvesting the outer leaves as they reach 3 or 4 inches tall. Arugula is a cut-and-comeagain green; as the outer leaves are picked, the inner leaves fill in, and you can get several harvests this way. Or you can slice off an entire rosette.
VARIETIES Garden arugula (Eruca sativa) is often sold without a variety name, as simply arugula, rocket, or roquette. There’s more variety to arugula than you might imagine, however. Apollo (45 days) has large, round leaves and a distinct sweetness. Astro (35 days) has slender, mild-flavored leaves. Roquette (35 to 40 days)—with a capital R—has wide, tangy leaves that can be hardy enough to overwinter. Wild arugula (Diplotaxis muralis) is an entirely different plant. This perennial can continue growing during the hot summer without bolting. The leaves are smaller than the annual varieties and it has a more intense peppery bite. You’ll usually find it with some variation of the name Sylvetta.
Asian greens run the flavor gamut from spicy to buttery. Some are enjoyed for their leafy greens, some for their crunchy ribs, and many even have edible flowers and buds. Most prefer the short, cool days of fall, but you can easily get a spring harvest, too. They are quick growers and do not require much space, so you’ll be able to experiment with the dozens of varieties to find your favorites.
GROWING Sow in early spring and again in late summer, about 8 to 12 weeks before your first fall frost. You can also start seedlings indoors to transplant into a moist, fertile soil in a sunny location. Sow about ¼ inch deep and keep well watered. The seeds germinate quickly, within a week. Thin seedlings when they are 1 or 2 inches tall, and eat them fresh or cooked. For loose-leaf greens, thin to about 6 inches. Heading varieties should be spaced up to 12 inches apart.
HARVESTING Leafy greens can be harvested as a few leaves or in whole clumps. You can pick them as baby greens or allow them to mature into heads. If you cut the entire clump and leave the crown intact, the plant will resprout several times. Heading varieties can be cut whenever they reach their mature size. Most Asian greens can withstand a slight frost, but harvest them before a hard freeze.
VARIETIES The mustards (mizuna, tatsoi, red mustards) grow fast and pest-free. Cool weather makes them sweeter. Japanese chrysanthemum (Chrysanthemum coronarium), sometimes called chop suey greens (20 to 60 days), has a pleasant bitterness and spicy flower petals. Extra Dwarf pak choy (30 to 45 days) matures at 2 to 3 inches and is piquant and tender. Choy sum (35 to 50 days), or choi sum, is a flowering mustard that produces lots of small, spicysweet edible flowers.
Growing asparagus requires some initial patience, but then you get to sit back and indulge. This perennial crop produces for 20 years or more, so find a spot where it can grow undisturbed. Each spring you’ll have multiple harvests of pencil-thin, sweet spears.
GROWING Although you can grow asparagus from seed, doing so will add a year or two to your wait time. Starting with 1-year-old crowns is just as easy and almost as inexpensive. The bare-root crowns look like badly worn string mops.
Prepare the bed in early spring. Dig a trench 8 to 10 inches deep and 18 to 20 inches wide. Work some compost into the bottom of the trench and amend your soil to a slightly acidic pH 6.5. Spread out the roots of the crowns on the bottom of the trench, spacing plants 12 to 15 inches apart. Cover with 2 or 3 inches of soil and water well. As the plants grow, continue covering them with soil until the trench is full.
Young asparagus will start out as the familiar spears. As the plants mature, they burst into airy fronds. Keep the beds weed free and top dress each spring with a fresh layer of compost or rotted manure. I prefer to cut back asparagus in the fall to prevent overwintering problems (such as hiding insects), but you can leave them in place as mulch if you wish. Just be sure to cut them back in early spring, before new growth starts.
Asparagus has few problems, but watch for asparagus beetles, which can feed on the fronds and weaken the plants. Hand pick or use an organic pesticide, such as neem, if necessary.
HARVESTING Don’t harvest anything the first year; let the plants grow and build up strength for the long haul. The second year, you can harvest a few thicker spears, but let them grow undisturbed after that. By the third year, you can harvest as much as you want. When the appearance of new shoots begins to slow, you’ll know it’s time to let the plants grow.
Harvest when spears reach 6 to 8 inches tall; snap them off at ground level. You can also cut them at the soil line, but take care not to slice through any emerging spears. When the plants hit their stride, you’ll be harvesting for up to 2 months.
VARIETIES Mary Washington (720 days) is an heirloom variety that is particularly suited to the NE. Newer varieties are all male and considered by some as better producers. Jersey Knight and Jersey Supreme (both 720 days) are both hardy from zones 3 to 8. Purple Passion (720 days) is especially tender; the purple color disappears with cooking.

Beans are one of the easiest vegetables to grow, and they come in dozens and dozens of varieties and types. They can grow on bushes or vines, can ripen in early season or summer, and can be snapped, shelled, or dried. The hard part is limiting yourself to a handful of varieties.
Bush beans are short plants that begin producing earlier than the pole varieties. They produce for 4 to 6 weeks and can be succession planted. Pole varieties take longer to develop pods, but once they do, you’ll harvest them continually until the end of the season.
GROWING Beans have big, easily handled seeds. Wait until the soil has warmed in the spring to about 60°F and is dry enough that you cannot form it into a ball. Planting seeds in cool, wet soil will cause them to rot. Many gardeners like to use inoculants for the first spring planting, which helps protect the seed from late-season chills and rains.
Pick a sunny spot and plant the seed 1 inch deep. Space seeds 2 to 4 inches apart or broadcast them in blocks. To keep bush beans producing, succession plant every 3 to 4 weeks. Pole beans will need to climb on a support or trellis. Sow four to six seeds at the base of each pole of a teepee or space them 2 to 4 inches apart on a trellis.
Keep the plants watered, especially while they are in bloom. They should not need supplemental food, although pole beans could do with a side dressing of compost in midsummer. Cut old bush bean plants at the soil line when they finish producing. Leave the roots in the soil, so that the attached nitrogen nodules can decompose and improve the soil.
HARVESTING Snap beans are ready to harvest when the pods feel firm and are just starting to fill out. Don’t wait until you can see the seed shape through the pod; young beans are the most tender and flavorful. Shelling beans are mature snap beans. Wait until the beans plump up and look lumpy, and then pick and pop the beans out of the pods. For dried beans, let the pods dry on the vine before picking and shelling.
VARIETIES Kentucky Wonder (60 to 70 days), Blue Lake, and Kentucky Blue (both 55 to 65 days) are popular standards available in both bush and pole varieties. Lazy Housewife (75 to 80 days) is an heirloom that produces prodigious clusters of beans for easy picking. Cherokee Wax (50 to 55 days) is a juicy, stringless wax bush bean. Black Valentine (50 to 55 days) can be grown as a snap or shelling bean and grows well in cool soil. Cannellini (75 to 80 days shell, 95 to 100 days dried) is a creamy, white Tuscan bean.
Few vegetables are as versatile as beets. You can eat the thinned plants and the tender tops, both with an earthy savoriness and just a hint of sweetness. The bulbs are great raw when grated into salads and soups, roasted until their sugars caramelize, steamed and sautéed, and even pickled. They come in beet red, golden orbs, and peppermint spirals. All this and they can grow pretty much all season long.
GROWING Beets are easy to squeeze into the garden. You can underplant late-maturing vegetables with beets or give the beets a block or row of their own. They prefer full sun and a rich soil. Beet seeds come in clusters. If you plant the whole cluster, you’ll need to thin out the tiny seedlings to 2 or 3 inches apart; thinnings make fine eating. You can also gently crush the clusters and plant the individual seeds. Direct sow after the soil has warmed to about 50°F. Soaking the seeds overnight before planting will soften their tough shells and speed germination. Keep the plants well watered, but allow the soil to dry between watering. The leaves will form a natural mulch. To keep the harvest coming, succession plant every 3 or 4 weeks through midsummer. Beets slow down in the heat of summer, but you can resume planting in the autumn after nighttime temperatures fall to about 75°F.
HARVESTING Beets are sweetest and their most tender when harvested small, at 2 to 3 inches. You can harvest some of the greens while they are young and tender; they taste similar to Swiss chard, a close cousin.
VARIETIES Chioggia, or bull’s eye beet (60 days), is as beautiful as it is sweet. Touchstone Gold (55 days) is sweeter still. Detroit Dark Red (60 days) forms perfect round balls that stay tasty in storage. Bull’s Blood (60 days) is grown for its succulent, blood-red leaves.
Berries are perfect candidates for edible landscaping, and blueberries, one of the few berries native to North America, will give you three seasons of beauty and interest in the garden. These perennial shrubs will keep you in pints of sweet-tart berries for years, with minimal maintenance and pruning required. Small lowbush or wild blueberries (Vaccinium angustifolium) mature in July and are considered the most flavorful by many. They are grown mostly in Maine and parts of Canada and are hardy in zones 4 to 8. Cultivated highbush blueberries (V. corymbosum) are larger and mature earlier than lowbush berries. They are the most commonly grown varieties and are hardy in zones 3 to 9. Half-high blueberries are being developed, which combine the larger size with the flavor of lowbush. Rabbiteye blueberries (V. ashei) are the tallest bushes, with prolific fruits similar to highbush. They are not terribly cold hardy, but they are very drought tolerant and good choices for zones 7 to 9.
GROWING Blueberries absolutely need acidic soil, in the pH 4.5 range. If your soil isn’t naturally acidic, amend it with garden sulfur or aluminum sulfur in the fall before you plant.
Although some blueberry plants are self-fertile, you’ll get more berries if you plant two varieties that bloom at the same time, to cross pollinate. Younger plants at 2 or 3 years old transplant best. Plant in early to midspring, spacing bushes about 4 to 5 feet apart. Water them well and keep them watered all season. Blueberries are shallow rooted and need several inches of water each week. Do not fertilize the plants the first year you plant them. In subsequent years, feed with a fertilizer labeled for acid-loving, edible plants.
Remove all the flowers from your blueberry plants during their first season. They will start to produce berries in their second year but won’t be fully mature and producing high yields until their fifth or sixth year.
HARVESTING Blueberries are ripe when they are uniformly blue with a white, powdery dusting. They’ll pass through shades of green and lavender first. As they start to develop their ripe color, consider netting them or hanging old CDs or strips of aluminum foil to keep the birds away. Early-season fruits ripen in June and July. Midseason berries ripen in late July, and late-season berries are ready in August. As always with fruit, the surest way to know when your berries are sweet enough to pick is to sample a few.
VARIETIES To prolong your blueberry pleasure, plant early-, midseason, and late-season varieties. Highbush varieties to try include early-season Earliblue and Collins, midseason Blueray and Bluecrop, and late-season Jersey and Elliot. Lowbush varieties include Brunswick, Burgundy, and Top Hat. Rabbiteye varieties include Tifblue, the old standard. For early-season varieties, try Climax and Woodard; for midseason, try Briteblue and Southland; and for late-season, try Delite. New pink-berried varieties include Pink Lemonade. Several blueberries are suitable for container growing, including midseason Dwarf Northblue and late-season Dwarf Tophat.
Broccoli is actually an edible flower, and we eat the giant cluster of flower buds—delicious flower buds. It is not the easiest vegetable to grow well, partly because it needs cool but not cold weather and partly because vegetables in the brassica family (such as cabbage, cauliflower, and kale) are favorites of many pests. So why grow it? Homegrown broccoli has a good deal more flavor and tenderness than the limp heads sold in the grocery store, and you can grow delightful varieties that you won’t find in the produce aisle.
GROWING You can direct sow broccoli about a month before your last frost date, but young plants are sensitive to cold. If they get hit by frosty temperatures, they’ll never produce a head, so be prepared to cover and protect them. You’re better off starting with transplants or starting seeds indoors and moving the plants out after danger of frost is past. The fall means fewer pests and long, cool days; this is an excellent season for growing a crop of broccoli, but you will need to start the plants in midsummer so they’ll be ready to grow on in fall.
Broccoli is a large plant that will grow tall first and then reach out with its leaves. Sow seed ¼ inch deep, spaced 6 inches apart, and thin the plants to 12 to 24 inches. Give them a rich soil and plenty of water and sunshine.
Brassicas are magnets for a parade of insect pests. To prevent insects from laying eggs on your plants, grow broccoli under row covers. Otherwise, keep a keen eye out, searching for and destroying eggs that are often on the undersides of leaves.
HARVESTING The central head is ready to cut when it is full and firm but the buds are still tightly closed. Don’t wait too long or the yellow flowers will burst open; you can still eat them, but they won’t taste as good as they should. Use a knife to harvest only the head and a short bit of stem; leave the rest of the plant intact, and smaller side shoots will continue to form. The more you harvest, the more broccoli you will get.
VARIETIES Mix things up with varieties that mature at different rates. Packman (50 to 55 days) gets off to a quick, dependable start. The head is small but side shoots continue for months. Piracicaba (55 to 60 days), pronounced “peer-a-Ceeca-bah,” has an impressively long sprouting season and stands up well in both heat and cold. Premium Crop (55 to 65 days) forms a large head and many side shoots. Purple Sprouting (200 days) is meant to be planted in late summer and overwintered. Come spring, you will be harvesting an abundance of tender shoots. Romanesco (75 to 80 days) forms stunning chartreuse, spiraling, conical florets that arrange themselves in a fractal pattern.
Broccoli raab, or rapini, looks like a tiny broccoli plant, but it is actually a closer relative to the turnip. The flavor is similar to that of broccoli, and you can use it in much the same way, except that you eat the entire plant: the leaves, stems, and small flower buds. This is another quick-growing, cool-season plant that thrives in our drizzly days of spring and fall.
GROWING Direct sow in early spring, as soon as the soil can be worked. Broadcast the seeds and cover with about ¼ inch of soil. Start thinning when the plants are 3 inches tall, and toss the thinnings in any dish. Mature plants will reach about 6 to 8 inches tall.
Succession plant every 3 or 4 weeks throughout the spring. Broccoli raab does not do well in summer heat, but you can resume sowing in late August or September for a fall harvest. Fall sowings do better in a semi-shady spot, perhaps under a trellis; cool the soil with a good soaking. Keep the plants well watered and be on the alert for slugs that will want to share the damp shade as they gobble up your plants.
HARVESTING After thinning, your first official harvest should begin when the flower buds start to form but before they open. As with broccoli, leave 4 or 5 inches of the stem on the plant to resprout a few times.
VARIETIES You’ll often find seed labeled only as broccoli raab or rapini, but there is some variance in flavor and growth among the varieties. Look for and experiment with quick-growing and tender Quarantina or Sorrento (both 40 days); Spring Raab (45 days), which has a sweeter bite to it; and Marzatica (75 to 110 days), which is best for fall and overwintering in milder areas.

CABBAGE FAMILY PROBLEMS
The members of the brassica family, which includes broccoli, cabbage, cauliflower, collards, kale, and mustard, all tend to suffer from the same diseases and pest problems. Many of these pests and diseases can overwinter in the soil. To avoid problems, clean out all garden debris in the fall and plant brassicas in a different section of the garden each year.
FUNGAL DISEASES
Fungal diseases are spread by spores and can rapidly infect nearby plants. They are usually exacerbated by damp weather. The best defense is to choose resistant varieties, keep the growing area clear of infected debris, and rotate where you plant brassicas every year.
Blackleg. Look for dark, sunken areas on the stem; plants also wilt. Damp weather will encourage the disease to spread.
Clubroot. This soil-borne slime mold makes the roots swell, causing yellowing, wilting, and stunting. The good news is that the mold does not like alkaline soil; adding enough lime to raise the soil pH above 7.2 can help control it.
Fusarium yellows. Plants, primarily cabbages, turn yellowish shortly after planting and get worse during hot, damp weather. The condition may improve as the weather gets drier. Look for varieties labeled as resistant to YR.
White mold. Also known as Sclerotinia, this fungus generally affects late-season cabbages. It starts as tan, water-soaked spots that eventually become covered in fluffy, white fungus. No fungicides are approved for white mold control, so you should destroy the affected plants (do not compost them because the fungus spreads easily) and rotate your planting area.
INSECTS
Brassica insect pests are early risers and are some of the first pests to arrive in the spring. Because brassicas are in the garden while it is still cool outside, they are the food of choice. The best defense here, other than careful monitoring and hand picking, is to protect early seedlings with row covers.
Cabbage aphid. Like its aphid cousins, these insects suck plant juices from the undersides of the leaves, transmitting diseases as they feed. Leaves are stunted and puckered. Remove the affected leaves and spray the whole plant with insecticidal soap.
Cabbage looper. This common, pale green worm feeds mostly on the undersides of leaves. Watch for multiple generations each season, and hand pick or use Bacillus thuringiensis (Bt).
Cabbage maggot. This small white larva bores its way into stems and roots, killing the plants in the process. You can place paper collars around the base of the seedling stems to block the insects’ entry. Row covers will prevent the adult fly from laying eggs near the plants.
Cutworm. Another moth larva, cutworms are most infamous for chewing right through young stems at ground level. Add paper or foil collars around the stem to prevent cutworms from circling the plant and cutting through. Or stick toothpicks halfway into the ground next to the stem. Place them on either side of the stem, being careful not to stab into it.
Imported cabbage worm. That pretty, pale yellow butterfly that hovers around your cabbage and kale is laying eggs that will hatch as the dreaded cabbage worm. Larvae are green with dark stripes and turn leaves into Swiss cheese as they feed. They tend to leave telltale black droppings. You can hand pick or add row covers, use Bt, or sprinkle diatomaceous earth or wood ashes around the plant to control these pests.
BACTERIAL DISEASES
Black rot. This bacteria gets inside cabbage and cauliflower plants, causing leaf veins to blacken. Heads may rot or never form at all.
This cabbage cousin creates an exotic look in the garden and is a welcome sight on the plate. The sprouts form along a tall stem and ripen from the bottom of the plant up. They need a long growing season and the caress of frost to make them sweet and succulent. Find a spot in the garden where they can spend the summer, and then be patient.
GROWING Because Brussels sprouts take months to mature, they are usually started from transplants rather than directly sown. You’ll have more control that way, too, and another month without them hogging precious garden space. They prefer rich, sweet soil with a pH of at least 6.5.
Set out your transplants after the threat of a hard frost. Gardeners in zone 7 should hold off planting until midsummer, when seeds can be sown for a late fall harvest. To start indoors, cover the seed with ¼ inch of soil and keep them well watered. When seedlings are about 3 inches tall, you can transplant them into the garden, spaced 2 or 3 feet apart: these are large plants. You can take advantage of the empty spaces between plants early in the season by planting a quick grower such as lettuce or spinach. Keep the plants watered and side dress them twice a season, about a month after planting and a month before harvest. Unfortunately, Brussels sprouts are susceptible to the same pests that harass the rest of the cabbage family, but because they start setting their sprouts late in the season, you can usually get any problems under control before they affect the sprouts.
HARVESTING A couple of light frosts should be enough to sweeten the sprouts. They are ready to pick when they are about 1 to 1½ inches in diameter and feel full and firm. Because they mature from the bottom of the plant up, start harvesting the lower sprouts and let the rest fill in. You may get a second flush of smaller sprouts at the bottom of the stem.
Brussels sprouts can tolerate freezing temperatures and even a little snow. In colder areas, protect the plants with row covers or straw mulch and harvest into winter—but harvest them before they get so large they crack, because they’ll be bitter by then. You can speed up the development of sprouts near the end of the season by cutting the plants’ leafy tops, which are delicious when cooked. To keep your Brussels sprouts fresh longer, cut the whole stem for your last harvest and don’t remove the sprouts until you are ready to cook them.
VARIETIES Try Bubbles (85 to 90 days), which has tender, sweet sprouts up to 2 inches and handles heat and drought well. Long Island Improved (90 days) is a smallish plant with a high yield. Rubine (85 to 95 days), a pretty reddish plant, matures later and has a lower yield than the early green varieties but a delicious flavor.
A growing head of cabbage is an imposing sight. The expanding, tight center ball is surrounded by huge floppy leaves, which makes the plant look much like a cabbage rose. Some cabbages can take up a lot of garden real estate, but others are not so large. Some good dwarf varieties have been introduced especially for home gardens, and crinkly Napa cabbage has a more upright growth habit, requiring less room.
GROWING Cabbage likes chilly weather, and you can set seedlings out 2 or 3 weeks before your last frost date. If you are starting seed indoors, sow seed 4 to 6 weeks before you plan to set them out. Gardeners in warmer areas can direct sow after danger of frost. We can all get a second season in by planting again in midsummer to late summer, about 12 weeks before the fall frost date, to mature in the fall. Fall-grown cabbages are less prone to splitting.
Cabbages need a rich, sweet soil. If you are direct sowing, space seeds about 4 inches apart and cover with ½ inch of soil. Final spacing will depend on the variety you are growing, but each full-sized head will need 2 or 3 feet of space. Consistent watering is the key to getting a plump, firm head. Cabbages attract the usual brassica pests, with cabbage worms topping the list.
HARVESTING Harvest when the heads feel firm. Wait too long and the heads will split open and won’t store well. Leave the wide, outer leaves and slice off the head at its base. Cutting an X in the top of the remaining stalk sometimes results in four smaller heads forming, but I’ve never had much luck with that.
VARIETIES Fast Ball (45 days) lives up to its name and produces crisp, softball-sized heads. Early Jersey Wakefield (60 to 70 days) is a space-saver with a large pointed head and few outside leaves. Rubicon (F1) (50 to 55 days), a tight-headed Napa, is self-blanching and resists bolting. January King (100 to 120 days) is a gorgeous, purple-tinged semi-savoyed heirloom.
Root vegetables always require a leap of faith to grow, because we don’t know what’s going on down there until we dig them up. Carrots can go wrong in so many ways: they can fork or otherwise become misshapen, be tough or bland, or be riddled with insect tunnels. But we love them anyway, and when we find a variety that works, a fresh carrot is sweet as nectar.
GROWING Carrots like moisture, cool weather, and loose soil. Hitting a rock or a hard clump is enough to cause a carrot to fork or deform. If you’re concerned about your garden soil, consider growing carrots in a raised bed or container. Another carrot caveat is soil pH: carrots will not grow well in very acidic soil, preferring a pH in the 6.5 to 6.8 range.
Begin direct sowing as soon as the ground can be worked, even if it is a few weeks before your last frost date. Succession plant every 3 or 4 weeks while the weather remains cool. Carrots need to grow fairly fast to become sweet. In zone 7, fall and late winter are the best sowing times. Sow the seeds about ¼ inch deep, spaced 1 or 2 inches apart. The seeds are tiny and hard to work with, so if you over-sow, you can thin the plants later and eat the thinnings. Carrots can be frustratingly slow to germinate, taking up to 2 weeks. Don’t let the soil surface crust over, and keep the soil moist until you see the first seedlings poke through. Keep your carrots well watered the whole time they are growing, and add a layer of straw mulch to help keep the soil moist and cool.
The major carrot pest, other than the four-footed marauders, is the carrot rust fly. It lays its eggs twice a year at the base of the plants, and the larvae, or maggots, tunnel into the roots as they feed. The pupa stage overwinters in the soil, so moving your carrots to a new location every year or planting them only every other year will help keep the larvae at bay.
HARVESTING Check to see if your carrots have reached full size by feeling around for the width of the tops just below the soil surface. If they are the right size for the variety you are growing, dig up a couple; first loosen the soil with a fork, because pulling on the top often means pulling off the top. Fall carrots can remain in the ground through fall and winter and even harvested in winter if the ground is not frozen. Cool temperatures will sweeten them; however, if rust flies have been a problem, it’s best to dig them all out at the end of the season.
VARIETIES Chantenay Red Cored (70 days) and other Chantenay and Nantes varieties mature at 4 to 5 inches and are good choices for rocky soils. Imperator (72 days) is a good choice for a longer, 7-to-9-inch, tapered carrot that stores well. Or try one of the unexpected colorful carrots, such as the purple Dragon (70 days) or the creamy Snow White (70 days). For baby carrots, try the Paris Market or Thumbelina (both 50 to 55 days) nugget-sized treats.
Cauliflower knows what it likes and will not accept anything less; that makes it a little exacting to grow. Like all the brassicas, it prefers cool weather; too much heat or dry weather, and you can wind up with small button heads. Add too much nitrogen, and the curds (the florets) turn grainy or ricey. I have found the purple varieties easier to grow, because they do not require blanching (covering to keep them white).
GROWING Start seed indoors, 4 to 6 weeks before your last frost date. The seeds like warm soil, 70 to 75°F, but once they’ve germinated, keep the plants a cooler 60°F. Transplant outdoors in 4 to 6 weeks, spacing the plants 12 to 24 inches apart. Here’s where the tricky part comes in, because if the weather fluctuates, the plants may never form heads. Wait until the soil has warmed to 50°F and there is no danger of frost. Using row covers over young plants helps moderate temperature swings, with the bonus of protecting transplants from insects. Cauliflower is susceptible to the same pests that affect broccoli and cabbage.
You can direct sow a fall crop in early summer or set out transplants in midsummer. Fall cauliflower often heads better, but be sure to keep plants well watered. The roots are very shallow and mulching is advised.
For truly white cauliflower, you’ll need to blanch the heads by covering them with the plants’ outer leaves, starting when the head is about 2 or 3 inches across.
HARVESTING Harvest by cutting the stem just under the head when the head feels firm and it’s just beginning to form curds. You may get a second flush of smaller curds.
VARIETIES Snow Crown (50 to 60 days) is less temperamental than most varieties. The colorful varieties spare you the need for blanching. Try the aptly named Cheddar (80 to 100 days) or my favorite, the vibrant purple heirloom Di Sicilia Violetto (80 to 90 days).
Speaking of challenges, let’s talk about celery, yet another cool-season plant that sulks and bolts in heat. It also takes an interminable amount of time to germinate, bolts if exposed to a prolonged cold spell while still a seedling, and requires blanching. However, some gardeners think the bracing flavor of fresh celery is worth the effort. I prefer growing celeriac, which has all the flavor and crunch of celery, except you eat the much easier to grow bulbous root.
GROWING Start seed indoors, 10 to 12 weeks before your area’s last frost date. The seeds need light to germinate, so press them on the surface of the soil and do not cover them. Plant extra seeds, because the germination rate is poor.
Keep the soil at a warm 70 to 75°F and keep it moist, and then wait. Germination can take up to 3 weeks. When the seeds sprout, move them to a cooler 60 to 70°F spot, and thin to one plant per cell. Transplant the seedlings outdoors about 2 weeks before your last frost date. Young plants can handle a little frost. You can space both celery and celeriac fairly closely, about 6 to 8 inches apart. Mulch the celeriac to keep the bulbs covered. Zone 7 gardeners can start a fall crop in midsummer, and it may even overwinter for you.
Celery doesn’t have many disease problems, but insects can become pests. Aphids and whiteflies can weaken the plants and the tarnished plant bug can ruin the leaves, but cutworms can completely destroy young plants by cutting them off at ground level. Once again, row covers early in the season are your best line of defense.
HARVESTING Harvest celery when the bunch is 2 or 3 inches thick and feels firm. The homely celeriac bulbs will push themselves up out of the soil. Harvest when the bulb is about 3 to 5 inches in diameter. Celeriac’s root system is extensive, and you’ll need to use a fork to lift out the bulb and roots. Use the bulb like celery in cooking. You can also cut off and use the roots and stalks, which are great for flavoring stocks.
VARIETIES Celery: Tall Utah (90 to 100 days) resists bolting and doesn’t get stringy. Ventura (80 to 100 days) has large, flavorful leaves and handles frost well. Celeriac: Mars (90 days) has a bulb that stays firm, no matter how large it grows. Brilliant (100 days) has relatively smooth bulbs. Giant Prague (110 days) is a large and crispy heirloom.
The names chicory, endive, escarole, and radicchio are tossed about interchangeably. They are all in the same family, and it can be difficult to keep them straight. Cutting chicories (Cichorium intybus) are biennial plants, and radicchio is a type of chicory. Most chicories grow into rosette heads, unlike endives, which are loose-leaf annuals. Roots are often forced (removed to a warm place to be coaxed into rapid and early growth), but they can be grown informally in the garden. Escarole (C. endivia) is a type of endive with flat leaves. Belgian endive (C. intybus) is the familiar small head sold at grocery stores.
GROWING These cool-season plants are grown for their leaves. Despite their fancy names, they like the same growing conditions that lettuce prefers: a rich, well-draining soil; mulch to keep the soil cool; and plenty of water. Start chicory seed indoors 6 to 8 weeks before your last frost date. Transplant seedlings into the garden when they are 4 weeks old. Endive seed can be started 4 to 6 weeks before the last frost date. For fall crops, direct sow in midsummer. Give them regular water, and that’s about it. Both plant families are extremely cold tolerant and will grow well into fall and milder winters.
HARVESTING Harvest when the heads reach a usable size. You can blanch plants in the garden, for a milder flavor, by covering them with a basket or something similar that lets air, but not light, get through. Both chicory and endive can be eaten fresh in salads or braised and grilled for a sweeter flavor.
VARIETIES Chicory: Bianca Riccia (35 to 40 days) forms a rosette of tender, serrated leaves. Catalogna (48 days) has tangy, strappy leaves and is slow to bolt. Radicchio: Rossa di Treviso Precoce (60 days) is a sweet heading variety that turns deep red in the fall.

There is no denying that freshly picked corn is so sweet and tender that it needs no cooking. But corn takes up a lot of space in the garden, and wonderful sweet corn is available at every farm stand throughout the NE. Many gardeners prefer to leave it to the farmers and grow crops that are not available elsewhere. I would encourage everyone to try growing corn at least once, however, for the sheer joy of the harvesting and eating experience.
GROWING Corn has a long taproot and is a heavy feeder. It needs a loose, nitrogen-rich soil, so provide plenty of organic matter. Direct sow seed after all danger of frost has past. Corn is pollinated by wind, which moves the pollen from the tassels to the silks. Pollination is more easily accomplished when stalks are planted closely in blocks rather than in rows. Sow seed 1 inch deep and 4 inches apart, and then thin to 8 inches when the seedlings are about 4 inches tall.
Feeding biweekly with a high-nitrogen fertilizer, such as fish emulsion, will keep the plants growing until the silks are set. Or you could try the Native American technique of burying a fish head with the seed. Give the plants plenty of water, especially as the ears start to swell. Don’t worry if you see roots popping above soil level; these are a means of anchoring the tall plants.
If corn borers are a problem, control them with Bacillus thuringiensis (Bt). Watch for a grayish fungus called smut. It’s a delicacy in some parts of the world, but remove it if you want the unadulterated corn.
HARVESTING Look for fat ears with brown tassels. Test corn for ripeness by piercing a kernel with your fingernail: if the liquid is milky, it’s ready. Cook as soon after picking as possible, because the sugars start turning to starch immediately. You’ll get only a couple of ears per plant, but you can extend the harvest by planting varieties that mature at different times.
VARIETIES Early: Trinity (60 to 70 days) produces a small plant and ear, but it’s sweet and early. Midseason: Tender Vision (75 days) is one of the best-tasting varieties. Late: Silver Queen (85 to 90 days) and Silver King (80 to 85 days) are large, sugar-enhanced varieties that are worth the wait.
You’ll need only a couple of cucumber vines to keep your family in salads all summer long. In good years, you’ll be able to supply the whole neighborhood. Vining types can be allowed to sprawl on the ground or trained up a trellis. Bush varieties can also spread several feet.
GROWING Cucumber seed is usually direct sown. They are heat lovers, so wait until after your last frost date and the soil has warmed to about 60°F. If you want a head start indoors, sow seed 3 or 4 weeks before transplanting, because older seedlings do not transplant well.
In the garden, keep the plants well watered; drought can cause a bitter taste. It can take awhile for fruits to begin setting. Cucumbers produce both male and female flowers. The males start blooming first, so don’t be dismayed if at first you see a lot of flowers and no fruit. You’ll know the female flowers have started when you see small fruits forming where the flowers attach to the stem. Cucumbers, like most vine crops, are also heavy feeders. Start with a rich soil and feed them a balanced fertilizer once a month.
HARVESTING Harvest when the fruits have reached their mature size. If they remain on the plant too long, they will turn yellow and become bitter.
VARIETIES Marketmore (60 to 65 days) is disease resistant and prolific over a long season. Crunchy, sweet Orient Express (65 days) is low on seeds and high on yield. Lemon cukes (65 days) are yellow, but not bitter, and they make great little edible bowls. You don’t need to peel Armenian (50 to 60 days), which thrives in hot, poor conditions.
If you are looking for an easy berry for edible landscaping, check out the ribes—currants and gooseberries. Bushes sport attractively lobed leaves and glossy berries, and they grow to 3 or 4 feet tall, so they can be grown in containers. They can also be trained into standards. Ribes species were banned for awhile because they are a host for white pine blister rust, but most states now allow their cultivation. Some still prohibit growing black currants (R. nigrum), however, so check before planting. Resistant varieties are generally allowed.
GROWING Both currants and gooseberries like to grow where it’s cool and moist. They will happily tolerate a partially shaded site. The best planting times are in the fall or very early spring, because they leaf out and flower early. Start with 1- or 2-year-old bushes, spaced 3 to 5 feet apart. Ribes can be trellised for improved sun exposure and air circulation, or they can be grown as shrubs. Mulch well and water regularly. These heavy feeders like rich soil, so add yearly side dressings of compost or manure.
Both currants and gooseberries fruit on 2- and 3-year-old branches, so you’ll need to do some pruning to keep them productive. Prune the plants in late winter or early spring while they are dormant. After the first year, prune all but six to eight of the strongest shoots. After the second year, remove all but four to six of the current year’s canes and three or four, 2-year-old canes. Continue this until all you have are three or four, 1- and 2-year-old canes.
HARVESTING Currants and gooseberries ripen over a 2-week span, usually in June. They change color as they ripen, but you can sample a few to determine when they’re ready to eat.
VARIETIES Currants: Rovada produces large clusters of sweet red berries. Translucent Primus is a delicious but hard to find white currant. Stick with resistant Consort and Crusader for black currants. Gooseberries: Poorman is large, easy growing, sweet, and productive. Hinnonmaki Red and Hinnonmaki Yellow are also nice choices for home gardens.
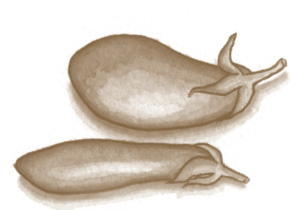
Eggplants are heat worshippers that need a long growing season; the large, voluptuous purple types can be difficult to mature in colder regions. Luckily, because there are all sizes and shapes of eggplants, you can probably find one that will do well in your garden, whatever your climate.
GROWING Start seeds indoors, 6 to 8 weeks before their transplant date. Plant ¼ inch deep and keep the pots warm, at least 80°F, for best germination. Hold off transplanting until there is no chance of frost and the soil temperature reaches 60°F. Preheating the soil with overlaid black plastic can buy you a couple of extra weeks of growing, or consider planting them in containers, which will hold the heat and can be moved if necessary. Space transplants 18 to 24 inches apart. Stake the plants at transplant time, because even a few fruits can be heavy enough to break a stem. Although eggplants are heavy feeders, too much nitrogen can mean fewer fruits, so use a balanced fertilizer every month or so.
Flea beetles will riddle the leaves with holes but ignore the fruits. This can weaken the plants, and row covers are advised for bad infestations. Remember to remove the row covers as soon as flowers are present, because they require pollination.
HARVESTING Ripe eggplants have firm, glossy skins. Overripe fruits will quickly turn bitter and pithy. Cut the fruits from the plant and beware of the prickly stems.
VARIETIES The gorgeous purple-streaked heirloom Violette di Firenze (90 to 95 days) produces tender, orbshaped fruits. Diamond (65 to 90 days) produces long, sweet fruits. Hansel (55 days) fruits grow in clusters and can be harvested when they are only 3 or 4 inches long, so they are great for short seasons. Gretel (55 to 60 days) is the white version, with lots of pale, nonbitter fruits. Japanese White Egg (65 days) resembles eggs and will remind you how this vegetable got its name. The small, white fruits are mildly flavored with few seeds.
A much anticipated spring treat, fava beans, or broad beans, have a delicious flavor and grow easily in the cool of spring. The plants are quite ornamental, with lush, green leaves; square stems; and pretty white flowers, each with a black dot.
GROWING Direct sow in the spring, as soon as the soil can be worked. If the soil is still cool, use inoculants to help the plant roots fix nitrogen. Plants need a prolonged period of cool weather, and gardeners in zone 7 will have better luck with a fall crop. Soaking seeds for an hour or two before planting speeds germination but is not required. Plant seeds 2 inches deep, spaced 4 to 6 inches apart. Thin seedlings to 8 to 12 inches to improve air circulation. Once the plants start setting beans, some gardeners pinch or cut off the top 3 or 4 inches of the stem to encourage an earlier harvest and to thwart disease and insect pests by opening the plants to air. Taller varieties may need staking.
HARVESTING When the pods look plump, but not bumpy, the beans are ready to harvest. They tend to hang on, so cut rather than pull them from the plants. Getting them out of their shells requires some work: Remove them from the pod and then pop the seeds free of their outer membrane. If the membranes are difficult to remove, blanch the beans and try again. The tender, leafy green tips are also edible.
VARIETIES Broad Windsor (80 days) has large, tasty beans and is very reliable. Negreta (70 days) is an extra early Italian variety. Statissa (70 days) produces lots of pods on compact plants.
Bulbing fennel combines a sweet, warm licorice flavor with the juicy crunch of celery. Bulbs are wonderful when eaten fresh as a snack or in salads, and they’re delicious when sliced and caramelized by grilling or broiling. Fennel has become associated with fall, but it is easy and quick to grow throughout the season.
GROWING Start seed indoors 4 to 6 weeks before your last frost date, and transplant outside after that date. I recommend using peat or paper pots, because fennel’s taproot does not like to be disturbed. You can succession seed until midsummer. Gardeners in zones 6 and higher can plant another crop in late summer for a fall harvest. Space plants about 12 inches apart in the garden. Fennel likes a sunny spot and rich, well-draining soil. You can also grow fennel in containers. Provide plenty of water, and side dress with compost monthly to keep it growing. Mulching around the plants will keep the roots cool.
HARVESTING Start harvesting when the bulbs reach the size of tennis balls. The days to maturity will vary with the weather.
VARIETIES You’ll often find seed with no variety name, labeled only as bulbing fennel or finocchio. Nevertheless, a couple of nice varieties to look for are Orion (80 days), a fairly quick grower with a sweet flavor, and Zefa Fino (80 days), a reliable bulb with a smooth anise flavor.
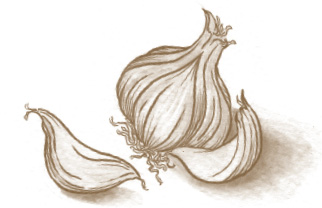
Can you imagine a kitchen without garlic? I can’t. Softneck garlic is the type we see in pretty braids and on the grocery store shelves. The bulbs can last for months. Hardneck garlic has stiff stems and larger but fewer cloves than softneck. It is the garlic of choice for cold-weather gardeners who plant in the fall and harvest the following summer. You might also know of the mild-flavored elephant garlic, which is not really garlic at all, but a bulbing leek.
GROWING Wait to plant garlic until after a light frost, or the bulbs will sprout and waste precious energy—and they need to grow for a long time. Plant them in a sunny spot in soil amended with organic matter. Gardeners in warmer zones can try planting softneck garlic in the spring. Plant individual garlic cloves, not the whole bulbs, in 2-inchdeep holes, with the pointed ends facing up. Space them 3 or 4 inches apart in rows spaced at least 12 inches apart. Elephant garlic needs to be planted deeper, at 4 to 6 inches, and further apart, at 6 to 8 inches. Water them well and keep them watered until the ground freezes. Once the ground has frozen in colder climates, mulch the bed with straw, leaves, or evergreen boughs.
Give the area a dose of food in the spring as new shoots emerge, and make sure they are receiving regular water throughout the spring. Hardneck garlic will send up a skinny flower stalk, called a scape, that curls around itself. Harvest the scapes just as they start to bend; leaving them on the plant takes energy away from the growing bulb. Toss the scapes in a sauté; they’re delicious. Stop watering when the scapes appear so that the underground bulbs can mature.
HARVESTING When the garlic’s lower leaves start to turn brown, dig up a couple of bulbs and test them for readiness. If the cloves have all filled out, they are ready to harvest. To avoid damaging the bulb, dig out the garlic rather than pulling it out. Brush off as much soil as possible and allow the bulbs to air dry and cure for 3 or 4 weeks in a well-ventilated, dry spot. You can cut off the roots and hardneck tops after they have dried and brush off any remaining soil.
Store garlic in a cool, dark location. Softnecks can last 6 to 8 months, but hardnecks should be used within 4 months or they will sprout and go soft.
VARIETIES Hardneck: Georgian Fire (8 to 10 months) is a spicy porcelain garlic that produces about six cloves per bulb. Purple Italian Easy Peel (8 to 9 months) has a warm spice and handles wet weather well. Softneck: Creole Red (3 to 5 months) is a mild variety with lots of flavor.
Grapes are native to North America and the most widely grown fruit in the world. Of course, a lot of the fruit is turned into wine rather than eaten fresh. The vines are not difficult to grow, but getting a good bunch of grapes requires effort. What you do with them after that is up to you.
GROWING Grapes need lots of sunshine and warm weather to ripen and sweeten. Avoid planting them where they will be subject to high winds, which can damage shoots and leaves and diminish fruit set and fertilization. Give them a rich, well-draining soil and plenty of water while the grapes are plumping up. Plant the vines—which come as unrooted cuttings, bare root, or in a container—in early spring, as soon as the ground can be worked. Space them about 6 to 8 feet apart. About 2 weeks after you plant, feed them a high-nitrogen fertilizer such as alfalfa meal, manure, or fish emulsion.
Add whatever type of support you intend to use at planting time, such as an arbor or a trellis. Or you can use the four-arm Kniffen system, the conventional home orchard method: Place tall posts on either side of the main cane, 16 to 24 inches apart, and stretch 12.5-gauge high-tensile wires between the posts, one at about 3 feet and the another at about 5 feet.
HARVESTING Some gardeners let their grapevines run amok, because pruning grapes the proper way can seem like a complicated process. But grape plants are vigorous and forgiving, and even if you make a pruning mistake, you’ll get a chance to fix it next season. You can find information on pruning techniques via a plethora of online sources, or you can contact your local extension agency or agricultural service for instructions.
Birds and many animals love to sample grapes, and you may need to install netting to save some fruit for yourself. Few insects cause problems, but grapes can often contract mildews and black rot. If you don’t want to use organic fungicides such as neem, choose resistant grape varieties.
VARIETIES Himrod (zones 5 to 8) is a large, sweet, green, seedless table grape. Mars (zones 5 to 8) is a seedless blue grape with good cold hardiness and some disease resistance. Einset Seedless (zones 5 to 8) is a hardy red seedless with a faint hint of strawberry flavor. For red wine, Frontenac (zones 3 to 8) shows some disease resistance.

Only a few herbs are winter hardy in the NE, and even those can be iffy in the coldest years. But growing herbs as annuals still provides a big payoff with minimal effort, and you can bring some plants indoors out of the cold weather to enjoy year-round. The woody herbs—such as lavender, oregano, sage, and thyme—tend to be perennial in all but the coldest zones.
Basil Annual, seed or transplant. Basil needs warm days and lots of water. Start pinching and harvesting when plants are 6 inches tall to encourage bushy side shoots. Some favorites are Genovese, Sweet Dani Lemon, and Siam Queen.
Bay. Woody, transplant. Although bay is hardy only to zone 8, the rest of us can grow it in a container outside and bring it inside each winter. The shrubby tree remains small in a pot. Water weekly and mist if the inside air is dry.
Borage. Annual, seed. With the scent and flavor of cucumbers and its vivid blue flowers, borage is a lovely addition to the garden as well as dishes and drinks. Once it goes to flower, it will self-sow.
Chives. Perennial, transplant or seed. Both chives and garlic chives grow in thick clumps of long, grassy leaves. They can be snipped and used to add flavor to a dish. Beware when they start self-sowing, because they spread quickly. You can divide larger clumps to make more plants.
Cilantro. Annual, seed. Cilantro is tricky in the NE. It doesn’t like any suggestion of warm weather, and if you can give it moist, partial shade, it will stand a better chance of survival. Otherwise, set out transplants early in the spring and in fall.
Dill. Annual, seed. You’ll find fern-leaf type dills and some with broader leaves. It grows with abandon and self-sows. If plants bolt, you can add the seeds to homemade breads and other dishes.
Fennel. Perennial, transplant. Grown for its ferny, anise-flavored leaves, fennel is also a pretty ornamental plant. Temperamental perennials, they are sometimes hardy and sometimes ephemeral. The green variety is easier to grow, but bronze fennel makes a nice contrast in the garden. The seeds of both are edible.
Lavender. Perennial, transplant or seed. We may never have billowy hedges of lavender, but we can grow the plants. English lavender (Lavandula angustifolia) varieties, such as Munstead and Hidcote, are the hardiest, surviving to zone 4 with protection. Don’t prune plants until you see new growth in the spring.
Oregano. Perennial, transplant. Greek oregano is the variety sold for cooking, but many other types are flavorful, and you should feel free to experiment. Plants spread and benefit from frequent division to avoid them dying out in the center.
Mint. Perennial, transplant. You can never have just a little mint in the garden, because these plants spread quickly and prolifically, especially in moist shade. To avoid this issue, grow your mint in containers. There are plenty of varieties and flavors, including peppermint, spearmint, apple mint, pineapple mint, lemon mint, and even chocolate mint.
Parsley. Biennial, transplant or seed. Homegrown parsley is so tasty it should be moved to the center of the plate. Both the flat-leaf and the curly types will continue growing throughout the season, especially if you keep harvesting stems. Plants may overwinter, but they quickly bolt to seed the second season.
Rosemary. Woody, transplant. Like bay, rosemary is hardy only to about zone 8. But in a container, it stays compact and is easy to move indoors and out. With a distinctive resinous, evergreen scent and flavor, a little goes a long way. Keep it misted indoors while the heat is on, but watch out for powdery mildew.
Sage. Woody, transplant. Sage tends to be a low, sprawling plant. Prune it fairly hard after flowering to keep it from becoming too woody. Common sage has the strongest flavor and the hardiest disposition, but the golden, purple, and tricolored sages are tasty, too. Pineapple and other fruit sages are related, but they are not woody or terribly hardy. They can be grown as annuals or houseplants.
Salad burnet. Perennial, transplant or seed. This herb is actually a member of the rose family. Its abundant leaves have a nice flavor that’s similar to cucumber, but this salad ingredient is available much earlier. Cut back after flowering for a new spurt of growth.
Thyme. Perennial, transplant. Although the plants and leaves never get very large, thyme has a minty, herbal flavor that is versatile in the kitchen. It also comes in several flavored varieties, with lemon thyme being the most popular. Like oregano, thyme needs occasional division to rejuvenate the plants.
For a beautiful plant that just keeps going throughout summer and well beyond, you can’t beat kale. The plants are large, almost shrub size. Young kale can be eaten raw, and large leaves can be cooked just about any way you can imagine, even baked into chips to fool the kids.
GROWING As with all brassicas, kale prefers cool weather. You can start seed indoors 5 or 6 weeks before your last frost date and transplant out after danger of frost. Cover seeds with ½ inch of soil and keep them moist. They germinate very quickly. In the garden, space transplants 16 to 20 inches apart. You can direct sow as soon as the soil can be worked. Although kale plants can keep producing for 2 months or longer, if you are harvesting regularly, succession plant every month or so. Zone 7 gardeners will have better luck with a summer-sown crop that matures into fall.
HARVESTING Harvest a few tender, young leaves for salad, but leave enough for the plants to keep growing. Harvest the outer leaves first.
VARIETIES Red Russian (60 days) has hearty, purple-tinged leaves and is rarely bothered by insects. The lacinato (or dinosaur) varieties, such as Nero Di Toscana (60 days), are great for simmering.
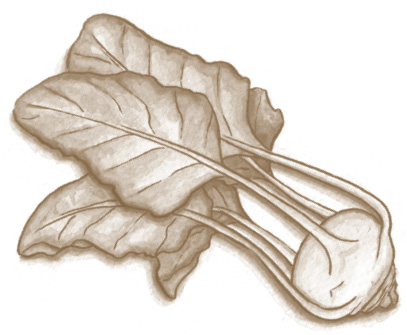
Kohlrabi’s bizarre appearance could have every gardener asking, what is it? And where can I get it? As it hovers over the soil like a space alien having a bad hair day, you might never guess that kohlrabi has sweet, crunchy flesh with a fruity, cabbagelike taste.
GROWING Sow seed indoors, 4 to 6 weeks before your last frost. Cover with ¼ inch of soil and keep moist. Transplant after danger of frost, spacing the plants 4 to 8 inches apart. Succession plant until midspring, and start a fall crop in midsummer. Kohlrabi likes a rich soil and sun to partial shade. Eventually, the leaves will self-shade the plants. Keep the plants well watered to maintain their juicy tenderness.
HARVESTING Harvest spring kohlrabi when it is about 2 or 3 inches in diameter, before the heat makes it woody. Plants growing into fall can be allowed to get larger, but don’t let them start to crack, which opens the plants to disease and insect infestation. Kohlrabi can handle light frost, and, like most of the brassicas, it gets even sweeter for the exposure. The whole plant is edible and is great fresh or cooked in any number of ways; you can even cook and mash the bulb.
VARIETIES Standard varieties Early Purple Vienna and Early White Vienna (both 55 days) are reliable, creamy, and mild. Kossak (65 to 80 days) can reach up to 8 inches in diameter and still be sweet. The outside may get woody, but inside it’s fine. Winner (45 days) is a pale green variety with an intense fruitiness.
As beautiful as any ornamental grass, the blue-green leaves of leeks add an architectural element to the vegetable garden. Good thing, because leeks require a long growing season. From starting them in the bleakness of winter to harvesting 6 months later, leeks can really build your anticipation. They seldom disappoint.
GROWING Start seeds indoors 8 to 12 weeks before your last spring frost date. In zone 7, start leek seeds in midsummer to transplant in fall for a spring harvest. Leek seedlings look like thin blades of grass. When they are about 3 inches tall, thin them to one or two plants per pot and allow them to grow and bulk up indoors. When they grow to the diameter of a pencil, they are ready for the trip outside in well-amended, rich soil. If you are planting a row of leeks, it is easiest to dig a 6-inch-deep trench, place the leeks in the trench spaced 4 inches apart, and backfill with only about 2 inches of soil. To get the tender white leaves, you’ll need to blanch leeks. Start blanching 4 to 6 weeks after transplanting by adding more soil to the trench or by mounding soil or straw at their base. Do this two more times as they grow taller. After leeks reach ½ inch in diameter, thin the row so that plants are spaced 6 to 8 inches apart; you can eat the thinnings. You can leave leeks in the ground through fall and winter, but mulch them after the first hard frost to prevent heaving.
HARVESTING You can start harvesting your leeks when they reach 1 or 2 inches in diameter. Use a fork to loosen the soil and lift the plants out, roots and all, to avoid accidently snapping off the tender, blanched base of the leek. Harvest only what you plan to use immediately. Leave the rest of your leeks in the ground, to harvest as needed.
VARIETIES Blue Solaise (175 to 200 days) is ideal for short seasons. In cold weather, the leaves will deepen in color but remain delicious. Carentan (155 to 215 days) has a delicate herbal flavor but a rugged hardiness. The mild Scottish heirloom Giant Musselburgh (135 to 230 days) will do well almost anywhere.

Many people are surprised the first time they experience the sweetness of fresh-picked lettuce. Of course, many people were surprised the first time their plate of salad showed up with reds and ruffles mixed in with the greens. Most salad greens are quick growers that can be tucked in any available spot in the garden.
GROWING You can get a head start on the season by sowing seed indoors, 4 to 6 weeks before your last frost date, but lettuce is a quick grower, and direct-sown seed will soon catch up with transplants. Start sowing outdoors a couple of weeks before your last frost date. You are growing lettuce for its leaves, so provide a rich planting bed. Barely cover the seeds with soil. They need light to germinate.
Eventually thin the seedlings to 4 inches apart. I like to grow lettuce in a patchwork of blocks by scattering the seeds and then eating the thinnings. The key to growing great lettuce is water, water, and more water, especially when the weather warms. Succession plant every 3 or 4 weeks throughout the summer. Spring lettuce will appreciate full sun, but during the summer, plant lettuce in the shade of taller plants.
HARVESTING Loose-leaf varieties will keep producing over a long period if you pick the outer leaves and let the center continue growing. Head lettuce is ready when it feels full and solid.
VARIETIES Loose-leaf: Grows in fluffy heads or rosettes; leaves can be harvested individually. Lollo Rosso (45 to 65 days) is heat tolerant with wavy, green leaves tipped with red. Deer Tongue (45 to 50 days) is sweet, with tender, strappy leaves. Black Seeded Simpson (30 to 45 days) has been grown forever for its reliable heads of delicate leaves. I grow Merlot (30 to 55 days) just to look at its stained-glass-red leaves, but it doesn’t hurt that it’s juicysweet, too.
Bibb/butterhead: Leaves have a smooth, buttery texture but few calories and no fat. Merveille des Quatre Saisons (50 to 55 days) may be a marvel for only three seasons in the garden, but it produces well throughout the summer, when the red color intensifies. Tom Thumb (40 to 60 days) delivers single-serving heads.
Romaine (cos): Leaves on the loose, upright head have a crunchy rib and a pleasantly bitter flavor. Speckled Trout Back, or Forellenschuss (55 days), offers flavorful, applegreen leaves splashed with maroon. Rouge d’Hiver (55 days) has a crisp green heart surrounded by tall, winecolored leaves.
Crisphead: Leaves cup over to form a tight, crispy ball. Crisphead lettuces mature slower than other varieties. Great Lakes (75 days) is easily recognizable as the standard for iceberg, with pale, dense, delightfully crunchy heads. Crystal (55 to 60 days) is a quick header with glossy green leaves shaded in red. The French heirloom Reine des Glaces (Ice Queen) (65 to 70 days) is a slow bolter that stays crisp in heat.
Other salad greens: Don’t let your salads stop with lettuce. Start the year with mache, or corn salad (40 to 60 days), with its nutty flavor and buttery leaves. Sow in fall or late winter and it will be the first thing up and growing in spring. The red mustard Osaka Purple (20 to 45 days) is tangy and tender when picked young. Plant broadleaf cress (20 to 30 days) in early spring for a snappy mustard flavor. Or try a microgreen mix (5 to 15 days) of beets, kale, broccoli, and mizuna to punch up a salad any time of year. You can grow these split-second greens indoors or out.
What would summer be without the sweet, cooling indulgence of melons? We may not love the hot, hazy days of summer, but melons do. The more sunshine they get, the sweeter they become. Gardeners in the northernmost parts of the NE may not have great luck growing them, but a few short-season varieties are available for those of you who want to share the experience.
GROWING Melons require warm, 65 to 75°F, soil, which is usually the case when the peonies bloom. You can speed things along by covering the soil with black plastic to warm it up. I like to plant melons alongside my driveway to take advantage of the heat it reflects. You can even grow melons in large plastic containers that warm in the sun. Melon seeds germinate quickly. If you want to start seeds indoors, sow 3 or 4 weeks before you plan to transplant. This is a good idea for some of the longer season melons, such as watermelon, but use paper or peat pots to avoid disturbing their sensitive roots when you transplant.
Melons are hungry plants. Work in several inches of compost or rotted manure before planting. To direct sow, make a small mound, or hill, and plant five or six seeds per hill, 1 inch deep. Thin to three plants per hill when the seedlings start to leaf out. I like to grow young melons under row covers. This serves two purposes: it keeps the insects at bay and keeps the soil temperature warm. I remove the covers when the plants start to bloom so the flowers can be pollinated. Squash bugs and cucumber beetles love melons, and the row covers will foil them early in the season, but be on guard for egg masses on the underside of leaves or clustered inside flowers; hand pick the adults. Powdery mildew also attacks melon vines and can stress growing plants. Spray a mix of 3 parts milk to 6 parts water every 2 weeks, from mid-July through harvest, to prevent it.
HARVESTING Muskmelons (cantaloupes) are the easiest melons to harvest. When ripe, they slip, or separate from their stems. Honeydews and watermelons are trickier. The rind color will change as they ripen, and honeydews will start to smell sweeter. Judging watermelons is something of an art, but one indication of readiness is when the curling tendril on the vine nearest the watermelon starts to turn brown and dry.
VARIETIES Muskmelon: The heirloom Hale’s Best (80 days) is aromatic and sweet and tolerant of cool weather. Minnesota Midget (60 days) has both compact vines and small, softball-sized fruits, but it’s big on flavor. Sweet Granite (70 days) was developed specifically for home gardeners in cooler, coastal, and mountain climates. Honeydew: Earlidew (80 days) is true to its name, with softball-sized, pale green melons. The large, scrambling vines of sweet Orange Flesh (85 days) endure drought. Venus Hybrid (88 days) is very sweet and another great choice for short seasons and impatient gardeners. Watermelon: Chris Cross (85 to 90 days) is an Iowa heirloom that delivers lots of 15-pound (or larger) melons. Raspa (80 to 85 days) bears blocky, 20-pound fruits in an impressively short amount of time. The name Orange Tendersweet (90 days) sums up this orange-fleshed, 30-pound watermelon.

One look at okra’s captivating blooms and you’ll know it’s in the hibiscus family. But okra is not just a pretty face; its furry pods have a tender crunch and a nutty, earthy flavor. It’s actually a tropical plant, but we can grow it as an annual in the Northeast. Each plant will reward you with copious amounts of tasty pods.
GROWING Direct sow or start seeds indoors. Direct sow 2 to 4 weeks after your last frost date. If starting indoors, plant seeds 2 or 3 weeks before transplanting, and don’t even think about transplanting them outdoors until there is absolutely no chance of freezing temperatures. Okra does not transplant well, so use paper or peat pots and plant the entire pot. The large okra seeds have a hard shell, and soaking them overnight will speed germination. Plant them ½ to 1 inch deep and space transplants 10 or 12 inches apart in the garden.
Okra is a heat lover and doesn’t really kick into gear until midsummer. It’s a heavy producer when it lives in fertile, well-drained soil and you side dress plants with compost when the first pods develop. Keep plants well watered. Few pests bother with okra.
HARVESTING When the pods start coming, you will be harvesting every day as they reach 2 to 4 inches, when they are their most tender and flavorful. Pods grow so quickly you can almost see them elongating. Stay on top of the harvest, because they get tough and woody if they get too large.
VARIETIES Red Burgundy (55 to 60 days) has stunning foliage and flowers, and its pods are tender even when oversized. Clemson Spineless (55 to 65 days) is a classic, with tender green pods and no spines. The overachiever Cow Horn (55 to 65 days) churns out extra-long, 6- to 8-inch pods. Louisiana heirloom Stewart’s Zeebest (65 to 70 days) has unusual round, rather than ribbed, pods that stay tender longer.
Onions are a kitchen staple; I can’t imagine life without them. The beauty of growing your own is the variety that is available. The grocery store offers red or yellow, but you can grow torpedo, walking, and potato onions in your garden. Can we ever have too many onions in the garden?
GROWING If you start from seed, you’ll find the biggest selection. Or you can purchase sets of mini onion bulbs or transplants that look like blades of grass. Transplants usually result in larger onions than bulb sets. To start from seed, get going indoors early, 10 to 12 weeks before your last frost date. Sow seeds ¼ inch deep and keep them moist. Give them a boost with some kelp fertilizer or fish emulsion, and when they reach 3 or 4 inches tall, clip their leaves by a third to force energy to the roots. If you prefer bunching onions, you can succession sow them in the garden every 4 to 6 weeks. Sow ½ inch deep and 1 inch apart.
Onions need a loose, well-drained, fertile soil; at least 6 hours of sun; and lots of water. They are shallow rooted and don’t like to compete with weeds; otherwise, they are not very demanding. Most pests are repelled by the scent of onions, and I interplant them with other vegetables just to confuse the intruders. The exception is onion root maggots, which burrow into the bulbs; rotating where you plant them each year will help avoid this pest.
HARVESTING Onion greens topple over when the bulbs are ready to harvest; at this point, dig a few to test. When they’re ready, dig them up; don’t pull them out, or you risk tearing off their leaves, without which the onions won’t cure well enough to store. Shake off the excess soil and let the greens remain while you cure them for 2 weeks in a warm, well-ventilated spot, out of direct sunlight. When they are fully dry, remove any remaining soil and cut the tops or braid them together. Store them in a dry, well-ventilated area.
VARIETIES For long-storing onions, try Copra or Cortland (both 105 days), mild all-purpose onions. Long Red Florence (100 to 120 days), an Italian heirloom, has an elongated bottle shape and a mellow onion flavor. Evergreen (60 to 120 days) bunching onions are about the easiest onion you will ever grow.

Underappreciated and underused, sweet and hardy parsnips spend the summer forgotten underground. Come winter, you’ll be glad you planted them. Roasted, boiled, or mashed, these homey vegetables go with just about anything.
GROWING Think of parsnips as white carrots: they like a loose, stone-free, well-draining soil and plenty of moisture. Direct sow any time after frost, but waiting until early summer lets the plants mature in cool weather, which sweetens them. Sow seeds ½ inch deep and ½ inch apart, and cover lightly with soil. Keep them watered, because the seedlings won’t be able to break through the surface if the soil crusts over. Thin to 3 to 6 inches apart. Like carrots, parsnips are also a favorite of the carrot rust fly.
HARVESTING You can start harvesting in October, but parsnips will be sweeter if you wait until after a frost. You can leave them in the ground through winter if you mulch with a thick layer of straw to keep the ground around them from freezing. Dig them up by loosening the soil with a fork and then pulling the parsnips out.
VARIETIES For huge, tasty roots, All American (95 to 145 days) is a top contender and virtually pest-free. Stocky Guernsey (95 to 120 days), or Half Long Guernsey, is great for roasting. Harris Model (100 to 120 days) is slow growing but very sweet, and it overwinters well.
Fresh garden peas are like potato chips: if you pop open a pod to see if they’re ready, you won’t be able to stop eating them. Edible snow pea and sugar snap pods are winning the popularity war in the garden, but shelling peas make the best snack. If you have room to grow several rows of them, your homegrown frozen peas will taste that much sweeter next winter.
GROWING There is a tradition of planting peas on St. Patrick’s Day (March 17), but don’t try it if the ground is still covered in snow. Peas are very tolerant of cold weather, however, and you should get seeds in the ground as soon as it can be worked. If your soil is still quite wet, use inoculants or pre-sprout your seeds to keep them from rotting. Peas need to be up and growing by the time the weather warms. If they are in flower and producing, they’ll continue on for a couple of months if they are regularly watered. It’s next to impossible to get them started in heat, but if you can find a cool, shady spot in midsummer, you might be able to get a fall crop going.
Direct sow seeds 1 inch deep, spaced 2 or 3 inches apart. Growing them in wide rows of 6 to 10 inches will make low-growing peas self-supporting, but a heavy rain is all it takes to knock them to the ground. Add a trellis or a twiggy branch in front of the plants for them to flop on; taller varieties definitely need to be trellised. Peas are legumes and can store nitrogen in their roots, but rich soil will get them off to a good start. You won’t need to feed them, but don’t forget to water.
The worst pea pest is the aphid. If the vines get too dense, you may not even notice that aphids are there. When you do, you should be able to blast them off with the hose, but it can take a few tries to get rid of them.
HARVESTING Shelling and sugar snap peas are ready when the pods swell and feel full. Snow peas can be harvested when the pod reaches full size, usually 2 or 3 inches, and before the peas inside swell. Keep picking; peas will get starchy as they get old, and the more you pick, the more the vines will produce. You also get a bonus crop with peas: pea tendrils, the tender vine tips, have great flavor and are delicious tossed into salads and stir-fries.
VARIETIES Old shelling favorite Lincoln (60 to 70 days) grows on short vines, producing six to nine peas per pod. It’s tolerant of downy mildew and Fusarium wilt. Tall Telephone (75 to 85 days), also known as Alderman, needs a tall, sturdy trellis to support vines that easily reach 6 feet and are covered with tender pods with eight to ten peas. Snow pea Golden Sweet (60 days) is a beautiful plant with purple flowers, and the buttery yellow pods have a zesty kick. Dependable Cascadia (58 to 65 days) sugar snap peas grow on short vines.
Peppers bide their time until the true heat of summer sets in. Unlike hot peppers, sweet peppers are a little lazy about setting flowers and getting a move on, but they make up for this by being large instead of hot. Peppers can be a challenge in colder NE climates, where the smaller varieties may have to suffice for pepper-loving gardeners. Hot or sweet, thin or stocky, there is a pepper for every garden.
GROWING Sow indoors 8 to 12 weeks before your last frost date. (I said peppers were slow.) The seeds need heat to germinate, so put them in a warm room, on top of the refrigerator, or on a heating mat. Heat will make the soil dry out quickly, so remember to water often. Harden off your seedlings gradually, because the shock of sudden cold can stunt them. Transplant them after temperatures remain reliably above 50°F.
Peppers are not fussy about soil, but the usual rich, well-draining soil is best. Plant them about 1 inch deeper than they were set in their pots; they can send out small roots at the base of their stems. Space plants 14 to 18 inches apart, although I find my peppers do best when I overcrowd and almost abuse them. They are defiant. I think it’s wise to stake pepper plants; not all varieties need it, but when they are full of heavy ripening fruits, they can flop over and snap a branch. To be safe, stake them at planting time. Keep the plants well watered, because drought can cause them to drop their flowers, as will prolonged periods of cool weather. Feed the plants with a balanced fertilizer when the first flowers appear.
Peppers, especially the hot ones, aren’t bothered by too many pests. Cutworms may try to attack young seedlings and can be thwarted with a collar placed around the base of the plant. Blossom end rot and sun scald are cultural problems that can be avoided with regular watering and leafy growth.
HARVESTING Harvest peppers when they reach the size and color you prefer. (If you like your peppers green, don’t apologize.) The more you pick, the more you will get. Cut them off, rather than pulling; a good tug can take half the plant with the pepper.
VARIETIES Sweet: Frying pepper Banana Supreme (68 days) gets high marks for both flavor and performance. Giant Marconi (70 to 90 days) is an exceptionally sweet bell pepper. Golden Bell (68 to 70 days) produces well into fall. Hot: Hot Lemon (70 days) is laden with dozens of crisp, medium-hot fruits (5000 to 30,000 Scoville units). The slender, 6-inch fruits of Long Cayenne (60 to 85 days) dry beautifully (20,000 to 40,000 Scoville units). You’ll like the spicy flavor of Fatalii (90 days), if you can survive the heat (125,000 to 325,000 Scoville units).

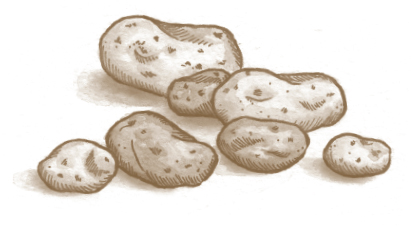
There is something very satisfying about digging up potatoes—maybe it’s the relief of finding out that they actually grew. Potatoes can take up a lot of space, but more and more gardeners are growing them in barrels or other large containers. I think this is even easier than growing them in the ground. You can use a barrel or a clean plastic garbage can with a few holes drilled at the bottom and around the sides. Add some good soil, and toss in your seed potatoes. Cover them with a few inches of soil, and as the plants grow, keep topping them with soil. At the end of the season, you simply tip over the barrel and dig in.
GROWING We don’t grow potatoes from seed; we start with chits, which are potato pieces that include two or three eyes. Unless you’ve been saving your own disease-free potatoes, you should always plant certified disease-free seed potatoes. Late blight can overwinter in potatoes, and the East Coast has had enough problems with that disease. After you cut up the potato, let the cut pieces sit out overnight to dry and callus.
For most of us, midspring is the time to plant potatoes, and most varieties take 3 or 4 months to develop. You can extend your season by planting early-, mid-, and late-season varieties. As with all long-season crops, starting with soil rich in organic matter and watering regularly are the keys to success. Unstressed, happy plants are less prone to problems.
In addition to the container method, you can try two different potato planting techniques. The traditional method is to dig a shallow trench about 6 to 8 inches deep—allow 2 or 3 feet between trenches if you’re planting several. Plant the chits about 10 to 12 inches apart in the trench, eyes facing up, and cover with soil. As the plants grow, continue filling in the trench, burying part of the stems as you go. The nice thing about this method is that the soil does not have time to compact, so at harvest time digging is easier. Keep hilling soil on the plants if potatoes begin popping above the surface. Exposure to sunlight will turn them green and make them mildly toxic with solanine. Stop hilling when the plants flower. You can also go for the lazy gardener method. Lay the potato chits right on top of the soil and dump a shallow layer of mulch on top of them. Then keep layering mulch as the plants grow.
Along with the incurable late blight, potatoes can be pestered by Colorado potato beetles, which will feast on the leaves. Scout for their orange egg masses early in the season to reduce the population. Scab, a disease that causes corky marks and sunken holes on your spuds, can be controlled by lowering the soil pH to 5.0 to 6.0. A lot of potato problems can be avoided by not planting them in a spot where tomatoes or peppers (both in the nightshade family) grew the prior season.
HARVESTING Treat yourself to a few little potatoes after the plants reach about a foot tall. Poke around near the base of the plant and you should find some small nuggets to enjoy. Once the tops of the plants die back, the potatoes are ready for you to dig and find them. Use your hands or a shovel to turn the soil and treasure hunt. I have yet to meet a gardener who dug potatoes with a fork and did not stab at least one.
VARIETIES Irish Cobbler (90 to 95 days) is an early-season favorite. Yellow-fleshed German Butterball (90 to 120 days) is creamy and comforting. Kennebec (70 to 90 days) and Katahdin (90 to 100 days) store well over the winter. The best blue potato is Peruvian Purple (100 to 110 days), which keeps its color when cooked. The long and slender French Fingerling (80 to 100 days) is tender enough not to need peeling.
Radishes have been relegated to the salad bar for too long. These spicy red orbs may seem a bit pedestrian, but there is more to radishes than a little color on the salad plate. Hardy winter radishes can fire up stews, add a little jolt to broiled root vegetables, and do a mean cracker imitation. Try these and you will gain new respect for the way those humble little globes wake up a salad.
GROWING Radishes are direct sown in the garden. They can be started very early in the spring as soon as the ground is relatively dry, again toward the end of summer for a fall harvest, and even in late fall with the protection of a cold frame. Radishes can be squeezed in between other plants and are good at loosening and cultivating soil for slow-to-sprout vegetables such as carrots. Spring radishes need to grow quickly. Give them a relatively rich, well-draining soil. Sow seed ¼ inch deep and about 2 inches apart. Thin to 3 or 4 inches when they are 1-inch tall and toss the thinnings in a salad. Because they grow so quickly, plants don’t need fertilizing, but make sure they have plenty of water, and don’t let them remain dry for several days running. Succession plant every 10 to 14 days for a continual harvest, until the days warm up to the 80s°F.
HARVESTING Fast-maturing spring radishes are ready to eat in 3 or 4 weeks, when they begin to poke their shoulders above the soil. Gently feel around the top of the radish bulb to judge its size. You can pull out the small, round radishes, but it’s a good idea to loosen the soil around the long, thin varieties. Don’t let mature radishes remain in the ground or they will get pithy or woody, depending on the weather.
Many of the Asian or winter radishes grow slowly. If you plant them in the spring, they won’t always have time to mature before bolting. These do best when they’re sown in midsummer to late summer. You can harvest them from the fall into winter or let them overwinter in the garden for a spring harvest.
VARIETIES For early spring, the classic, red Cherry Belle (22 days) and the multihued Easter Egg (25 days) will get the season off to a spicy start. French Breakfast (23 days) is a bit more tolerant of heat. Despite its bracing, cool look, the long, white Icicle (25 days) can also handle some heat. If you want to harvest and eat radishes all summer, try Rat’s Tail radishes (45 to 50 days) for their edible seed pods and great flavor, without the worry of bolting. Daikon (60 days) is probably the most familiar Asian radish. It has a surprisingly mild flavor and goes very well with beer. Slice up a Red Meat (45 to 60 days), also known as Watermelon, radish to use as a cracker for dips and spreads. To overwinter, try the pungent Round Black Spanish or Long Black Spanish (both 55 days). The black skin looks woody, but it is tender enough to eat without peeling.
Ripe raspberries and blackberries look like little jewels. The brambles, as they’re called, are big, unruly shrubs that are usually pruned and trained for maximum fruiting. Luckily, they tend to ripen over a stretch of time, so you can snack to your heart’s content and still have plenty for baking and jams.
GROWING These are hardy plants, and once they take root, you’ll find it difficult to get rid of them. If you want only one or two plants, you’ll find some decent varieties at nurseries. If you are greedy and want an entire hedge of berries, purchase bare-root plants at a fraction of the cost. Give them a good start with well-amended, well-draining soil. They need full sun to develop the berry’s sugars. Space plants or canes 2 or 3 feet apart and cut canes back to 6 inches at planting. Don’t worry; more canes will sprout.
There are two basic types of raspberries: summer-bearing, which bear on second year growth, and everbearing, which fruit on new growth in the fall and then on the same canes the following summer. After fruiting, the canes of both types decline and should be cut back at soil level. Which brings us to pruning. For summer-bearing varieties, you want new growth for next year’s crop and 2-year-old canes for this year’s crop. You can prune out the old canes after fruiting, but you’ll still need to do a little maintenance pruning. Thin out any new wood that is thinner than the diameter of a pencil and any canes that cross other canes or that sprout up far from the base of the plant. Everbearing varieties can be pruned the same way after the second fruiting in the summer. If this cyclical pruning gives you a headache, you can cut all the canes to the ground after the fall fruiting and have just one crop each year on new wood.
The same laissez-faire attitude can be applied to trellising. The conventional way to train berries is to run two horizontal wires on either side of the plant and secure the canes to one side or the other, in a kind of running V shape. This keeps the canes from flopping over and opens them to sun and air. But the brambles will fruit even if you let them go au natural.
HARVESTING Ripe berries will change to their mature color and soften, and you can start to smell their sugars. Try a few to test, but the best sign of readiness might be when the birds start hanging out nearby.
VARIETIES Summer-bearing raspberries: Jewel (July) is a black raspberry with glossy, firm, very sweet fruit. Reveille (July) was developed in Maryland and has great cold hardiness. Best for fresh eating, the soft, juicy fruit ripens in early summer. New Yorker Taylor (August) has good disease resistance and large, late-ripening, firm berries. Everbearing raspberries: Another New Yorker, Heritage (July and September) is high yielding but thorny. The fruit is excellent and firm enough to stand up to freezing. Autumn Bliss (August and September) delivers lots of large, full-flavored berries. Fall Gold (July and August) has luscious, soft, yellow fruits blushed with pink. Blackberries: Chester (August) is a thornless favorite. It is very hardy with some disease resistance. The fruit is on the tart side but delicious. An earlier thornless fruiter, Triple Crown (July through August) is a sweeter blackberry.
There was a time when rhubarb was the first sweet treat of the year. After a winter of root crops, the first stalks of rhubarb meant dessert. It’s an odd thought that a leafy vegetable can do such a good job of impersonating a juicy fruit, but rhubarb pulls it off.
GROWING Rhubarb is one of a handful of perennial vegetables. When something takes up long-term residence in your garden, you want to make it comfortable. Start with a sunny location and rich soil deeply amended with organic matter. Rhubarb has a short season and needs to grow fast. It is rarely started from seed, because seed does not always grow true, and it can take 2 years to reach harvestable size. Instead, we plant crowns, dense chunks of bare-root divisions. Space the crowns 3 or 4 feet apart in rows about 3 feet apart, with the crown 2 inches below the soil surface.
Keep the plants well watered and allow them to grow and establish themselves the first season. A layer of mulch around the plants will help the soil retain moisture. Remove any flower stalks and continue watering, even if the plants go dormant. Feed in early spring with a balanced fertilizer. You’ll need to divide the plants every 2 or 4 years. Crowded plants produce thin stalks. You can slice out the older center of the plant and leave the newer outer edges in place, or dig out the whole root mass and divide the crown into 2-inch pieces, cut between buds.
HARVESTING After transplanting, wait 2 years before harvesting the stalks. The following spring, begin harvesting when the plant has fully leafed out. Grasp the stem at the base and pull down with a twist. Never harvest more than half the leaves of any plant, or it might not have the energy to regrow.
As the weather warms, growth slows down and your rhubarb may go dormant. Stop harvesting when you see little new growth, which is usually around the beginning of June, and let the plants reestablish. Note: Eat only the stalks and never the leaves. The leaves contain toxic levels of oxalic acid. Also do not eat stalks that have been frozen and have fallen over, because the oxalic acid can move from the leaves into the stalks.
VARIETIES A good choice, especially for northern gardeners, is Valentine, with thick, red stalks that are very sweet and retain their color when cooked. It is also very slow to bolt. The classic rhubarb is Victoria, which grows with abandon. Two others I like are Canada Red, with thin and tender stalks, and Giant Cherry, which does well even in areas with milder winters.
If you’re like me, you would never think of not planting garlic in the fall, but you don’t hesitate to buy expensive shallots at the market. Shallots, the sophisticated onions, are every bit as easy to grow as garlic, and when you have your own stash, you’ll find all kinds of uses for them. Try the old chef’s trick and sauté them in butter before adding them to your favorite recipe.
GROWING You can grow shallots from seed, but because they rarely set seed, it can be hard to find. Instead, shallot sets, or bulbs, are available in the fall. They need rich, loose soil with a slightly acidic pH. In cooler climates, plant them by mid-October. You could also plant them in the spring, but they will yield smaller bulbs. Gardeners in milder climates can plant in late fall. Plant individual bulbs just below the soil surface, 4 to 6 inches apart. Keep the bulbs well watered until the ground freezes. Do not mulch, because shallots are susceptible to many types of rot and the soil needs to dry between waterings. Side dress with organic matter in early spring. Cut back any flower stalks to focus the plant’s energy on the bulb. You can also cut the leaves back by a third for the same reason.
HARVESTING Cut a few of the greens to use like green onions. The bulbs are ready when their tops start to yellow and flop over. Fall-planted shallots will be ripe in early summer; spring-planted shallots will mature later in the summer. Cure shallots for storage by shaking off the excess soil and allowing them to sit in a dry, shaded spot for 2 to 4 weeks. Shallots should store well for up to 8 months if you separate the bulbs and keep them cool and dry. Don’t forget to save the largest bulbs to replant.
VARIETIES The French gray (90 to 100 days) is the gourmet’s go-to shallot; some consider it the only true shallot. Red Sun (80 days) is another French shallot, with glowing red skin and spicy, blushed interior rings. Ambition (100 days) is a good choice for northern gardeners. It’s a large French shallot with copper skin and white flesh, and it stores extremely well. Prisma (100 days) is red inside and out, with a stronger onion flavor than most.
Cool, wet springs are perfect for growing a lush patch of dark, leafy spinach. Packed with nutrients and flavor, spinach has become a darling of the salad bar and side dish. You can find it in a variety of shapes, sizes, and textures. Savoy type spinach has thick, crinkly leaves. Baby spinach isn’t necessarily the immature leaves; several tender varieties simply never get very big.
GROWING Direct sow spinach in early spring as soon as the soil can be worked. A quick grower and a heavy feeder, spinach needs fertile soil and a shot of high-nitrogen fertilizer, such as fish emulsion or soy meal, when you start harvesting. It is also particular about soil pH and will not thrive in acidic soil, preferring a pH of 6.5 to 7.5.
Sow seed thinly, ½ inch deep and about 1 inch apart, in rows or blocks. Cover lightly with soil and keep moist. Thin plants to about 3 inches and enjoy the thinnings in a salad. Succession plant every 7 to 14 days for a continual harvest.
As the weather warms, spinach slows down and bolts to seed. You can try growing it in a shady spot with plenty of water, but summer spinach often tastes bitter. But keep your seeds handy, because spinach can be sown again in late summer to grow sweet and tender in the cool, short days of fall. Spinach can handle a little frost, and row covers will keep it going longer. Gardeners in zone 7 will be harvesting well into winter. In colder zones, mulch any remaining plants when the ground freezes, and your spinach will resume growing the following spring.
HARVESTING Harvest individual outside leaves in the cut-and-come-again style to get several weeks of spinach. Or slice off an entire mature plant; if you leave about 1 inch of the crown intact, the plant will send up new growth for a second, smaller harvest.
VARIETIES Nordic IV (40 to 45 days) is a slow-to-bolt choice for spring, with smooth, tender leaves. Bordeaux (25 to 30 days) has beautiful, tender leaves with red veins, but it tends to bolt quickly. Semi-savoy Tyee (39 to 45 days) is one of the longest lasting spring spinaches. For fall planting, Giant Winter (45 days) has semi-savoyed leaves that overwinter well. Bloomsdale Long Standing (40 to 48 days), another good fall/winter spinach, has succulent savoyed leaves and germinates well in cold soil.
So many fruits and vegetables are seasonal markers. Strawberries announce that June has arrived, although many varieties will bear throughout the summer. Still, those first plump berries of June seem to taste the sweetest. Resist the pithy strawberries sold in winter, no matter how rosy they look, and hold out for the real thing.
GROWING June-bearing strawberries produce one large crop in—you guessed it—June. These berries are great if you want to preserve your harvest. Everbearing strawberries produce two or three harvests during the course of the summer but are not as highly prized as day-neutral berries, which fruit sporadically throughout the growing season. Spring-bearing alpine strawberries produce tiny, sweet berries that make a carefree groundcover.
Prepare your strawberry bed ahead of time by working in lots of organic matter, and adjust it to a slightly acidic pH level of around 6.0. You may find potted strawberry plants at the nursery, but they are often grown from bare-root stock. To plant a bare-root strawberry, dig a hole large enough to accommodate the spreading roots. Hill the soil in the center of the hole and place the plant on the hill, with its crown slightly above soil level so it won’t rot. Spread the roots around and down the hill and refill the hole with soil to halfway up the crown.
Space the plants 12 to 15 inches apart, and keep them well watered. Mulching with straw will help conserve moisture and keep the berries off the ground. Now comes the hard part. For the first year, pinch off all the flowers on Junebearing strawberries and all the flowers that form before July 1 on the other varieties. This will delay your gratification but allow the plants to grow stronger. June strawberries send out lots of side runners. Train them outward and press them gently into the soil, where they will root and become new plants. Feed your strawberry bed each spring with a balanced organic fertilizer.
HARVESTING The sweet scent will tell you the berries are ripening. Wait until the entire berry reaches full color before you pick it, and try to get a small portion of the stem with the berry. Handle them gently, because fresh ripe strawberries are fragile.
VARIETIES June-bearing: Earliglow is one of the earliest and sweetest. Northeaster has a distinct flavor and good disease resistance. Jewel is probably the most popular NE strawberry, with large, sweet, full-flavored fruits. (All varieties are harvested in or around the month of June.) Day-neutral: Both reliable varieties, Tribute has the largest fruits but Tristar is the sweetest. (All day-neutral varieties are harvested continually from June or July through frost.) Everbearing: Fort Laramie and Ozark are older varieties with good production. Quinault fruits in a speedy 4 or 5 weeks. (All everbearing varieties are harvested from June through frost.) Alpine: Alexandra produces lots of dark red berries. Mignonette starts fruiting its first year, from seed. Yellow Wonder has aromatic, pale yellow fruits. (All Alpine varieties are harvested from late spring through frost.)
You may not associate the NE with growing sweet potatoes, but why not? They take about 4 months to mature, which means you can even wait until May to plant and harvest in September. You might not get the giant tubers you see in the produce aisle, and mine often grow in funky shapes, but they’re still delicious. Sweet potatoes are in the same family as morning glory flowers, and we know how well they grow here.
GROWING Work lots of organic matter into your planting bed and amend it to a soil pH of 5.5 to 6.5. Choose a spot that receives at least 6 hours of direct sunlight to keep the plants warm. Sweet potatoes are grown from small rooted pieces of the tuber called slips. Before you plant, wait until the ground has warmed enough to sit on comfortably. Covering the soil with black plastic for a week or two will help heat it up. Raised beds are a great place to plant sweet potatoes, because the soil warms quickly in the spring, drains well, and is light and fluffy for the expanding tubers. Space the slips 12 to 18 inches apart with 3 or 4 feet between rows. This is a vining crop, so give it room to roam. The vines will become a living mulch, but they can be a bit slow to start growing. Keep the area weeded until they can do their job. Work some compost into the soil and you won’t need to add supplemental food. Keep the plants well watered until 3 or 4 weeks before harvest, and then stop watering to prevent the tubers from splitting.
HARVESTING Sweet potato leaves make a nice cooking green and can be cut at any time and used like spinach. The tubers are ready to dig when the leaves start to turn yellow. Tubers grow close to the soil surface and have very tender skins, so be gentle when you dig in. Frost will damage the leaves, but the tubers should be fine.
VARIETIES Moist, orange-fleshed Centennial (90 to 100 days) grows well and tastes great, but some of the tubers are oddly shaped. Beauregard (90 to 100 days), a reliable quick grower with disease resistance, should do well in cooler climates. Georgia Jet (100 days) seems happy to grow anywhere; its meaty, orange flesh bakes well.
Standing tall and upright in the garden, with colorful ruffled leaves, Swiss chard can look so perfect you may wonder if it’s real. This easy vegetable is grown for its succulent leaves, which taste somewhat like a spinach with a crunchy midrib. Although it does not form a bulb, chard is actually in the beet family, and it’s sometimes called silverbeet. Swiss chard loves to grow, and you can get an entire season of harvest from your plants, although I like to start a second crop in midsummer. I guess I’m greedy.
GROWING You can sow chard indoors or out. If you want to get a head start indoors, sow seeds 3 or 4 weeks before your last frost date. Direct sow in the garden about 2 weeks before the last frost date. Choose a site with full sun to partial shade, and amend the soil with organic matter. Chard likes soil on the acidic side, preferably with a pH of 6.0 to 6.4, but it can be forgiving. Like beet seed, chard seed comes in clusters, so some thinning after planting will be necessary. Sow seeds ½ inch deep and 2 to 4 inches apart. Thin the young seedlings when they reach 8 to 10 inches and toss them in a stir-fry or salad. Provide plenty of water and mulch to keep the soil moist and the leaves clean.
A midseason side dressing with compost or rotted manure will keep them chugging along. You can start a fall crop by sowing in mid-August. Chard can handle a little light frost.
By far the biggest pest for chard is deer, which see a patch of chard as a personal salad bar. Do not be tempted to grow it in the flower bed, unless you want to feed the deer, rabbits, groundhogs, and other hungry animals instead of your family. Leaf miners can burrow into the leaves; watch for their eggs and destroy them. Slugs also love the leaves and will turn plants from Swiss chard to Swiss cheese.
HARVESTING Harvest the leaves at any size, while they are still glossy. Snap or cut off the leaves at the base and leave the crown intact. Take only two or three leaves from each plant at a time, and more leaves will fill in.
VARIETIES Five Color (60 days), also known as Bright Lights, creates a beautiful mix of colors and textures. Rhubarb (55 to 60 days) defies all kinds of weather. Fordhook Giant (55 to 58 days) is a great choice for fall growing. Perpetual (50 to 60 days) tastes a lot like spinach, with smooth, tender leaves.
These two cousins in the Physalis genus are very similar in appearance and growing conditions, but they’re completely different in flavor and use in the kitchen. Both grow into fruits that are individually wrapped in papery husks. Tomatillos burst open when they are ready to harvest. They have a fruity, slightly tart, tomato flavor and are a mainstay of salsas. They also taste great when grilled or diced into stews. Ground cherries, or cape gooseberries, are sweet little fruits with a pineapple-like flavor. When ripe, they completely fall off their plant and pop out of their husks. Although they make good jams and bake well, I think few ever make it out of the garden uneaten.
GROWING These are easy-growing plants. Give them sun, heat, and water and they are happy. Both tomatillos and ground cherries are very sensitive to cold. You may not be able to find seedlings, but the seeds are easy to start indoors about 4 weeks before your last frost date. Transplant seedlings when the ground is warm enough to sit on. You can also direct sow seed in the garden after danger of frost has passed.
You will need to plant at least two tomatillo plants, because they are self-sterile and need a pollinator to set fruit. Tomatillos get tall and heavy, so staking is recommended. Ground cherries will sprawl across the ground, or you can grow them in containers.
HARVESTING When tomatillos start to plump up, their husks split open. For full sweetness, wait to harvest them until they have fully colored, either green or purple, depending on the variety. The fruits are covered in a sticky film that washes off easily. There is no guessing with ground cherries, because they almost jump off the plant and into your hand. When they drop, they are ripe. Don’t eat unripe ground cherry fruits, because they are toxic with solanine, as are the stem, husk, and leaf.
VARIETIES Tomatillos: Purple (75 to 85 days) is a beautiful heirloom with large, sweet, dark purple fruits. Another purple, de Milpa (65 days), has a pleasant sweet-tart flavor. Verde Puebla (75 to 80 days) is a classic large green variety. Ground cherries: Cossack Pineapple (65 days) can be eaten fresh, cooked, or dried. Aunt Molly’s (65 to 70 days) is widely available, extremely sweet, and prolific.
Is there a vegetable gardener who does not grow tomatoes? I think tomatoes are how we judge the growing season’s success: if the tomatoes were good, nothing else matters. Ever since heirlooms became mainstream, the number of available tomato varieties has become overwhelming, but there are worse problems to have. You could probably try a new variety every year, and I suspect each would offer something special. It certainly would be a fun experiment. Tomatoes are tropical heat lovers, and they can pose a challenge for gardeners in zone 4 or lower, but do not accept defeat. There is a tomato for your garden, too.
GROWING Seeds offer a wider selection than nursery-grown seedlings. Tomato seeds are quick growers, and you want short, stocky transplants, so don’t start them too early—about 6 weeks before you plan to move them out is fine. Sow the seed ½ inch deep. The seeds will germinate faster if the soil is kept at a warm 70 to 80°F. You can either heat the containers from the bottom with plant heating mats or coils or keep them in a heated room. Be sure to move them off the heating mats once they are up and growing, so the soil does not continually dry out. When the seedlings have true leaves, thin each cell or pot to the one strongest seedling by cutting the others at the soil line. To get stocky plants, either use a gentle fan to blow air on the plants or rub your hand gently across the plants for a few seconds every day to strengthen the stems.
Before you put seedlings in the ground, harden off the plants slowly over the course of a week or two. Do not rush transplanting them into the garden: wait until nighttime temperatures are reliably above 50°F. Then plant them in full sun, in a rich soil with a slightly acidic pH.
All tomatoes need some type of heavy-duty staking or caging. Even bamboo poles are not strong enough to support dozens of beefsteak tomatoes. Install your supports at planting time and train or tie the vines as they grow.
HARVESTING Harvest when the tomato has reached full color; it should be slightly soft and very aromatic. We are all faced with the dilemma of what to do with late-season green tomatoes. By early September, your plants have finished setting viable fruits, so remove all the remaining flowers and prune back the top of the plants to force them to focus on the existing tomatoes. If a frost threatens, harvest everything and bring the fruits indoors to finish ripening.
VARIETIES Favorite tomatoes are a personal thing. I favor the purple tomatoes, such as Pruden’s Purple (70 to 80 days), Cherokee Purple (75 to 85 days), and Black Krim (70 to 80 days). I like their combination of smoky, sweet, and tart. Spitfire (68 days) is an early, all-purpose red tomato, good for short seasons. Polish (85 days) is an exceptionally meaty beefsteak. If you lean toward low acid, fruity tomatoes, try some of the yellow and green varieties: Carolina Gold (80 days) and Green Zebra (75 days) are good growers. Small-fruited tomatoes are some of the most prolific: Chocolate Cherry (70 days) has a smokiness I love. Mild and sweet Beam’s Yellow Pear (70 to 80 days) is a big hit with kids. For sauces, I like Opalka (75 to 85 days), with its huge yields and meaty goodness, and the mini-Roma Juliet (60 days), which is as good fresh as it is sauced.
These vegetables get no respect. Even the commercial farmers seem to consider them fillers. For years we have abused them in the kitchen, boiling them into an unpleasant smelling mush, but these versatile vegetables offer more: cook their tangy leaves, roast and caramelize the bulbs, bake them into casseroles and soufflés, or serve them up as French fries. I hope I’ve tempted you to try growing turnips and rutabagas.
GROWING Turnips and rutabagas like full sun, rich and well-draining soil, and a slightly acidic pH. Because they are bulbs, both need to be direct sown. Turnips are quick growers and can be seeded in early spring or midsummer, about 2 months before your first fall frost. Rutabagas grow more slowly, and a spring sowing will mature in fall. Thin seedlings to 2 to 4 inches apart, and add the thinned plants to a salad. Make sure the plants get at least an inch of water weekly or they will crack, leaving space for disease and insects to enter. Turnips don’t need feeding, but rutabagas like a top dressing of organic matter at midseason. The only serious pest of concern is the root maggot. A row cover will prevent the moth from laying its eggs on the soil.
HARVESTING You can harvest the greens any time, and as long as you don’t injure the top of the bulb, the greens will resprout. Turnip bulbs are most tender when small, at 2 or 3 inches in diameter. Fall-planted turnips will sweeten even more if they’re overwintered; add a layer of mulch after the ground has frozen. Rutabagas, on the other hand, will not overwinter, but you should wait to harvest them until after the tops have been hit by a frost, which sweetens the bulbs. Mature bulbs are best at 3 to 5 inches in diameter.
VARIETIES Turnip: Gold Ball (45 days) is sweet and tender when bulbs are about 3 inches in diameter and is wonderful raw in salads. Shogoin (55 to 70 days) is a bright white turnip that is excellent when lightly cooked. Rutabaga: Creamy, yellow-fleshed American Purple Top (90 days) grows huge and stores well. Sweet, white-fleshed Gilfeather (75 to 100 days) tastes like a turnip.
There is something so delightfully comforting about a row of winter squash in your cellar, waiting to be turned into something warm and delicious in the kitchen. Dressed in their fall colors, pumpkins, butternuts, acorns, delicata, and even the inedible gourds dress up the garden, the table, and often the yard. They are large plants, to be sure, but you don’t need many to fill your home with color and the wonderful scent of baking pies.
GROWING You can start seed indoors, about 3 or 4 weeks before your last frost date, but direct-sown seed quickly catches up. Direct sow in the garden after all danger of frost. Winter squash need heat to start growing in earnest. Gardeners in zones 3 to 5 can spread black plastic on the soil to warm it quickly. Plants also need a rich, welldraining soil and plenty of sun. Plant seeds much as you’d plant melons and cucumbers, in hills or small mounds. Plant three or four seeds per hill, 1 or 2 inches deep. Space the hills 4 feet apart for bush varieties and 6 feet apart for vines. Thin the hills to the one strongest seedling after they leaf out. Keep plants well watered, especially when the fruits start forming. Winter squash self mulches with its enormous vines.
HARVESTING Winter squash will change to its mature color as it ripens. When your fingernail can no longer dent the rind, the squash is ready to pick. Cut it from the vine, leaving a few inches of stem attached. This is not a handle; keeping the stem attached prevents rotting and disease at the tender end. Let the squash sit and cure in the sun for 2 or 3 weeks, and then bring them indoors and store in a cool, dark spot until you are ready to cook something fabulous during the winter.
VARIETIES Winter squash: Bush Delicata (80 days) is a compact grower with full-sized, creamy fruits. Buttercup (90 days) is a rambling vine with luscious fruits that store for months. Sweet Dumpling (90 to 100 days) has an earthy sweet potato flavor and a gorgeous speckled shell. Potimarron (85 to 95 days) hints at the flavor of chestnuts. Pumpkins: New England Pie (105 days) loves the NE weather and makes a nice pie or side dish. For sheer beauty, there is Rouge Vif D’Etampes (115 days), the deep red-orange Cinderella pumpkin. Gourds: For fun, try Harrowsmith Select (95 days), a mix of funky, colorful, bumpy gourds. Or grow some birdhouse or bottle (125 days) gourds; dry them over the winter and create birdhouses with them for the garden next year.
Anyone can grow zucchini. In fact, zucchini may be able to grow without our assistance. So instead of looking for highly prolific zucchini, which seems redundant, focus on finding the most delicious types. Summer squash should be tender when harvested; although it is true they become sponges for other flavors, they can bring a flavor of their own to a dish.
GROWING Zucchini and summer squash are grown much the same as cucumbers, meaning they pretty much grow themselves. You can start seed indoors, but there is really no need. Wait until the soil has warmed and direct sow in the garden. Use the hill method and plant two or three seeds per hill about 1 or 2 inches deep. Space the hills 2 or 3 feet apart. When the seedlings leaf out, thin to one or two of the strongest plants. Because the plants are such heavy producers, they sometimes exhaust themselves by July or August, so you can start a second crop in early July to keep harvesting into fall.
Like cucumbers, squash plants have separate male and female flowers, and both must be present at the same time for pollination (and fruit production) to occur. Several plants with many flowers will improve the chances of pollination. Provide plenty of water and stand back. Once they start coming, there is abundance.
HARVESTING Check your plants daily. Summer squash should be harvested while they are young and tender, and they can grow several inches overnight. As you harvest, more fruit will come. Mark your calendar for August 8, National Sneak Some Zucchini on Your Neighbor’s Porch Day.
VARIETIES Dark green and glossy Raven (48 to 52 days) is a delicious choice, especially for short-season gardeners. Cocozelle (53 days) is an Italian heirloom with firm flesh and ridges along its length. Cut slices look like flowers on the plate. The amazing Tromboncino (70 days) puts overgrown zucchini to shame. These long, twisting squash end in a bulb, which is where all the seeds hide. The entire neck offers up dense, juicy flesh that stays tender, no matter the size. Yellow crookneck Horn of Plenty (45 to 50 days) lives up to its name, with lots of sweet, firm fruits. Sunburst (50 to 55 days) is a pattypan, or scallop, squash that glows yellow and has a nutty, earthy taste.
Once you realize how delicious your backyard harvest is, you might want to try your hand at growing fruit trees. What’s more seasonal than honeyed peaches and crisp apples? Smaller fruit trees make it possible for you to grow and enjoy these sweet treats even if you’re gardening in containers on a patio. Go for it.
Despite the abundance of NE apples, they are not the easiest fruit to grow. Although we have great apple-growing conditions, we also have ideal conditions for apple pests and diseases. Rise to the challenge, and you’ll enjoy the reward of biting into the sweet crunch of a homegrown fruit.
GROWING Full sun and good drainage are essential; wind protection is a consideration as well. Apples need deep, fertile soil with a pH of 5.5 to 7.0. Spring is the best time to plant apple trees, and young trees are easiest to establish. Mail-order trees are usually 1-year-old whips—trunks with no branches. Nurseries sell potted 2-year-old trees; look for three or four well-spaced branches.
Most apple trees are grafted; plant so that the graft is 2 to 4 inches above ground. If the graft is buried, the top portion of the tree will sprout roots and whatever dwarfing you hoped to gain will be lost. Prune the tree as soon as it is planted: Reduce whips by about a third, just above a bud; cut any branches back by a quarter; and remove crossing branches and those with narrow crotch angles.
Water the trees well and keep them watered throughout summer. Mulch helps keep the developing roots cool and moist. Don’t feed the trees their first year; after that you can top dress them annually with a layer of compost or rotted manure. In winter, cover and protect the lower trunks from gnawing rabbits and other critters. The parade of insects that attack apples includes apple maggots, coddling moths, leaf rollers, and aphids. You can foil many apple maggots by hanging several sticky red-ball traps in the tree beginning in mid-June. Coddling moths are trickier; pheromone traps can help. Or you can cover each apple with a small paper bag and staple the ends closed. Applying dormant oil before the flowers open can also help destroy overwintering pests.
Apple scab, fire blight, and cedar apple rust are the most prevalent diseases. Some apple varieties are resistant to apple scab, which overwinters in fallen debris. A wetable sulfur spray can thwart fire blight, but you’ll need to apply it several times (check with your local extension office). Cedar apple rust is a disease that jumps back and forth from apple trees to junipers, so choose which tree you want to grow and don’t grow the other. Good fall cleanup will also help with all of these problems.
HARVESTING Apple trees start producing in 2 to 7 years. The surest way to judge ripeness is to bite into the fruit. Color is a good indicator, and ripe apples pull easily from the tree, with their stem intact. Late-maturing varieties can be picked a bit immature, but early varieties should be allowed to ripen on the tree
VARIETIES Baldwin, with thick, juicy skin and crisp, yellow flesh, is an antique from colonial Massachusetts that stores very well. Empire, a cross between McIntosh and Red Delicious, is a popular fresh-eating apple with very sweet, white flesh. Other disease-resistant varieties include Freedom, GoldRush, Jonafree, Liberty, and Redfree.
I find cherries to be the easiest tree fruit to grow. Sour or tart cherries are used for baking and are selffertile, so you need only one tree. Sweet cherries usually need a second cultivar for pollination, but they are often grafted with two varieties on one tree, which solves that problem. A few varieties are self-fertile, such as Compact Stella. Cherry trees can grow quite large; consider a dwarf variety for easier harvesting and maintenance.
GROWING Cherry trees need well-draining soil and room to grow and reach their mature size. They bloom early in the spring and are susceptible to frost damage. Plant them out of extreme wind exposure. When the fruit has set, keep the tree evenly watered. Dry weather causes the fruit to shrivel, and too much rain can cause them to crack. Mulching under the trees helps keep the moisture level consistent. Net small trees as soon as the fruits start to show some color to protect them from bird raids. Larger trees should produce enough to share. Prune only to allow light into the center of the tree. Sweet cherries can be pruned on top every 3 or 4 years to promote more lower branching.
HARVESTING When you notice a few cherries lying on the ground, it’s time to harvest. Gently pull the clusters from the branches, keeping the stems on the cherries.
VARIETIES Sweet: Rainier (zones 4 to 8) is a large tree with firm fleshed yellow and red fruits. Stella (zones 5 to 8) cherries are extremely sweet and resist cracking. Sour: Montmorency (zones 4 to 9) is the classic pie cherry. English Morello (zones 4 to 9) ripens later in spring and can be sweet enough to eat fresh.
Peach and nectarine trees are pretty easy to maintain, as fruit trees go. They do require pruning, but a little effort once a year is not much to ask. I strongly recommend a dwarf tree, because a height of 8 to 10 feet is easier to maintain and harvest than a tree that grows to 15 feet or taller.
GROWING Late spring frosts are the biggest enemy; a sudden dip to freezing can kill an entire season’s buds. Don’t plant in a windy area or at the bottom of a hill, where frost tends to settle and linger. Peaches and nectarines need full sun, a well-drained loamy soil, and a neutral pH around 6.5. Neither peaches nor nectarines need a cultivar for cross pollination, so you need only one tree. It’s common to find good sized, potted peach trees for sale at garden centers, but if you mail-order your tree, you will probably get a 1-year-old whip, which is a 3- to 4-foot-tall trunk with no branches.
Peaches and nectarines are pruned or trained using the open center system—basically a vase shape with two or three major (scaffold) limbs. This configuration allow lots of air and sun into the center of the tree. You’ll need to prune every year to maintain this form. Fruit appears on the prior year’s growth, so pruning each year ensures new growth. Prune a 1-year-old tree immediately after planting to a height of 26 to 30 inches and remove all the branches. It seems severe, but this allows you to shape the tree from the start as new branches appear. As the tree grows, remove any low-hanging limbs and any upright shoots in the center of the tree. In year 2, choose two or three strong, wide-angled limbs as scaffolds and cut off all the others. Prune the scaffolds to 30 inches. Then in subsequent years, remove anything growing up or into the center of the tree. You can maintain the height of the tree by pruning scaffold branches back to 8 to 10 feet.
Mature trees will set more fruit than they can handle. Some fruits will be shed naturally in early summer, but this may not be enough, so you’ll need to remove some more by hand to ensure a large and healthy crop. When the fruits are about the size of a quarter, thin them to a spacing of 6 to 8 inches to allow the remaining fruits to grow into large, sweet peaches or nectarines. To keep your tree growing and setting new buds every year, feed annually in early spring with a fruit tree fertilizer or any balanced fertilizer: 1 pound for young trees and 2 pounds for mature bearing trees.
Watch out for the tarnished plant bug, peach tree borers, and the plum curculio. The most common problem is the peach leaf curl disease.
VARIETIES Peaches: Contender (zones 4 to 8) withstands late-season frosts. Yellow-fleshed Redhaven (zones 5 to 8) is considered the standard for peach quality, and it doesn’t drop its fruit. Reliance (zones 4 to 8) has honey-sweet fruits and is considered one of the most winter-hardy peaches. Nectarines: Mericrest (zones 5 to 8) has excellent flavor and good disease resistance. Hardired (zones 5 to 8) tolerates bacterial spot and brown rot.