
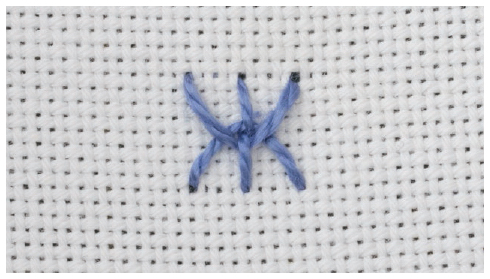
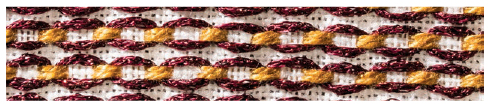
Chevron Stitch (Herringbone)
Chevron herringbone is made up of one part chevron stitch and one part herringbone stitch. It can be used as a border or may be built up row upon row to create embellished textures. You can change the height and spacing to create numerous varieties.
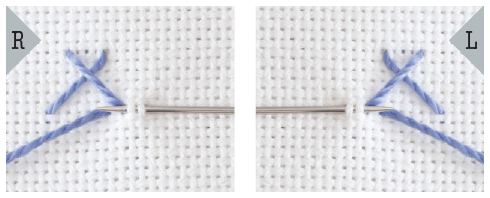
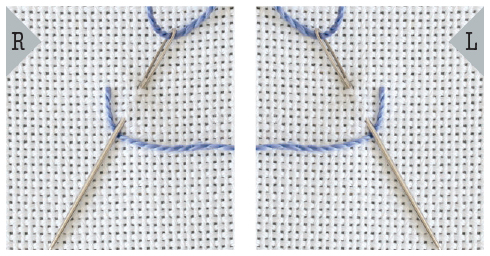
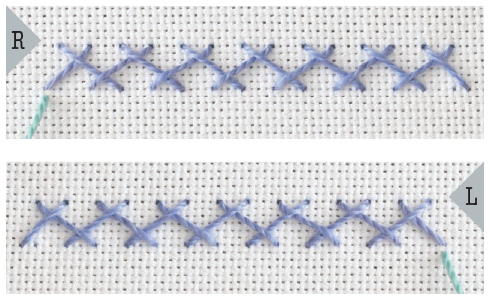
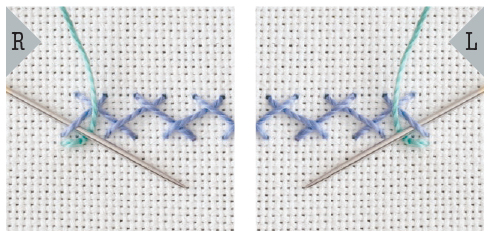
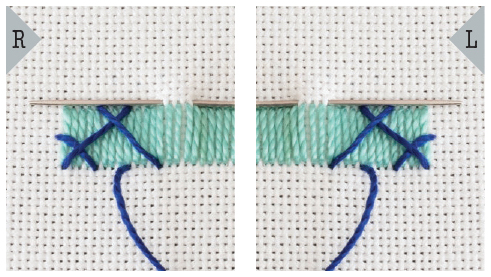
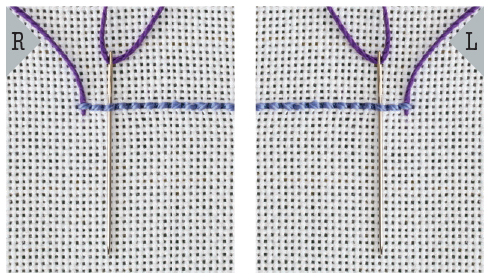
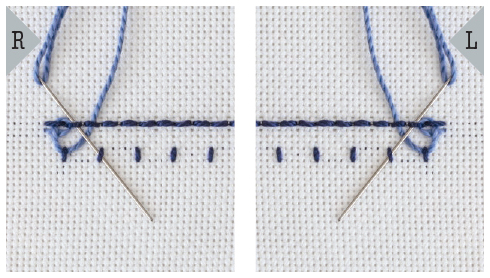
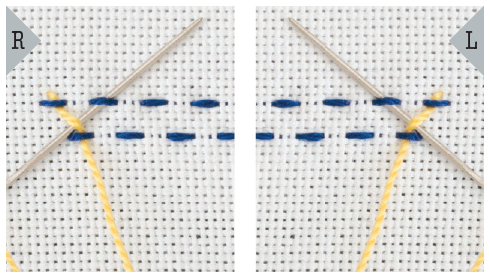
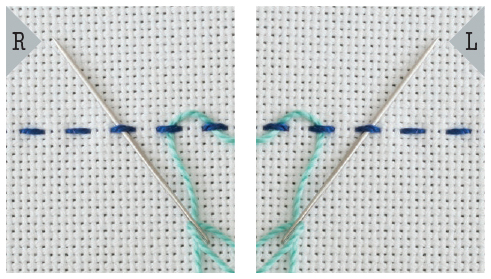
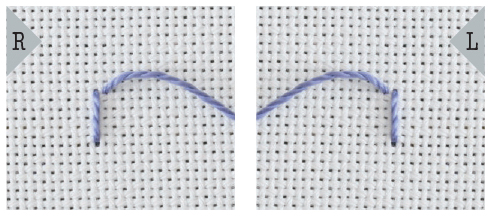
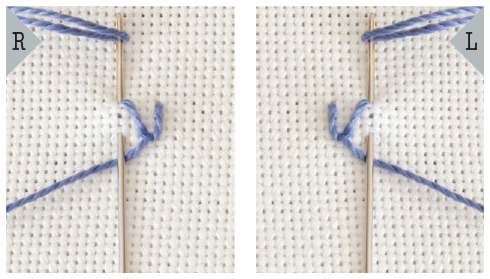
1. Work from left to right (right to left for left-handed) on 2 imaginary lines. Bring the thread from the back of the fabric on the bottom line. Move diagonally to the top line. Take a bite of the fabric to the left (right) and pull the needle through to make the first diagonal stitch. Take the needle diagonally down to the bottom line and insert it with the tip pointing left (right). Pull the needle through.
2. Make a small foot bar stitch, as you would a chevron stitch, by moving to the right (left), inserting the needle to have tip emerging at the base of the diagonal stitch. Pull the thread through.
3. Take your needle to the top line and repeat the process. Continue the pattern down the row.


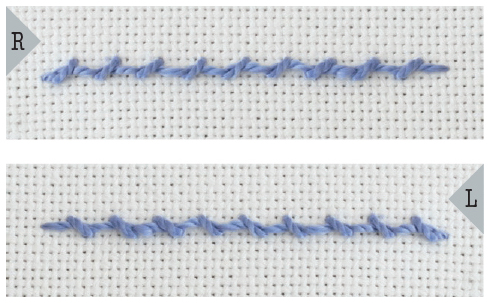
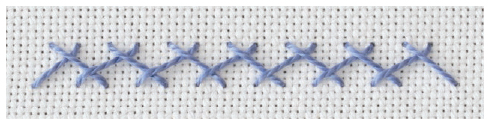
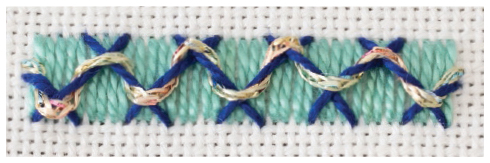
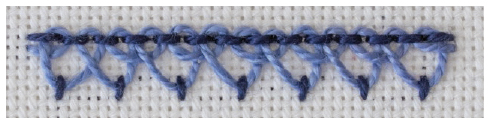
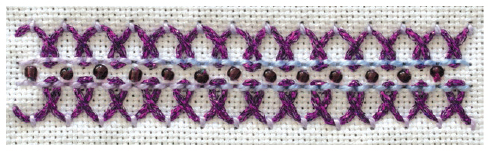
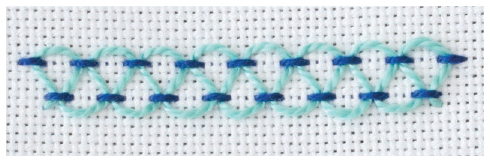
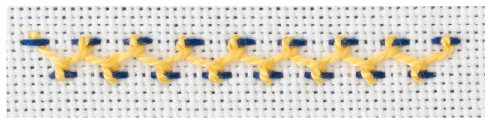
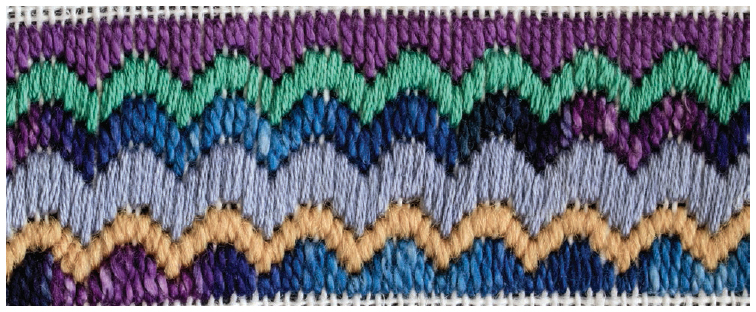
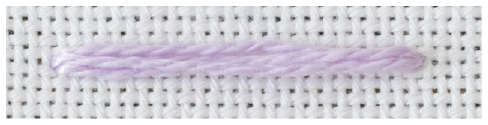
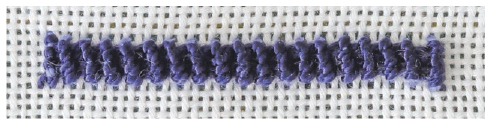
Chevron herringbone stitch

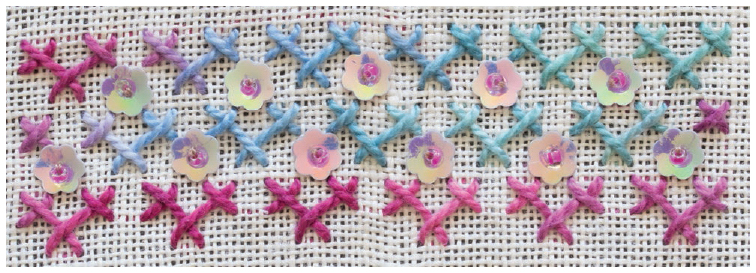
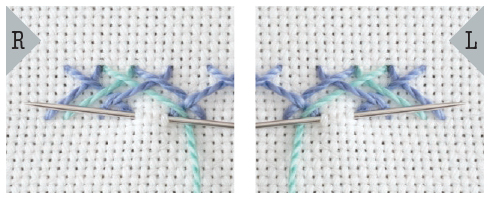
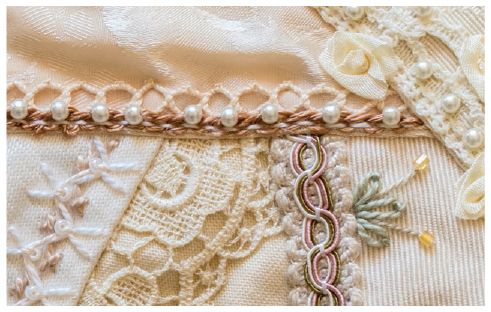
Two lines of chevron herringbone stitch worked face to face, with a seed bead stitched down the center line.

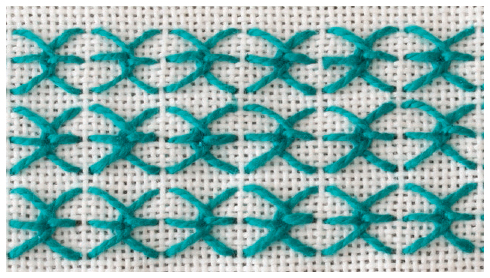
Two lines of chevron herringbone stitch worked back to back with a seed bead stitched down the center line

Two lines are worked face to face in perle cotton #5 and placed so they tuck in to each other.

Two rows, with the second row worked on top of the first using a different thread.
Chevron Stitch (Squared)
Squared chevron stitch can be used as a single unit or worked in lines to build up patterns. Its geometric shape lends itself to beautiful patterning.
Think in terms of defining the corners of each square with the foot of a chevron stitch.
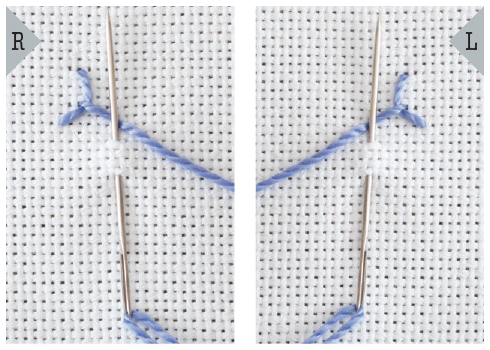
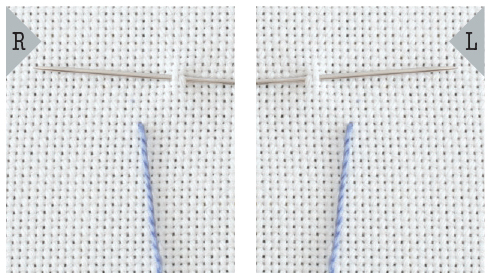
1. Bring your needle up at what would be the left (right) corner of the square. Move up diagonally to take a stitch at the top corner of the square.

2. Take another stitch that comes out at the top corner.

3. Take the needle diagonally to the right (left) corner and make an upward stitch.

4. Take another stitch that comes out at the right (left) corner.

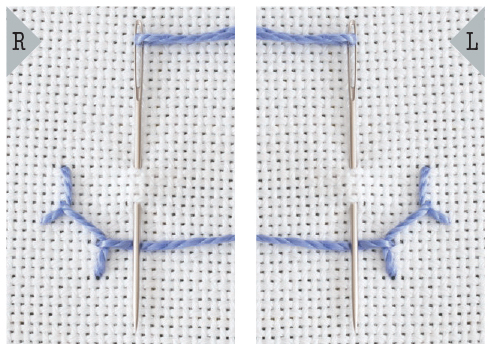
5. Continue to form the bottom corner and left (right) corner.


Squared chevron stitch

Squared chevron stitch is effective when you change threads, colors, and scale.
Chevron Stitch (Stepped)
Stepped chevron is simply a double chevron stitch, where the second journey is larger than the first. To change the patterns created with this stitch, experiment with the spacing of both journeys and the height of both journeys. There is also the opportunity to explore using different threads.
This stitch is a decorative way to hold down a ribbon or couch down thicker threads.
1. Work a row of chevron stitch with each stitch a little apart, so you have room for the second row. Bring the second thread below the first row.

2. Work a taller line of chevron stitch, placing each stitch between the V’s of the first line.


A line of stepped chevron stitch

Lines of stepped chevron stitch worked row upon row to form a filling stitch
Coral Stitch
Coral stitch is an old embroidery stitch which creates a line that looks like a row of knots. It is used for outlines, as it follows a curve well.
1. Follow an imaginary line or use a pen that will disappear to mark a line. Bring the thread from the back of the fabric. Take a stitch at a slight right angle, above the line to be worked. Wrap the thread over, then under, the needle.

2. Pull the needle through the fabric to form a knot. Repeat the pattern along the line.

A line of coral stitch. This sample was worked using perle cotton #5. The effect created by coral stitch can be altered by using thicker threads or even a fine ribbon.

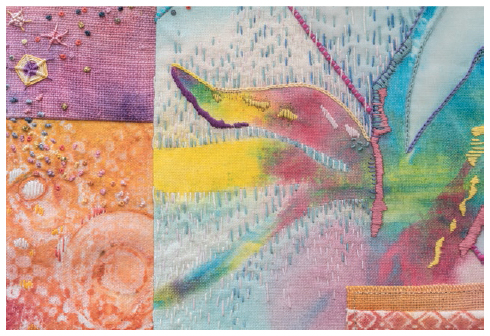
Coral stitch used in a detail of a wall piece
Couching
Couching is wonderful technique that enables embroiderers to use interesting textured and novelty threads. You can create rich embellished surfaces and it is quick to work, and easy to do.
1. With couching, a surface thread is laid on the fabric, and anchored using a second thread. Use a large-eyed needle to bring the heavy thread through the fabric.
2. Using a finer needle and thread, make small, straight stitches over the thick thread to secure it to the fabric.

Usually, couching is done with thread in a matching color. Here I used contrasting thread so you can see the stitching.
3. Continue until you have completed the line or filled the area.


Couched threads and textured stitches. In this detail, I used French knots, bullion knots, oyster stitch, buttonhole wheels, and couching.

There are many ways to use couching. You can create patterns and grids which are easily combined with other stitches. I added cross-stitches at the intersections of each couched thread.
Cretan Stitch
Cretan stitch—from the island of Crete—can be used in many decorative ways. With it you can fill a shape, create a border, or create a line.
1. Work from left (right to left for left-handed) to right between 2 imaginary horizontal lines. Bring the needle up through the fabric at the beginning, halfway between the upper and lower lines. Move along slightly, insert the needle on the top line and make a small stitch by pointing the needle to the center. Keeping the thread under the needle, pull it through the fabric.

2. Move to the lower line and repeat the action.
3. Continue working along the line. Make sure that with each small stitch the needle is pointed to the middle and the thread is under the needle as you pull it through.

A line of Cretan stitch

Perle cotton #8 on hand-painted Aida cloth, with bugle beads between the stitches

Cretan stitch works very well if you double it. In this sample I worked 3 lines of the stitch, then added another wider row on top. Next, I laced the arms with a metallic thread.

Four lines of Cretan stitch worked one on top of another.

Two rows of Cretan stitch worked face to face, but one side having a longer arm than the other. Beads were added along the middle.

Cretan stitch spaced closely together, with varied arm lengths to form a zigzag pattern. The Cretan stitch is outlined in backstitch with tulip stitches in line.

Cretan stitch used in a free-form manner to evoke an organic feel. Detached chain stitches and pistil stitches were added last.
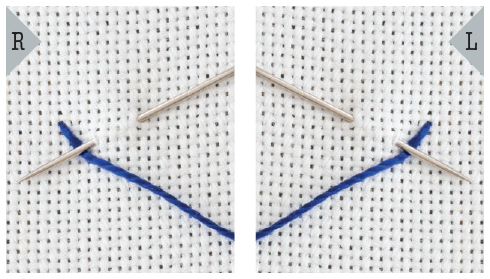
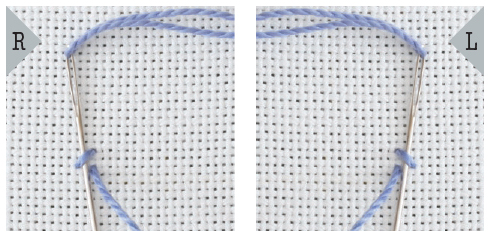
Cretan Stitch (Herringbone)
Cretan herringbone stitch is a combination of Cretan stitch on one side of the line and herringbone stitch on the other. Cretan herringbone stitch is a versatile stitch that can be worked in a regular or free-form manner and has many uses. For instance, you can use it for a border, as a fill, or along a curved line.
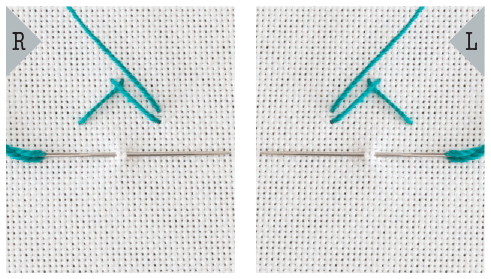
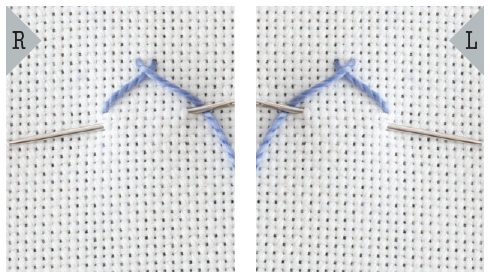
1. Work from left to right (right to left) between 2 imaginary lines. Start with half a Cretan stitch.
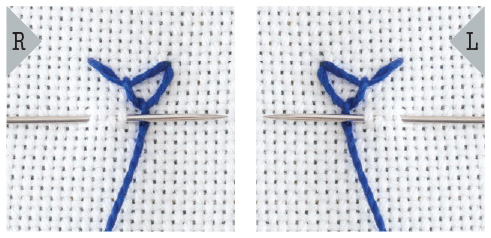
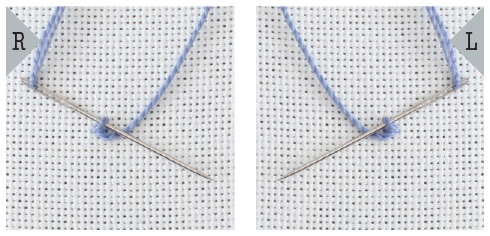
2. Move diagonally to the lower line and make half a herringbone stitch by taking a small stitch to the left (right).
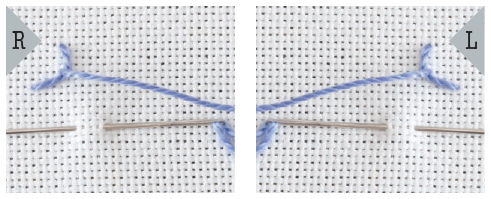
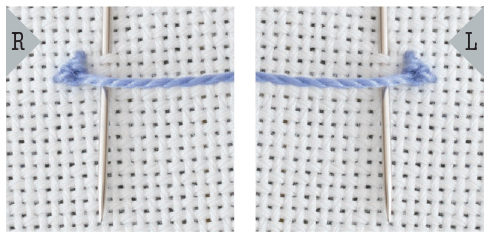
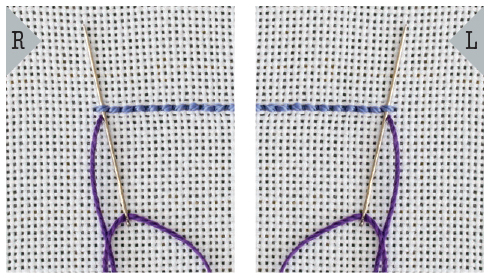
3. Pull your thread through. Move to the top of the line and make a small downward vertical stitch. Repeat these motions along the line.


A line of Cretan herringbone stitch

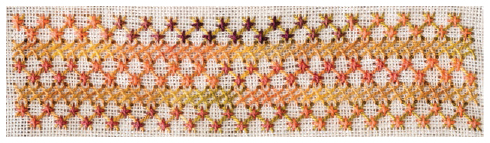
Pairs of Cretan herringbone stitch that have been worked face to face. Changes in the length of the arms of the Cretan part of the stitch and the width of the cross in the herringbone part of the stitch and the spacing allows for a large variety of patterns.

You can create some very rich borders by adding beads to the Cretan herringbone stitch.

A border consisting of 4 lines of Cretan herringbone stitch worked in perle cotton #5, with beads added last
Cretan Stitch (Looped)
Looped Cretan stitch is interesting because you can change the spacing of the stitches to create different patterns. It is possible to vary the length, angle, and width of the wings to create interesting effects and beads are easily added.
1. Work from top to bottom between 2 imaginary horizontal lines. Bring the needle through the fabric at the start of the line on the top left (right) side. Insert the needle on the right (left) and make a stitch, keeping the thread under the needle.
2. Pull the thread through the fabric. It should look like a shallow unsecured fly stitch. Insert the needle on the right (left) edge in the same place and make another small stitch. Keeping the thread under the needle, pull it through your fabric to create a loop. This extra loop gives this stitch its name.

3. Move to the left (right) edge and make a small stitch. Keeping the thread under the needle, pull it through.
4. Insert your needle on the left (right) edge and make a small stitch. Keeping the thread under the needle, pull it through your fabric to create a loop.

5. Move across to the right (left) and repeat this process. Continue working downward, back and forth until the line is worked.

Looped Cretan stitch

Looped Cretan stitch worked in crazy quilting
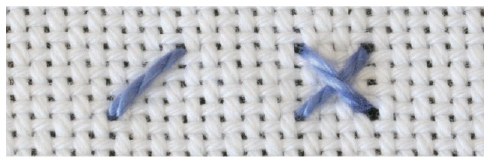
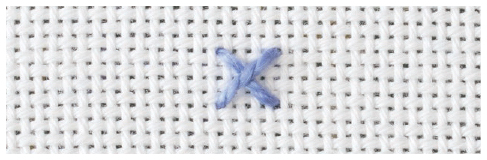
Cross-Stitch
Cross-stitch is extremely quick and easy to work.
Work a diagonal straight stitch. Then work a second diagonal stitch laid in the opposite direction.
Although the construction of cross-stitch is the same, there are different ways of working. Cross-stitch can be worked individually, completing each cross before moving on to the next. Use this method if you are using a multicolored thread. Or you can work a line of half-cross-stitches, then finish the crosses on a return journey
No matter the method used, in traditional cross-stitch one rule remains constant. The top diagonals should always lie in the same direction. Although this rule is often deliberately broken by some contemporary embroiderers.

A traditional cross-stitch motif used in crazy quilting

A nontraditional free-form use of cross-stitch in a panel of contemporary embroidery
Cross-Stitch (Raised)
Raised cross-stitch is a quick and easy way to create little roselike flowers. It is created by working around a cross-stitch, whipping as you go. You can also use this as a silk ribbon stitch, and many novelty threads come to life with this stitch. You can also add a bead to the center of the flower.
1. First make a cross-stitch. The larger the cross, the larger the finished stitch.

2. Bring your needle out at the center of the cross, to the left (right) of the cross bar. Slide the needle under the bottom of the cross bar without picking up any fabric to whip the first spoke.

3. Move to the next bar of the cross and whip the next spoke.

4. Continue around the cross in a counterclockwise (clockwise for left-handed) direction. As you work, pack the crossbars fairly firmly by pushing them to the center in order to create a neat little round disk. Continue working around the edge of the cross until the disk is well packed. Take the thread to the back and finish off.

Whipped cross-stitch

Raised cross-stitch used in crazy quilting, worked in synthetic knitting yarn.
Cross-Stitch (Woven)
This is a simple, quick, and very effective stitch, particularly if you experiment with the thread you use. For instance, it looks great as little flowers when you work it using silk ribbon. You can switch threads halfway through the process to use 2 different colors. The stitch looks fantastic with a bead in the middle.
1. Work a regular cross-stitch.
2. Make a third diagonal straight stitch in the same direction as the first stitch you worked.

3. To make the fourth straight stitch, weave the needle through the 2 bars and to the back of the fabric.


Woven cross-stitch

A detail with woven cross-stitch worked in wool alongside backstitch, French knots, and various beads.
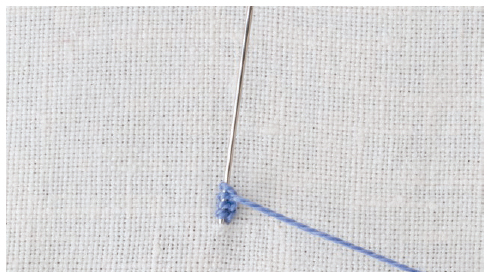
Drizzle Stitch
Drizzle stitch is a three-dimensional stitch that stands free from the fabric. It is often used for the center of a flower, adding texture and dimension. It combines well with floral motifs and is useful in underwater scenes, as clusters of the stitch look like coral or sea anemones.
Since tension is important, stretch the fabric in an embroidery hoop or frame. This stitch is easier to work if you use a use a milliner’s or straw needle, as the shaft of the needle is the same diameter as the eye, meaning you can slide the stitches along the needle easily in the second phase of the stitch. You can use any thread with a good twist, such as perle cotton.
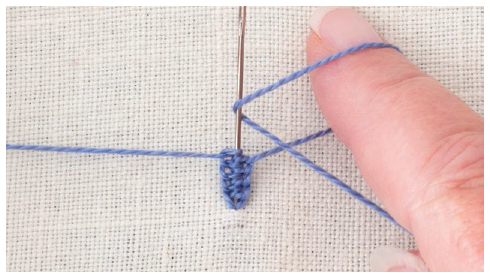
1. Bring the threaded needle to the front of the fabric, then unthread the needle. Next to where the thread emerges, poke the needle a little way in the fabric. Wrap the thread over your index finger.

2. Rotate your finger, keeping the thread still over your finger but under slight tension. This movement will create a loop around your finger. Transfer the loop to the needle.

3. Slide the loop down the needle. Pull the thread until snug but not tight. This is the first cast-on stitch.

4. Work at least 6 loops, gently sliding them down the needle as you go. You can work 20 or 30 loops to create long spirals. Keep the stitches even on the needle.
5. When you have the required number of stitches, rethread the needle.

6. Gently pull the needle through the center of the cast on stitches and continue to pull the thread through the fabric to the back. Pull firmly but not too tight.

7. The finished stitch will be free at one end so that it will pop up from the fabric and will coil in a spiral to the base.

Drizzle stitch
NOTE
The size of the stitch depends upon the number of cast-on stitches you use. The higher the number of cast on stitches, the bigger the loop. The thickness of the thread will determine the weight of the stitch.

Drizzle stitch used in an underwater motif
Drizzle Stitch (Double)
Double drizzle stitch is another three-dimensional stitch that sits proud of the fabric. You can use any thread with a good twist, such as perle cotton. This stitch is easier to work if you use a use a milliner’s or straw needle as the shaft of the needle is the same diameter as the eye, and this means you can easily slide the stitches along the needle in the second phase of the stitch.
1. Thread the needle with 2 threads. Bring the needle to the front of the fabric, then take the threads out of the needle. Place the needle in the fabric near to where the threads emerged.

2. Place a single thread over your right (left) index finger and rotate your finger, creating a loop around your finger.

3. Transfer the loop from your finger to the needle.

4. Gently slide the loop down the needle. This is the first cast-on stitch.

5. Pick up the second thread and repeat this cast-on action on the opposite side of the needle.


6. Continue adding stitches to alternate sides of the needle.
7. Make 8–10 cast-on stitches, keeping the stitches as even as you can.

8. Rethread the needle.

9. Hold the stitches while you pull the threaded needle through the center of the stitches to the back of the fabric.

10. You have a stitch that stands proud! The finished stitch is free at one end so that it will pop up from the fabric. The size of the stitch depends upon the number of cast-on stitches you use. The higher the number of cast-on stitches, the bigger the loop. The thickness of the thread will determine the weight of the stitch.

Double drizzle stitch

Double drizzle stitch used on a crazy quilting seam
Feather Stitch
Feather stitch is a versatile stitch that can hold a curve, making it ideal to use in any organic motif, such as floral sprays, vines, and twisting twiglike stems. It also looks great in underwater scenes, as the flowing lines are very suitable to represent corals and seaweed.
Tips
• To make sure this stitch sits neatly on a curve, keep the center of the stitch on the line you want to follow.
• You can vary feather stitch by changing the width between the tops of the Y, the angle of your needle, and changes of spacing in the length of stitches.
1. Bring the thread up at the top left (right for left-handed). Insert the needle to the right (left) and make a downward stitch so that the needle emerges between the 2 points. With the thread wrapped under the needle, pull it through the fabric. It should make a V.

2. Insert the needle to the right (left) and make another downward diagonal stitch so that the needle emerges between the 2 points. With the thread wrapped under the needle, pull it through the fabric.

3. Continue working on alternate sides of the line, keeping the Vs aligned.


Feather stitch

A small marine design where feather stitch dominates. I used a variety of threads including novelty yarns such as eyelash thread, chenille, and chainette.

In this sample, the legs are different lengths. Rows were worked back to back then beads added. The result looks very different from regular feather stitch.
Feather Stitch (and Chain)
You have many possibilities with this combination of stitches. For instance, you can vary the length of the chain stitch, or work rows back to back. Many of the variations of both chain stitch and feather stitch can be adapted to this stitch.
1. Make 2 feather stitches.

2. Insert the needle at the base of the second feather stitch and wrap the thread under your needle, to make a chain stitch. Pull the needle through.

3. Move to the right side of the line and continue with feather stitch.

4. Work down the row repeating this pattern.
Feather and chain stitch

Feather and chain stitch worked in perle cotton #5
In this crazy quilt block seam, a bead is added to the middle of the chain stitch.
Feather Stitch (Knotted)
Knotted feather stitch can create ornate patterns and effects by varying the spacing between the arms and spine length. Add beads for a more decorative line.
1. Work this stitch from top to bottom. For beginners, it is useful to imagine 4 parallel lines; you may find it useful to mark the fabric with guidelines using a water dissolvable marker or fade-out fabric marker. Bring the needle out at the top of the line to be worked. Insert the needle a little to the right (left for left-handed) on the same level and make a small downward stitch, keeping the thread under the needle point. Pull the thread through.

2. Pass the needle under the thread at the right (left) side of the V shape. Do not pick up any fabric. Wrap the working thread under the needle point as though working a chain stitch.

3. Pull the needle under the foundation thread so that you are working a small chain stitch on the bar.

4. Insert the needle to the right (left) on the same level as the chain stitch you just made.
5. Continue until the line is complete.

A line of knotted feather stitch

Knotted feather stitch on a piece of crazy quilting with beads and cast-on stitch flowers.

Knotted feather stitch in perle cotton #5 with detached chain stitch flowers.
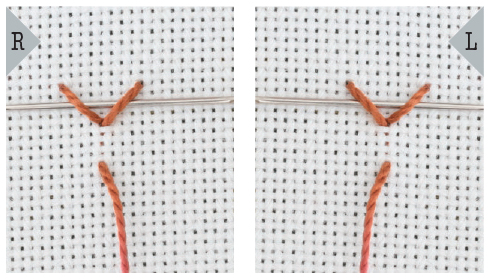
Feather Stitch (Plaited)
This stitch is simple but versatile and can be very effective if you experiment with different spacing and yarns.
1. Work plaited feather stitch between 2 imaginary vertical lines. Bring the needle out at the top of the left (right for left-handed) line. Reinsert it a little to the right and make a downward stitch.
2. Keeping the thread under the needle point, pull the thread through the fabric to make the first stitch. Insert the needle to the left (right), in line with the base of the V you have just made and make a vertical stitch.

3. Pull the thread through the fabric. Work these movements alternately down the line to complete the first row of a feather stitch with straight sides.

4. For demonstration purposes the second journey is worked in red thread. Bring the thread out at the top of the second stitch. Insert the needle top left (right), and have the needle come out where it first emerged. This stitch exists in order to start the row neatly.
5. To make the first V, insert the needle at the base of the first stitch. With the thread under the needle, pull the thread through.


6. Slide the needle under the cross bar to the left (right).

7. Once again, take a downward vertical stitch in the open space of the left (right) side. Pull the needle through.

8. Repeat these movements, alternating down the line. In every second stitch, take your thread under the cross bar of the first row of stitches.
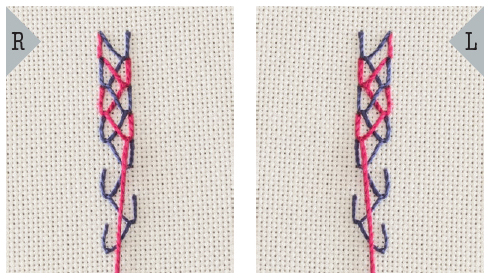

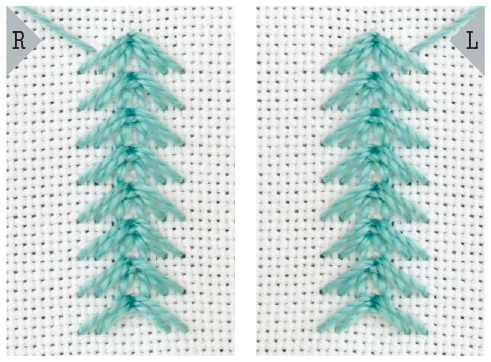
Plaited feather stitch

Plaited feather stitch worked in 2 colors of perle cotton #5 on a crazy quilt block

Plaited feather stitch worked in variegated perle cotton #5 on a crazy quilt block
Plaited feather stitch worked in 2 colors of perle cotton #5.

Plaited feather stitch used to couch down a ribbon
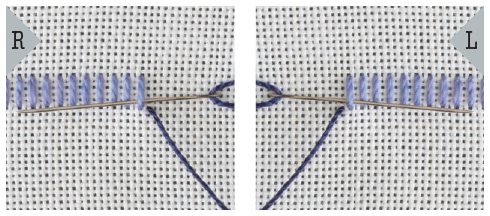
Feather Stitch (Triangular)
Triangular feather stitch looks a little complex. But once in the swing of it, you will find it quick and easy.
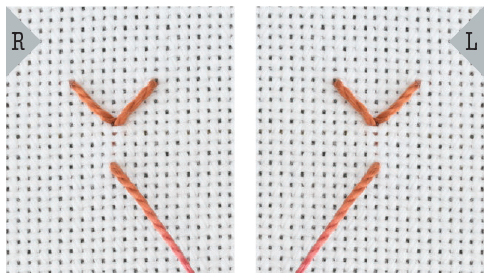
1. Work 2 regular feather stitches.


2. Insert the needle where the thread emerged on the first feather stitch and take a straight downward stitch. The needle should emerge lower than the base of the second feather stitch.

3. With the thread under the needle, pull the needle through.

4. Move the needle to the left (right) and create the next V stitch.
5. Continue to finish the line.
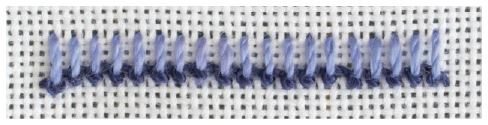
Triangular feather stitch

A single line of triangular feather stitch

Two lines of triangular feather stitch worked back to back
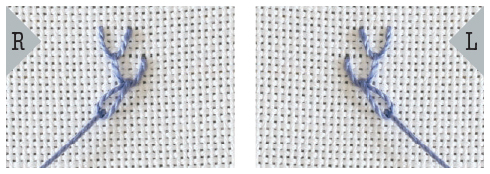
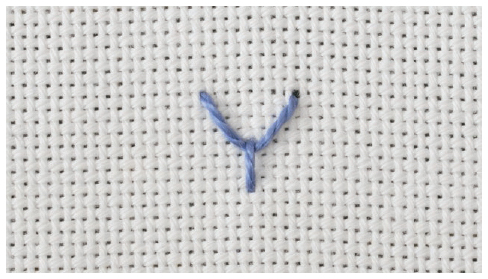
Fly Stitch
Fly stitch is versatile, and quick and easy to work. You can use this stitch in a regular or free-form manner. It also is known as Y stitch and open loop stitch.
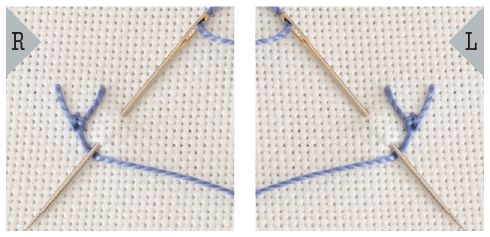
1. Bring the thread up at the top left (right for left-handed) and insert the needle to the right (left). Make a downward stitch between the top 2 points.

2. With the thread wrapped under the needle, pull it through the fabric. Secure the V in position with a small vertical straight stitch.

Fly stitch

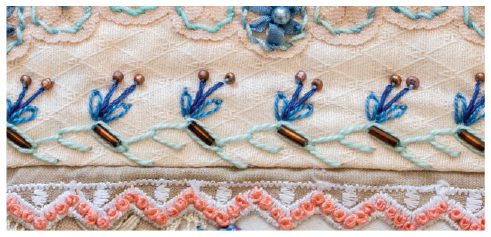
Fly stitch worked free-form over layers of net and chiffon to create a watery effect
Fly stitch in a pattern alongside detached chain stitch
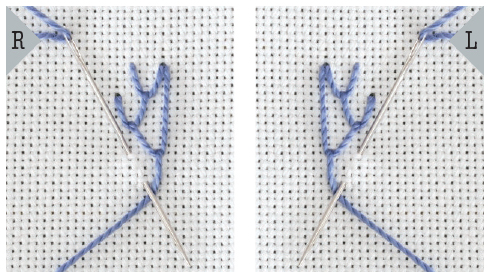
Fly Stitch (var. Crown Stitch)
Crown stitch is an isolated stitch that you can sprinkle across an area to produce a delicate texture. You can build up patterns with crown stitch, and it lends itself to being worked in a wide variety of thread.
1. Start with a fly stitch.

2. Add 2 slanting straight stitches at the base.

Crown stitch

Crown stitch is arranged in rows to create a patterned fill. You can work the stitch in a variety of widths and heights by changing the height of the arms. You can make interesting variations by working it in rows closer together or further apart.
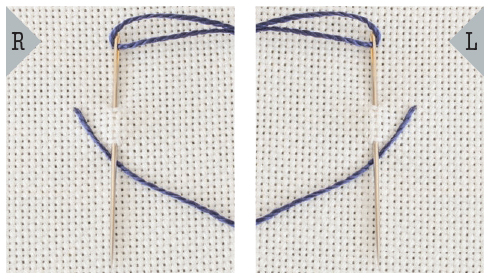
Fly Stitch (Laced)
Laced fly stitch produces a branched line with a central braidlike section. You can vary this stitch by changing the angle of the V on the foundation stitches. The lacing thread can also be of a different weight, color, or type.
1. Work a foundation row of fly stitch.

2. Lace a second contrasting thread, starting at the bottom.

Tips
• Use a blunt-ended tapestry needle for the second thread so you do not split the foundation threads as you sew.
• Do not pass the needle through the background fabric.
3. Pass it in the other direction under the tie of the next fly stitch.

4. Continue lacing to the top.
5. Turn the lacing thread and repeat the lacing movement down the other side of the fly stitches.


In this line of laced fly stitch, the fly stitches are in perle cotton #5 and the lacing is in a 4-ply knitting yarn.

Laced fly stitch worked in perle cotton #5 and laced with a metallic thread.
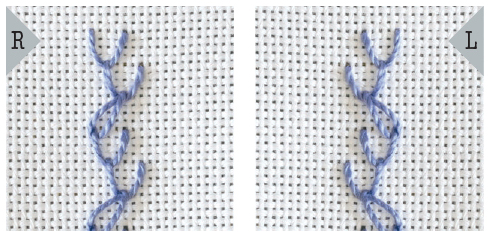
Fly Stitch (Reversed)
Reversed fly stitch is an example of an isolated stitch that is first duplicated, then arranged in patterns. It is easy and quick to work, which makes it enjoyable to experiment with. You can change the angle of the fly stitch arms to create varieties. The completed unit can be duplicated and arranged in patterns along a line or around a circle.
1. Start with a single fly stitch.
2. Turn your work and make a second fly stitch. Line it up so that the second stitch is worked on top of the first.

3. Make sure the center of both V’s line up together.

Reversed fly stitch
Reversed fly stitch worked perle cotton #5 arranged in lines
French Knot
French knots are very handy; you are likely to use them everywhere. The thickness of the thread and the number of wraps on the needle will determine the size of the finished knot.
1. Twist the needle around the thread 2 or 3 times and take the needle back into the fabric, 1 or 2 threads away from where the thread first emerged.


2. Brush the knot down the shaft of the needle with the nail of your left (right for left-handed) thumb so that it is sitting firmly on the fabric. Take the needle through to the back of the fabric.

3. Use your left (right) index finger to hold the thread against the fabric as you pull the thread through the knot. This helps prevent tangles.


The completed knot
Tips
• If your knot pops through the fabric, leave a bigger gap between where the thread emerges from the fabric, and where it goes back in.
• If your wraps get stuck on the needle, use a milliners needle, which has an eye that is the same width as the shaft of the needle. The knot will slide off the needle easily.

French knots are heavily used alongside buttonhole wheels, bullion knots, cast-on stitch, oyster stitch, whipped wheel, and whipped spoke stitch.
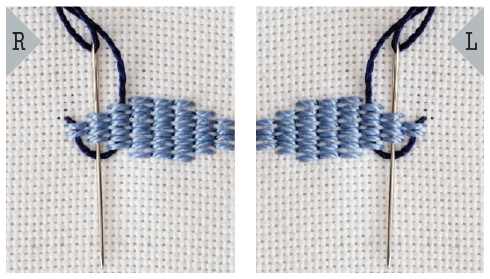
Herringbone Stitch
Herringbone’s structure forms regular patterns, which makes it ideal to work row upon row, or to play with combinations of offset lines of stitches. It can be doubled up, overlapped, or even divided into sections and rearranged, as in herringbone square. It also can be laced as in twisted lattice band. Since it forms a band, you can use it to couch down ribbons, braids, and novelty yarns. Herringbone is a very versatile stitch!
1. Work along 2 imaginary horizontal lines. Bring the needle out on the top left. Move diagonally to the lower line and make a small stitch.

2. Insert the thread on the upper line, a little to the right (left), and make a small stitch.

3. Continue the pattern along the line


A completed row of herringbone stitch

Detail of a wall piece where herringbone sits as a grid behind a feature of coconut beads and wrapped metal washers

Herringbone can be worked in a free-form manner.

Herringbone row upon row, with lines of beads stitched in the spaces
Herringbone stitch broken into basic units and worked in a pattern
Herringbone Stitch (Barred)
Barred herringbone is a quick and easy stitch that can be used as a border or worked line upon line as a filling.
1. Work a line of herringbone stitch.

2. Work vertical lines from the edge of the top cross to the edge of the bottom cross. I have worked this step in a different colored thread so the bars can be seen easily.


A line of barred herringbone stitch

Barred herringbone worked in variegated perle cotton #8

Barred herringbone worked in variegated silk thread with bugle beads added last

Barred herringbone can also be used as a pulled stitch. Here it is worked in perle cotton #8.
Herringbone Stitch (Buttonholed)
Buttonholed herringbone starts with a foundation of herringbone stitch, which is then buttonholed.
Tips
• Use a blunt-ended needle for the second thread so that you do not split the foundation herringbone stitches.
• Use a fairly solid thread, such as perle cotton #5.
1. Work a line of herringbone. Bring your needle out at the base of the row.
2. Work a buttonhole stitch on the bar of the first herringbone stitch. Note: Do not pass the needle through the fabric; use the herringbone stitches as the foundation.
3. Work buttonhole stitches along the bar until they are snug.

4. When you reach the top of the bar, pass the needle under the cross of the herringbone stitch and work a single buttonhole stitch.

5. Continue the buttonhole stitch on the downward bar until the foundation stitches of herringbone are covered.
6. Continue the pattern. At each cross bar, work 1 buttonhole stitch to make each section neat.

Buttonholed herringbone

A line of buttonholed herringbone used in crazy quilting
Herringbone Stitch (Double)
This version of double herringbone stitch can be laced easily. Since the stitches are plaited, it holds a secondary lacing thread neatly, such as in twisted lattice band.
1. Lay a foundation row of herringbone stitch.
2. Work a second row of herringbone. On every second stitch, slide the needle under the cross bar created by the first row of stitches. This means that the second row of herringbone is woven or interlaced through the first row.

3. The pattern is to take the needle over on the upward stitch, and under on the downward stitch.
4. Continue along the line. This variety looks very effective when worked in 2 colors.

A line of double herringbone stitch

Double herringbone worked free-form
Herringbone Stitch (Laced Square)
You can work laced herringbone square as an isolated stitch or arranged in patterns. Since the lacing process does not involve many passes of the needle through the fabric, you can experiment with thicker novelty threads and yarns.
Tip If your work puckers because of tension in the lacing, use a hoop or frame.
1. Work a herringbone square.

2. Bring your needle up on the inside left (right for left-handed) corner. Pass the needle under the crossed foundation bars of the top corner of the square. Do not go through the fabric as you are lacing, not stitching.

3. Pass the needle under the crossed foundation bars at the right (left) corner.

4. Continue around the square.

5. Secure the laced square with 4 crossed straight stitches. Start by bringing the thread from the back and making a straight stitch across the laced square.

6. Repeat the straight stitch on the other sides so you have 2 straight stitches making a cross.

7. Bring your needle out and work 2 more stitches to complete a double cross-stitch.


A completed laced herringbone square
Herringbone Stitch (Raised Band)
Raised herringbone band is built in layers—first satin stitch, then herringbone, then lacing. It looks complex but is relatively simple. You can vary the width of the band and change threads. It makes a very effective border and is quite complete in itself. You can also work the band on a gentle curve.
1. Lay down a band of satin stitch.
2. Work a line of herringbone stitch. Make sure the herringbone stitches are slightly loose, as lacing will tighten the stitches.

3. To lace the herringbone stitches, bring the needle out at the side of the row. Thread the needle under the herringbone.

4. Take the lacing thread over the crossed bars and up under the next diagonal line.

5. Repeat this motion along the line of herringbone. Don’t pull too tight; just relax and lace the threads.

A line of raised herringbone band

Raised herringbone band and satin stitch worked free-form using cotton, silk, stranded cotton floss, wool, and metallic threads
Raised herringbone band worked free-form using perle cotton #5 and metallic threads
Herringbone Stitch (Square)
Herringbone square stitch is simply herringbone stitch worked in a square. You can use it as an isolated motif or arrange the units in patterns so that it becomes an interesting filler.
1. Starting on the left (right for left-handed) side of the square, take your needle up diagonally, and make a small horizontal stitch. This is the first corner of the square.

2. Take your needle diagonally down and make a small vertical stitch. This is the second corner of the square.

3. To make the third corner of the square, take the needle diagonally downward and make a small horizontal stitch.
4. Take the needle back up to the first corner to complete the stitch.

Completed herringbone square

Free-form herringbone squares stacked in combination with couched eyelash thread and beads

Herringbone squares stacked, worked in a variegated cotton thread
Herringbone Stitch (Tied)
Tied herringbone is a highly decorative composite stitch that consists of herringbone stitch that has been tied with a straight stitch where the bars cross. You can switch out the straight tacking stitch for other decorative stitches. This stitch is also known as tacked herringbone.
Work a line of herringbone stitch, then tack down the crosses. You can substitute the straight stitches for cross-stitches or detached chain stitches. Other nice tacking stitches are fly stitch, oyster stitch, bullion knots, or beads.


Two lines of tied herringbone

Rows of herringbone worked in perle cotton #5 tied with crosses worked in variegated perle cotton #8.
Lines of herringbone tied with a cross, interspersed with herringbone stitches worked closely together. The sample was worked in variegated perle cotton #8.

Two lines of tied herringbone worked as a border in hand-dyed perle cotton #5. Sequins were stitched in the spaces of the pattern.

Two rows of herringbone that have been stacked. The bottom row was worked in wool and tied with a seed bead. The top row is tied with the straight stitch. Seed beads were added in the fork of the cross.

Tied herringbone tied with an upright straight stitch
Herringbone Stitch (Twisted Lattice Band)
Twisted lattice band creates an attractive band of stitching that can be used as a border. You can also work this stitch row upon row to create an interesting filling.
1. Lay a foundation row of herringbone stitch. Space the stitches slightly wider and looser than normal. The lacing will tighten the stitches slightly, and if you space the foundation stitches a little wider, it gives you room for thicker threads if you want to use them.

2. Work a second row of herringbone stitch. On every second stitch, slide the needle under the cross bar created by the first row of stitches. The pattern is to take the needle under on the downward stitch and over on the upward stitch.


3. Complete a line of double herringbone stitch, spaced between the foundation row.

The lacing is worked in 2 journeys. Please note the weaving in twisted lattice band will not work if you do not use this version of double herringbone, as you need the woven cross bars for the lacing thread to sit neatly. Use a tapestry needle to avoid splitting the foundation herringbone stitch.
4. Bring the needle out at the start of the row and slide it under the first bar pointing left (right for left-handed). Pull the thread under the stitch.

5. Slide the needle under the second bar and pull the thread under the stitch.

6. Continue along the line. Take care to lace, and not to pick up any of the fabric.

7. Turn your work and lace along the other side of the row.
Completed twisted lattice band

Experiment with different threads to develop some really interesting effects. Here, the foundation stitches are worked in perle cotton #5 and then laced with a metallic thread.
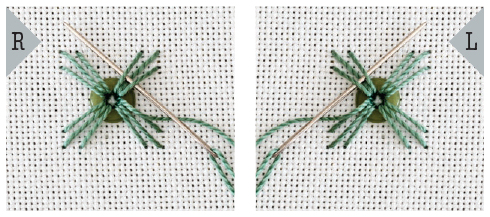
Needle-Woven Picot
Needle-woven picot is a fun three-dimensional stitch that is ideal for leaves and flower petals. You can work this stitch short or long for different-size leaves. When worked wide and stacked, they form lichen-type textures. If worked stacked in semicircles, they make great pine cones!
Tip Use a blunt tapestry needle so that you do not split the threads as you weave them.
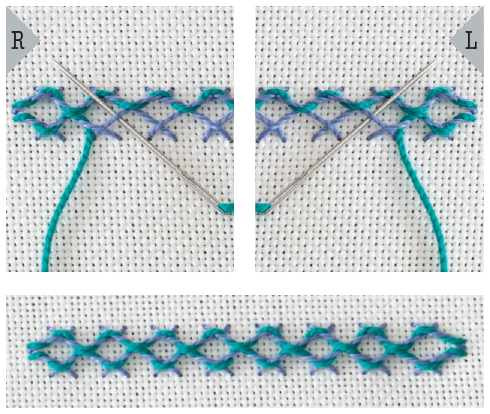
1. Place a pin in your work with the pin emerging from the fabric where you want the base of your picot to be. Bring the thread out at the base to the left (right for left-handed) of the pin. Take the thread back into the fabric on the right hand side placing the loop under the pin.

2. Bring the thread out, at the base of where the pin emerges.

3. Wrap the thread behind the pin, from right to left.

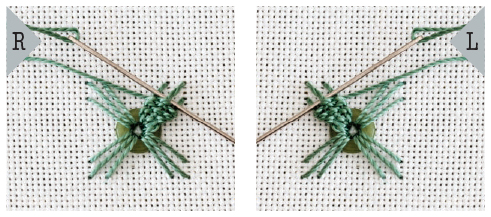
4. Begin weaving by sliding the needle from left to right, picking up the 2 outer threads. You do not pick up the middle thread.

5. Pull the thread through firmly but not too tight. Turn the needle and slide the needle under the middle thread.

6. Pull your thread through and continue in this back-and-forth motion. As you weave, use the needle to pack the picot so that it is firm.

7. Continue weaving until the picot is packed firmly to the base. Take the thread to the back and secure with 2 small backstitches.
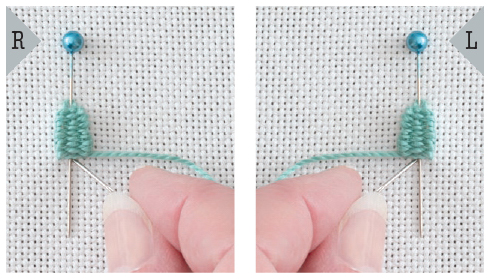
8. Remove the pin, and you have a freestanding needle-woven picot which pops up from the fabric.

Completed needle-woven picot
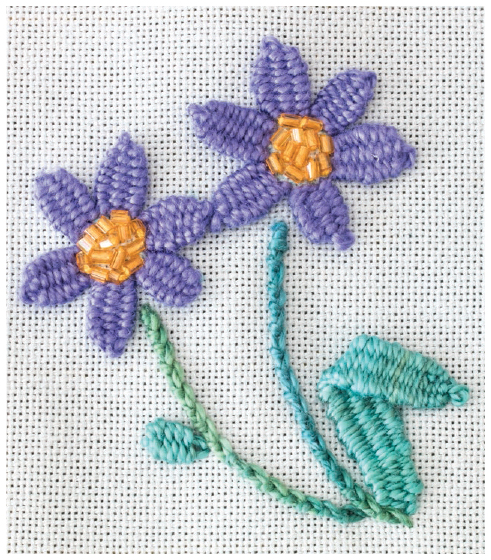
Needle-woven picot in a floral motif
Palestrina Stitch
Palestrina stitch will produce an interesting textured line that will hold a curve well, which means it can be used to outline shapes in a design. A firm twisted thread, such as perle cotton, will show the knots to their best advantage.
1. Bring the needle up through the fabric and make a small diagonal stitch. This forms the first bar onto which the stitch is made.

2. Pass the needle under the stitch. This movement will take your thread over the top of the bar. Pull the thread through.
3. Pass the needle under the bar a second time. Loop the thread under the needle and pull the needle under the bar.
4. Pull the thread snug to form a knot.

5. Move along the line and make a second bar onto which you work your knot.
6. Space the knots evenly and close together to produce a textured line.

Palestrina stitch

A small motif worked in perle cotton #5
Pekinese Stitch
Pekinese stitch is also known as Chinese stitch, since it is found on Chinese embroideries, worked in silk, row upon row, sometimes 30–40 stitches to the inch.
Pekinese stitch creates a heavy line which can follow a curve well. This stitch is useful as a finishing line around the edge of items like fabric postcards, fabric book pages, needle books, or pincushions. For extra interest, experiment with different threads. You can lace with fine cord, chainette, rayon ribbon floss, a yarn, or a fine ribbon.
1. Work a foundation line of backstitch in a loose manner, because the threading will tighten the stitches.
Tip Use a blunt-tipped tapestry needle for the second pass to avoid splitting the foundation stitches.
2. Using a second, decorative thread, lace the thread up through the first stitch, then down through the third. Do not pass the needle through the fabric.
3. Move back 1 stitch and lace the thread up, then down through the fourth stitch.

4. Repeat this lacing process along the line. Tighten slightly after each threaded loop.


A line of Pekinese stitch
Pekinese stitch used along the edge of lace on a crazy quilt block
Pekinese Stitch (Chained)
Chained Pekinese creates a great border and takes on a life of its own once you start working it in 2 rows face to face or back to back. It also lends itself to experimenting with different threads in contrasting color and texture.
To work chained Pekinese stitch, you need to understand how to work Pekinese stitch.
Tip Weave the second thread using a blunt-ended tapestry needle to avoid splitting the foundation threads.
1. Start by working a row of backstitches looser than usual. Below the line, space a line of vertical straight stitches so that a stitch sits between each pair of backstitches.

2. Bring your needle out at the base of the line of backstitches. Slide the needle up, under the second backstitch. Pull the thread through.

3. To make the first “chain,” slide the needle under the previous backstitch and pull the thread through.

4. Slide the needle under the little straight stitch and pull your thread through.

5. Slide the needle under the next backstitch in the top line. Pull your thread through.

6. Slide the needle under the previous backstitch and the next small straight stitch and pull the thread through to complete the first loop of chained Pekinese stitch.
7. Continue the pattern using the vertical stitches to catch the “chain” of every second loop.
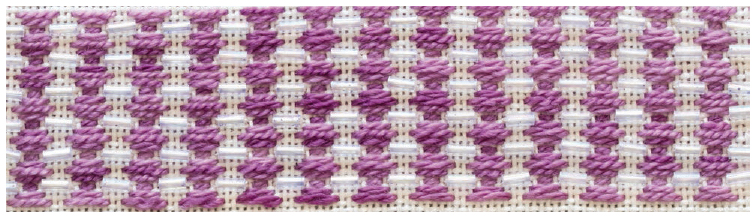
Chained Pekinese

A single line of chained Pekinese
Two lines of chained Pekinese stitch worked face to face

Chained Pekinese used on a crazy quilt block
Pekinese Stitch (Diminishing)
Diminishing Pekinese is worked on a foundation of backstitches. However, unlike regular Pekinese stitch, the foundation stitches are worked in a variety of shapes, including circles.
1. Work a number of foundation rows of backstitch in a simple shape. The rows of backstitch should line up vertically and be worked in a fairly loose manner because the threading will tighten them.

2. To thread, start at the narrowest point. Pass the needle under the stitches, not through the fabric.

3. Slide the needle under the third row of stitches, then back through the second row.
4. Repeat this back and forward motion, lacing the foundation stitches along the shape.


Diminishing Pekinese stitch used in a traditional motif

Diminishing Pekinese stitch used in crazy quilting
Pistil Stitch
Pistil stitch looks like a French knot with a tail. It is an interesting stitch, ideal to use for the center of flowers or arranged in a circle as a flower motif. The weight of the thread will determine the size of the finished stitch.
Tip This stitch is easier to work with the fabric stretched in an embroidery hoop. I recommend that you use a milliners needle.
1. Bring the thread to the front of the fabric. Wrap the thread twice around the needle.

2. Insert the needle back into the fabric a little distance from where it emerged, holding the “tail” of the thread taut and flat to the fabric.

3. Take the needle and thread through to the back of the fabric. Hold the knot with your thumb as you pull the thread through to the back of the fabric.


Pistil stitch

Work as many stitches as your design requires.

Pistil stitch worked in perle cotton #8
Running Stitch
Running stitch is also known as darning stitch, as many darning patterns are created using it.
1. Simply pass the needle over and under the fabric in a regular, even manner.

Running stitch
Running stitch worked free-form in the background

Pattern darning creates very attractive designs by changing the length of the stitches and the spacing between them.

Pattern darning can look effective if you use a variegated thread.
Beads spaced between running stitches
Running Stitch (Stepped and Threaded 1)
Stepped and threaded running stitch 1 creates a line which can take on a braidlike appearance. It can be used just as it is, or further decorated with stitches or beads. To create more interest, you can also use novelty threads at the lacing stage.
1. Work 2 parallel rows of running stitch. “Step,” or offset the stitches in the second row

2. Thread a blunt-ended tapestry needle with a second thread. This needle will help you avoid splitting the foundation running stitches. Bring the thread out on the bottom line and pass the needle diagonally under the first bottom and top stitches.

3. Pull the thread through. Turn the needle and slide it under the second top running stitch and the first bottom running stitch.

4. Pull the thread through and repeat along the line. As you move from stitch to stitch, do not pass the needle through the ground fabric.

A line of stepped and threaded running stitch 1

Stepped and threaded running stitch worked row upon row and threaded with a metallic yarn

Stepped and threaded running stitch decorating a seam in crazy quilting
Running Stitch (Stepped and Threaded 2)
Stepped and threaded running stitch 2 creates a line which can look like a braid, if worked closely spaced together. As you move from row to row, do not pass the needle through the ground fabric.
1. Work 2 parallel foundation rows of running stitches, offsetting the second row.

2. Thread a blunt-ended tapestry needle with a second thread. This needle will help you avoid splitting the foundation running stitches. Bring the thread out on the top line and pass the needle diagonally under the first top and bottom stitches.

3. Turn the needle and pass it first under the lacing thread, then under the next running stitch on the top row. Pull the thread through.
4. Turn your needle and slide it under the lacing thread, then under the next running stitch on the bottom row. Pull your thread through.

5. Continue these lacing steps along the line.
A line of stepped and threaded running stitch 2

Stepped and threaded running stitch 2 laced with a fine ribbon
Running Stitch (Threaded)
Threaded running stitch makes an attractive threaded line, which follows curves well.
1. Work a line of running stitch.
2. Using a blunt-tipped tapestry needle, thread the stitches with a contrasting color or weight of thread. Take care to lace under the stitches only, not under the fabric.

A line of threaded running stitch

This stitch becomes interesting when you lace with a different thread. Here, I have used silk, novelty yarn, and perle cotton #5 and #8.

Another approach is to work 2 or 3 lines of running stitch as a foundation row. Here, the rows are worked face to face and bugle beads are added to the spaces created in the pattern.
A foundation row of 2 lines of running stitch was worked in perle cotton #5 before lacing in both directions with a metallic thread.

The upper right corner above the crab is threaded running stitch worked in a variety of threads.
Satin Stitch
Satin stitch is one of the oldest embroidery stitches and is found on traditional embroideries in practically every country of the globe. To use satin stitch to advantage, stitches should lie evenly and closely together.
Tension can be an issue for some people. If your stitches are too slack or too tight, use an embroidery hoop.
This stitch is really suitable for covering small areas only, as long satin stitches can snag and become loose and untidy. If holding a neat, curved edge is difficult, try using outlined satin stitch to solve the problem. If you need to cover a larger area, divide the shape into smaller sections and work rows of satin stitch to fill each area.
1. Make a single straight stitch.
2. Bring the needle out very close to the stitch just made and continue to work the line or fill the shape.


Satin stitch worked in a line

Satin stitch worked in variegated perle cotton #5. I worked them in a simple zigzag pattern.
Satin stitch worked in scallop shapes in different threads

Satin stitch worked in a regular patterns using a variegated perle cotton #5

Different threads were used in this sample of satin stitch and Algerian eye stitch. Silk, linen, and perle cotton #5 are used.

You do not have to cover the whole surface of the fabric. Here, rows of satin stitch are spaced apart. The pattern was worked using variegated perle cotton #5.
Satin Stitch (Outlined)
Outlined satin stitch is ideal for adding an even edge to a shape. It is created by working straight stitches close together over an outline of chain stitches. It produces a neat, uniformly edged, filling stitch.
Tip If your stitches are too slack so that they sag, or too tight so that they pucker the fabric, use an embroidery hoop.
1. Mark your shape on fabric using an erasable or dissolving pen. Work the outline in chain stitch.

2. Starting at one edge, bring the thread up close to the line and work straight stitches very close together, but not on top of each other.

3. Continue working straight stitches side by side until you fill the shape.


A filled shape using outlined satin stitch

Outlined satin stitch used to define small circles. The sample is worked in perle cotton #8 on hand-dyed linen.
Satin Stitch (Padded)
Padded satin stitch is a very effective way to define and emphasize an area in your embroidery.
1. Work 3–5 long straight stitches using a thicker thread or 6 strands of cotton floss.
2. Make a straight stitch across the foundation stitches at one end. Make another straight stitch very close to the first. Make sure you take the needle to the back of the fabric, so you are stitching through the fabric, not just wrapping the padding stitches.
3. Continue to cover the padding evenly. When completed, only the satin stitches should show.


Padded satin stitch in a row

Padded satin stitch worked in rings
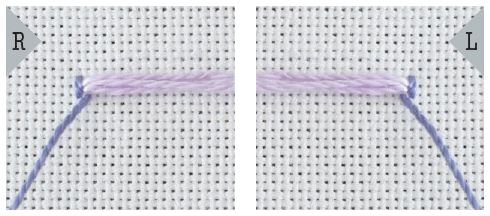
Scroll Stitch
Scroll stitch will hold a tight curve and can be worked back to back to produce a heavy braidlike line. This stitch looks good in thicker threads and novelty threads, so do experiment a bit.
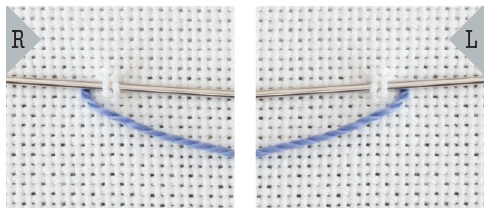
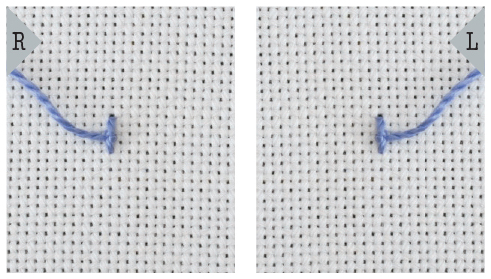
1. Work scroll stitch from left to right along a line. Bring your needle out on the left and take a small bite of the fabric on the line. With the thread wrapped behind and under the needle, pull it through the fabric.

2. Do not pull the loop too tightly.


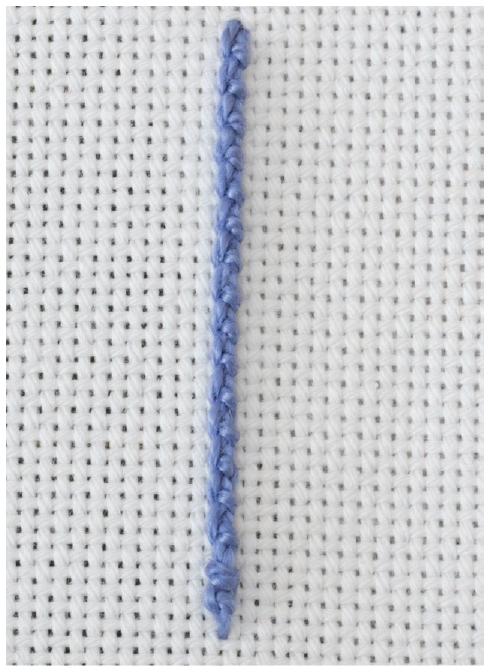
A line of scroll stitch. This sample was worked in perle cotton #5. However, I encourage you to experiment with threads, as this stitch looks good worked in thicker threads.

Scroll stitch worked a series of scallops along a seam on a crazy quilt block
Sheaf Stitch
Sheaf stitch is a quick, easily worked stitch that looks good in a firmly twisted thread such as perle cotton #5 or #8.
1. Bring the needle out at the top of where you want your stitch to be and make a vertical straight stitch. This stitch will be the middle stitch of the sheaf.

2. Make a second straight stitch to the right (left) of the first. Make a third vertical stitch bringing the needle out to the left (right) of the center stitch as illustrated. Pull the thread through.

3. Thread the needle under the left (right) straight stitch.

4. Take the thread over the top and pass the needle under the right (left) straight stitch. Insert the needle in the middle and take the thread to the back.

5. Pull it snug to make a small cross bar and give the sheaf a waist.

Completed sheaf stitch

Sample of sheaf stitch used in a motif of a kite
Stem Stitch
This linear stitch is incredibly useful because it can hold a curve well and looks good in variety of threads.
1. Work from left to right (right to left for left-handed). Bring the thread up from the back of the fabric on the line.
With your working thread under your needle, make a small backward stitch.
2. Pull the thread through the fabric.

3. Make the second stitch forward along the line, bringing the needle out a little behind the first stitch. Pull the thread through the fabric.

4. Repeat along the line. Keep stitches the same length and the tension even. Closely spaced stitches make a tight line. You can make a looser line by lengthening the spacing.

A line of stem stitch

Stem stitch worked on a seam on a crazy quilt block.

Stem stitch worked along the edge of a piece of silk appliquéd with Mistyfuse (by Attached Inc.)
Stem Stitch (Portuguese)
Portuguese stem stitch creates a knotted, ropelike line which can be accentuated by using a heavy solid twisted thread, such as pearl cotton.
Portuguese stem is best used when you want a chunkier, stronger stitch. It can be used on even-weave or plain fabrics and follows a curve well.
1. Portuguese stem is best worked starting at the bottom and working toward the top. Bring the thread through from the back of the fabric and pick up a small piece of material.

2. Bring the thread out to left (right). Slide the needle under the first stitch. Make sure you do not pick up any fabric.

3. Take the needle through. You are actually whipping this stitch.
4. Whip the stitch a second time under the first whipped stitch. These 2 whipping stitches form the knotlike appearance.

5. Move along the line and make another small stitch.

6. Repeat the whipping process on the first and second stitch. Continue up the line.

A line of Portuguese stem stitch

Portuguese stem stitch used on a crazy quilt block
Stem Stitch (Whipped)
Whipped stem stitch creates a slightly raised line that can look like a fine cord.
For the whipping thread, you have the option of switching the color, thread thickness, or thread texture.
1. Work a foundation row of stem stitches. Make each stitch slightly longer and looser than usual, so you can pass a second thread under them more easily.
2. Use a blunt tapestry needle for the second thread, so that you do not split the foundation threads as you sew. Bring the needle from the back of the fabric and pass it under the first 2 stitches. Do not pick up any of the fabric.

3. Take the thread over the top of the stitches and pass the needle under the second and third stem stitches. Do not pick up any of the fabric.

4. Repeat along the entire length of the row.

Completed row of whipped stem stitch

Whipped stem stitch on a small wall piece
Turkman Stitch
Some embroiderers classify Turkman stitch as a form of chain stitch, and others classify it as a closed feather stitch. This stitch could be either. No matter which it is, Turkman stitch is simple and quick and will follow a gentle curve. You can easily decorate it further by using the spaces created by the stitch.
1. Work between 2 imaginary vertical lines. Bring the needle out at the top left (right), insert it on the top right (left), and make a small vertical stitch so that the needle point reappears on the right (left) line. Keeping the thread under the needle point, pull the thread through.

2. Insert the needle on the left (right) line, very close to where the thread emerged, and take a small vertical bite. Keeping the thread under the needle point, pull the thread through.
3. Insert the needle on the right (left) line, catching the loop, and make a small vertical stitch.

4. Alternate down the row, making sure that each stitch catches the previous stitch.

Completed line of Turkman stitch

Turkman stitch worked in perle cotton #5 and further decorated with French knots

Turkman stitch worked in perle cotton #5 and tied with a cross bar

There are many opportunities to fill the spaces in this stitch with extra decoration.
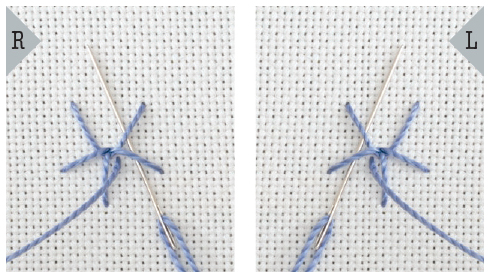
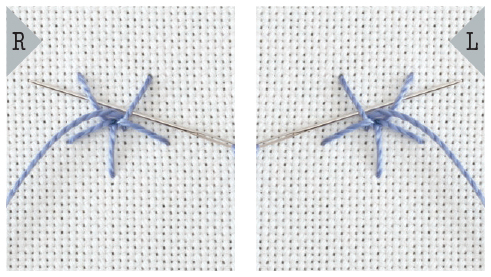
Van Dyke Stitch
Van Dyke stitch is traditionally used as a border. By varying the width, you can create nice leaf shapes that have a central line up the spine of the design. Van Dyke stitch looks good worked in thread with a firm twist such as a perle cotton #5 or #8.
Tip Keep your tension slightly loose. If you pull the stitches too tightly, the center plaited line will not form nicely.
1. This stitch is worked between 2 invisible vertical lines. If needed, you can mark the outline with a disappearing marker pen. Bring the thread out on the left. Move up diagonally and make a small horizontal stitch at the center point of the stitch.
2. Pull the needle through and insert it on the right (left) (right) line. The working thread should make a narrow cross. Bring the needle out on the left (right) line, a little below the first stitch.
3. Pass the needle behind the 2 long diagonal stitches, taking care not to pick up any fabric.

4. Take the needle to the back of the fabric on the right (left) side of the line and bring it out on the left (right), just below the stitch.

5. Continue working down the line.

Completed Van Dyke stitch
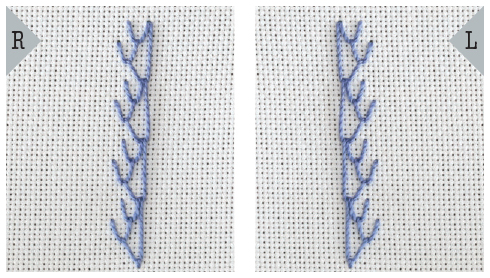
Wheat Ear Stitch
Wheat ear stitch is an easy, versatile stitch that is often used to depict wild grasses and wheat. This stitch will follow a curve well or can be worked in single units and arranged in patterns. The length of the diagonal stitches can be varied, and it lends itself to beading. Many types of embroidery thread can be used. It is a stitch that can easily be laced or threaded, and you can use the rows to couch down the thread.
1. Make a straight stitch worked at an angle.

2. Make a second straight stitch in the opposite angle, with the base touching the base of the first stitch. Bring your thread out a little below the base of the V.
3. Pass the needle under the 2 straight stitches.
4. Pull the needle through and take it to the back of the fabric so that the thread loops in a single chain

5. At this stage, this unit is a single detached wheat ear stitch and you can arrange these units in patterns.

6. To make a row, add another set of diagonal stitches and bring the thread out further down the line.


7. Pass the needle under the 2 stitches to make the chainlike loop and continue down the line.


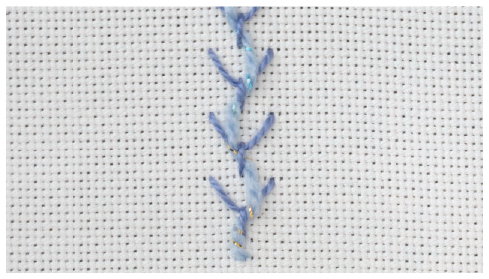
A line of wheat ear stitch

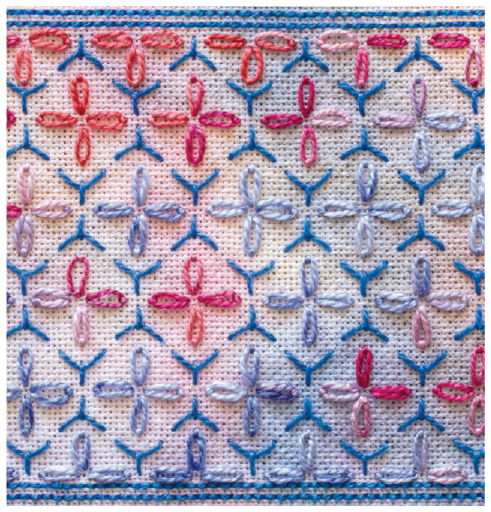
The grasses were created using a variety of wheat ear stitches.
Wheat Ear Stitch (Alternating)
Alternating wheat ear stitch can be used to create unusual border patterns. This stitch will follow a curve well or can be worked in single units.
1. Start with a straight stitch worked at an angle.

2. Make 3 straight stitches at an angle in the opposite direction. Make sure the base of each stitch is in the same hole as the first stitch. Bring the thread out a little below the base.

3. Pass the needle under the straight stitches.

4. Take the needle through the fabric so that the thread loops in a single chain.

5. Work 3 straight stitches on the other side of the line, into the base of the chain stitch.

6. Add a single stitch to the other side and bring your thread out further down the line.

7. Pass the needle under the 4 stitches to make another chainlike loop and continue in this manner down the line.


Alternating wheat ear stitch

Alternating wheat ear stitch in variegated perle cotton #5
Wheat Ear Stitch (Chevron)
Chevron wheat ear stitch can be used to create unusual border patterns. If you work just a single line of this stitch, it will follow a curve well. It is very similar to regular wheat ear, but with extra straight stitches added to the V section of the stitch. Changing the angle of the straight stitches and changing the spacing between the lines can vary the pattern.
1. Start with 4 straight stitches worked at an angle. Bring the needle out a little below the base.

2. Pass the needle under the straight stitches.

3. Pull the needle under the stitches and take it through the fabric so that the thread loops in a single chain.

4. Work another set of 4 straight stitches into the base of the chain stitch. Bring your thread out further down the line.

5. Continue until you have a line of stitches.

6. Turn your work and commence the next line of stitches.
7. Work a set of 4 straight stitches.

8. Continue the pattern down the line.

9. Work each line in the opposite direction, turning your work at the end of each line. Work as many lines of chevron wheat ear stitch as you need to fill the area of your design.

Chevron wheat ear stitch
Whipped Spoke Stitch
Whipped spoke stitch produces a line of ridged stitches. It can be used alone as an accent stitch, or to produce a textured filling. It can be very dramatic, as it forms a strong line. Use variegated threads, novelty threads, or even fine knitting yarns to whip the spokes.
1. Lay down foundation stitches of straight stitch, in the shape you wish to work.
2. Use a blunt tapestry needle to avoid splitting the foundation stitches. Bring the thread up at the bottom of the line and slide the needle under 1 thread and pull it through. Move back to the start and slide the needle under 2 threads. Note that the needle does not go through the fabric.

3. Pull the thread through, and you have whipped the first spoke.

4. For the rest of the line, slide the needle under 2 threads, pull it through, move back 1 thread, and slide the needle under 2 threads.

5. Repeat this action, whipping each spoke as you progress along the line.
6. When you have finished the first row, take the needle through the fabric to where you began and work a second row, then a third and so on until the rows fill the shape.
A line of whipped spoke stitch

Whipped spoke stitch is worked in a fan shape in combination with French knots on a crazy quilt seam.

Whipped spoke stitch used around a bead

Fans of whipped spoke stitch used to secure a bead
Whipped Wheel
Whipped wheel creates a ribbed disk that can be used as single accent stitch.
1. Start with a single fly stitch. To each side of the fly stitch tail, add 2 straight stitches of equal length. You should have a circle which has five “spokes” to form the foundation.

2. Bring your thread up at the center of the wheel.

3. From this point on, your needle does not go through the fabric, so use a blunt tapestry needle to avoid splitting the foundation stitches. Slide the needle under 2 threads and pull the thread through.
4. Move back 1 stitch and slide the needle under 2 threads. Pull the thread through and you have whipped the first spoke. This process is best described as making a spiral of backstitches over the spokes

5. Repeat this action, whipping each spoke as you progress around the wheel until the circle is filled.


Whipped wheels worked in perle cotton #8 and used as accent stitches

Whipped wheels worked on hand-dyed felt over free-form machine embroidery
Whipped Wheel (Over-a-Bead)
1. Secure the bead to the fabric with 5 straight stitches that will form the foundation of the stitch.
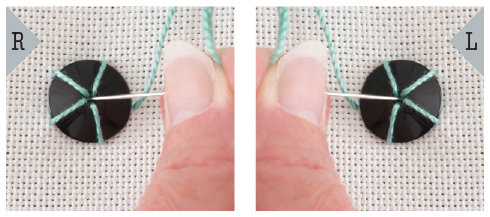
2. Bring the thread up at the center of the bead. From this point onward, your needle does not go through the fabric. Slide the needle under 2 threads and pull it through.

3. Move back 1 stitch and slide the needle under 2 threads. Pull the thread through and you have whipped the first spoke.

4. Continue around, whipping each spoke as you progress around the wheel, until the circle is as large as you want it to be. To finish, slide the needle under the whipped area and take it down through the center of the bead.


Whipped wheel over-a-bead

Whipped wheel over irregular coconut beads, alongside French knots and buttonhole wheels
Woven Trellis Stitch
To make woven trellis, you work a group of foundation stitches onto which you weave. Use a blunt tapestry needle so that, as you weave the threads, you do not split them by accident.
1. Start by working 12 straight stitches clustered in groups of 3, arranged radiating from the middle.

2. Bring the working thread up through the fabric at the middle. Begin weaving by sliding the needle under the 2 outer threads, skipping the middle thread. Pull the thread through firmly, but not too tight.

3. Turn the needle and continue weaving by picking the middle thread of the same group. Pull the thread through and continue in this back-and-forth motion.

4. As you weave, use the needle to pack the petal so that it firm.

5. Continue weaving until it is packed firmly to the base. Take the thread to the back and bring it out at the center of the motif ready to work the next set of foundation stitches.

6. Work until each section is woven and take the thread to the back and secure it with 2 small backstitches.

Woven trellis

You can vary this stitch by working it in parts. This sample illustrates a quarter of woven trellis worked between the scallops on a crazy quilt seam.
Woven Trellis Stitch (Over-a-Bead)
Woven trellis over-a-bead is worked in the same way as regular woven trellis, but you use the 12 straight stitches to secure the bead. If you want to add texture to your work, use a low, flat bead. If you want to use a higher bead, the bead will show, becoming a novel way to attach a bead.
1. Start by using 12 straight stitches to secure the bead. Arrange them in groups of 3 radiating from the middle.

2. Bring the working thread up through the bead at the middle. See woven trellis stitch to weave the base stitches.


Woven trellis over-a-bead

Woven trellis over-a-bead in a detail of a wall piece. The beads are large and I wove only 9 straight stitches so the beads could be seen.