CHAPTER 6
PHASE 1: FOUNDATION
Enough chit chat. It’s time to start the Maximum Strength Program. Step 1 is to do your pretesting. Follow the pretesting instructions presented in the next section, and record your results on the table provided on page 175, where you will also record your Moving Day results 16 weeks from now. You will repeat the same testing protocol on Moving Day at the end of Phase 4. The only difference is that your results will be much better!
I recommend that you do your pretesting on a Saturday. This will allow you to have a day of rest before you start Phase 1 on Monday. This chapter provides all of the information you need to complete the first four weeks of the Maximum Strength Program. All of the Phase 1 strength exercises are explained and illustrated. A detailed schedule of strength-training sessions, which emphasize straight sets, and energy workout recommendations are given at the end of the chapter.
PRETESTING (AKA PACKING DAY)
Before tackling your first set of performance tests, you’ll need to get your body weight in just a pair of underwear, preferably first thing in the morning. At this time, you’ll also want to snap a few “before” pictures against which you can compare your progress four months from now, when you take your “after” photos. Once those tasks are out of the way, you can get to the fun stuff at the gym!
As you should do with any training session, begin your pretesting by getting the blood flowing with one of the mobility warm-up routines outlined in Chapter 5. Either one will do the job. After you’ve completed this warm-up, move on to the specific warm-ups for the tests, and the tests themselves, in the order given below. If you do your warm-up barefoot, as I recommend, don’t forget to put your shoes on for the tests.
1. BROAD JUMP
The first test is the broad jump (also known as the standing long jump). To prepare for this test, extend a tape measure on the floor (fastened securely with tape) at a length of 12 to 14 feet. I don’t expect you to jump 12 feet, but you don’t want to feel “cramped” at all during the test. Stand normally with the toes of both feet even with the beginning of the measuring tape.
Crouch down into a partial squat, swing your arms back, and jump forward, landing on both feet. Begin with five easy jumps at 50 percent of maximal effort just to get a feel for the movement and to get the blood flowing. Once you’re feeling looser, go ahead and take a jump at 85 to 90 percent of your best effort, just to get a number on the board. Measure your jumps from the back of the heel of the leg that is furthest back upon landing (ideally, your two feet will land evenly). Mark off your jump with a piece of tape on the floor, and then head back to the starting line. Take three more attempts at 100 percent maximal effort, recording your best jump of the day as your official distance.
2. BOX SQUAT
For the box squat (described and illustrated on page 81–82), you’ll warm up by doing a set of eight reps with just the bar, and then you’ll add a small number of plates and do five more easy reps after a break of one minute. Next, perform three moderately challenging reps with a weight you could lift six or seven times before failing.
Now do three or four one-rep sets with three-minute rest periods between sets, finishing with the maximum weight you are currently capable of lifting. Do your first one-rep set with a weight that you are very confident of being able to lift once but might not be able to lift twice. Add 5 to 10 pounds to each subsequent lift until you reach your true maximum. For example, if your current box squat max is 150 pounds, your warm-up and performance test sequence might look like this:
1. Bar (45 pounds) x 8
2. 95 (bar + 25 pounds per side) x 5
3. 125 x 3 (moderately challenging)
4. 135 x 1
5. 145 x 1
6. 150 x 1 (very challenging; it’ll count as your one-rep max)
Err on the side of caution and never rush through your attempts. Remember never to attempt a rep that you cannot complete with perfect form. We aren’t looking for “ugly” reps. Record your results.
3. BENCH PRESS
Follow the same warm-up and performance test protocol for the bench press that you followed for the box squat. Start by lifting only the bar eight times. Next, perform three moderately challenging reps with a weight you could lift six or seven times before failing. Now do three or four one-rep sets with three-minute rest periods between sets, finishing with the maximum weight you are currently capable of lifting. Do your first one-rep set with a weight that you are very confident of being able to lift once but might not be able to lift twice. Add 5 to 10 pounds to each subsequent lift until you reach your true maximum. Record your results. See page 90–91 for a description and illustrations of proper bench press technique.
4. DEADLIFT
I will preface this test with the following disclaimer: If there is one test you should consider omitting from your repertoire, the deadlift is it. The reason is that at the beginning of a resistance-training program, many people lack the flexibility needed to deadlift from the floor safely. Combine this problem with the fact that you’ll be a bit fatigued from the other tests by the time that you get to the deadlift, and you have a higher potential for injury. This is one reason we’ll be doing “speed deadlifts” with a lower percentage of your one-rep maximum deadlift early in this program; they give you a chance to practice the movement.
If you are not familiar with the lift already, do not do it. You’ll still have several measures from which to gauge your progress, and you’ll be able to improve your flexibility to the point where you can do the lift safely by the time this program is complete. If you are familiar with the lift, proceed in accordance with the guidelines below—but “call it” if your form starts to break down.
Follow the same warm-up and performance test protocol for the deadlift that you followed for the box squat and bench press, but adjust the weight for the current movement. (You will probably be able to deadlift more weight than you could box-squat or bench-press.) Start by lifting only the bar eight times to get your groove, then do two more warm-up sets of three reps with increasing weight, and then do three or four one-rep lifts with increasing weight until you hit your limit. Proper technique for the deadlift is described and illustrated on page 83–84.
5. THREE-REP MAX CHIN-UP
Proper technique for the three-rep max chin-up is described and illustrated on page 104. Warm up for this performance test by doing three body weight chin-ups. Move into the performance test by adding external resistance (in the form of weight plates attached to a weightlifting belt by a chain) and complete another set of three reps. Continue adding external resistance and doing three-rep sets until you find your maximum.
PHASE 1 STRENGTH EXERCISES
You will do 20 different strength exercises during Phase 1. The amount of resistance/weight you use in each exercise depends on how many repetitions per set are prescribed in a given session. As a general rule, use the highest level of resistance/weight you can lift for the prescribed number of repetitions with perfect form. This rule does not apply to exercises (such as scapular push-ups) that use only body weight for resistance. You will find specific training guidelines in the Phase 1 Training Schedule at the end of this chapter.
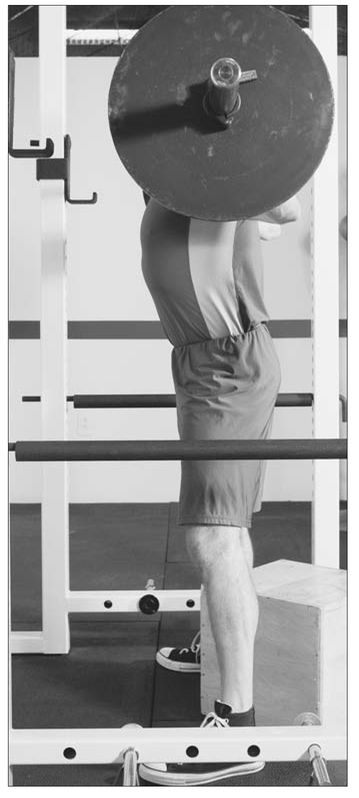
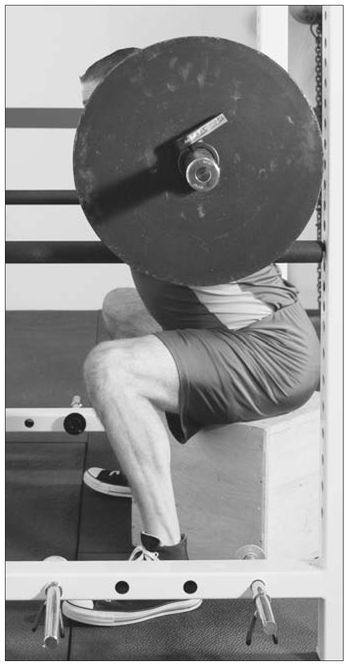
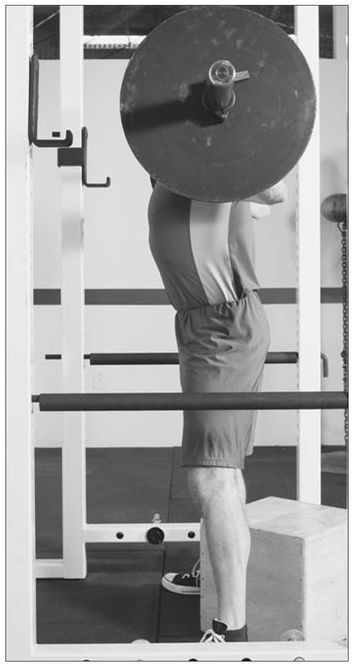
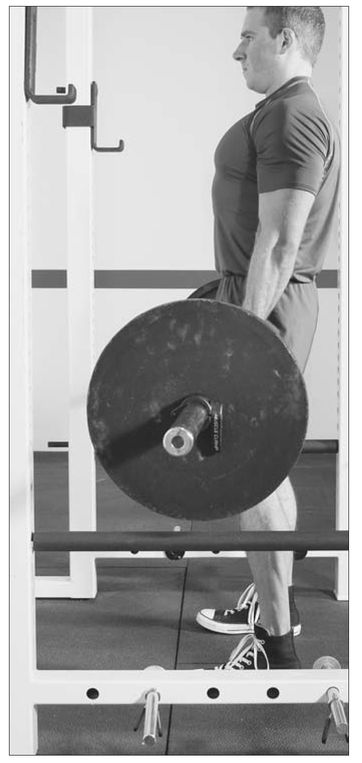
Box Squat
BENEFITS: This exercise strengthens the glutes, hamstrings, quadriceps, and various core stabilizers.
SETUP: Position a box behind you in a power or squat rack. Set up under the barbell as you would for a normal squat, but allow the bar to sit a bit lower on your upper back. Pull the bar down into your traps (i.e., your upper back muscles) by tightening your lats (i.e., your large mid-back muscles) and pulling the elbows forward. Brace your core tightly and take a good gasp of air into your lungs.
ACTION: With a slightly wider stance than you’d normally use, and with your weight on the heels and outsides of your feet, sit back and not down to the box behind you, forcing the knees out to the sides as if you were squatting between your legs instead of over them. When you lower yourself correctly, you’ll feel a stretch in the inner thighs and hamstrings. The box height should put you at a point where the crease of your hips is just below the kneecap in the bottom position.
Box Squat Start
Box Squat Start Middle
Box Squat Finish
Do not bounce off the box. Sit lightly down on it and pause without rocking backward. There will be a little forward lean in your torso in the bottom position. To stand up, continue to push through the heels, and explode off the box, thinking about thrusting your hips forward instead of just extending your knees. Your quads really just come along for the ride as the hamstrings and glutes do the brunt of the work. Stand tall at the completion of each rep before descending for your next rep.
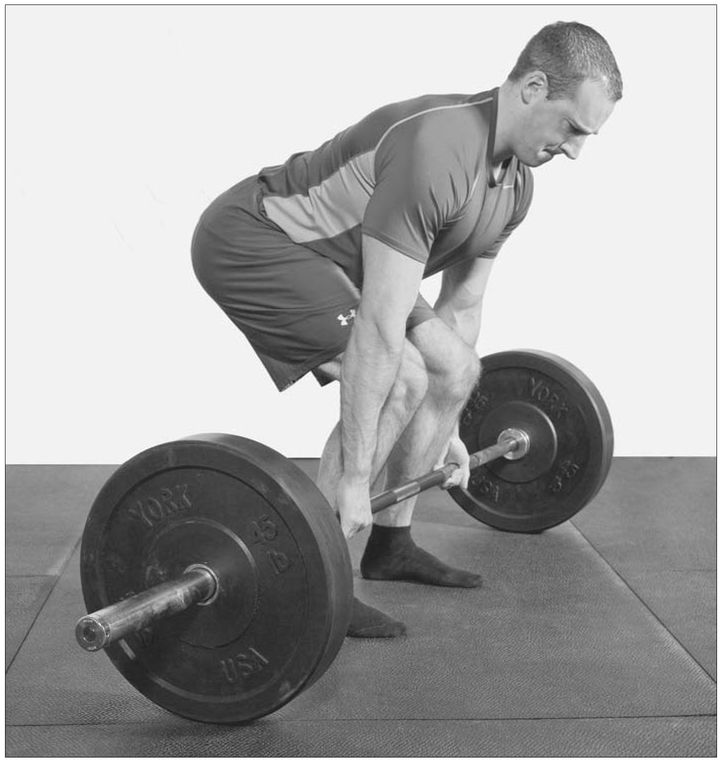
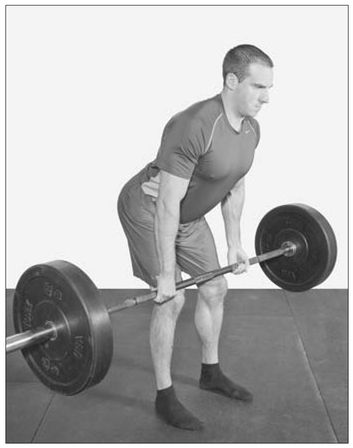
Speed Deadlift Start
Speed Deadlift
BENEFITS: This exercise strengthens the glutes, hamstrings, upper back, grip, and various core stabilizers.
SETUP: Stand facing a weighted barbell with your feet at shoulder width and your shins almost touching the bar. Squat down and, using an overhand grip, grasp the bar with the arms fully extended and close to the sides of the thighs. Think about getting your chest as high and as far forward as possible—you might have to sink your butt down a little more than you otherwise would.
Speed Deadlift Lockout
Speed Deadlift Lowering
ACTION: Drive the heels into the floor and push your hips forward as your knees extend; think of pinching something between your butt cheeks at the top to lock the weight out. Do not just lean back.
You initiate the lowering portion by pushing the butt back (to prestretch the hamstrings); don’t worry about bending the knees until the bar has passed them. Once the bar has passed them, you can bend the knees to get the rest of the way to the floor.
The single most important component of the deadlift is maintaining a neutral spine position. You should not round over at any point. If you don’t have the flexibility to pull from the floor without rounding yet, elevate the plates a bit (with an aerobics step, or by stacking them on some other plates).
Once the weight gets challenging, you’ll notice that your grip will start to become an issue. I recommend getting some chalk for your hands, and also trying out the alternate grip (overhand with one hand, underhand with the other). In certain deadlift variations, you’ll want to use straps, but you should never rely on them when performing conventional deadlifts from the floor. Here, in Phase 1, you’ll be performing what we call speed deadlifts. The idea is to use a lighter load (50 to 65 percent of your one-rep max) in order to develop technique and faster bar speed on the lift.
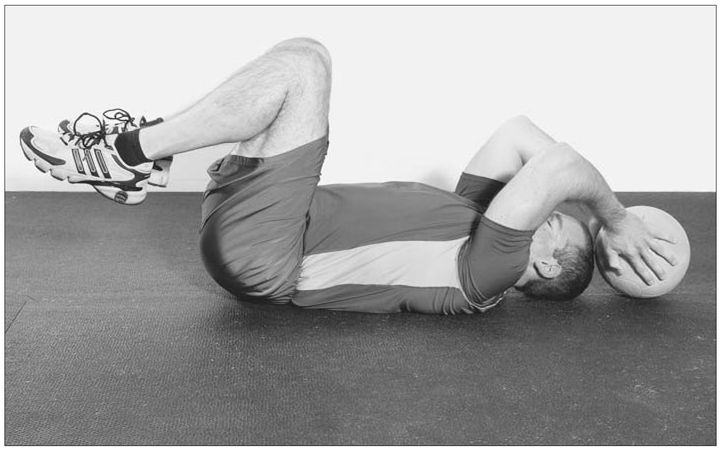
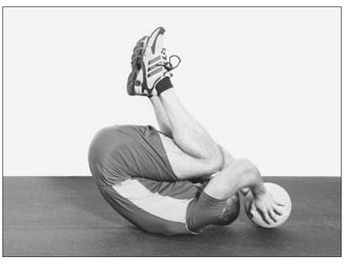
Reverse Crunch Start
Reverse Crunch
BENEFITS: This exercise targets the external obliques, commonly referred to as the lower abs, and helps to correct forward pelvic tilt—a common postural imbalance.
SETUP: Lie face up on the floor with your knees sharply bent, your feet elevated a couple of inches off the floor, and your arms extended straight overhead.
ACTION: Contract your abs and attempt to pull the knees toward the elbows without allowing the ankles to lose contact with your butt. The only motion should be a posterior tilt of the pelvis; you’ll feel it in your lower abs. Your arms shouldn’t move. At first, almost everyone does this exercise incorrectly by letting the legs drop too far and just using the hip flexors. To avoid cheating when you’re initially learning this exercise, hold onto something (e.g., a medicine ball or dumbbell) behind your head to keep yourself in place. As you get more proficient with the movement, you can go to a lighter implement or just leave it out altogether.
Reverse Crunch Finish
Walking Dumbbell Lunge Start
Walking Dumbbell Lunge Step 1
Walking Dumbbell Lunge Step 2
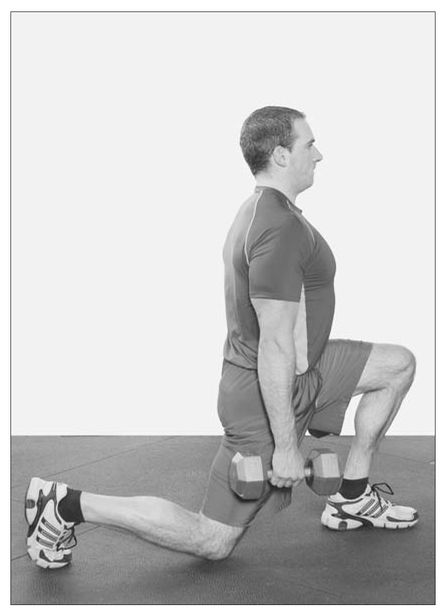
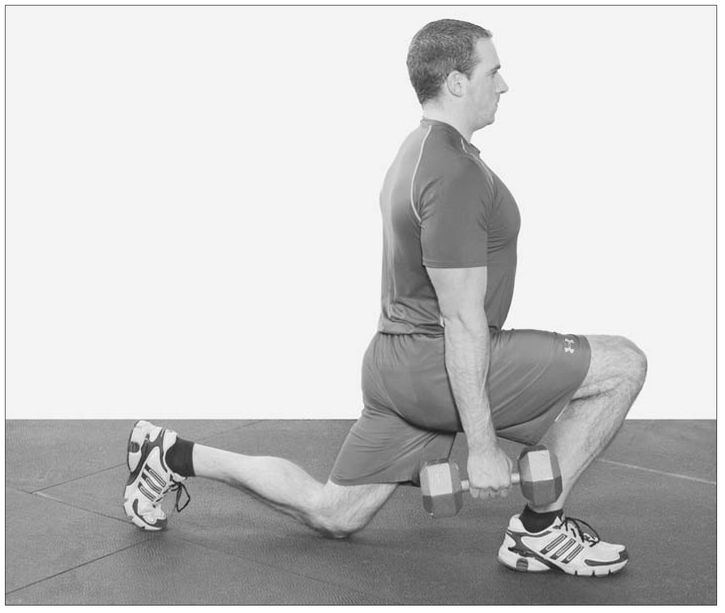
Walking Dumbbell Lunge
BENEFITS: This exercise strengthens the glutes, hamstrings, quadriceps, grip, and various core stabilizers.
SETUP: Stand normally holding dumbbells at your sides.
ACTION: Take a long stride forward, landing on your heel and decelerating with the strength of your glutes, hamstrings, and quads. Sink into the lunge until the knee of your trailing leg lightly grazes the floor, and then push through the front foot’s heel to propel yourself forward into the next step. Be sure to keep the chest up and shoulder blades pulled back throughout this movement.
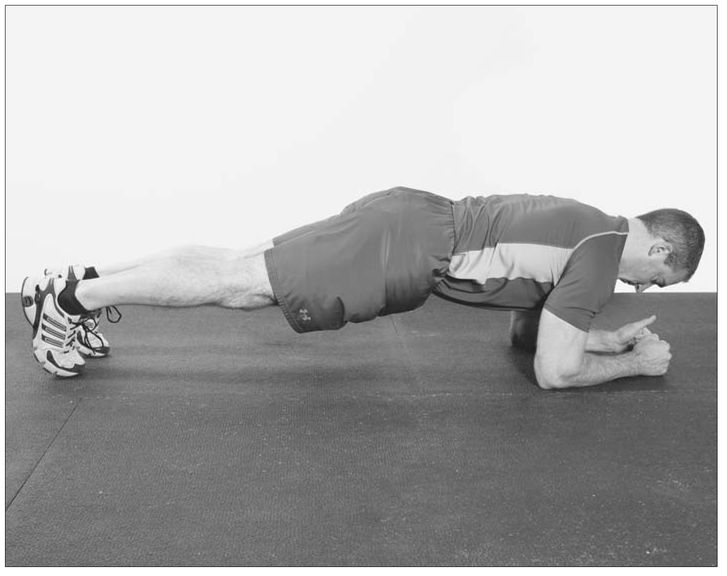
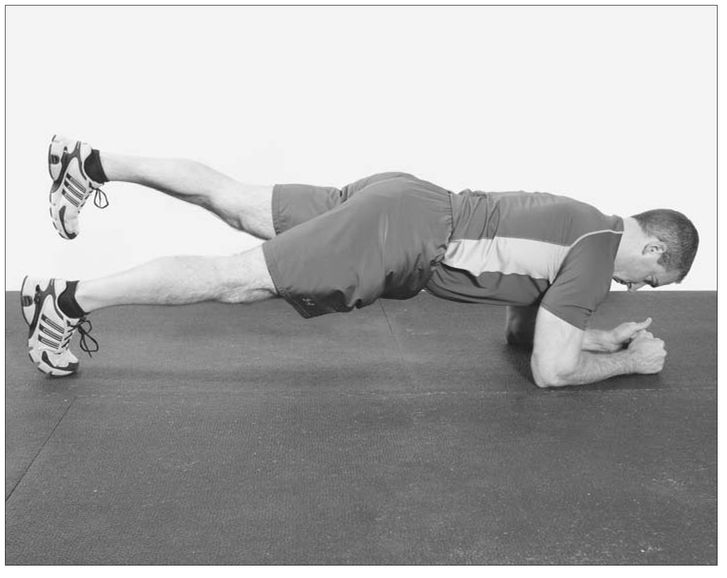
Prone Bridge
BENEFITS: This exercise helps to build muscular endurance in key core stabilizers.
SETUP: Assume a standard push-up position with your upper body weight supported on your forearms instead of your palms. Maintain a 90-degree bend in your elbows and make sure they are placed directly underneath the shoulders.
Prone Bridge
ACTION: Brace your entire core area and keep your hips up and in line with your legs and torso. Think “forearms and toes” with the hips held firm. Hold this position for the amount of time designated in the Phase 1 Strength-Training Schedule (see page 108). If the two-legged version feels too easy and you’re meeting your time goal without a problem, switch to a version where one foot is raised slightly off the floor.
Single-Leg Prone Bridge
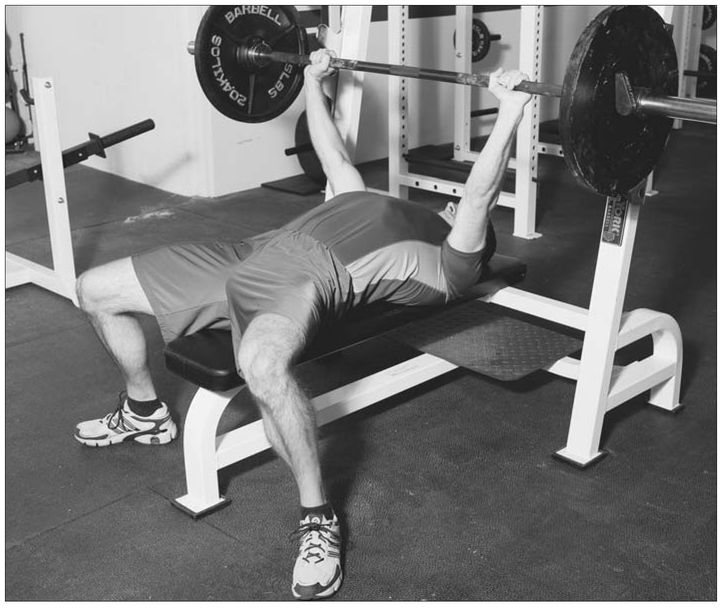
Bench Press Start (and Finish)
Bench Press
BENEFITS: This exercise primarily strengthens the chest, shoulders, and triceps, although there is considerable involvement of the upper back, lower body, and core musculature when the exercise is performed correctly.
SETUP: Line up on the bench so that the very top of your head is directly underneath the bar. Retract your shoulder blades hard. Now slide your body toward the head end of the bench until your eyes are directly under the bar. Keep your shoulder blades pulled down and back. Your rib cage should pop right up. Set your feet underneath your knees, not out in front. This position will put your back in its natural arch.
ACTION: Grasp the bar with your hands placed roughly 1.5 times your shoulder width apart, and get a good handoff from someone so that you don’t lose the tight upper back you’ve established. Keep those shoulder blades back and down!
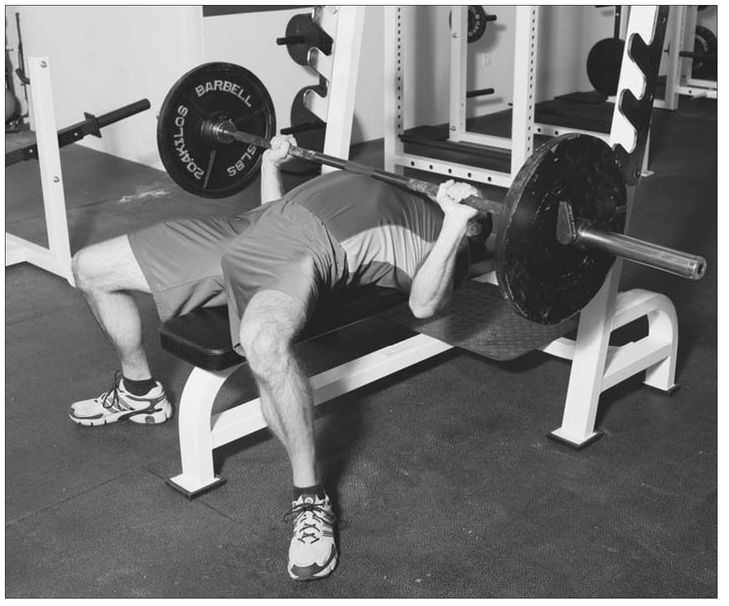
Bench Press Middle
As you lower the bar, keep the upper arms at a 45-degree angle to the torso, and tuck the elbows instead of letting them flare out, as it’s easier on the shoulders. Get a big gulp of air so that the belly and chest rise up to meet the bar as it descends. Lower the bar until it lightly touches your chest.
As you press the bar up (driving through your heels as well), imagine trying to push yourself away from it (through the bench).You can also think of spreading the bar to activate the triceps a bit more. As you lock the weight out, do not excessively protract the shoulder blades; you shouldn’t lose your tightness in that area prior to descending into the next rep.
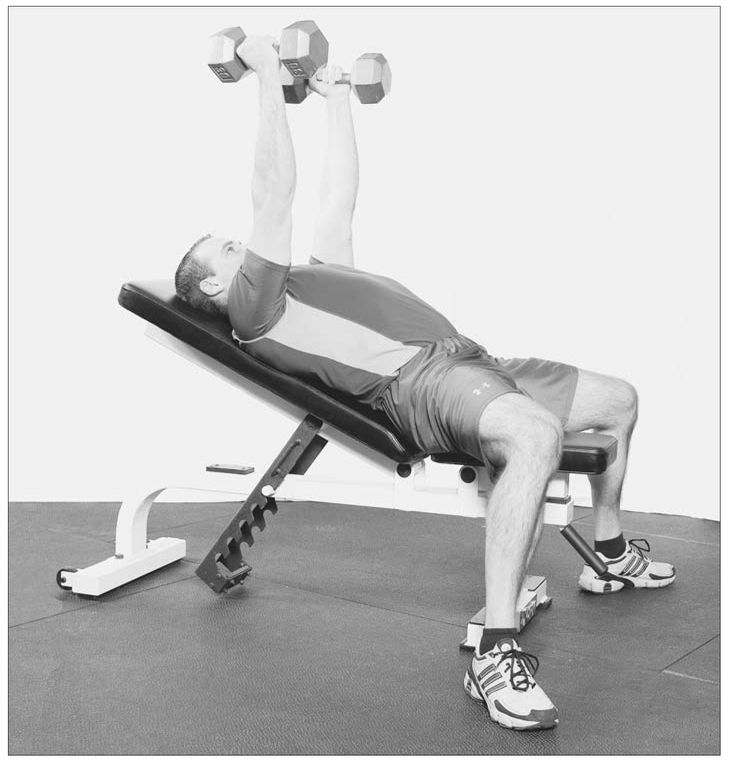
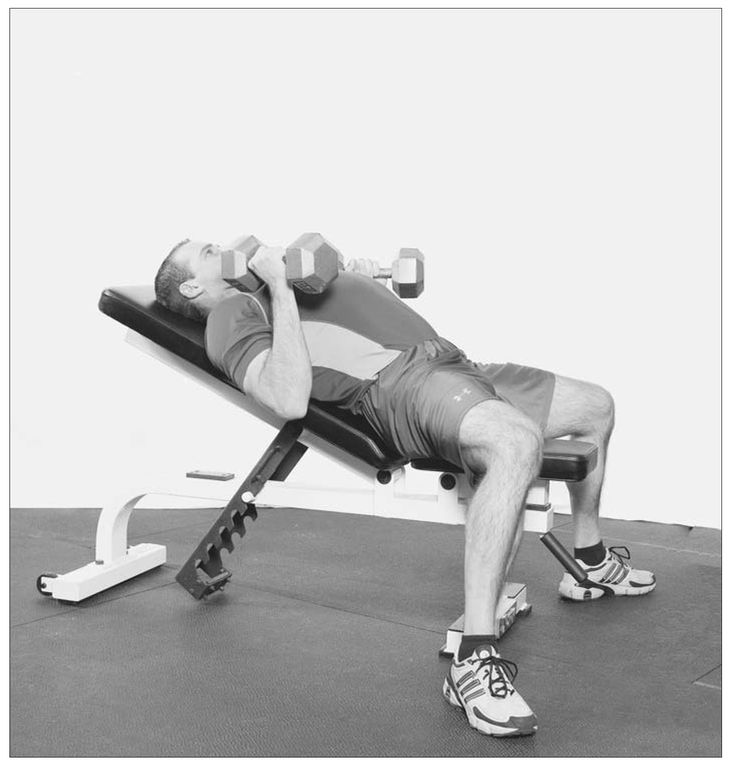
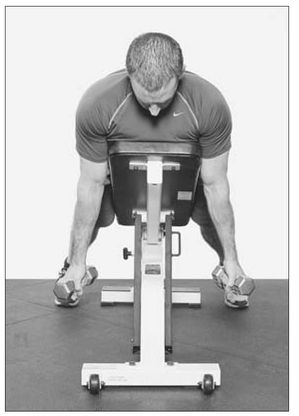
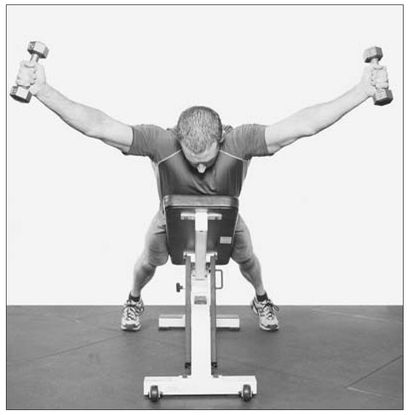
Neutral-Grip Low-Incline Dumbbell Press Start (and Finish)
Neutral-Grip Low-Incline Dumbbell Press
BENEFITS: This exercise primarily strengthens the chest, shoulders, and triceps.
Neutral-Grip Low-Incline Dumbbell Press Middle
SETUP: Set your incline bench at a 30- to 45-degree angle. Sit on the bench with your back and head resting against the incline. Begin with your arms extended straight toward the ceiling, a dumbbell in each hand, and your palms facing each other.
ACTION: Lower the dumbbells until they are just above and outside your shoulders. Now press the dumbbells straight up—not forward—to lock out, being careful not to let the shoulder blades loosen up. Stay tight just as you did on the regular bench press.
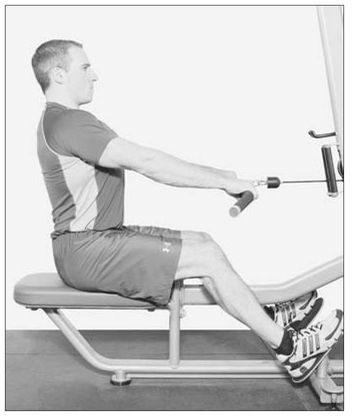
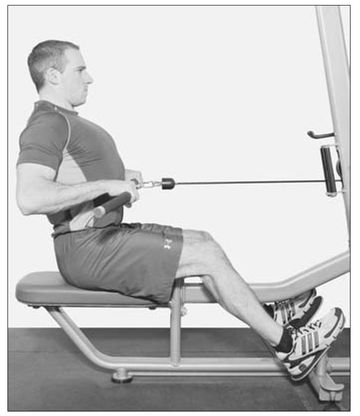
Seated Cable Row—Medium Pronated Grip Start (and Finish)
Seated Cable Row—Medium Pronated Grip Middle
Seated Cable Row: Medium Pronated Grip
BENEFITS: This exercise strengthens several upper back muscles—the lats, upper/ middle/lower trapezius, and rhomboids—as well as the elbow flexors (most notably, the biceps) and grip.
SETUP: Sit at a cable row station with a slight bend in the knees. Grab the handle with both hands, using a shoulder-width, overhand grip. Keep the chest out, shoulders back, and eyes straight ahead so that you’re sitting up tall.
ACTION: Think “shoulder blades back and down” as you pull the handle to your stomach. Extend your arms to return to the starting position.
Prone Trap Raise Start
Prone Trap Raise Finish
Prone Trap Raise
BENEFITS: This exercise strengthens the lower trapezius, which is crucial for ideal upward rotation of the shoulder blades during overhead movements.
SETUP: Lie face down on a 45-degree incline bench with a light dumbbell in each hand and your arms hanging toward the floor. Imagine your head is in the 12 o’clock position on a clock face.
ACTION: Keeping the thumbs up, raise the arms to 10 o’clock and 2 o’clock without bending the elbows. You should feel the effort predominantly in the mid-back area. If you find yourself “cramping” up in the upper traps and neck, you’re shrugging too much. If that’s the case, drop the weight and just focus on getting a feel for the movement with the weight of your arms only.
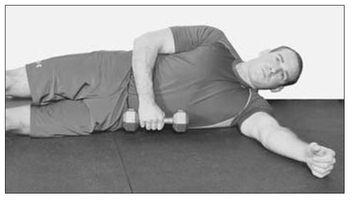
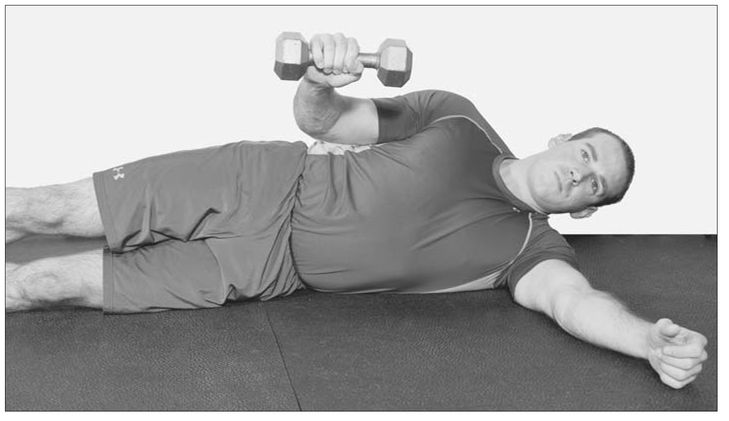
Side-Lying External Rotation
BENEFITS: This exercise strengthens the infraspinatus, teres minor, and posterior deltoid—three muscles that must be strong for the shoulder to functional effectively.
SETUP: Lie on your side on the floor or on a bench with your bottom arm extending in front of you. Begin with the upper part of your top arm resting snuggly against your side, the elbow bent 90 degrees, and a lightweight plate or dumbbell in the top-side hand.
ACTION: Rotate the shoulder of your top-side arm and swing the weight upward as far as you can comfortably go. Keep the elbow locked against your side. You’ll feel the effort in the back of your shoulder. Return to the starting position.
Side-Lying External Rotation Start
Side-Lying External Rotation Finish
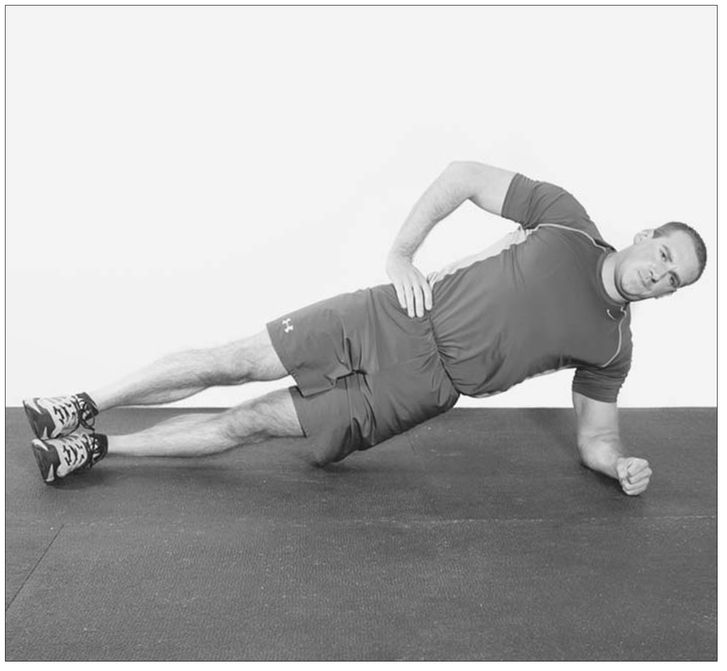
Side Bridge
BENEFITS: This exercise builds endurance in key core stabilizers, most notably the internal and external obliques.
SETUP: Lie on your side on the floor with the elbow of your bottom arm bent 90 degrees and only the forearm in contact with the floor, so that your torso is propped up. Your legs are straight and your feet stacked.
ACTION: Brace the core tightly and lift your hips until your body forms a straight line from head to toe. Don’t let the hips sag. Hold this position for the designated amount of time.
Side Bridge
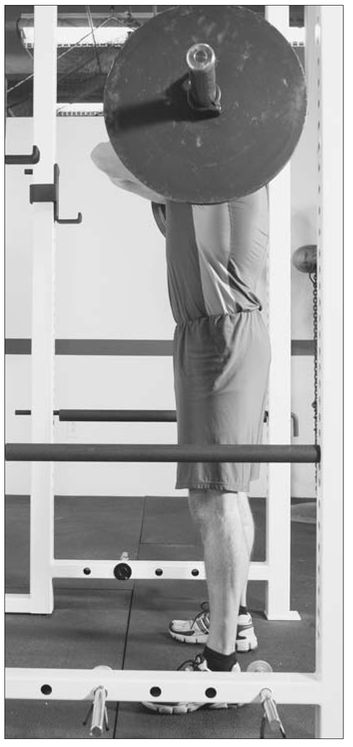
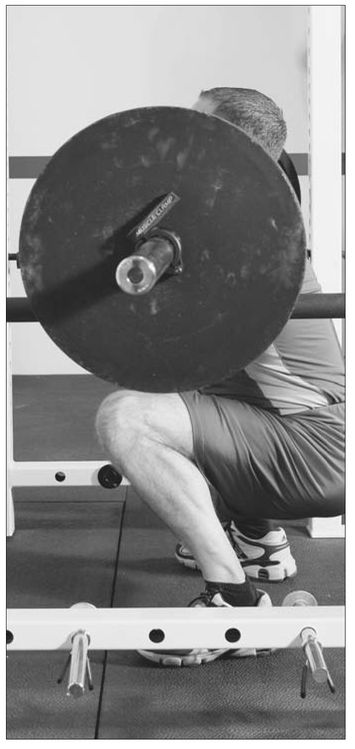
Front Squat
BENEFITS: This exercise strengthens the quadriceps, glutes, hamstrings, and several core stabilizers.
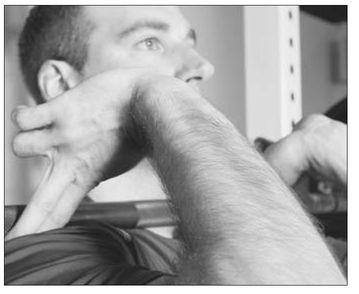
SETUP: Cross your arms at the wrists, and then take your thumbs to the edge of the knurl in the center of the bar, which will be set up in a power/squat rack at shoulder height. From there, dip down under the bar and force your elbows high so the bar sits in the “divot” you’ve created in your shoulders by elevating the elbows. If you have the bar in the right spot, it’ll be just short of choking you. Don’t worry, the discomfort will go away after a few weeks as you get used to it. I should note that some lifters do prefer the clean grip over the cross-face grip, and below, I’ve included photos of both so that you can experiment and choose which of the two feels best for you. In both cases, the bar is “racked” on the entire shoulder girdle, not simply supported by the arms.
ACTION: Take a big gulp of air into your lungs, tighten your core, and lift the bar off the rack by standing up fully. Take a step backward and set your feet slightly farther than shoulder-width apart and turn your toes out slightly, if that’s more comfortable for you. Break at the hips and knees simultaneously to squat down as deeply as you can without rounding over along the spine. Keep the weight on the mid-foot, not the toes. Without bouncing in the bottom position, reverse your direction by using the strength of your quads, glutes, and hamstrings to accelerate the bar all the way up to lockout.
Cross-Face Grip
Clean Grip
Front Squat Start (and Finish)
Front Squat Middle
Rack Pull from Kneecaps Start (and Finish)
Rack Pull from Kneecaps
BENEFITS: This exercise strengthens the glutes, hamstrings, upper back, grip, and various core stabilizers. It’s an excellent movement for those who aren’t flexible enough to deadlift from the floor.
SETUP: This is just a partial deadlift from the pins in the power rack.
ACTION: Perform a deadlift exactly as described on page 83–84, except with the bar set at knee height. Reset the bar on the pins after each rep. Note that you’ll be able to use more weight than with conventional deadlifts from the floor.
Rack Pull from Kneecaps Lockout
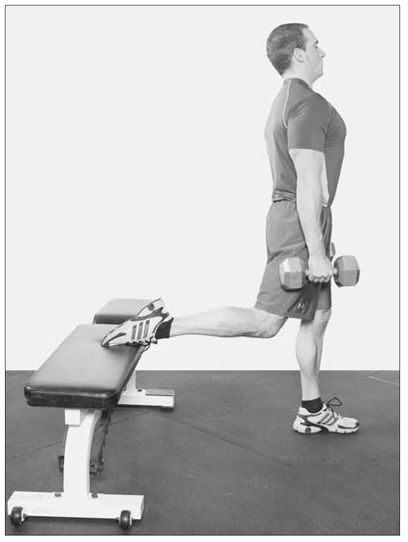
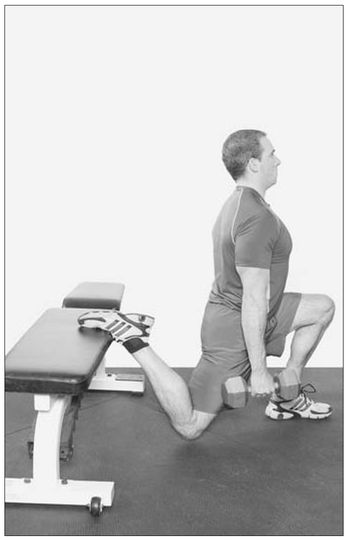
Dumbbell Bulgarian Split Squat Start (and Finish)
Dumbbell Bulgarian Split Squat Middle
Dumbbell Bulgarian Split Squat
BENEFITS: This exercise strengthens the glutes, hamstrings, quadriceps, grip, and various core stabilizers.
SETUP: Position a bench roughly three feet behind you. Stand normally with your arms hanging at your sides and a dumbbell in each hand. Reach backward with one leg and place the top of that foot on the bench.
ACTION: Break at the knee of the forward leg and lower yourself down into a split-squat position. In the bottom position, the knee of your trailing leg should be just short of touching the floor, with the torso upright and shoulders pulled back. You’ll feel a great stretch on the front of the hip and thigh of the trailing leg. Your weight should be almost completely on the mid-foot of the forward leg with the toe of the back foot just helping you to maintain balance. Push through the front leg to return to the starting position, where you’ll stand upright by fully extending the hip and knee. After completing a full set, reverse your position and work the opposite leg.
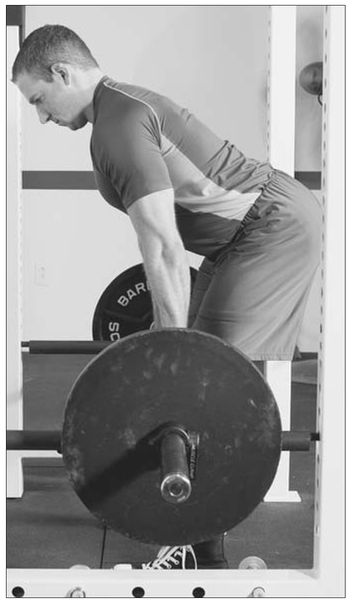
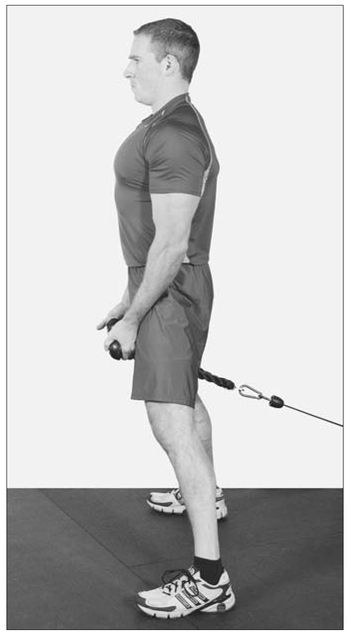
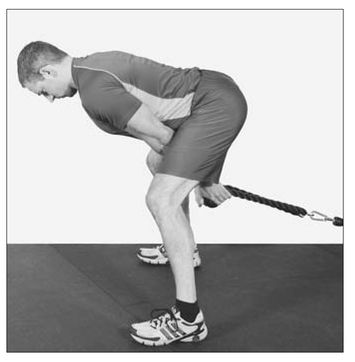
Pull-Through
BENEFITS: The pull-through is a great exercise for targeting the posterior chain—hamstrings, glutes, and hip adductors—without placing a ton of stress on the back. It’s also excellent for teaching appropriate lower-back and hip movement for exercises such as deadlifts and box squats.
SETUP: Stand facing away from a cable column with the rope attachment set in the bottom position. Set your feet slightly farther than shoulder-width apart so that you have room to reach between your legs with both arms fully extended, and grasp the rope. Bend your knees slightly and bend forward slightly at the hips to counterbalance the pull of the rope. Be sure to keep your weight on your heels.
ACTION: To initiate the movement, let the weight pull your hips back as if someone had a rope tied around your waist and was pulling you backward. Now begin tilting your torso forward from the hips (not the waist) and allow the weight to pull your extended arms between your legs. Avoid rounding your back. The lowering phase ends when the torso is just short of parallel with the floor, at which point you’ll push through the heels and use your posterior chain to pull the rope forward between your legs and straighten your body back to the starting position. Push your hips forward and squeeze your glutes to lock out. Stand upright; don’t lean back!
Pull-Through Start (and Finish)
Pull-Through Middle
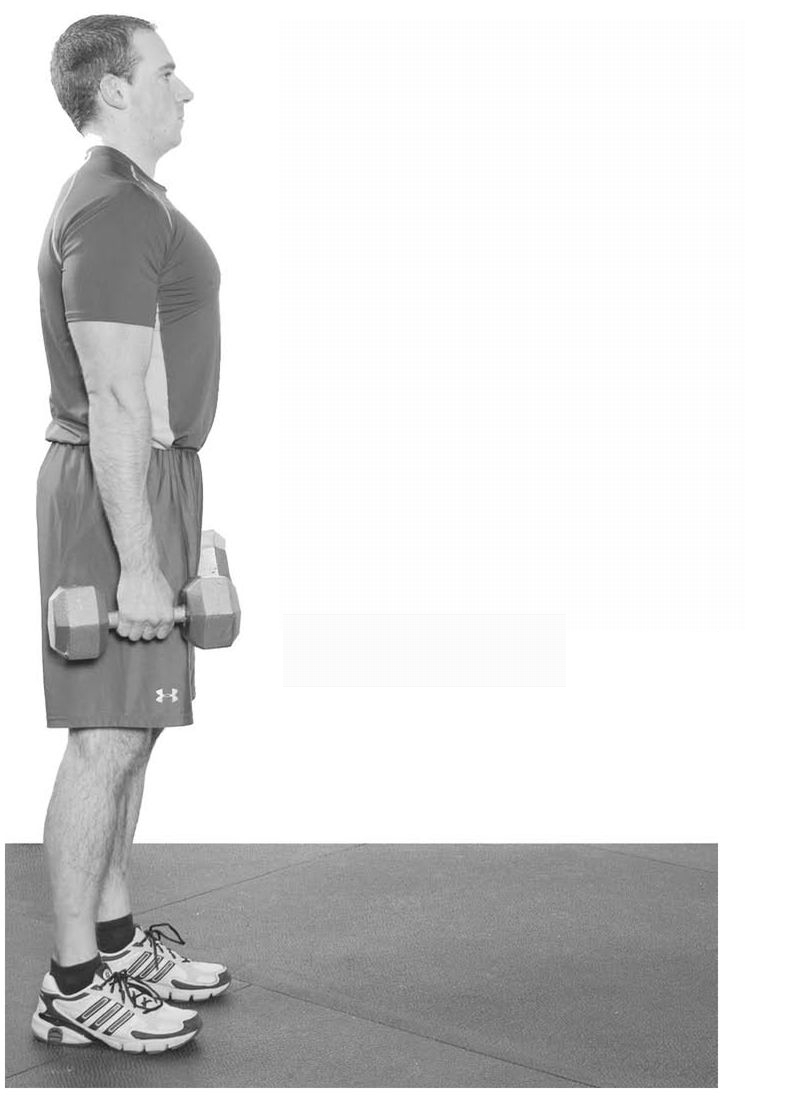
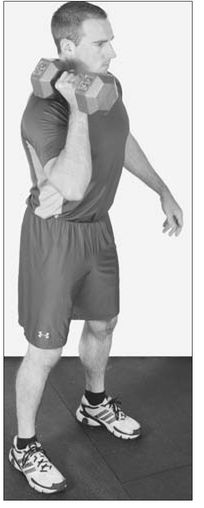
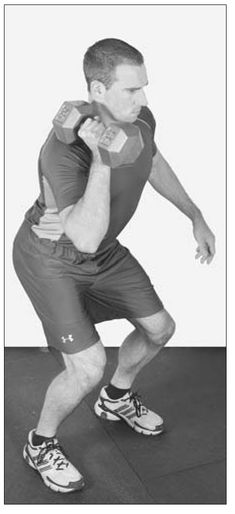
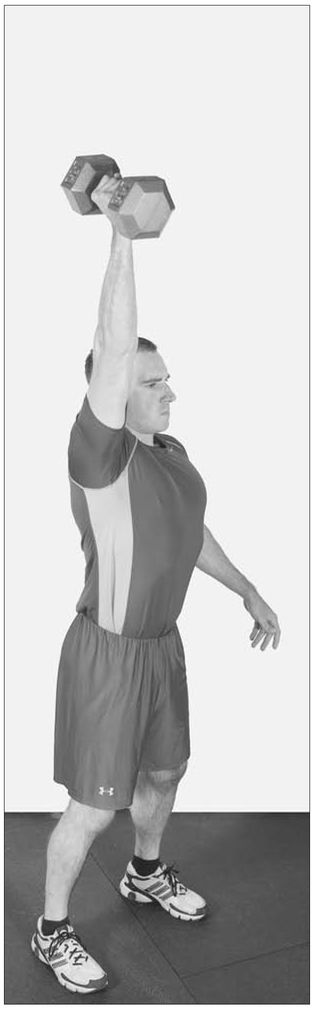
One-Arm Dumbbell Push Press
BENEFITS: This exercise strengthens the shoulders, triceps, and several core stabilizers.
SETUP: Stand normally with a dumbbell in one hand and your arm folded so that the weight is just above your shoulder.
ACTION: Sink into a quarter-squat position and then extend your legs powerfully to give the dumbbell upward momentum. The moment your knees lock out, forcefully contract your shoulder and press the dumbbell overhead. Lower the dumbbell back to your shoulder. Complete the designated number of repetitions, and then repeat the exercise with the other arm.
One-Arm Dumbbell Push Press Start
One-Arm Dumbbell Push Press Middle
One-Arm Dumbbell Push Press Finish
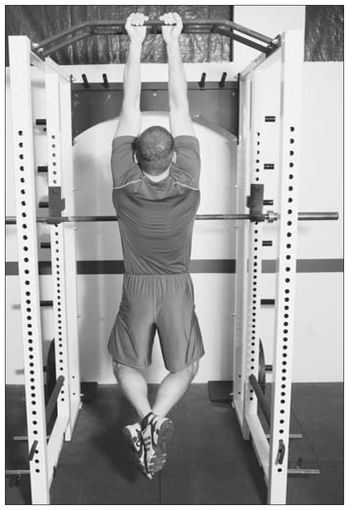
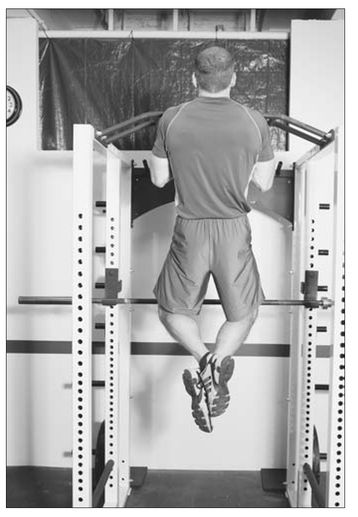
Close-Grip Chin-Up Start
Close-Grip Chin-Up Finish
Close-Grip Chin-Up
BENEFIT: This exercise strengthens the lats, biceps, and grip, plus several core stabilizers.
SETUP: Position your hands roughly six inches apart on a chin-up bar with the palms facing you.
ACTION: Pull your body upward until your chin clears the bar, and then lower yourself back to the starting position. To add weight, wear a weight vest or use a chain and/or dipping belt to hang a dumbbell or weight plate from your waist.
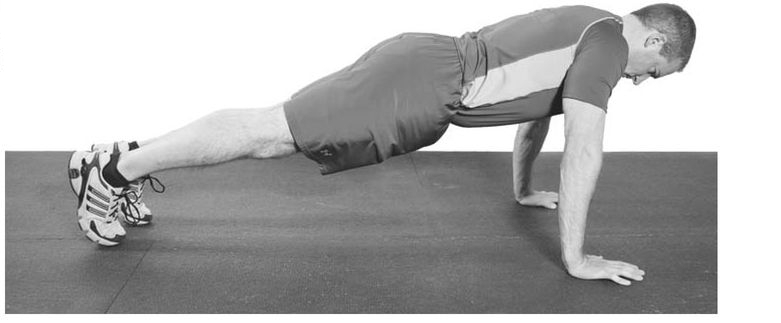
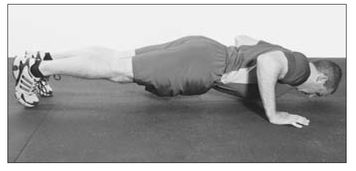
Push-Up
BENEFITS: The push-up may seem rudimentary in the context of this program, but the sad truth is that 95 percent of gym goers have no idea how to perform the movement correctly. The beauty of this movement is that it not only requires minimal equipment but also allows you to train the muscles of the upper body in closed-chain motion (hands fixed, body moving) instead of the more traditional open chain (body fixed, arms moving, e.g., the bench press). The push-up strengthens the chest, shoulders, and triceps.
SETUP: Everyone knows the push-up starting position, but most people take their hands out too wide. Position the hands just outside shoulder width. Imagine your body being a straight line from ankles to neck; don’t allow the hips to sag or the butt to stick up too high. The chin should be tucked (double chin) so that your head is close to being in line with your body.
ACTION: Lower your chest to within an inch of the floor. As you do, think about pulling your chest (not your hips or chin) down to the floor. If you do the exercise right, you’ll actually feel the muscles in your upper back working to pull you down into this position. The elbows should be set at a 45-degree angle to the body; this position is much easier on the shoulders. Look straight at the floor the entire time, and keep the core braced tightly (as though someone is about to punch you in the stomach, and you’re trying to protect yourself). Press back to the starting position.
Push-Up Start (and Finish)
Push-Up Middle
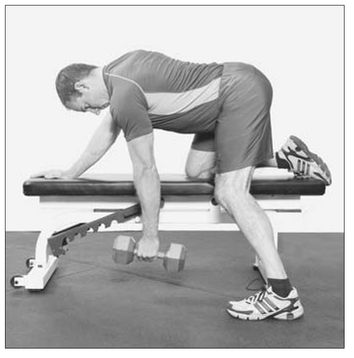
One-Arm Dumbbell Row Start
One-Arm Dumbbell Row Finish
One-Arm Dumbbell Row
BENEFITS: This exercise strengthens several upper-back muscles—the lats, upper/middle /lower trapezius, and rhomboids—as well as the elbow flexors (most notably, the biceps) and grip.
SETUP: Place your left hand and left knee on a bench so that your torso is parallel to the ground with the spine in a neutral position (not rounded). Position your right foot on the floor next to the bench. Grasp a dumbbell in your right hand and begin with your right arm extended straight toward the floor.
ACTION: Retract your shoulder blade and bend your elbow to raise the dumbbell up to your side. Be sure to keep the elbow close to the body, and avoid jerking the weight or rotating the torso to create upward momentum. Lower the weight back to the starting position. After completing the designated number of repetitions, reverse your position and work the other side.
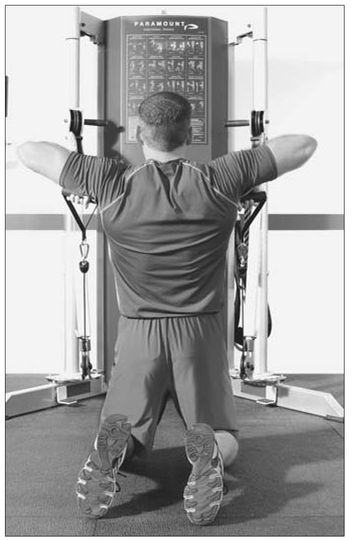
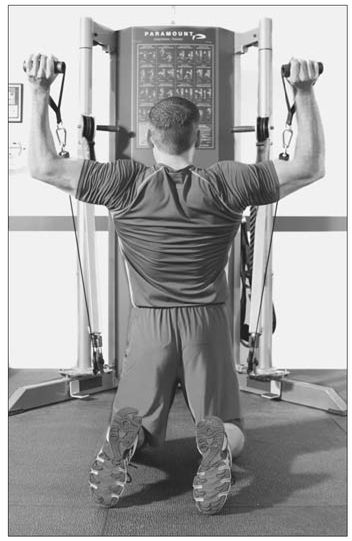
Kneeling Cable External Rotation
BENEFITS: This exercise strengthens the infraspinatus, teres minor, and posterior deltoid—three muscles that are crucial to overall shoulder health.
SETUP: Kneel on both knees while facing a double-sided cable column (two weight stacks) with the D-handles positioned down near the floor. Grasp one handle in each hand with your upper arms positioned straight out to the sides, parallel to the floor, and the elbows flexed 90 degrees so that your forearms are pointing toward the weight stacks. The weight plates should be elevated in this starting position so that there’s tension on the cables.
ACTION: Externally rotate the shoulders and swing your forearms 90 degrees upward, so that they are now pointing toward the ceiling (scarecrow position). Keep your chest high and your upper arms locked in position throughout this movement. Lower the weights under control to the starting position, and repeat for reps.
Kneeling Cable External Rotation Start
Kneeling Cable External Rotation Finish
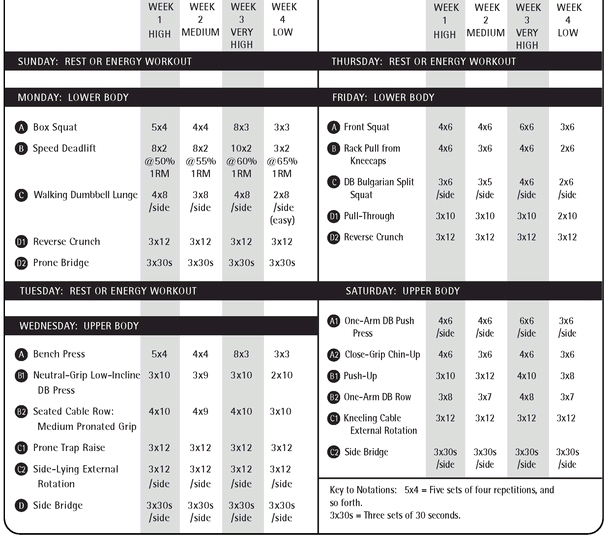
PHASE 1 TRAINING SCHEDULE
PHASE 1 STRENGTH-TRAINING SCHEDULE
Here is your four-week strength-training schedule for Phase 1. Remember to begin each session by doing one of the two warm-ups presented in Chapter 5. In each exercise involving external weight/resistance, use the highest level of weight/resistance you can lift for the designated number of repetitions with perfect form. In exercises involving no external resistance (reverse crunch, etc.), simply perform the designated number of repetitions. Between sets, rest as long as necessary to perform the next set at the same level of performance, but not longer. When you see “A1” and “A2” or “B1” and “B2,” etc., you should alternate between those two exercises.
PHASE 1 ENERGY WORKOUT RECOMMENDATIONS
Following are energy workout recommendations for Phase 1. Separate recommendations are provided for each of the three somatotypes discussed in Chapter 3.
Ectomorphs
TUESDAY AND THURSDAY. Technique practice of your choice (see page 24 for a sample technique practice session) with 30 percent of one-rep max, then 20 minutes of low-intensity cardio (stationary cycling, running, etc., at 60 to 70 percent of max heart rate).
Mesomorphs
IMMEDIATELY FOLLOWING EACH STRENGTH-TRAINING SESSION. Ten minutes of low-intensity cardio (stationary cycling, running, etc., at 60 to 70 percent of max heart rate).
TUESDAY. Fifteen minutes (excluding warm-up and cooldown) of high-intensity intervals on a 15-seconds work/45-seconds rest cycle on the elliptical trainer, bicycle, or rower. Running is your best choice, if you can manage it.
THURSDAY. Technique practice (see page 24 for a sample technique practice session) with 30 percent of one-rep max, then 20 minutes low-intensity cardio (stationary cycling, running, etc., at 60 to 70 percent of max heart rate).
Endomorphs
IMMEDIATELY FOLLOWING EACH STRENGTH-TRAINING SESSION. Ten minutes of low-intensity cardio (stationary cycling, running, etc., at 60 to 70 percent of max heart rate).
SATURDAY. Replace low-intensity posttraining cardio with 10 minutes of high-intensity intervals on a 20-seconds work/40-seconds rest cycle on the elliptical trainer, bicycle, rower, or on foot (running).
TUESDAY. Fifteen minutes (excluding warm-up and cooldown) of high-intensity intervals on a 15-seconds work/45-seconds rest cycle on the elliptical trainer, bicycle, rower, or on foot (running).
THURSDAY. Technique practice of your choice (see page 24 for a sample technique practice session) with 30 percent of one-rep max, then 20 minutes of low-intensity cardio (stationary cycling, running, etc., at 60 to 70 percent of max heart rate).