
The old adage “no hoof, no horse” applies equally to oxen. Oxen must be able to move comfortably on whatever surface they are required to work. Some oxen require little or no hoof care if they wear their hooves down normally and no faster than the hooves can grow.
Cattle getting little regular exercise tend to have long hooves that require trimming. Oxen that work regularly may wear down their hooves too rapidly and require shoeing. Shoes are needed for pulling competitions and for working on ice, in snow, or on other slippery or extremely hard surfaces such as paved roads.
The greatest challenge in trimming bovine hooves is restraining the animal. A foot is easiest to trim or shoe when it is not moving, and in general cattle don’t like to have their feet worked on. Their first instinct is to kick. A bovine kick is dangerous. Careful restraint will safely control an animal and allow work on his hooves.
Young cattle may be trained to have their feet held up, but they cannot hold up a foot as easily as horses can. They are (or pretend to be) uncomfortable when holding a foot up for more than a minute or two. A good trimmer can adequately trim a hoof in this time.
An animal that tires of holding up a foot may lie down or lean his weight on the hoof trimmer. Some hoof trimmers are able to hold up a cow or a smaller ox, but a 2,500-pound ox is a different story. A rugged stool or wooden block placed under a front knee will bear the weight of a leaning animal, as an ox can learn to rest his knee on the stool while a front foot is being trimmed. The secret to trimming rear hooves is not to lift the foot too high.
Trimming both front and hind feet without any sort of restraint requires a strong back, excellent trimming skills, and the ability to dodge an occasional kick. Because cattle are more difficult to deal with than horses in this regard, trimming and shoeing oxen have historically been done in a shoeing stock.
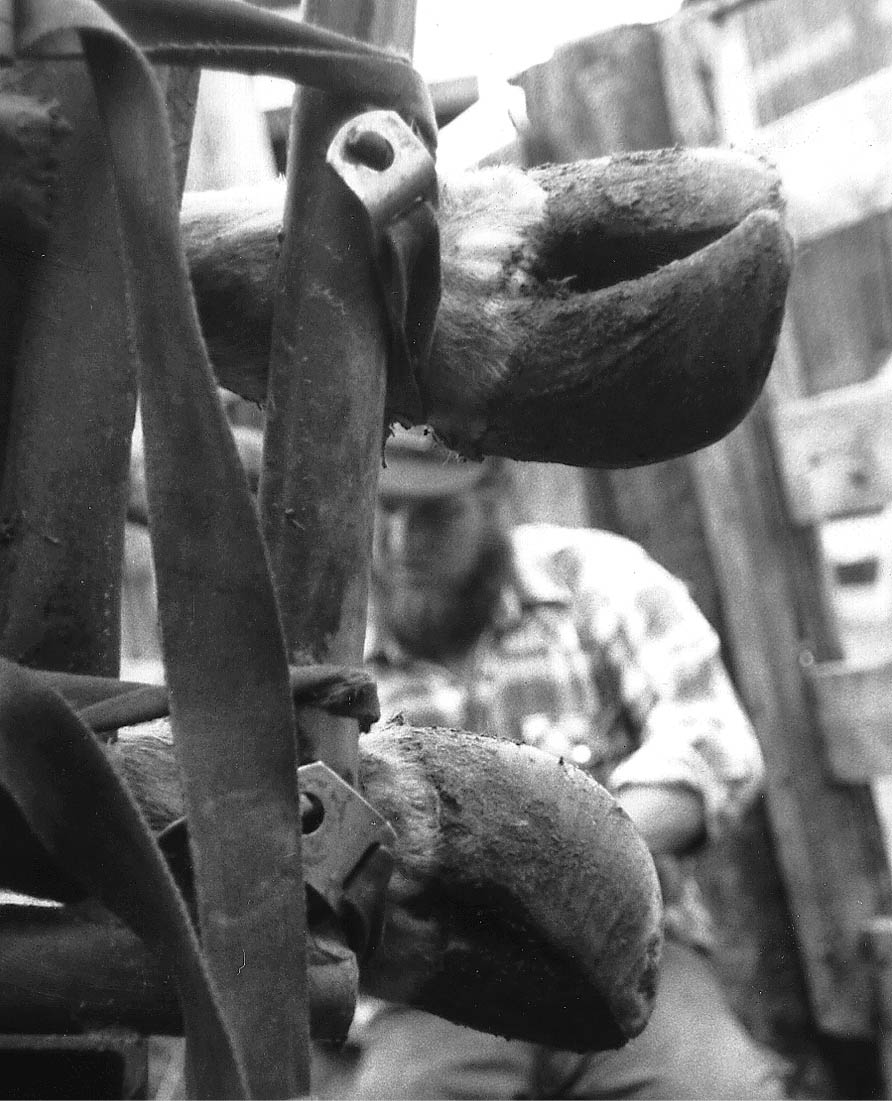
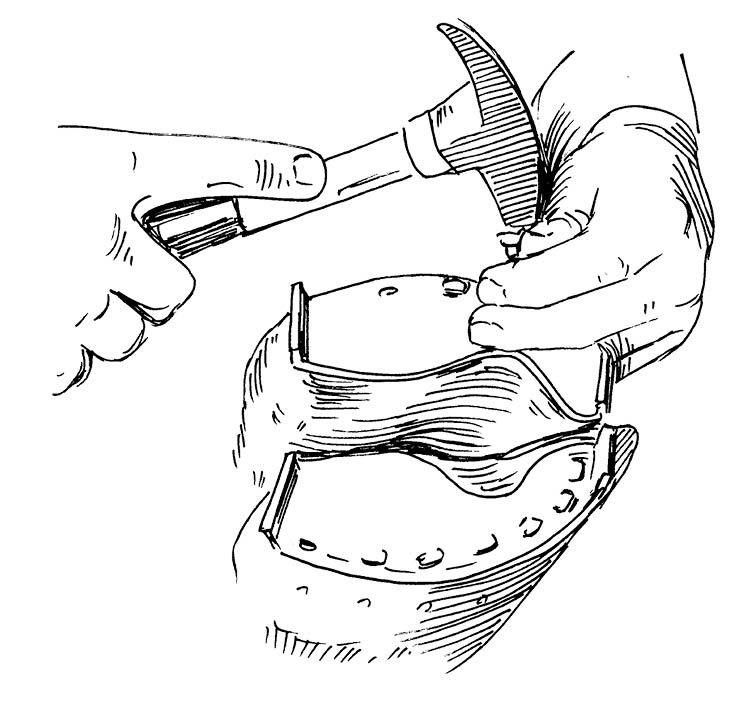
The shoeing stock consists of a wooden or steel frame with heavy belts designed to support the weight of an ox and allow his feet to be restrained in a position to be worked on. The animal’s head is restrained by a halter, by a stanchion, or by tying the horns into the frame of a horn yoke built into the stock.
Once the animal’s head is secure, belly bands support his weight. Do not lift the animal up with the belly bands. An ox that is lifted up in shoeing stock will kick and thrash. After an ox becomes used to the procedure, he may relax and slump down on the belly bands.
After the head and the belly bands are secure, lift a foot, by hand or with a rope, and tie it in place. Tie the nearest back foot to the frame so the animal cannot reach up and kick the trimmer. Secure the feet with some type of quick-release knot or other mechanism in case the animal slips out of the sling or the belly bands break.
Once the work is done on the first hoof, untie that foot, let it down, and tie the next one into place on the shoeing stock. Again, tie the closest rear foot to the frame to prevent kicking. Continue the procedure until all four feet are finished.
A good shoeing stock is designed to accommodate animals of different sizes, and a great deal of variation exists in the size of working cattle. Animals that are too small for the shoeing stock have too much freedom and may not be safely restrained. Some oxen become so large, on the other hand, that they don’t fit into the shoeing stock.
Before designing a stock, explore the possibilities of adjustable footrests, and design your stock with a particular breed in mind. A shoeing stock needed for a Dexter is vastly different in size from a stock needed for a mature Chianina.

Many professionals trim dairy cattle hooves using a chute that turns the animal on its side. This type of restraint may be used to trim the hooves of an ox, unless the animal is too big for the chute. A professional trims the hooves of 20 to 40 animals per day and may not want to come to your farm to trim just one or two oxen.
Regular hoof trimming helps prevent lameness in animals that tend to grow long hooves. Hoof trimming is difficult, dirty, and dangerous. Cattle not used to having their feet lifted up generally don’t like their hooves trimmed, and cattle owners are usually reluctant to trim hooves unless it is absolutely necessary.
Bovines with good conformation and adequate exercise may never need their hooves trimmed. When the hooves grow faster than they are worn down, however, the result is hoof overgrowth. Anyone with more than a few cattle eventually has to trim some feet.
The normal bovine hoof replaces itself naturally in about one year, which means the hoof grows 4 to 6 inches annually depending on the animal’s size. If the hooves are not worn down at about the same rate, the animal must have his feet trimmed. If the feet are not trimmed, the toes become too long and force the animal to put weight on his heels, leading to less pressure and wear on the toes, leading in turn to additional and often exaggerated hoof overgrowth.
An ox that walks on his heels is uncomfortable and prone to lameness. He may also develop heel cracks, especially if it is a large ox that is overweight. Heel cracks develop horizontally across the back of the heel and allow foreign materials, including bacteria, to invade the hoof. Bacterial invasion can lead to footrot, abscesses, and other hoof diseases, resulting in a lame ox that possibly ends up being culled. Many working and show oxen in the United States that are otherwise healthy face this problem. Preventing lameness and the diseases that cause it begins with proper hoof care.
This animal in a trimming chute has distorted front hooves, partly because the front feet are naturally toed out but also because laminitis (as evidenced by the lines on the hooves) caused the animal to walk on his heels.
To do a good job trimming hooves you must have a mental picture of the ideal hoof — high in the heel and short in the toe with two equal, or almost equal, claws. A healthy hoof is smooth on the outer surface. The ideal angle of the hoof is about 50 degrees, as measured by putting the hoof on the ground or a flat surface and using a protractor. A healthy hoof protects the sensitive tissue within the hoof and provides traction.
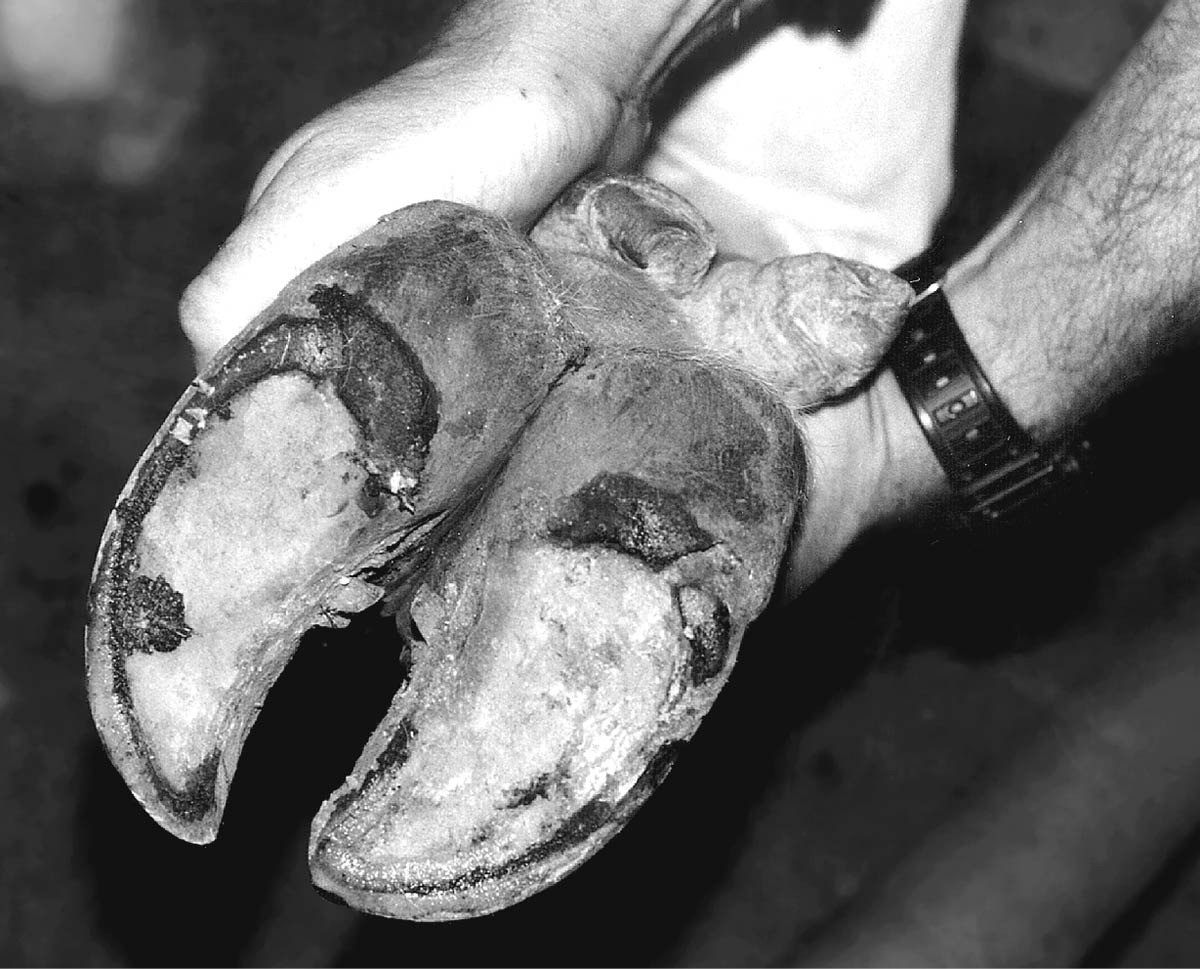
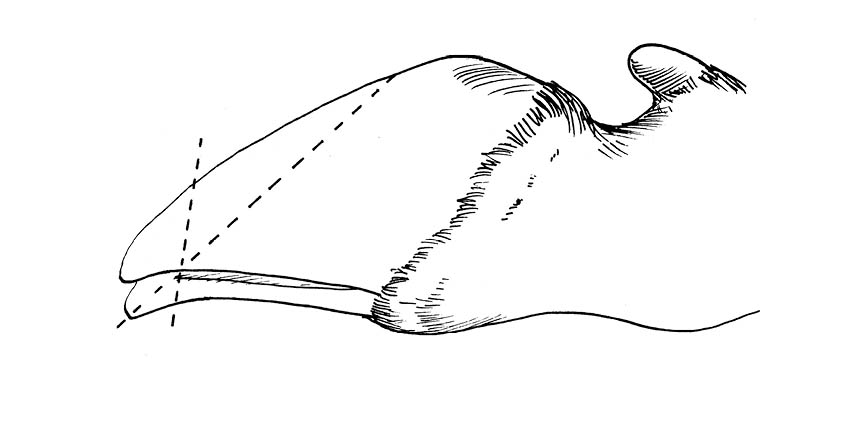
The ideal hoof has two equal claws, a short toe, and a high heel, indicated by the distance between the ground-bearing surface and the hairline just below the dewclaws.
The hoof wall is strongest and thickest near the toe and along the sides of the weight-bearing surface. Most of the animal’s weight should be carried on the hoof wall that touches the ground surface. The sole of the hoof protects the sensitive tissue and should not act as a cushion. The sole should bear much less weight than the hoof wall, especially on hard surfaces.
The hoof wall naturally extends beyond the sole toward the ground, with a concave surface, and gives the animal traction. The hoof wall is much like the rim of a cup, and the sole like the cup itself. This cup shape catches debris such as sand, dirt, or snow, adding additional traction when the animal is working.
Cattle with desirable hoof and leg conformation are valuable for work because they are naturally predisposed to good hoof health. The ideal hoof does not need regular trimming. When an animal puts most of his weight on the toe, the front of the hoof wears down naturally, keeping the hoof short in the toe and high in the heel.
An animal carrying his weight on his heels will wear down its hooves where they have the least protection. The toe will grow with little or no wear and further exaggerate the problem of overgrown toes. Long toes and short heels cause the animal to exert more energy with every step, and to walk awkwardly and less comfortably.
Leg conformation has a direct impact on hoof shape and wear. An animal that is sickle-hocked will lean back on his heels. An animal that is extremely post-legged will excessively wear down his toes. An animal that is cow-hocked will place more weight on the inside toe and less on the outside, leading to one toe that wears faster and is therefore shorter.
The same holds true for front feet. An animal that toes out generally puts more weight on the inside toe and has a longer toe on the outside. Toeing out could cause larger, more twisted inside toes due to the extra weight on the inside toes.
Cattle with straight legs when viewed from the front or rear, and a desirable angle of the rear leg when viewed from the side, have fewer problems and require less hoof trimming than animals with poor leg conformation.
Trimming the bovine hoof is not difficult, in theory. The shape of the ideal bovine hoof is your goal, no matter what the hoof looks like when you start. A severely distorted hoof or one that has large pieces torn away cannot be made ideal with one trimming.
The hoof trimmer’s job is to restore normal function and shape. If a hoof of a 1,000-pound steer is 12 inches long it may be trimmed back to a normal length of about 5 to 6 inches, provided no diseases or lesions interfere with normal trimming. Visualizing the ideal hoof can be difficult when looking at a severely distorted, overgrown, and dirty hoof. Understanding the normal hoof is essential to knowing how deep to safely trim and rasp.
Practicing on hooves from the local slaughterhouse is a helpful way to develop the skills necessary to trim bovine hooves. Practice will provide you with valuable lessons before you attempt to trim the feet of a live animal. Technique is important in trimming, and speed will come with practice.
Options abound for removing excess hoof growth. Some teamsters find more work for their animals so they can wear their hooves down naturally. This system may work well for animals with hooves that are not too long. Walking on pavement will wear down the hoof faster than on pasture or natural soils, but this often leads to other problems like too much wear, sore feet, or uncomfortable animals. In the neck yoke, oxen may develop the bad habit of pulling away from each other as they try to adjust to walking on an uncomfortable surface.
The tools for hoof trimming depend on the system of restraint. Electric cutting discs or grinders are not appropriate unless you are a professional hoof trimmer using a tilt chute or shoeing stock. They are definitely not appropriate when trimming hooves to be shod. These tools that can remove a lot of hoof too quickly are dangerous in the hands of a novice.
Every ox teamster should learn to use hoof nippers, a rasp, and a pair of hoof knives (right-hand and left-hand). Purchase the best-quality tools you can afford. Farm supply stores usually have only the cheapest tools available. A good farrier supply catalog will have better designs. The high-quality steel and sharp cutting edges of well-designed nippers and rasps cost more but are worth the money.
Ideally, the hoof should be trimmed from the bottom because it naturally wears on the bottom surface. This procedure makes hoof trimming difficult because the foot has to be picked up for trimming. Some people use a chisel or long-handled hoof nippers to trim the end of the toes while the animal stands up. Clipping the toes, however, does not remove hoof the way it naturally wears down. Proper hoof trimming results in an ideal shape and is more comfortable for the animal.
Following are the four steps of removing excess hoof and restoring the ideal shape of the hoof.


The sole need not be shiny and clean. Don’t remove more of the sole than is necessary to restore normal hoof function. Thin soles lead to tender feet, especially when an animal is walked on gravel or stony surfaces. Cut out any loose pieces of sole or cracks and pockets that could collect debris and cause lameness.
The only exception to trimming the sole is when the hoof will be shod. In that case, leave as much sole as possible because the shoe requires good contact with both the hoof wall and the sole in order to stay on.
Oxen are shod either to protect their hooves from excessive wear or to give the animals additional traction. Animals that walk on stony or hard surfaces often wear their hooves down faster than the hooves grow. Cattle that are worked on slippery surfaces or used in pulling competitions also benefit from shoeing. Although oxen have been shod for centuries, the difficult challenges of trimming and shoeing cattle may have contributed to their loss in popularity as draft animals.
An ox does not like to stand while being shod. Some teamsters may boast of an ox that will stand on three legs for trimming and shoeing, but these are rare animals. Calm animals will lean on the person who is working on their feet or may lie down to make shoeing impossible. Unruly cattle kick, thrash, and usually get their way. Anyone who regularly shoes oxen finds the investment in a shoeing stock a necessity.
Ox shoeing is difficult to learn without some hands-on experience, such as having previously shod horses. For the beginner, practicing on cattle feet from a slaughterhouse provides excellent training without endangering a live animal. The process of trimming, fitting, and nailing a shoe on a hoof held in a vise is an excellent teaching aid that helps build the skills necessary for shoeing oxen. It also provides a way to develop a sense of how hard the hoof is and how to nail on a shoe. By experimenting and perhaps dissecting the hoof after nailing on a shoe, you will better understand hoof anatomy.
Cattle hooves are different in texture and anatomy from horse hooves. The bovine hoof is more leathery, offering a stronger hold with a lower nail. The hoof wall is thinner, making it easier to quick the animal, or drive a nail into sensitive flesh. The hoof wall is particularly thin in the heel. Cattle that are allowed to wear down their hooves too short present additional shoeing challenges because the sensitive tissue may be close to the inside of the hoof wall or sole. Having two claws on each foot also makes nailing and holding the shoe while nailing difficult.
To save time and money, some teamsters shoe only the front feet. Shoeing the front feet offers some traction on snow and ice. Oxen used for competition sometimes have the front feet shod because the front hooves wear more quickly in the toe during the frequent workouts necessary to properly condition the animals. Oxen that suffer from excessive wear or are regularly worked on snow and ice should wear shoes on all four feet.
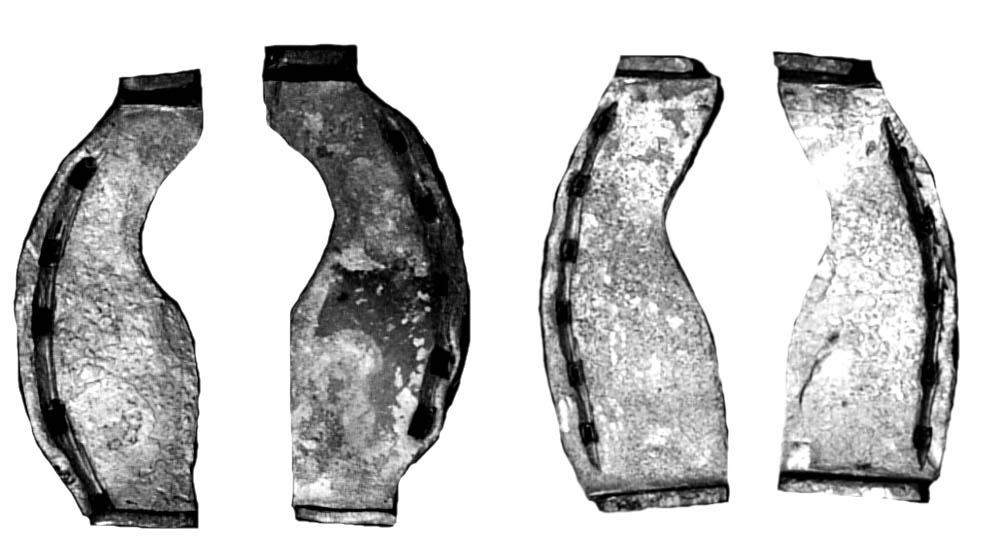
Shoes cut out of steel, then heated to punch the holes and bend the calks; note the rounder shape for the front claws and the straighter shape for the hind claws.

Hand forged shoes made from straight bar stock, heated in a coal forge before the heel area was drawn out and the calks and nail holes punched.

Cast iron shoes are commercially made in three sizes; compared to steel ox shoes they break more easily at the nail holes and tend to wear faster.
Oxen wear eight shoes, one on each claw. The type of shoe depends in part on the task at hand. Shoes with calks (sharp-pointed pieces of iron projecting downward from the shoe) are used for additional traction on snow and ice, but create problems for animals walking on pavement and concrete. Flat shoes add traction and protection for animals that frequently walk on hard surfaces, but are little help on snow and ice. In addition, the size and shape of the shoe must correspond to the hoof.
Good ox shoes are hard to find and can be expensive. Ox shoes were traditionally made in a forge by a blacksmith, but today most blacksmiths are unfamiliar with oxen and ox shoes. Modern teamsters find it easier to cut the shoes out of flat steel, weld on calks if needed, and punch or drill the nail holes in a machine shop.
Shoes made of cast iron may be purchased, but they do not wear as well as steel shoes and have the tendency to break more easily. They are also designed for front hooves that are more rounded. Shaping them to fit the more pointed and narrow hind hooves is nearly impossible. Cast-iron shoes are the only commercially available ox shoes in the United States. They may be purchased from Centaur Forge. Shoes are purchased by the pair, four shoes for two feet, or by a set of eight shoes for all four feet.
Shoes are nailed to the outside of the claw. The average ox shoe has more nails per inch than a horseshoe. Most have holes punched for 5 to 7 nails, compared with 10 to 14 nails for a horse’s hoof. The nail holes are closer to the outside of the shoe and angled to correspond to the natural shape of the hoof.
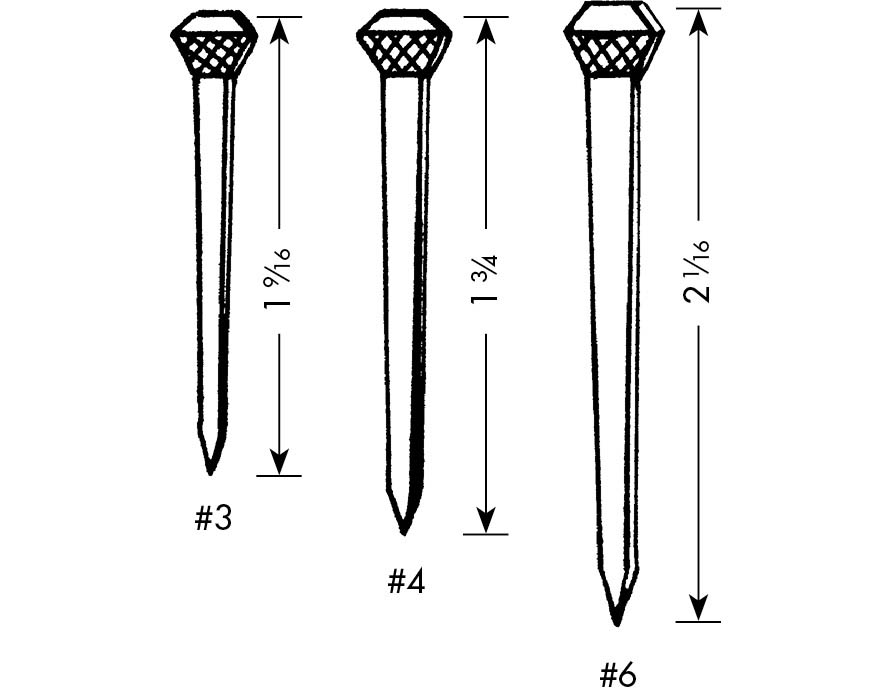
Ready-made cast-iron ox shoes come in three sizes. The smallest is the #2, appropriate for animals weighing between 1,000 and 1,200 pounds or larger animals with small hooves. The middle size is the #3, appropriate for animals weighing 1,300 to 1,600 pounds. The largest shoes are #4, appropriate for animals weighing around 2,000 pounds. Mature Chianinas and other large breeds may require shoes larger than #4. These are only guidelines, as the hoof size or shape of each ox is different. A shoe that is too small or too large creates more problems than it prevents.
Toe nails should be at an angle and heel nails should be more perpendicular to the ground-bearing surface of the shoe. The nail holes are smaller than those used for a similar-sized horse because the ox has a much thinner but more flexible and leathery hoof wall.
Ox shoes are designed to provide more protection and cover on the bottom of the hoof than horseshoes. Although horseshoes have been cut in half and nailed to the feet of oxen, the practice is not appropriate. The ox bears a considerable amount of weight on the bulb of its heel. This weight-bearing surface is important and natural. The heel of the bovine hoof is not like the frog of a horse hoof. It must bear weight with each step.
Most ox shoes are shaped like a comma, for complete coverage at the heel and to correspond to the pointed but curved claw. The coverage on the bottom provides a surface to protect the sole. Some teamsters prefer a shoe that has a slight cup shape under the sole. They believe the cup shape helps hold the shoe on as the sole grows into this concave surface. Most ox shoes, however, are flat and level.

Time-tested wisdom:
Fit the shoe to the hoof, not the hoof to the shoe.
Before shoeing an ox, the hooves must be trimmed. Trimming a hoof for shoeing is different from basic trimming. The hoof should be trimmed as level as possible. Do not cup the sole. If the sole has a natural cup, nail the shoe on the hoof wall so that the shoe will be parallel to the ground. Do not nail on a shoe that follows the natural angle or curve of the sole.
The outside of the shoe must be made level to fit tight against the bottom of the hoof wall in both the front and back. Likewise the hoof wall must be level to offer a secure and tight fit. The sole will quickly grow and soon fill any void between the shoe and the hoof.
Be sure the shoe fits to the outside of the hoof wall. A shoe that is nailed on with the hoof wall hanging over will create problems for the animal. The hoof wall is the natural weight-bearing surface. Nailing the shoe so it puts pressure on the white line or sole instead of on the hoof wall causes lameness. Even if the animal does not become lame, the hoof wall will grow quickly around and over the shoe.
Make sure the shoe fits to the back of the heel where it starts to curve up toward the leg. If the heel has insufficient coverage, the edge of the shoe creates pressure points that can lead to bruising and lameness. Do not, however, fit the shoe too far back, because the animal is likely to catch the shoe and tear it off. Rear hoofs often catch and tear off front shoes that are fitted too far back. Rear shoes might also catch on things the ox steps on, such as rocks or tree roots.
Fit the shoe to the toe unless the animal’s toes tend to overlap. If the shoe is not pointed or small enough in the toe, let the toe overhang about a half-inch, then cut off this extra toe at the end of the shoeing process. This procedure is particularly important for animals shod with calks because sharp calks can damage the other hoof at the coronary band if the ox interferes (steps on himself) as he moves.
Animals that fight each other in the yoke or pull away from each other often cross-step in trying to maintain their balance. Cross-stepping creates problems when oxen are shod too close to the end of the toe.
If the ox shoe does not fit, do not put it on the animal. A shoe that fits poorly creates problems. Instead, let the ox go barefooted and allow some time off for his feet to grow out. Ox shoeing is challenging enough without creating problems from the start.
The hoof wall of an ox is approximately one-third of the thickness of a horse’s hoof wall. Oxen are therefore shod using small nails, which reduce the chance of pressure quicking the hoof or splitting it when clinching the nails. Use the smallest nails possible, but get them high enough for a good strong clinch.
City head nails are preferred for small oxen because they are less likely to split the hoof. For smaller oxen use #3 or #4 city head nails. Larger oxen may be shod with nails up to size #6. Compared to large nails, small nails are difficult to nail into the tough hoof wall, but are less likely to damage the hoof. A drop of oil on the nail helps. Do not use rusty nails.
The nails are started at the white line and nailed in much the same manner as for shoeing horses. Always put the beveled or rough side of the nail head toward the inside of the shoe. The tip of the nail is also beveled to ensure that it comes out of the hoof.
If the nail is put in backwards with the bevel of the nail head facing out, the bevel of the tip will force the nail into sensitive tissue. An ox shoer has enough to learn without making this mistake.
Put in the middle nails first because they are less likely to pull the shoe toward the back of the hoof, rather than starting with a heel nail, and are easier to put in than toe nails. Nailing toe nails first requires additional support of the foot.
Angle the toe nails more than the heel nails. The hoof wall at the heel is quite thin, so place the heel nail carefully. If the ox has a damaged or torn hoof wall, try to get nails where they will hold. Custom shoes work best for an ox that has a damaged or torn hoof wall. Getting a secure fit is essential, but may be impossible if the hoof has been severely damaged. Shoeing an ox with long hooves that may be trimmed to get a good solid wall for shoeing is easier than waiting for the hooves to wear down to a point where the hoof wall will not hold a nail.
Nailing shoes on oxen offers little room for error. The nail should go in with a fair amount of steady resistance. If a nail goes in easily, remove and reposition it. A tiny bend on the nail’s beveled end will help ensure that the nail comes out of the hoof.
Black hooves are usually more difficult to nail than white hooves. This difference influences the feel of the right amount of resistance. Environment and nutrition also create variation in hoof texture and water content. Oxen that are housed or worked in a dry environment generally have harder hooves than those spending their time standing in mud or wet pastures.
Animals on a high-grain diet may have softer hooves or frequently suffer from laminitis compared to cattle consuming primarily long-stemmed fibrous feeds. Knowing your animals’ anatomy and getting a feel for nailing is as important as trimming their feet and fitting their shoes.
City head nails: #3 or #4 are used for smaller oxen, up to #6 for larger oxen.
Calked shoes freshly nailed on the claws of a mature Holstein ox. Note the position of nail holes and the extending toes, which will be clipped off when shoeing is complete.

Most ox shoers find that the easiest way to properly position a shoe is to put in the middle nails first.
After the shoe is nailed, cut the nails off at the hoof wall and leave about 1⁄8 to 3⁄16 inch sticking out of the hoof wall. This excess nail must be clinched to hold the shoe in place. Clinching involves bending the nails over to secure the shoe. Without clinching the shoe will readily come loose and fall off. Every nail needs to be clinched.
Do not place your finger between the hoof and the shoeing stock when the ox has his foot secured. As the ox moves and fights the restraint, your finger could easily be pinched or injured by both the hoof and the protruding nails during clinching.
Before clinching, securely set the nail in the hoof and shoe using a solid steel clinching block. Place the clinching block on the hoof wall above the protruding cut-off nail. Set the nail by giving the head on the bottom of the hoof one or two hard blows. Hold the block above and against the protruding nail on the opposite side to begin the clinch by rolling over the tip of the nail.
Use a hacksaw blade or small file to remove the burr on the underside of the nail, caused when the nail penetrated the hoof. Removing the burr allows the nail to be more securely clinched and less likely to penetrate the hoof wall.
Clinching may be done using a hammer to bend the nail down tight against the hoof wall. Instead of hammering down the clinch, some teamsters use a set of gooseneck clinchers to bend and secure the clinch in one motion. Compared with regular clinchers, gooseneck clinchers are less likely to pull the nail down and tear the hoof, a concern because most oxen are not clinched as high as are horses.
Once clinched, the shoe is secure. It should not wiggle against the claw. It should be flat to the hoof and parallel to the ground surface. A set of shoes properly applied should remain secure for about three months. Resetting them may be necessary, depending on the hoof’s growth. The shod hoof will grow without wear, creating a smooth flat hoof for the next shoeing.

After the nails are cut off and set, remove the burr of hoof from under the nail to ensure a strong clinch.

With gooseneck clinchers, clinch the nails to secure the shoe.

If the nails come loose, or if after six to eight weeks the hoof wall starts to grow around the shoe’s edge, it is time to reset the shoe.
Numerous products are available that protect the hoof or raise it off the ground. These options are suitable for teamsters who desire an alternative to shoeing for parades, wagon trains, or other activities on hard surfaces. These alternative shoes are designed for dairy cattle with lameness from a hoof disease or other problem. For cattle that are suffering from sore feet and have too little hoof to shoe, gluing on Technovit Blocks or CowSlips may offer a solution. Both products are more easily applied than shoes and usually do not require a shoeing stock.
Technovit is an epoxy that may be placed on the hoof or used to glue a wooden block to the bottom of the hoof. This product offers a temporary solution when ox shoes are out of the question but the animal’s hooves need immediate protection from excessive wear. They do not hold up well when oxen are worked.
In most veterinary practices, Technovit has been largely replaced by Cowslips (see www.cowslips.com for international , or www.rileybuilt.com/cowslips for U.S.). Designed and manufactured in Ireland, Cowslips are plastic and come in a number of sizes that offer a temporary solution for a teamster with no other options. They are glued onto the sound claw of a pair in order to raise the other injured or diseased claw off the ground. Cowslips may not come in a size appropriate for larger oxen.
Other alternatives include cutting ox shoes out of plastic, rubber, or fiberglass. Such materials offer excellent traction on paved surfaces and cushion an animal from the trauma of walking on hard surfaces. They do not last long on the hoof, however, even when nailed on.
Brian Patten has been a friend since I started with my first team of steers back in the 1970s. Recently, while watching ox pulling with Brian and his wife Kim (Mock) at Ossipee Valley Fair, I realized it had been 30 years since I first met the two of them. Wow, how time flies.

Even if we had not seen each other in all these years, I certainly couldn’t forget the Patten family. They have always impressed me with their skills in driving oxen, competing, and being outstanding examples of sportsmanship, combined with a passion for working cattle.
Brian has 40 to 50 cattle, most of them steers, oxen, or cows that he uses to produce bull calves for oxen. Most of the cows are part Chianina, but he admits with a chuckle, “I don’t get along so good with the pure white ones (full-blood, all-white Italian-type Chianinas), so I like to breed my own.”
Brian’s 16-year-old son was sitting with us, and I asked him if he helps his dad much working oxen. Brian is known to work three to four pairs of oxen, all at the same time, to keep his many teams in condition for competition pulling. Tim admits, “I have a hard enough time working a pair or two. Plus, I never did get the hang of working oxen like a train, and my dad gets up earlier than I like to.”
Brian is also one of the few people who shoe oxen and will shoe for other teamsters. I asked him to highlight his reasons for ox shoeing and a few pointers on how to do it. He answered, “I try to shoe them only one time per season, and then only put a shoe on as the ox needs it.”
What was the toughest thing to learn? Without hesitation, Brian, replied, “Learning to place the nail. Getting the foot prepared for the shoe is probably next. Paring too much away before you shoe is usually the problem.”
He had a late start this year and said, “Working the steers like I have, they have more hoof worn off, and it makes shoeing harder.”
Why do you shoe? I asked. “Traction mostly,” Brian said, looking at the oxen pulling below us. “In a place like this it would have been ideal to have shoes on all the oxen. The other reason is to protect the foot while getting them ready. I do a lot of walking and the steers’ feet take a beating [his farm has many rocks and ledge outcroppings]. Some folks do not have to shoe, as they work their cattle on soft ground.”
I asked about individual hooves. Brian stated, “Black hooves seem to be tougher. Frank Scruton always said a black and white hoof is about the best, and I have to agree; that seems to be the best foot for shoeing.”
How many ox shoers are there? Not many, but we came up with a list of about 15 names. These folks come from New York, Connecticut, Massachusetts, Vermont, New Hampshire, and Maine; however, they do not travel to shoe oxen, and we could not think of any who advertise their services. Some of the ox teamsters who gathered around as we spoke said you’d better not even mention some of these names, because most of them want to shoe only their own oxen.
Brian says he shoes about five teams for other people each year, and he has to charge a price that makes it worthwhile. He has also built some shoeing stocks for other people with oxen and encouraged me to come see his most recent project.
Brian’s son Tim admits that if he did learn how to shoe oxen, he would do it for the money. Brian just smiled. He is one of the few people with the skills to shoe oxen, and he knows it is not easy.
Entire textbooks have been written about hoof care and diseases of the bovine hoof. Dairy cattle are the most frequently affected animals, the result of being confined on concrete in wet and unsanitary conditions. Ox teams that are worked in the field or forest and housed in barns, pastures, or corrals are generally free of many of the common diseases of the bovine hoof.

