Chocolate tart
You can recognize a good chocolate tart by the marks your teeth leave in the filling. It has to be dark, dense, rich and slightly sticky, with pastry that must be golden brown, not too thin but really crumbly. It’s an intense experience and, for this reason, I never eat as much as I would, say, of an apple tart. Well, almost never.
Serves 6
For the pastry
175g [1½ cups] plain [all-purpose] flour, plus extra for rolling out
90g [1/3 cup] unsalted butter, diced and softened
1 Tbsp caster or granulated sugar
¼ tsp salt
1 egg, beaten
For the chocolate filling
150ml [2/3 cup] double or whipping [heavy] cream
200g [7oz] dark [bittersweet] chocolate, 70% cocoa solids, chopped
2 Tbsp butter, softened
a pinch of sea salt flakes
For the pastry, in a mixing bowl, rub the flour, butter, sugar and salt together with your fingertips until the mixture is like fine breadcrumbs. Add the beaten egg and gradually work it into the dry ingredients, kneading lightly to make a smooth dough.
Preheat the oven to 200ºC/180ºC fan/400ºF/Gas 6. Roll out the pastry on a lightly floured board until 5mm [¼in] thick, and lift into a 20-cm [8-in] flan tin [tart pan] lined with baking parchment. Bake blind for 30 minutes until the pastry case is cooked (see Magic-crust quiche Lorraine). Leave the pastry case to cool and then chill it while you make the filling.
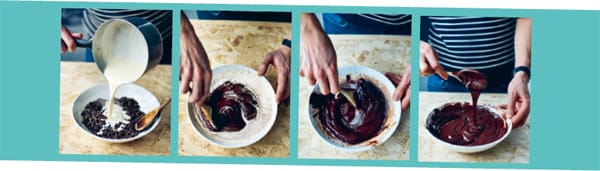
For the chocolate filling, heat the cream in a saucepan over a medium heat. When bubbles start to appear on the surface, remove the pan from the heat. Put the chopped chocolate in a heatproof bowl and pour in the hot milk. Leave to stand for 1 minute – the time it will take for the chocolate to start to melt. Stir and then add the butter, stirring until the mixture is smooth and glossy. By the way, you have just made another French classic, a ganache – how about that?
Pour the mixture into the chilled pastry case and return to the refrigerator until the filling is firmly set. Sprinkle with a few sea salt flakes before serving.
SACRILEGE?
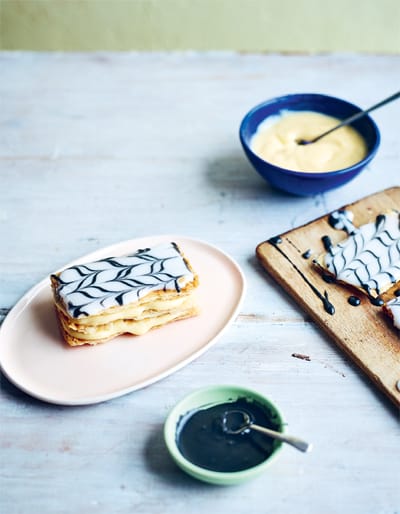
Just because most of the ingredients come from the supermarket doesn’t mean this millefeuille will let you forget your manners. You don’t eat a millefeuille layer by layer as that would be a betrayal of what the dessert is all about. Instead, you turn it gently on its side and cut across it with a knife and fork, so that each mouthful is a small sandwich of puff pastry and custard. Or, according to one French president, you eat it without any fuss using your fingers. #TheFrenchParadox
Millefeuille is a classic French pastry made by stacking three thin layers of puff pastry on top of each other, sandwiching them with crème pâtissière, and covering the top pastry sheet with icing. But I’m afraid I have to be honest – at the time of writing this recipe I have still never made puff pastry, crème pâtissière or icing –and I’m not going to start today.
Serves 8
1 rectangular sheet of ready-made puff pastry, measuring about 35 × 23cm [14 × 9in]
caster [superfine] sugar
thick vanilla custard or vanilla pudding mix (made up according to the packet instructions)
ready-made white icing and black icing
Preheat the oven to 200ºC/180ºC fan/400ºF/Gas 6.
Unroll the puff pastry and lightly dampen the sheet with cold water. Prick it all over with a fork and dust with sugar. Carefully lift the pastry onto a baking sheet and place a wire rack on top to prevent the pastry puffing up as it bakes.
Bake the pastry for about 10 minutes or until it is golden brown.
Turn the pastry sheet over, moisten and dust with sugar. Replace the wire rack on top and return to the oven for a few minutes until the pastry has dried out and is lightly golden.
Using a serrated knife, cut the pastry into 24 small rectangles measuring about 4 × 8cm [1½ x 3½in] and spread 8 of the rectangles with a layer of vanilla custard or pudding about 1cm [ in] thick.
Place another rectangle of pastry over each of these, spread with thick custard or pudding as before and top with the remaining pastry rectangles.
Spread the top layers of pastry with the icings. You can create a beautiful marbled pattern by swirling the icings together, which is very traditional and means you’ll be guaranteed entry into the exclusive club of top French pâtissiers. I’m joking. They will throw you out with the trash.
Tidy up and smooth the edges of the millefeuille with a knife.
Fake croissants and pains au chocolat
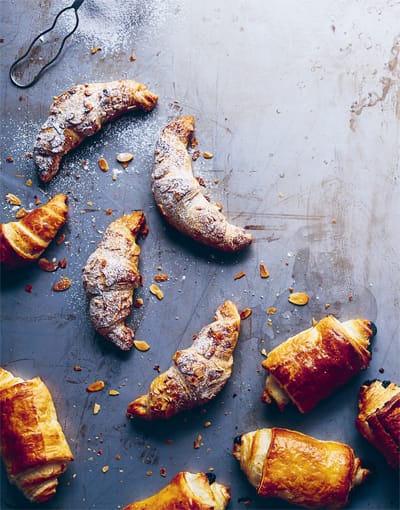
What are you talking about? Me, make fake croissants?? Sigh. You must think I’ve completely lost it... On the other hand, they are not that fake, or rather no more so than my other little pastries, which I make with puff pastry anyway. They are also really cheap and super–quick to make. Whew, I’m not crazy after all.
Makes about 6
2 sheets of ready-rolled all-butter puff pastry
icing [confectioners’] sugar
egg wash (1 egg beaten with 2 Tbsp cold water)
flaked [slivered] almonds OR dark [semisweet] chocolate, cut into 7.5-cm [3-in] sticks (2 sticks for each pain au chocolat)
Preheat the oven to 220ºC/200ºC fan/425ºF/Gas 7.
Lay 1 sheet of puff pastry on a board and dust it with icing sugar (or, if you’re feeling really decadent, spread with chocolate and hazelnut spread). Stack the second sheet on top – using 2 sheets of dough sandwiched together will give you a better rise in the oven.
Trim the pastry edges so the stack is roughly round and then cut it into wedges like a pizza.
Arrange a wedge so the tip is pointing towards you and, with both hands, roll it up slowly from the wide, rounded end, to make a croissant shape. Repeat with the other wedges and then lift the croissants onto a baking sheet lined with baking parchment.
Brush the croissants with egg wash and sprinkle with almonds, if you like. Bake for about 15 minutes or until puffed and golden brown. You can dust them with icing sugar or leave them plain.
Pains au chocolat
Preheat the oven to 220ºC/200ºC fan/425ºF/Gas 7.
Use the double puff pastry trick of stacking one sheet on top of the other (described opposite) and then cut the stack into 7.5 × 12.5-cm [3 × 5-in] rectangles.
Position one rectangle so a short side is facing towards you and lay a stick of chocolate across the pastry, 2.5cm [1in] from the top. Start rolling the pastry from the top: after one turn you won’t be able to see the chocolate any more – that’s good. Flatten the top of the roll gently with your fingers so it becomes oval-shaped. Give the roll a second turn, flattening it slightly again and place a second chocolate stick close to the roll. Give it a final roll and a last press, ensuring the join in the pastry is tucked underneath. Trim off any excess and repeat with the other rectangles and chocolate sticks.
Brush the pastry with egg wash and bake for 20 minutes or until puffed and golden brown.
For me, it’s the salt that makes this dessert so addictive. Not the sugar or the butter the latter certainly helps but don’t make me say something I didn’t. With the salt, a balance is created and magic happens. If you think I’m going overboard, make the recipe and let’s talk again.
Serves 2
100g [½ cup] granulated sugar
3 Tbsp unsalted butter
about 150ml [¾ cup] milk
a pinch of sea salt flakes
Put the sugar and butter in a frying pan [skillet] over a medium heat and sprinkle in a few drops of water. When the butter is completely melted, bring the mix to the boil (warning: it’s mega mega hot) and cook until smooth, thick and caramel coloured.
Take the pan off the heat and mix in the milk to stop the mixture from over-cooking. Put the pan back over a low heat this time and stir gently until the mixture is the consistency you want. Using slightly less milk will give a spreadable texture; a little more and it will be like runny honey.
Add the pinch of salt. Transfer to a clean jar, leave to cool and store in the refrigerator. Use it on pancakes, in cakes, on tartines, stirred into yogurt, straight from the spoon…
"Thanks, Alex, you’ve ruined my saucepan..."
No need to panic. Just fill the pan with water, chuck in any sticky spoons as well and bring the water to the boil. Go and surf the web in which case can I suggest a YouTube channel? ‘et voilà ‘. Without doing a thing your saucepan and utensils are clean again.
This dessert is amazing. My mother used to make it when I was a child and – confession – I adored drinking the very cold, wine-flavoured syrup straight from the bowl. But don’t panic: although it contains hardly any alcohol, the flavour of the red wine – refreshing, mature, spicy and tannic – is still very much there. Perhaps that helped develop my taste for good wine these days. Who knows?
Serves 2
½ bunch of fresh basil
3 glasses of red wine
100g [½ cup] caster or granulated sugar
½ tsp vanilla extract
250g [9oz] strawberries
freshly ground black pepper
Separate the basil leaves from their stalks.
Heat the wine in a saucepan over a medium heat, stirring lightly until it comes to a gentle boil. Add the sugar and stir until completely dissolved.
Continue cooking the wine until the smell of alcohol has disappeared (5–10 minutes). Turn off the heat under the pan and add the vanilla extract and the basil stalks. Set to one side.
Cut the strawberries into pieces and add to the wine mixture. Leave to cool and then chill in the refrigerator. When ready to serve, grind in one turn of black pepper from the mill and add a few basil leaves.
Which strawberries to choose?
The wine, the sugar and the vanilla all have very distinctive flavours so there’s no point in buying small fragrant strawberries plus they’ll be overpriced. Much better to go for bigger strawberries that are deep red and will be very juicy, as the syrup will be better.
Picture the scene – mid-summer, blazing hot sun. Your small son pulls your arm and for the second time you drop a messy pulled pork and slaw sandwich. MMH. Not so sure that the sticky butterscotch buns planned for dessert are going to be any more successful. If only you’d thought of making my fresh sweet summer rolls...
Makes 10 rolls
100g [3½oz] dried rice noodles
100ml [1/3 cup] full-fat coconut milk
1 Tbsp runny honey
10 rice wrappers
Fruit, vegetable and fresh herb combinations that work well in the filling
EITHER mango, avocado and chopped mint
OR strawberries, red peppers and chopped basil
OR cucumber, pineapple and fresh chopped coriander [cilantro]
Serving suggestion
natural yogurt
runny honey
Cook the rice noodles according to the packet instructions. Drain and set them aside in a bowl. Mix in the coconut milk and honey.
Cut one-quarter of the fruit and vegetables you are using into attractive, thin slices (carpaccio, anyone?) and set these aside for decoration. Cut the rest of the fruit and vegetables into thin sticks – you are going to use these to fill the rolls.
Fill a large dish with warm water, dip a rice wrapper in the water and then place the wrapper flat on a board in front of you.
Put a few noodles and then some chopped herbs and fruit and vegetable sticks on top, laid horizontally, one-third of the way from the edge of the wrapper nearest your navel. Top with fruit and vegetable slices so they line up with the sticks.
Roll the rice wrapper around the filling, folding the sides in as you go to seal the summer roll. If you’ve done the job properly, you’ll see the fruit and vegetable slices through the transparent wrapper.
Mix together some yogurt and honey and use as a dipping sauce for the rolls.
I adore ice cream but I don’t have an ice–cream maker. However, I do have a freezer so I make my ice creams in that. Logical – non?
Serves 4–6
For the ice cream
6 egg yolks
150g [¾ cup] caster or granulated sugar
225ml [1 cup] whole milk
450ml [2 cups] double [heavy] cream
Suggested flavourings
rum and chopped crystallized ginger
unsweetened cocoa powder
vanilla pods [beans] or vanilla extract
crushed strawberries
Place a large, thick glass or ceramic dish in the freezer to chill it thoroughly.
Put the egg yolks in a large bowl, add the sugar and mix until you have a smooth, pale yellow paste. This requires a bit of effort to make it smooth (electric hand whisk, maybe?).
Mix the milk and cream together in a saucepan, whisk in the egg yolk mixture and, stirring constantly, bring to a gentle simmer over a medium heat. On no account let it boil otherwise the egg yolks will scramble and you’ll end up with some really weird ice cream.
Pour the mixture into the chilled dish and stir in your chosen flavouring until it is evenly mixed in.
Freeze for 1 hour. Take the dish out of the freezer and stir the ice cream briskly with a fork. Return it to the freezer for 2 hours. Remove the dish from the freezer and stir again briskly with a fork.
Return the ice cream to the freezer and freeze overnight.
Is it crystal clear?
A good ice cream is a smooth ice cream, that is to say its ice crystals are so small your teeth don’t crunch on them when you eat it. Here, the speed at which you freeze the mixture is vital. Frozen slowly, without being stirred, the ice cream will produce large crystals that are hard and watery, whereas rapid freezing, combined with energetic stirring, will produce tiny crystals and thus a better ice cream.
To tell the truth, I have a crush on this recipe and here’s why – it’s delicious and a real confidence booster as I always feel like a pastry chef at the end. The light, fluffy puffs are made with what the French call ‘pâte à choux’ – that means ‘cabbage dough’ in English. Yum, I know. In fact, the name has nothing to do with cabbages. ‘Choux’ comes from the French word ‘chaud’, meaning warm, as the pastry dough is made over the heat. The more you know... The chouquettes are great split open and filled with ice cream, too.
Makes 30–40 puffs
For the dough
225ml [1 cup] milk and water, mixed in equal proportions
115g [½ cup] butter, diced
a pinch of salt
1 heaped Tbsp granulated sugar
115g [1 scant cup] plain [all-purpose] flour
3 eggs
pearl sugar nibs [nibbed sugar], or sugar cubes, bashed up into small pieces in a cloth
For the dough, put the milk and water, butter, salt and sugar in a saucepan over a medium-high heat. As soon as the butter and sugar melt and the liquid comes to the boil, tip in all the flour and mix over the heat with a wooden spoon until the dough comes together and dries out a little bit. It will form itself into a weird-looking ball that surprisingly won’t stick to the sides of the pan.
Scrape out the dough into a bowl and add the eggs. Beat with the wooden spoon (or an electric hand whisk on low speed). To begin with, the dough won’t come together but eventually it will. So, go for it, beating until you get a thick, glossy dough and muscles you can be proud of. The dough needs to hold its shape but not be too dry so add a drizzle of milk and mix a bit more, if necessary.
Preheat the oven to 200ºC/180ºC fan/400ºF/Gas 6. Line a couple of baking sheets with baking parchment. If you’ve got a piping [pastry] bag, now’s the time to use it. Otherwise, take a clean, strong plastic bag, turn it inside out and spoon the dough into it. Turn the bag back the right way, snip off one corner with scissors, and twist the top of the bag closed – hey presto, one homemade piping bag!
Pipe about 30–40 small puffs on the baking sheets, lightly pressing the points on top flat with your fingers. Sprinkle the puffs with pearl sugar nibs, gently pressing them into the choux. Bake the puffs for 20 minutes until they are golden. Transfer them to a wire rack to cool.
This tart from Normandy makes the most of locally grown apples and Calvados, which is apple brandy Bourbon works a treat too. It’s great both hot or cold and – if you’re feeling brave – do as the Normans do and flambé the tart with extra Calvados before serving it.
Serves 6
For the pastry
175g [1½ cups] plain [all-purpose] flour, plus extra for rolling out
90g [1/3 cup] butter, diced and softened
1 Tbsp granulated sugar
¼ tsp salt
1 egg, beaten
For the filling
3–4 dessert apples, depending on size
2 eggs
90g [½ cup] caster [superfine] sugar
100g [1 cup] ground almonds
100ml [scant ½ cup] double [heavy] cream
4 Tbsp Calvados (or, if you don’t want to use alcohol, fresh apple juice)
3 Tbsp flaked [slivered] almonds
For the pastry, in a mixing bowl, rub the flour, butter, sugar and salt together with your fingertips until the mixture is like fine breadcrumbs. Add the beaten egg and gradually work it into the dry ingredients, kneading lightly to make a smooth dough.
Roll out the pastry on a lightly floured board until 5mm [¼in] thick, and lift into a 23-cm [9-in] flan tin [tart pan]. Refrigerate while you prepare the filling.
Preheat the oven to 200ºC/180ºC fan/400ºF/Gas 6. Put a baking sheet in the oven to heat.
For the filling, peel, core and quarter the apples. Cut each quarter into 3 wedges and arrange them in concentric circles in the pastry case. Beat together the eggs, sugar, ground almonds, cream and Calvados and carefully pour or spoon this mixture over the apples. Scatter over the flaked almonds.
Carefully lift the tart onto the hot baking sheet and bake for 30–35 minutes or until the filling is set and the tart is golden. Serve hot or cold.
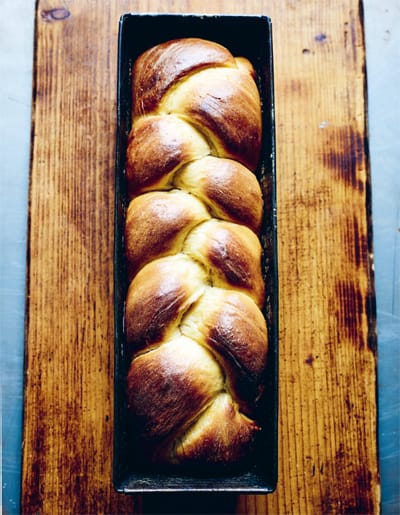
Foolproof brioche
A word of warning – if you dislike fluffy buns, sweet buttery aromas, rich milky doughs and stretchy but obliging gluten, it’s time to turn the page now. Otherwise, welcome to the wonderful world of brioche.
Makes 1 large brioche
500g [3½ cups] strong white bread flour
7g [1 tsp] instant yeast
2 eggs, beaten
200ml [scant 1 cup] whole milk, gently warmed (but not hot!)
2 heaped Tbsp granulated or caster sugar
1 tsp salt
100g [generous 1/3 cup] butter, diced and softened
extra butter and flour for the tin
Sift the flour into the bowl of a food mixer and stir in the yeast.
Add the beaten eggs, milk, sugar, salt and finally the butter and mix on slow speed to begin with. When everything is evenly combined, increase the speed and continue mixing until you have a smooth dough that is soft and elastic but not too sticky.
Transfer the dough to a large bowl, cover with clingfilm [plastic wrap] and leave in a warm place for 1–2 hours or until it has doubled in size.
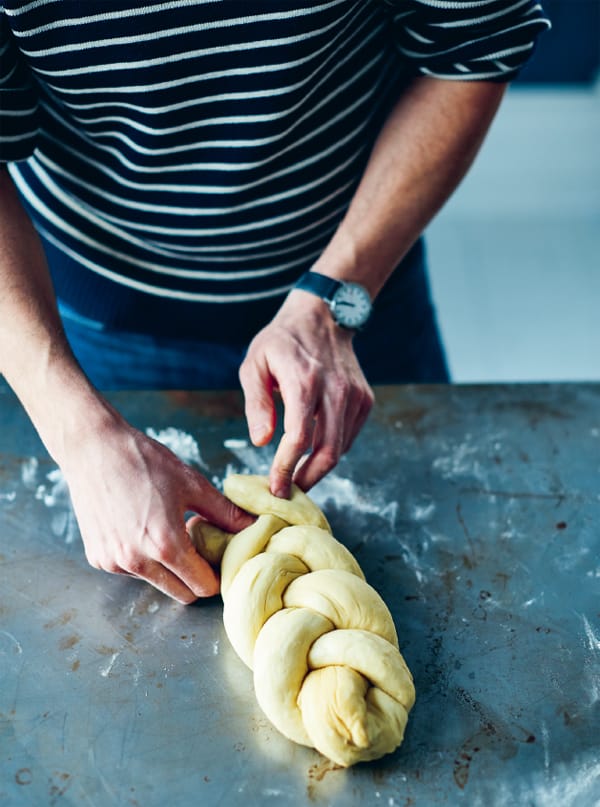
Punch the dough down and then knead lightly to burst any air bubbles inside. Divide into 3 equal pieces and roll each into a long, plump sausage. Brush a loaf tin [loaf pan] – the one I use is 30 × 13cm [12 × 5in] and 8cm [3¼in] deep – with melted butter and dust with flour. Plait [braid] the dough sausages together and then drop the plait carefully into the tin.
Cover with clingfilm and leave in a warm place to prove for about 15 minutes or until the dough just reaches the top of the tin. Meanwhile, preheat the oven to 200ºC/180ºC fan/400ºF/Gas 6.
Bake the brioche for about 25 minutes or until well risen and golden brown.
Remove from the oven, turn the brioche out of the tin and leave to cool on a wire rack.
In the unlikely event...
There is little chance of you having any left over the next day but, should that ever happen or you missed a bit first time round, on no account throw it away as it will make the best French toast in the world.
This fantastic tart kills two birds with one stone – you make a cake without even lighting the oven, while passing for a French pastry chef in front of your friends. Hard to believe, eh? And, even better, I guarantee a round of thunderous applause when you place it in the middle of the table.
Serves 6–8
For the base
75g [generous ¼ cup] butter, melted
250g [9oz] digestive biscuits [graham crackers], blitzed into crumbs
For the crème pâtissière
400ml [1¾ cups] whole milk
3 eggs
90g [½ cup] caster [superfine] sugar
4 Tbsp plain [all-purpose] flour
1 tsp vanilla extract
For the topping
250g [2 cups] raspberries, defrosted if frozen
4 Tbsp seedless raspberry jam
For the base, stir the melted butter into the biscuit [cracker] crumbs and press over the base and 4cm [1½in] up the sides of a 20-cm [8-in] springform cake tin [cake pan]. Refrigerate to firm up while you make the crème pâtissière.
Heat the milk in a saucepan until bubbles appear on the surface. While the milk is heating, beat the eggs, sugar and flour together in a jug until smooth. Pour a little of the hot milk into the egg mixture, stir well and then pour back into the pan. Stir constantly over a medium heat until the custard is thickened and smooth. Make sure you keep stirring vigorously all the time or lumps will form and you don’t want that! If this starts to happen, take the pan off the heat and beat or whisk the custard until it is smooth again.
Take the crème pâtissière off the heat and stir in the vanilla extact. Tip into a bowl and press clingfilm [plastic wrap] over the surface to prevent a skin from forming. Leave until cold and then spread in the chilled tart case.
For the topping, cover the crème pâtissière with the raspberries. Heat the jam with 1 tablespoon of water in the microwave until it bubbles and brush it over the raspberries. Chill the tart until ready to serve. Release from the tin and carefully slide onto a serving plate.
Hey – the great thing about this cake is you don’t need any scales or cups to measure out the ingredients, just the pot you bought the yogurt in. So how easy is that? And did I mention that it’s absolutely delicious as well? But don’t take my word for it, try it yourself.
Makes 1 small cake
oil for greasing the loaf tin
1 pot of natural yogurt (about 150g [5oz])
2½ pots of plain [all-purpose] flour
1½ pots of caster or granulated sugar
1 tsp vanilla extract
finely grated zest of 1 lemon
3 eggs, beaten
½ pot of sunflower oil
1 tsp baking powder
Preheat the oven to 180ºC/160ºC fan/350ºF/Gas 4. Grease a small loaf tin [pan] by brushing it with oil and line the base and sides with baking parchment.
Scrape the yogurt out of the pot into a mixing bowl. Wash and dry the pot and use it to measure the other ingredients. Add the flour, sugar, vanilla and lemon zest to the bowl and stir until combined. The mixture will not be smooth at this stage – it will look quite dry and crumbly.
Add the beaten eggs, stir well, then add the oil and baking powder. Beat or whisk until the mixture is glossy, smooth and doesn’t have any nasty lumps left in it.
Scrape the batter out of the bowl into the loaf tin. Bake the cake for 30–35 minutes or until it has risen, is golden brown and a cake tester or skewer pushed into the centre of the cake comes out clean with no uncooked batter sticking to it.
Cool the cake in the tin for 10 minutes before turning it out onto a wire rack to cool completely.
6 magical microwave winners… and 1 epic failure

Some people see it as the devil’s work but, for me, a microwave is just a useful extra piece of equipment in the kitchen. It’s pretty effective, I have to say, but you have to know how to use it. Here are a few microwaving tips and tricks that you might not be aware of.
Instant cake
Mix some self-raising [self-rising] flour with a bit of milk, a beaten egg, salt and sugar until you get something like a thick pancake batter. Pour into a mug so it’s one-third full and microwave on full power for 1 minute and then in 30-second bursts until done. Instant cake!
High-speed cooking
Artichokes take 45 minutes to cook, but only 8–10 minutes in the microwave. I also frequently pre-cook potatoes before I roast them. Put the potatoes in a bowl, add 2–3 tablespoons of water, cover and microwave on full power for 8–10 minutes until just tender when pierced with a knife. Finish in a hot oven.
Even heating
Placing a dish in the centre of the microwave turntable is disastrous, as your food will be burning in some places and frozen in others. Place the dish at the edge of the turntable.
Crisps [potato chips]
Put very thin, even slices of potato in a dish and cover with microwave-safe clingfilm [plastic wrap], or – as I prefer to do – very lightly coat them in oil and place them directly on the glass microwave turntable (if you do this you’ll have to separate them with a spatula). Cook for 2½ minutes on full power and then in 30-second bursts until crisp. They should take 3–5 minutes in total.
Worry-free garlic
To save time when you have to peel a lot of garlic, microwave a whole bulb for 20 seconds and then take it out without burning yourself. Rub the bulb between your hands to separate the individual cloves and remove their skins. And, there’s even more magic, as the smell on your fingers will last FOREVER!
Chopping without tears (almost)
Peel an onion, make a couple of small cuts in it so it doesn’t explode (oh, the joys of cooking!) and microwave for 30 seconds. This releases the tear gases so the task of chopping the onion will be much less traumatic.
Something you must never do
Twice in my life I’ve tried to hard-boil an egg in the microwave. Twice it has exploded, ruined the inside of my oven and the smell in my kitchen has been unbelievable. TWICE!