Chapter 11. PDF
Adobe’s Portable Document Format (PDF) is a popular way to get a consistent look, both on screen and in print, for documents. This chapter shows you how to dynamically create PDF files with text, graphics, links, and more. Doing so opens the door to many applications. You can create almost any kind of business document, including form letters, invoices, and receipts. In addition, you can automate most paperwork by overlaying text onto a scan of the paper form and saving the result as a PDF file.
PDF Extensions
PHP has several libraries for generating PDF documents. This chapter’s examples use the popular FPDF library, a set of PHP code you include in your scripts with the require() function—it doesn’t require any server-side configuration or support, so you can use it even without support from your host. The basic concepts, structure, and features of a PDF file should be common to all the PDF libraries, however.
Note
Another PDF-generating library, TCPDF, is better at handling HTML special characters and UTF-8 multilanguage output than FPDF. Look it up if you need that capability. The methods you’ll use are writeHTMLCell() and writeHTML().
Documents and Pages
A PDF document is made up of a number of pages, each of which contains text and/or images. This section shows you how to create a document, add pages in that document, write text to the pages, and send the pages back to the browser when you’re done.
Note
The examples in this chapter assume that you have at least the Adobe PDF document viewer installed as an add-on to your web browser. These examples will not work otherwise. You can get the add-on from the Adobe website.
A Simple Example
Let’s start with a simple PDF document. Example 11-1 writes the text “Hello Out There!” to a page and then displays the resulting PDF document.
Example 11-1. “Hello Out There!” in PDF
<?phprequire("../fpdf/fpdf.php");// path to fpdf.php=newFPDF();->addPage();->setFont("Arial",'B',16);->cell(40,10,"Hello Out There!");->output();
Example 11-1 follows the basic steps involved in creating a PDF document: creating a new PDF object instance, creating a page, setting a valid font for the PDF text, and writing the text to a “cell” on the page. Figure 11-1 shows the output of Example 11-1.

Figure 11-1. “Hello Out There!” PDF example
Initializing the Document
In Example 11-1, we started by making a reference to the FPDF library with the require() function. Then the code created a new instance of the FPDF object. Note that all the calls to the new FPDF instance are object-oriented calls to methods in that object. (Refer to Chapter 6 if you have trouble with the examples in this chapter.) After you have created the new instance of the FPDF object, you’ll need to add at least one page to the object, so the AddPage() method is called. Next, you need to set the font for the output you are about to generate with the SetFont() call. Then, using the cell() method call, you can send the output to your created document. To send all your work to the browser, simply use the output() method.
Outputting Basic Text Cells
In the FPDF library, a cell is a rectangular area on the page that you can create and control. This cell can have a height, width, and border, and of course it can contain text. The basic syntax for the cell() method is as follows:
cell(floatw[,floath[,stringtxt[,mixedborder[,intln[,stringalign[,intfill[,mixedlink]]]]]]])
The first option is the width, then the height, and then the text to be output. This is followed by the border, the new line control, its alignment, any fill color for the text, and finally whether you want the text to be an HTML link. So, for example, if we want to change our original example to have a border and be center-aligned, we would change the cell code to the following:
->cell(90,10,"Hello Out There!",1,0,'C');
You’ll use the cell() method extensively when generating PDF documents with FPDF, so you’d be well served by taking some time to learn the ins and outs of this method. We will cover most of them in this chapter.
Text
Text is the heart of a PDF file. Accordingly, there are many options for changing its appearance and layout. In this section, we’ll discuss the coordinate system used in PDF documents, functions for inserting text and changing text attributes, and font usage.
Coordinates
The origin (0, 0) in a PDF document with the FPDF library is in the top-left corner of the defined page. All of the measurements are specified in points, millimeters, inches, or centimeters. A point (the default) is equal to 1/72 of an inch, or 0.35 mm. In Example 11-2, we change the defaults of the page dimensions to inches with the FPDF() class instantiation-constructor method. The other options with this call are the orientation of the page (portrait or landscape) and the page size (typically Legal or Letter). The full options of this instantiation are shown in Table 11-1.
FPDF() constructor parameters |
Parameter options |
|---|---|
| Orientation | P (portrait; default)L (landscape) |
| Units of measurement | pt (point, or 1/72 of an inch; default)in (inch)mm (millimeter)cm (centimeter) |
| Page size | Letter (default)LegalA5A3A4 or a customizable size (see FPDF documentation) |
Also in Example 11-2, we use the ln() method call to manage what line of the page we are on. The ln() method can take an optional argument, instructing it how many units (i.e., the unit of measurement defined in the constructor call) to move. In our case, we’ve defined the page to be in inches, so we’re moving through the document in measurement units of inches. Further, since we’ve defined the page to be in inches, the coordinates for the cell() method are also rendered in inches.
Note
This is not really the ideal approach for building a PDF page because you don’t have as fine-grained control with inches as you would with points or millimeters. We’ve used inches in this instance so that the examples can be seen more clearly.
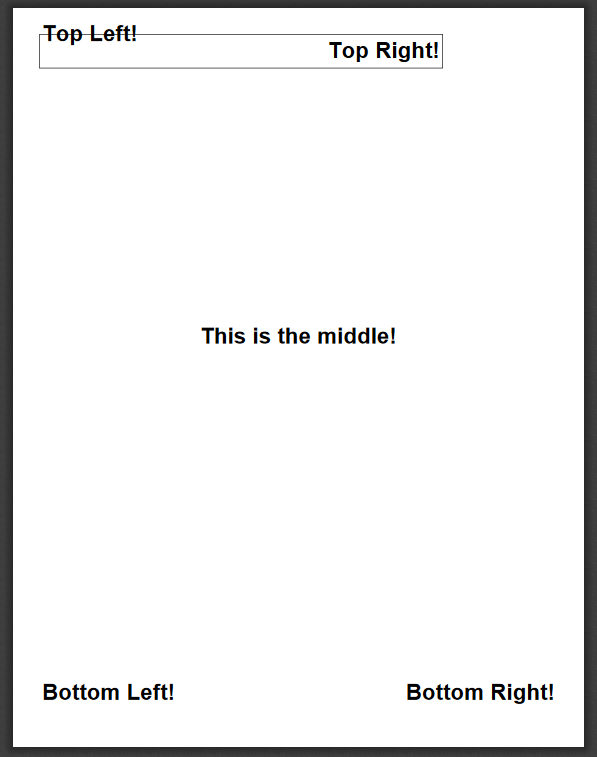
Example 11-2 puts text in the corners and center of a page.
Example 11-2. Demonstrating coordinates and line management
<?phprequire("../fpdf/fpdf.php");=newFPDF('P','in','Letter');->addPage();->setFont('Arial','B',24);->cell(0,0,"Top Left!",0,1,'L');->cell(6,0.5,"Top Right!",1,0,'R');->ln(4.5);->cell(0,0,"This is the middle!",0,0,'C');->ln(5.3);->cell(0,0,"Bottom Left!",0,0,'L');->cell(0,0,"Bottom Right!",0,0,'R');->output();
The output of Example 11-2 is shown in Figure 11-2.

Figure 11-2. Coordinate and line control demo output
So let’s analyze this code a little. After we define the page with the constructor, we see these lines of code:
->cell(0,0,"Top Left!",0,1,'L');->cell(6,0.5,"Top Right!",1,0,'R');->ln(4.5);
The first cell() method call tells the PDF class to start at the top coordinates (0,0) and write out the left-justified text “Top Left!” with no border, and to insert a line break at the end of the output. The next cell() method call prompts the creation of a cell six inches wide, again starting on the lefthand side of the page, with a half-inch-high border and the right-justified text “Top Right!” We then tell the PDF class to move down 4½ inches on the page with the ln(4.5) statement, and continue the output generation from that point. As you can see, there are a lot of possible combinations with the cell() and ln() methods alone. But that is not all that the FPDF library can do.
Text Attributes
There are three common ways to alter the appearance of text: bold, underline, and italics. In Example 11-3 the SetFont() method (introduced earlier in the chapter) is used to alter the formatting of the outgoing text. Note that these alterations in the text’s appearance are not exclusive (i.e., you can use them in any combination) and that the font name is changed in the last SetFont() call.
Example 11-3. Demonstrating font attributes
<?phprequire("../fpdf/fpdf.php");=newFPDF();->addPage();->setFont("Arial",'',12);->cell(0,5,"Regular normal Arial Text here, size 12",0,1,'L');->ln();->setFont("Arial",'IBU',20);->cell(0,15,"This is Bold, Underlined, Italicised Text size 20",0,0,'L');->ln();->setFont("Times",'IU',15);->cell(0,5,"This is Underlined Italicised 15pt Times",0,0,'L');->output();
Also, in this code the constructor has been called with no attributes passed into it, using the default values of portrait, points, and letter. The output of Example 11-3 is shown in Figure 11-3.

Figure 11-3. Changing font types, sizes, and attributes
The available font styles that come with FPDF are:
Courier(fixed-width)HelveticaorArial(synonymous; sans serif)Times(serif)Symbol(symbols)ZapfDingbats(symbols)
You can include any other font family for which you have the definition file by using the AddFont() method.
Of course, this wouldn’t be any fun at all if you couldn’t change the color of the text that you’re outputting to the PDF definition. Enter the SetTextColor() method. This method takes the existing font definition and simply changes the color of the text. Be sure to call this method before you use the cell() method so that the content of the cell can be changed. The color parameters are combinations of red, green, and blue numeric constants from 0 (none) to 255 (full color). If you do not pass in the second and third parameters, then the first number will be a shade of gray with red, green, and blue values equal to the single passed value. Example 11-4 shows how this can be employed.
Example 11-4. Demonstrating color attributes
<?phprequire("../fpdf/fpdf.php");=newFPDF();->addPage();->setFont("Times",'U',15);->setTextColor(128);->cell(0,5,"Times font, Underlined and shade of Grey Text",0,0,'L');->ln(6);->setTextColor(255,0,0);->cell(0,5,"Times font, Underlined and Red Text",0,0,'L');->output();
Figure 11-4 is the result of the code in Example 11-4.

Figure 11-4. Adding color to the text output
Images and Links
The FPDF library can also handle image insertion and control links within the PDF document or externally to outside web addresses. Let’s first look at how FPDF allows you to insert graphics into your document. Perhaps you’re building a PDF document that uses your company logo and you want to make a banner to print at the top of each page. We can use the header() and footer() methods that we defined in the previous section to do this. Once we have an image file to use, we simply call the image() method to place the image in the PDF document.
The new header() method code looks like this:
functionheader(){global$title;$this->setFont("Times",'',12);$this->setDrawColor(0,0,180);$this->setFillColor(230,0,230);$this->setTextColor(0,0,255);$this->setLineWidth(0.5);$width=$this->getStringWidth($title)+120;$this->image("php_logo_big.jpg",10,10.5,15,8.5);$this->cell($width,9,$title,1,1,'C');$this->ln(10);}
As you can see, the image() method’s parameters are the filename of the image to use, the x coordinate at which to start the image output, the y coordinate, and the width and height of the image. If you don’t specify the width and height, then FPDF will do its best to render the image at the x and y coordinates that you specified. The code has changed a little in other areas as well. We removed the fill color parameter from the cell() method call even though we still have the fill color method called. This makes the box area around the header cell white so that we can insert the image without hassle.
The output of this new header with the image inserted is shown in Figure 11-6.

Figure 11-6. PDF page header with inserted image file
This section also has links in its title, so now let’s turn our attention to how to use FPDF to add links to PDF documents. FPDF can create two kinds of links: an internal link (i.e., one within the PDF document to another location within the same document, such as two pages later) and an external link to a web URL.
An internal link is created in two parts. First you define the starting point, or origin, for the link, and then you set the anchor, or destination, for where the link will go when it is clicked. To set a link’s origin, use the addLink() method. This method will return a handle that you need to use when creating the destination portion of the link. To set the destination, use the setLink() method, which takes the origin’s link handle as its parameter so that it can perform the join between the two steps.
An external URL type link can be created in two ways. If you are using an image as a link, you will need to use the image() method. If you want to use straight text as a link, you’ll need to use the cell() or write() method. We use the write() method in this example.
Both internal and external links are shown in Example 11-6.
Example 11-6. Creating internal and external links
<?phprequire("../fpdf/fpdf.php");=newFPDF();// First page->addPage();->setFont("Times",'',14);->write(5,"For a link to the next page - Click");->setFont('','U');->setTextColor(0,0,255);$linkToPage2=->addLink();->write(5,"here",$linkToPage2);->setFont('');// Second page->addPage();->setLink($linkToPage2);->image("php-tiny.jpg",10,10,30,0,'',"http://www.php.net");->ln(20);->setTextColor(1);->cell(0,5,"Click the following link, or click on the image",0,1,'L');->setFont('','U');->setTextColor(0,0,255);->write(5,"www.oreilly.com","http://www.oreilly.com");->output();
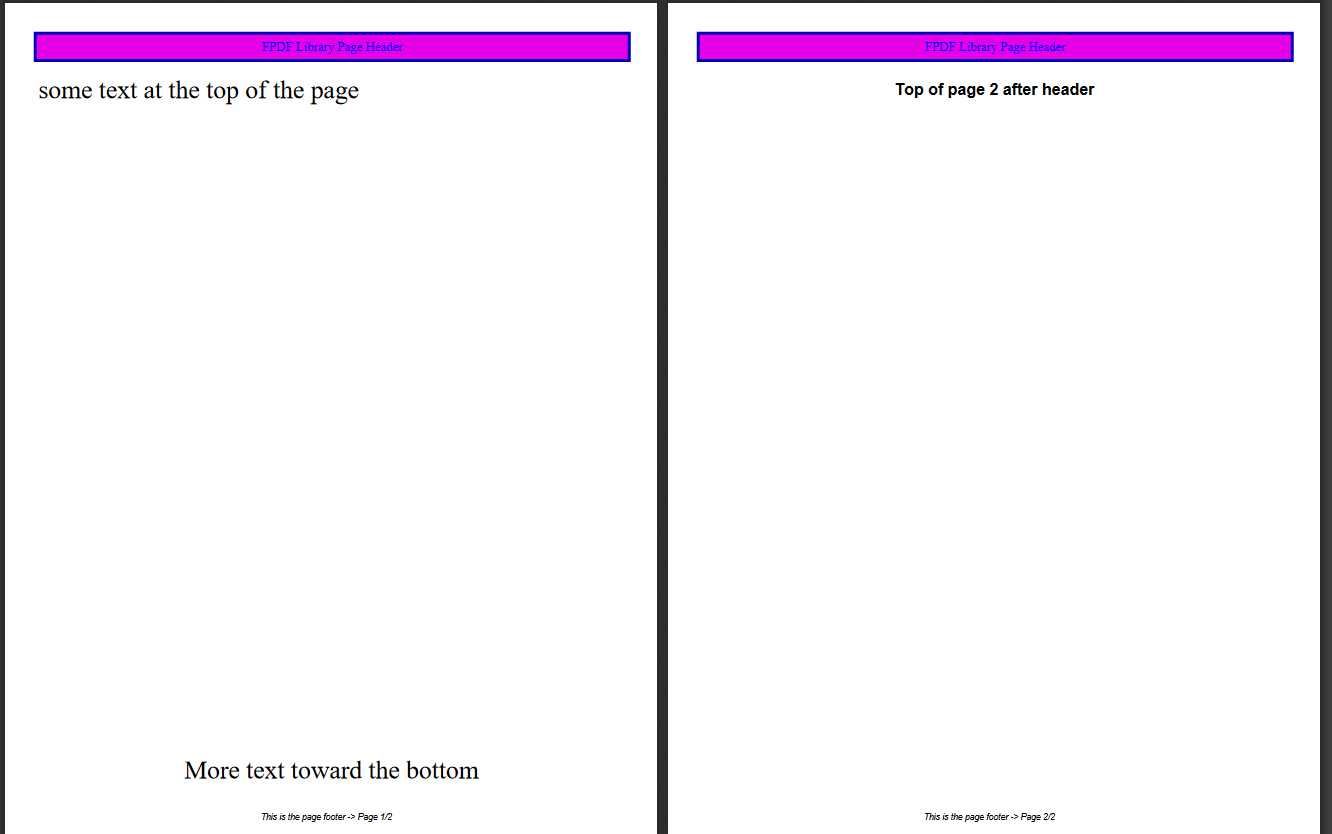
The two-page output that this code produces is shown in Figures 11-7 and 11-8.

Figure 11-7. First page of linked PDF document

Figure 11-8. Second page of linked PDF document with URL links
Tables and Data
So far we’ve looked only at PDF materials that are static in nature. But PHP, being what it is, does so much more than static processes. In this section, we’ll combine some data from a database (using a MySQL example of the database information from Chapter 9) and FPDF’s ability to generate tables.
Note
Be sure to reference the database file structures available in Chapter 9 to follow along in this section.
Example 11-7 is, again, a little lengthy. However, it is well commented, so read through it here first; we’ll cover the highlights after the listing.
Example 11-7. Generating a table
<?phprequire("../fpdf/fpdf.php");classTablePDFextendsFPDF{functionbuildTable($header,$data){$this->setFillColor(255,0,0);$this->setTextColor(255);$this->setDrawColor(128,0,0);$this->setLineWidth(0.3);$this->setFont('','B');//Header// make an array for the column widths$widths=array(85,40,15);// send the headers to the PDF documentfor($i=0;$i<count($header);$i++){$this->cell($widths[$i],7,$header[$i],1,0,'C',1);}$this->ln();// Color and font restoration$this->setFillColor(175);$this->setTextColor(0);$this->setFont('');// now spool out the data from the $data array$fill=0;// used to alternate row color backgrounds$url="http://www.oreilly.com";foreach($dataas$row){$this->cell($widths[0],6,$row[0],'LR',0,'L',$fill);// set colors to show a URL style link$this->setTextColor(0,0,255);$this->setFont('','U');$this->cell($widths[1],6,$row[1],'LR',0,'L',$fill,$url);// restore normal color settings$this->setTextColor(0);$this->setFont('');$this->cell($widths[2],6,$row[2],'LR',0,'C',$fill);$this->ln();$fill=($fill)?0:1;}$this->cell(array_sum($widths),0,'','T');}}//connect to database$dbconn=newmysqli('localhost','dbusername','dbpassword','library');$sql="SELECT * FROM books ORDER BY title";$result=$dbconn->query($sql);// build the data array from the database records.while($row=$result->fetch_assoc()){$data[]=array($row['title'],$row['ISBN'],$row['pub_year']);}// start and build the PDF document=newTablePDF();// Column titles$header=array("Title","ISBN","Year");->setFont("Arial",'',14);->addPage();->buildTable($header,$data);->output();
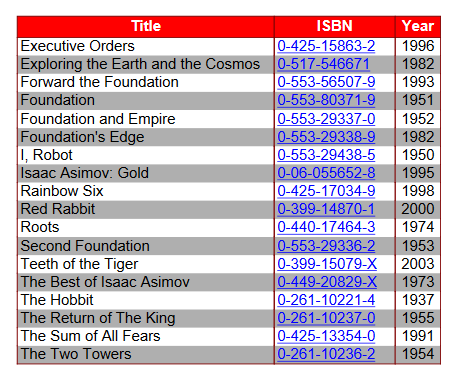
We are using the database connection and building two arrays to send to the buildTable() custom method of this extended class. Inside the buildTable() method, we set colors and font attributes for the table header. Then, we send out the headers based on the first passed-in array. There is another array called $width used to set the column widths in the calls to cell().
After the table header is sent out, we use the $data array containing the database information and walk through that array with a foreach loop. Notice here that the cell() method is using 'LR' for its border parameter. This inserts borders on the left and right of the cell in question, thus effectively adding the sides to the table rows. We also add a URL link to the second column just to show you that it can be done in concert with the table row construction. Lastly, we use a $fill variable to flip back and forth so that the background color will alternate as the table is built row by row.
The last call to the cell() method in this buildTable() method is used to draw the bottom of the table and close off the columns.
The result of this code is shown in Figure 11-9.

Figure 11-9. FPDF-generated table based on database information with active URL links
What’s Next
There are quite a few other features of FPDF that are not covered in this chapter. Be sure to go to the library’s website to see other examples of what it can help you accomplish. There are code snippets and fully functional scripts available there as well as a discussion forum—all designed to help you become an FPDF expert.
In the next chapter we’ll be switching gears a little to explore the interactions between PHP and XML. We will be covering some of the techniques that can be used to “consume” XML and how to parse it with a built-in library called SimpleXML.
