TWO
Navigating the Night Sky
IT IS VERY easy for me to rattle off a whole host of fascinating objects to look at in the sky, point out their location and even steer a high-powered telescope to reveal them in their full glory. Modern amateur computerized telescopes can even point to objects for you but, for the beginner just starting out, equipment like this may be a little daunting, and certainly a little pricey. Other technological aids are available such as smartphones and tablet computer devices which run applications that can guide you around the sky. These tools are all impressive but there will be times when you need to find things yourself. If you are out and about with friends it is great to be able to find your way around the sky and show others little celestial treats.
Finding your way around the sky is not just a neat party trick though, as a thorough understanding of how the sky moves and knowing roughly where things are will prove invaluable to your observing sessions. The great thing is that while it may seem daunting, navigating the stars is not actually that difficult. There are some good techniques and tools that will help you in tracking down that faint galaxy or planet, and with a bit of practice you’ll be whizzing around the sky like a pro. Before launching into these tips we first need to take a look at how the stars and objects in the sky move and at the coordinate systems used in astronomy.
We all recognize that things in the sky rise in the east and set in the west; from the Sun to the Moon and distant, faint galaxies, they all follow this daily ritual. The general movement of objects across the sky is caused by the rotation of the Earth as it spins on its axis once every day. This is why many advanced astronomical telescopes have drives attached to them that turn the telescope in the opposite direction to the spin of the Earth, which effectively stops the motion of the object being looked at. The rotation of the Earth coupled with the movement of the Earth around the Sun mean we see a different set of stars at different times of the year.
Exactly which stars you can see in the sky is determined not only by the time of year but also by your position on the Earth; for example, if you lived at the North Pole you would be looking out into space in one direction, but if you lived at the South Pole you would be looking in the opposite direction and see different stars. Because the Earth is almost a sphere and rotates on an axis, this also means that someone at the North Pole will never be able to see any of the stars that someone at the South Pole can see. This changes at the equator though, as there it is possible to see all the stars in both northern and southern parts of the sky over the period of one year.
If you observe the sky from a latitude between the poles and equator you will see some stars from the northern sky and some from the southern sky. If you consider again someone living at the North Pole, all stars would be constantly above the horizon, never rising and never setting, and it is the same at the South Pole. At the equator things are different, with all stars rising and setting and none staying above the horizon over a 24-hour period. At latitudes in between, some stars rise and set while others stay constantly above the horizon; the stars that stay above the horizon twenty-four hours a day are called circumpolar and, while their positions change, they will always be visible.
In order to be able to navigate around the sky or to be able to communicate the position of an object we need some sort of coordinate system for the sky, and two of these are common in astronomy. The first uses an object’s altitude and azimuth to explain its position in terms of a measurement called a degree. The altitude part of the coordinates explains how high the object is above the horizon when the horizon is 0 degrees altitude and the directly overhead position (or zenith) is 90 degrees, and halfway between the horizon and overhead is 45 degrees. It is easy to approximate angular measurements like this on the sky and a great technique using your hand is explained here.
The other part of the coordinate system, azimuth, explains how far around the horizon you need to look, starting from the north. If you do not have a compass to identify north you can note which direction the Sun sets and when you stand facing that when it is dark, your right shoulder will be pointing north and your left shoulder facing south; this is regardless of which hemisphere you happen to be observing from. Alternatively, if it is dark and clear and you are in the northern hemisphere the star Polaris lies due north, or if in the southern hemisphere you can use the constellation called Crux (the Southern Cross) and a couple of bright stars in Centaurus to find the south and from that the north. From the north, wherever you are, azimuth defines a number of degrees around the horizon in the direction moving through east to your chosen target. You can imagine a great circle lying around the horizon, 360 degrees all the way round, with north at 0 degrees, east at 90 degrees, south at 180 degrees and west at 270 degrees. Using altitude and azimuth it is easy for positions of objects to be communicated. The only problem is that objects move across the sky as the night progresses so their altitude and azimuth will also change.
This problem is solved with a slightly more complex coordinate system whose components are called right ascension and declination. Let us consider the Earth, which is a sphere that has a grid coordinate system superimposed on it whose components are called latitude and longitude. Latitude defines position on the Earth north or south of the equator: the equator is 0 degrees latitude, the North Pole is 90 degrees, the South Pole is –90 degrees, and locations between the equator and the poles, like the UK, are at latitudes between 0 and 90 or –90 degrees.
The celestial equivalent to latitude is called declination and to understand how it works, imagine the Earth is surrounded by a great celestial sphere upon which everything in the sky is fixed. Extending the Earth’s equator out onto the celestial sphere gives an imaginary line known as the celestial equator which reaches around the sky. If you stood at the Earth’s equator the celestial equator would pass directly over your head, or if you stood at the South Pole it would lie around the horizon.
Like our own terrestrial equator and latitude, the celestial equator is the starting point for the celestial coordinate referred to as declination and defines position in the sky north or south of it. The celestial equator itself has a declination of 0 degrees, the North Celestial Pole is 90 degrees and the South Celestial Pole –90 degrees. The star called Polaris is very close to the North Celestial Pole and has a declination of just over 89.5 degrees. As you can see from the declination of Polaris, it is sometimes necessary to measure angles smaller than a degree. Each degree can equally be divided into 60 segments called minutes of arc (arc-minutes), which can themselves be divided into 60 equal seconds of arc (arc-seconds). While it is perfectly fine to say that Polaris is at 89.5 degrees declination it is also accurate to say 89 degrees and 30 arc-minutes (30 arc-minutes being equal to half a degree).
Back to the Earth and our terrestrial coordinates: if latitude defines position north/south, the other half of the system is longitude, which defines position east/west of the Greenwich Meridian – also known as the Prime Meridian – that runs through the UK, France, Spain and five other countries. Heading east, longitude increases up to 180 degrees, which is on the opposite side of the Earth, and moving west from the Meridian, longitude decreases to –180 degrees, although practically speaking these lines of longitude are the same.
The starting point for longitude was essentially the result of an arbitrary decision on political grounds but the starting point for its celestial equivalent, right ascension, is a little more scientific. We’ve already looked at the celestial equator and its origins but there is another imaginary line on the sky. The Earth moves around the Sun, taking a year to complete one orbit, but because we live on the Earth we perceive this as the Sun moving against the background constellations, so for example, in February it lies in Aquarius but in March it will be in Pisces. The line that the Sun traces against the sky is called the ecliptic and it is angled to the celestial equator by just over 25 degrees. There are two points where these two imaginary lines cross and one of them is the starting point for right ascension. It is called the First Point of Aries, although due to the wobble of the Earth on its axis it actually lies in the constellation of Pisces.
Unlike longitude on Earth, which is measured in degrees, right ascension is measured in hours going east from the First Point of Aries all around the sky, and twenty-four hours brings you full circle back to the starting point. It may seem confusing to use hours instead of degrees but imagine standing at the equator when the First Point of Aries is directly overhead. An hour later it will have moved towards the east by an angle equal to 15 degrees, so one hour of right ascension is equal to 15 degrees. An hour later it will have moved another 15 degrees, and so on, until just under twenty-four hours have passed, when it will have returned overhead again. Just as degrees are broken down into arc-minutes and arc-seconds, an hour of right ascension can also be broken down into smaller sections. As you might expect, one hour of right ascension is divided into 60 equal minutes and each minute into 60 seconds. Do remember, though, that 1 minute of arc is different to 1 minute of right ascension.
This is not all just theoretical stuff: the two systems, altitude/azimuth and right ascension/declination, both have important and practical uses in astronomy. The appearance of satellites or the International Space Station, for example, will be described in terms of altitude and azimuth, as will planetary positions most of the time. For other objects, the positions are generally referred to in terms of their right ascension and declination. Having an understanding of the origin and nature of the coordinate systems is important as it makes using them much easier. Right ascension and declination are probably the hardest to grasp but when it comes to telescopic astronomy they are the most useful since detailed star charts use them.
The simplest form of star chart is a device called a planisphere, which is usually made from plastic. It takes the form of two discs that are joined at the centre and rotate against each other. On the bottom disc is a map of the sky and, around the edge, the days of the year and marks that show right ascension. You will also see corresponding lines of right ascension radiating out from the centre of the planisphere. Cutting across the lines of right ascension and running around the centre of the map are the lines of declination, and you will notice a dotted line marking the ecliptic, the line along which the planets, Sun and Moon will all generally be found. On the top disc will be a transparent window which represents the portion of the sky you can see and, around the edge, the time of day. Using it is simply a matter of lining up the current time with the current date. It is important to note that you must make sure you get a planisphere for your location as they are calibrated for different locations on Earth.
Planispheres are great for naked-eye astronomy and finding which constellations are visible, but they can also be used to find the approximate position of the planets. A table is usually printed on the back of the planisphere and shows a value in degrees for each of the naked-eye planets for different dates. Make a note of the number for the planet and date you are interested in, turn the planisphere over and look around its edge next to the right ascension scale and you will see degrees marked. Find the point where the number of degrees is the same as the number you took off the table and, from there, draw a line to the centre of the planisphere. Where the line cuts across the ecliptic, the path followed by the Sun and planets, is where the planet will be found.
A modern alternative to the planisphere is the smartphone or tablet PC. These devices are fantastic little bits of kit as most of them can tell where you are on Earth and even detect which way is north, south, east or west. These features have been put to good use for astronomy, with a huge range of applications that can be downloaded and greatly aid finding your way around the sky. Because they know where you are and the date and time, if held to the sky they can show you what can be seen in any direction. Coupled with a nice graphical representation of the sky they are fantastic for the naked eye, brilliant for the beginner, and will have you picking out planets, brighter stars and deep-sky wonders with ease.
More detailed than a planisphere or a smartphone application is a proper star chart, which can be bought in either book format, loose leaf or sometimes even laminated. They show many more stars than a planisphere, but without the date or time reference, and are just detailed maps of the sky. They do still have the lines of right ascension and declination so you can read off an object’s coordinates with considerable accuracy. Both star charts and planispheres represent stars so that you can tell how bright they are, with the fainter stars shown as smaller dots and brighter ones as bigger dots. On a planisphere, the brighter stars are usually joined up to show the pattern of the constellations, but this is not always done on a star chart. You will also find galaxies, star clusters and nebulae marked clearly. Star charts come in a range of printed colours but it is best to steer away from all but white on black or, preferably, black on white. Red torches are the best way to read a star chart at night because your dark adaption will not be affected, but most colours can be quite hard to read under red light, particularly red print, which will just disappear.
One skill that it is really useful to master and will help you move around the sky to find your chosen object is star-hopping. It is simple in principle and only takes a little practice before you can use it with ease, but the great thing is that it works with naked-eye, binocular or telescopic observations. The technique relies on identifying a bright star or object that it is easy to spot and is near the object you are trying to pin down. If you are observing with the naked eye you simply ‘hop’ your way around the sky from this bright star, moving from one star to the next until you get to the object you are looking for. A simple example of star-hopping in the northern hemisphere is finding the Pole Star, or Polaris, which is not really all that obvious, by first picking out the easily recognizable stars at the end of the pan of the Plough (part of the constellation of Ursa Major, it is often described as being like a saucepan) and then simply following the line from them north until you come across the next star, which is Polaris. Another good example is the route to the Andromeda Galaxy by first picking out the bright star at the north-east corner of the Square of Pegasus and then hopping further east by two stars and north by three to locate the galaxy just to the north-west. It is all about finding a known starting point and imagining lines between stars on a simple star chart to devise routes to your target. In many ways it is just like driving a car to a destination: to make your way there you note other places along the way and ‘hop’ from one to the other.
Star-hopping with binoculars or a telescope is a little more tricky because you can see more stars now, with the added complication through telescopes that the image is sometimes upside down or back to front, meaning that ‘up’ in the field of view is actually ‘down’ in the sky or your ‘left’ is actually your ‘right’. Sounds confusing? But just try it and you will be surprised how easy it is. A great tip to make telescopic star-hopping easier is to get a piece of clear plastic and draw a circle on it which represents the amount of sky you can see through the binoculars or telescope – its field of view. With binoculars the field of view remains unchanged, but with a telescope if you change the eyepiece the field of view will also change so you may want a few different circles for each of your eyepieces. If you are not sure how big your field of view is you should point the binoculars or telescope at an area of sky where there are lots of bright stars so you can work out how much is visible. You can then draw the right-sized circle to represent the field of view. Not only will you need to do this for each eyepiece but also for each different star chart that you are using since the scales will differ from one chart to another.
To use it, place the plastic circle over a bright star on your chart that you can easily find and is close to your target object. This will be your starting point, but first work out if the image you can see is upside down or back to front. You can even do this in daylight by just looking through your telescope at something in the distance and noting how it appears. Now look on the chart and find another moderately bright star in the direction of the object you are after, move the disc over it and then find it in the telescope. Keep doing this, hopping from one star to another using patterns of stars until you get to your target. Sometimes there may be no stars in that direction so you may have to make big jumps, estimating how far to move from your chart and plastic disc.
Another method of finding things with a telescope relies on attaching something called setting circles to the telescope. Using these, it is important first to make sure the telescope is polar aligned (this process is covered in the equipment chapter). Once this is done, you need to point the telescope at a known bright star and centre it in the eyepiece. Then find the right ascension (RA) and declination (Dec.) of the star and turn the setting circles to read the coordinates of the star. To find the target object you need to look up its own RA and Dec. and then turn the telescope until the setting circles read the correct values. Hopefully, if it has been set up accurately, you will now have a telescope pointing at the object you wish to see.
As you will see in Chapter 3, the ultimate luxury is to have a telescope that knows where everything is and can even point at it for you. Sounds like the stuff of science fiction, but telescopes like this are readily available today. You will have to pay a little more money for them and they are more complicated to set up, but once ready for use, which generally involves telling the telescope where you are on Earth, setting the date and time, and calibrating it on a couple of stars, the motors will turn it to point to any object in its database that you choose.
Impressive gadgets aside, there really is no substitute for understanding the sky and how objects in it move and learning your way around it. To home in on a neighbouring planet or distant galaxy yourself is a great skill to have and one that will stay with you for many many years.
February: Northern Hemisphere Sky
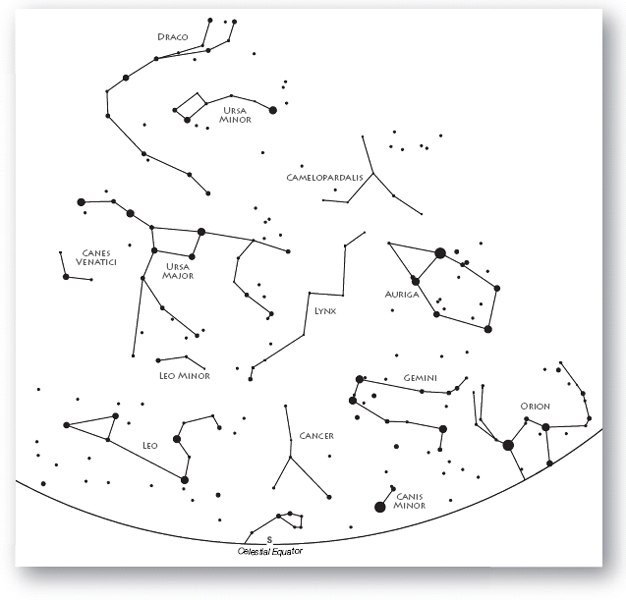
Looking along the celestial equator over to the south-west reveals the familiar constellation of Orion, which was introduced in January’s guide. To the north-east corner of this famous constellation lies Betelgeuse, a prominent red giant star nearing the end of its life. Through studies of its spectra we know that this giant dying star is just under a thousand times the diameter of our own Sun and cooler at just over 3000 degrees kelvin, the scale used to measure the colour temperature of light sources. Surprisingly, although Betelgeuse is dying, it is only about 6 million years old (compared to the Sun, at about 5 billion years) but because of its original large mass it has evolved rapidly. It is said to have a declination of +7 degrees, putting it just north of the celestial equator. (As already discussed, declination is just like latitude on Earth and the further north or south of the celestial equator, the higher the number, with southerly declinations preceded by a minus sign.)
Due east and a little to the north of Betelgeuse lies the constellation of the twins, Gemini, with its brightest stars Castor to the north and Pollux to the south. The two stars differ significantly: Castor is a complex grouping of six stars whereas Pollux is a single cool yellow-orange giant star. Like Betelgeuse, it is not as old as the Sun but because of its high mass it has evolved quickly. It is possible to tell from its colour that it is just starting to evolve towards the red giant phase as it has exhausted all the hydrogen in its core and is now fusing helium into carbon and oxygen. This phase is expected to last 100 million years before intense stellar winds will puff the outer layers into space, creating a beautiful planetary nebula. Interestingly, it has at least one planetary companion, a Jupiter-sized planet called Pollux B, which will probably suffer a fate not too dissimilar to the Earth’s when our Sun dies.
Just to the south-west of the twins Castor and Pollux in Gemini is a great example of what will happen to our Sun after it turns into a red giant. The object is too dim to be seen with the naked eye – in fact, there are no examples that can be seen without optical aid – but readers with a telescope should search out this instance of a planetary nebula, called the Eskimo Nebula. In photographs it looks just like the face of an eskimo surrounded by a fluffy hood and it is just about visible with a pair of binoculars. Like all planetary nebula, the outer layers of the original star were finally pushed off into space through the force of nuclear processes in its core, leaving behind a white dwarf star.
A little further along the celestial equator and just to the north of it is an easily spotted constellation which actually does look like its name suggests, Leo, the lion. To find it, look for a backwards question mark, which represents Leo’s head, and extending out to the east is its body, including the bright star Regulus at the front and Denebola marking its tail. Just below the curve of stars marking its head lies the point in the sky where the Swift satellite detected a short ten-second burst of gamma radiation back in April 2009. This has the catalogue number GRB090423 and, as such, is one of the rather strange and not well-understood gamma ray bursters (GRBs). Fortunately for us, this one was at a distance of around 13 billion light years, so not close enough to cause us any problems. The burster is thought to have been generated at the moment a supermassive, fast-rotating star collapsed into a black hole at the far reaches of the Universe.
Directly to the north of Leo is the well-known group of stars called the Plough, or Big Dipper. This group is not an official constellation but instead part of a larger group of stars called Ursa Major, the Great Bear. At this time of year, the pan of the Plough, which represents the hind end and tail of the bear, sits high in the sky and horizontally around midnight with the rest of the constellation stretching out to the west and south.
At the western tip of the pan is another orange-coloured star, called Dubhe. Similar in nature to Pollux, it is a star nearing the end of its life and is rapidly evolving into a red giant. With the star at the southern tip of the pan, Merak, the two act as pointers to the North Pole Star, Polaris. Most of the stars that are seen in the Plough, excluding Dubhe, are part of a group of stars called the Ursa Major Moving Group, which consists of thirteen stars in Ursa Major and one in the neighbouring constellation of Canes Venatici to the south-east. The group is defined by stars that all share the same direction of movement as they hurtle through space, with the centre of the group about 80 light years away from us.
The second star in the Plough’s pan handle from the eastern end is called Mizar and good eyesight will allow its fainter companion, Alcor, also to be seen. The two stars, separated by about one light year, are themselves binary stars, making this a quadruple star system. At the end of the handle which represents Ursa Major’s tail is the star called Alkaid. Just to the north of this star is the Pinwheel Galaxy, which is a fine example of a spiral galaxy, whose orientation faces on to us, meaning its spiral structure is nicely visible through amateur telescopes. It also has the catalogue number M101, making it the 101st object in the catalogue published by Charles Messier in 1781 (see Chapter 10), and, like all galaxies, it is possible to split M101’s light into a spectrum and determine how fast it is moving away from us. In the case of the Pinwheel Galaxy, it is moving away at 241km per second. The movement is not the result of the galaxy rushing through space but, instead, the expansion of space carrying the galaxy along with it. From studies of stars that have exploded as supernovae in distant galaxies, such as the one in the Pinwheel in August 2011, it seems that the rate at which space is expanding is getting faster rather than slower as previously expected.
Our knowledge of whether the Universe will continue to expand for ever or ultimately stop is determined by the study of galaxies and in particular of galaxies and galaxy clusters that act as gravitational lenses, such as HST14113+5211 just to the east of the Pinwheel Galaxy. It was discovered by the Hubble Space Telescope and is just one of many lenses that are caused by the presence of a galaxy cluster lying between us and a more distant one, a phenomenon that we shall explore in detail in Chapter 12.
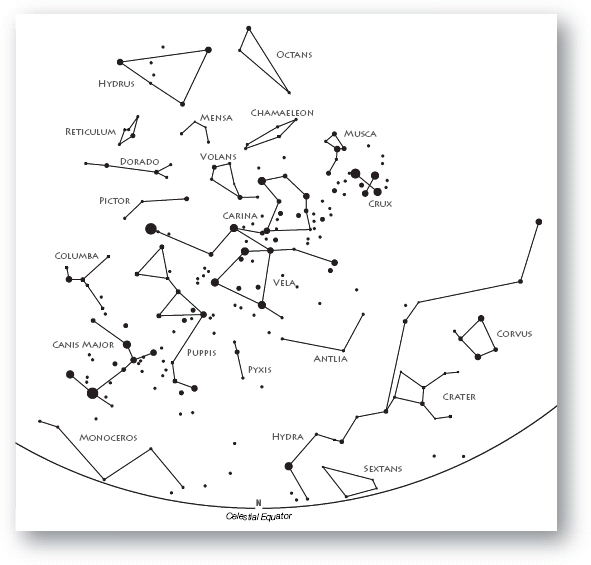
February: Southern Hemisphere Sky
Hydra, the largest constellation in the sky, is well placed for observation in February yet it does not have that many bright stars. It starts just north of the celestial equator and stretches for quite a distance to the south-east. The brightest star in the constellation, Alphard, is found to the east of Sirius, which lies south of Orion and its famous three-star belt. Alphard is quite prominent as it sits in an otherwise sparse area of sky and its bright orange colour hints at its cool temperature of 4000 degrees. The orange colour comes from the fact that it is evolving away from what is known as the ‘main sequence’ and heading towards its next evolutionary phase as a red giant. This is the same fate that will face the Sun in a few billion years’ time. Like many red giants it dwarfs the Sun and, at forty times its size, would stretch almost halfway to Mercury if it were at the centre of our Solar System.
Following on from the red giant phase, the Sun, and any star evolving in the same way, will ultimately lose its outer layers into space. There are many different examples of these so-called planetary nebulae in the sky but one in particular can be found in Hydra, not far from Alphard. Moving to the south-east just a short distance, find the next star, called Lambda Hydrae, which is fainter than Alphard, and then on to Mu Hydrae (both named after letters of the Greek alphabet). Together, the two stars form a slightly bent line with Alphard. Just to the south of Mu Hydrae is a great example of a planetary nebula; although not quite visible to the naked eye it is still worth hunting down with a pair of binoculars or a small telescope. Binoculars will reveal a star that looks slightly fuzzy, while a small telescope will show a blue-green disc whose apparent size in the sky is broadly similar to that of Jupiter, hence its name, the Ghost of Jupiter Nebula. Much larger telescopes are required to see the faint stellar core known as a white dwarf.
Just to the south of Alphard is a small, faint constellation called Antlia, which has no prominent stars in it, but a little further on, towards the South Celestial Pole, is another constellation, Vela, that was referred to in the January guide along with the prominent multiple star system Gamma Velorum. A little further to the west is the rather strangely shaped constellation of Puppis, which was once part of a much larger constellation called Argo Navis that represented a ship. It was divided in the 1700s into four separate constellations, of which Puppis is one. It is easy to locate as the Milky Way runs through the northern part of the constellation.
Within the borders of Puppis are a number of worthy deep-sky treasures to hunt out such as M47 (the 47th object in Charles Messier’s catalogue). This stellar cluster is near the limit of visibility to the naked eye, so a dark observation site is needed. It is right on the northern border of Puppis and can be found by looking to the north-east of the bright white star Sirius in neighbouring Canis Major on the very edge of the Milky Way. To the south of Sirius is the bright yellow star Canopus and about halfway between the two, slightly to the east, is the orange star Pi Puppis, which is the rough position in the sky where meteors from the Pi Puppids meteor shower seem to come from. In reality the pieces of rock and dust are travelling through space in parallel streams, but the effect of perspective makes them seem to come from one point in the sky. The shower peaks in April but only when the comet 26P/Grigg-Skjellerup makes its closest approach to the Sun, every five years. Meteor showers generally dump hundreds of tonnes of meteoric dust onto the Earth every day but this is not enough to upset life. It is the larger lumps of rock that cause devastation, even extinction, as we shall see in Chapter 12.
Continuing to the east, the next star along is a little brighter and is the blue supergiant Naos, or Zeta Puppis. This star is a fairly rare breed and among the hottest stars in the Universe, with a surface temperature of around 42,000 degrees, compared to our Sun at just under 6000 degrees. To the north of Naos by half a degree (a finger held at arm’s length represents a degree so half of that) marks the location of one of the closest GRBs ever detected, GRB031203.
Gamma ray bursters like GRB031203 are impossible to predict and are thought to appear at the moment when a supermassive star finally collapses into a black hole. Initially the burst is seen in gamma ray wavelengths but afterglows can be detected at longer wavelengths such as X-rays, visible light and radio waves. GRB031203 was picked up in December 2003 and studies showed that it happened at a distance of 1.3 billion light years from us, so the light has taken 1.3 billion years to reach us. GRB031203 was unexpectedly faint, which means it was either a different type of burster or was a different type of event, known as an X-ray flash. These are not well understood and only a few have ever been observed.
Bordering Puppis to the south-east is the constellation of Carina with its unmistakable star Canopus as its brightest. Between Canopus and the Southern Cross high in the east lies the renowned star system of Eta Carinae, which is surrounded by the nebula NGC3372 (New General Catalogue). The nebula is visible to the naked eye and at a distance of around 8000 light years may pose a threat to the Earth. The nebula is thought to be home to one of the most massive stars in the Universe, which is orbited by a Wolf-Rayet star that is losing mass rapidly. The supermassive star Eta Carinae has gone through significant brightness variations since its discovery, which suggests instability leading ultimately to the star going supernova or maybe even hypernova, the most violent explosion in the Universe.
All of the objects in the sky guide this month have had roughly the same azimuth, i.e. the measurement around the horizon from due north, but they have differed in altitude as the guide has moved from the celestial equator to the South Celestial Pole. As the night progresses, the altitude and azimuth will change as the objects move from east to west.