
MAKES 24 STEAMED OR BAKED BUNS
This is Amy’s master recipe for both our steamed and baked bun doughs. It is a bit sweet on its own but balances perfectly with the full character of our well-spiced bun fillings.
Amy uses a KitchenAid-type mixer fitted with a flat paddle for her dough work. If you do not have one, you can mix the dough in a food processor or by hand.
Great buns of any kind take time, as all of us gym-enthusiasts can attest! Count on at least 12 hours for the first rising of the dough, and then another hour or more for the finished buns to rise.
FOR THE SPONGE:
1½ teaspoons active dry yeast
½ teaspoon sugar
⅓ cup warm (110°F) water
¾ cup all-purpose flour
DOUGH:
3¼ cups all-purpose flour
½ cup sugar
3 tablespoons solid vegetable shortening
2 tablespoons finely chopped Chinese chives
½ cup cold water
2 tablespoons milk
1 egg, beaten
Extra flour, for dusting the board
1 egg yolk beaten with 1 egg, for the egg wash
Black and/or white sesame seeds, for garnish
1. To make the sponge: Combine the yeast, sugar, and warm water in a medium bowl. Stir to dissolve. Add the ¾ cup flour and stir to mix. Seal airtight with plastic wrap and set aside in a warm (70 to 85°F) spot for about 10 minutes, until the mixture starts to rise.
2. To complete the dough: Combine the 3¼ cups flour, the sugar, shortening, and chives in the bowl of a mixer fitted with the flat paddle. Separately combine the cold water, milk, and egg, and stir them into the risen sponge. Scrape the sponge mixture into the flour mixture, then blend on slow speed to bring the dough together in a soft, ragged mass. If the dough is too wet and sticks badly to the paddle, sprinkle in a bit more flour to make it behave.
3. Turn the dough and any unincorporated bits from the bowl out onto a lightly floured board. Knead gently several times into a soft, lopsided ball. Do not overwork the dough. Put it in a large mixing bowl nearly double its size, then press a large piece of plastic wrap directly on the dough. Refrigerate the dough until it is 1½ to 2 times its original size, at least 12 to 15 hours, or a full day if more convenient. The refrigeration will ensure that the dough rises slowly, resulting in a fine crumb and high loft for the buns.

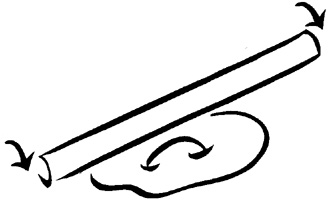
1. Roll the pin towards the center of the dough round, leaving a plump “belly button” unrolled in the middle.
2. Put the filling on top of the belly button, then begin pleating the edge.

3. Continue making tiny pleats, enclosing the filling as you go.
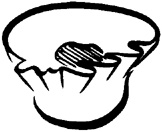
4. When the last pleat is made, twist the closure shut in the same direction.

5. The finished bun is gathered in a tight closure. Turn it upside down (pleated side down) to bake or steam.

While the dough rests and rises, make and cool the filling for the buns.
4. To shape and fill the buns: Turn the risen dough out onto a lightly floured board and divide the dough into 2 pieces. While you work with one piece, cover the other with a dry towel. On a lightly floured board, roll the first piece into a 1-foot-long even log, then slice it crosswise into twelve 1-inch pieces (each weighing about 1½ ounces). Put the pieces on one side of the board, cut side down and not touching; cover with a dry cloth. Roll out and slice the remaining dough; cover the second batch of dough pieces.
5. Working with one piece at a time and leaving the rest covered, roll out the first piece of dough, as illustrated here, into a 4-inch circle with evenly thin edges and a puffy 1-inch belly button in the middle. Try not to use any additional flour, as the bun can then become difficult to pleat together. Put 1 heaping, compressed tablespoon of filling on top of the belly button, then pleat and twist the bun shut as illustrated.
If you are baking the buns, put the finished bun, pleated side down, on a baking sheet lined with parchment paper. Shape and fill the remaining buns, one at a time, placing them on the baking sheet with 1½ inches between them.
If you are steaming the buns, put each one, pleated side down, on its own 2-inch square of parchment, then position them 1½ inches apart on the baking sheet. For a full batch of dough and filling, you will need 2 baking sheets to allow for the spread.
6. Lightly brush the tops and upper sides of the buns with the egg wash. To decorate, sprinkle a dusting of sesame seeds on top. Let the buns rise, uncovered, in a warm (70 to 85°F) spot until they are half again their original size, 1 to 1½ hours. If your kitchen is very cold, settle yourself in for a longer rise.
7. To bake the buns: Preheat the oven to 350°F. Move the racks to divide the oven evenly into thirds. (If you are doing a half-recipe on one baking sheet, arrange a single rack in the middle of the oven.) Bake the buns until golden, 10 to 12 minutes. Midway through baking, to ensure even coloring, quickly rotate the trays from front to back and from the upper rack to the lower.
If you are baking the buns in advance for reheating later, bake them only to a light gold; they will pick up a bit more color when rewarmed. Let the buns cool to room temperature, then wrap and refrigerate them if you are holding them more than 6 to 8 hours. Let come to room temperature before rewarming. Reheat in a preheated 250°F oven until thoroughly hot, about 5 to 6 minutes.
8. To steam the buns: Bring ample water for steaming to a boil over moderately high heat. Arrange the buns on their parchment squares and 1 inch apart on steaming racks. Steam the buns for 10 minutes, adjusting the heat so the steam gushes heartily around the buns. Rotate the tiers carefully midway through steaming. Steam them for 2 to 3 minutes longer if you are steaming several tiers at a time.
If you are steaming the buns in advance, put them aside to cool to room temperature. Seal and refrigerate if you wish to hold them for more than 6 to 8 hours; let come to room temperature before resteaming. Reheat over gentle steam, each bun still on its parchment square, until thoroughly hot, about 8 minutes.
9. Serve the buns hot, either on a platter of contrasting color or nested prettily in a woven bamboo tray.

Kneading dough, whether by hand or machine, develops the gluten, which the Chinese call “flour muscle.” Gluten needs time to relax. Cut the resting or rising time short and you’ll wind up with tough (not fluffy) buns!