Two years ago I staggered into the kitchen and plunked my new electric bread baker on the kitchen counter.
My husband looked up and said, “I thought you didn’t like making bread.”
“I don’t. This monster is going to do it for me.”
I had no idea I’d soon be calling it “a little jewel” and touting it as “the handiest appliance in the kitchen.” I was still overwhelmed by the electronic system and the promises in the direction manual—if I ever learned to push those magic buttons.
I wasn’t ready to become an owner of this machine, but I’d been shamed into the purchase. I’d heard about electric bread bakers but hadn’t investigated much. The week before, at a meeting of local celiacs where one bread machine was on display, a member leaned over to me and said, “Your True Yeast Bread works great in my machine, but it always runs over. Why?”
Another wanted to know if any of the other bread recipes worked. She hadn’t tried them yet. The final blow was when they all wanted to know which machine I used.
I had to confess I didn’t own a bread baker—yet. They couldn’t have been more surprised if I’d admitted I still scrubbed clothes on a washboard.
To save face, the next day I went out to do some serious looking. I might not have had replies at the time, but I was sure I could find them for those who’d asked … and had left phone numbers for me to call with answers.
If you’ve been baking bread the old-fashioned way, as I had, and dreaded those endless hours of measuring, mixing, beating, rising, punching down, and the pouring into bread pans, doing another rising session (all the while keeping an even, warm temperature in the kitchen), and then the hour of baking, an electronic bread baker seems too good to be true. Advertising claimed all one had to do was toss the ingredients into a square, round, or loaf-shaped pan and push a button. Approximately four and one-half hours later, out comes a loaf of bread. For once, those advertising genuises have not exaggerated. In fact, I thought the claims most sedate. For me, the auto-baker has proved to be one of the biggest timesavers in the house, and I still haven’t pushed all the buttons.
Once you decide to invest in a bread machine, the next question to face is this: Do you have to have one that makes a loaf shaped exactly like the bakery loaf you are familiar with, or can you accept a square or round loaf? I would have taken Z-shaped bread to get out of baking twice a week—especially when I discovered that in my new climate-controlled condo, bread often came out a disaster. Chilly air-conditioning fighting the sun through the windows left the dough rising and falling like the tide outside and the bread as soggy as if it had been splashed by the waves.
The bread machine eliminates disasters by perfectly controlling the climate within the tiny metal box, but when we use gluten-free flours, it isn’t quite as easy as the publicity claims. (So what is?) I find it is better to preblend the dry ingredients (except the sugar and yeast) and to premix the liquid ones separately outside the container. You will find these suggestions incorporated into all my bread recipes.
The real question is what machine works best with our difficult gluten-free flours. I worked with a fellow celiac, and we have come up with some answers that are based on the machines that turn out the l½-pound loaf using approximately 3 cups of flour. This is the most common machine and the one for which the recipes in this book are planned, but don’t be surprised if your bread loaf is the right size but weighs considerably more. The one-pound machine also works, but all the recipes have to be cut down by one third.
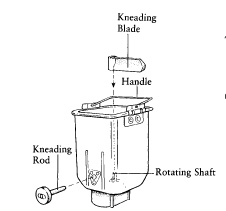
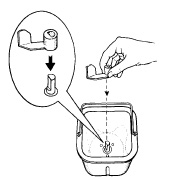
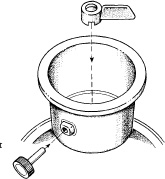
1. All machines can turn out excellent bread. The ones that have the strongest stir power seem to work best with our batterlike dough. If the paddle (kneading blade) is strong and the sides have added ridges and/or inserts (kneading rods) to help blend the dough, the machine will turn out a fine loaf of bread. Before you purchase a machine, check to be sure that the paddle at the bottom is the same thickness for the full vertical length. The machines with paddles that are part wand and resemble a hook might require preheating outside the baking pan to completely blend the dough, or the batter may need to be stirred while the machine is running. We discovered that the dough in the more loaf-shaped (oblong) container doesn’t always get as well stirred in the corners as in the upright square or circular pan. See the diagrams on page 28.
2. It is desirable for the machine to have a strong fan for the cool-down cycle. (If it doesn’t, you will have to remove the bread immediately after baking; it becomes soggy if left in the pan.)
3. Where will the machine stand in your kitchen? Will the controls be convenient and the vents free of obstruction? Since the machines have different shapes and placement of control buttons and vents, you’ll be able to find one to fit your kitchen space. (Even as I write this, I see there are more models being offered.)
4. Look at the lining of the baking pan. Is the Teflon or inside coating of a quality good enough to ensure a nonstick surface for a long time? Will the whole unit be easy to clean? In some machines the pan and paddle and all the parts that touch the bread are removable for easy cleaning. This is especially important if you intend to use the machine for gluten-free and wheat breads interchangeably. In some, a part of the paddle (or rotor it fits over) cannot be removed to wash, making it more difficult to clean thoroughly. This is no real problem if you plan to use it only for gluten-free bread. Also check the element and the inside of the machine (I think of it as the oven part). Will a simple wipe of a wet sponge or paper towel remove the baking dust and any spillover?
5. Price. There are machines that fit the above qualifications in every price range, but some more expensive models may have extra features that are worth investigating—and other features that are completely unnecessary.
6. Extra features. The machine, to be most automatic, should have a cool-down cycle. This means you don’t have to be home when the cycle ends, giving you even more freedom. It also prevents burned hands, for there is very little room to maneuver a hot pan of bread inside the machine. If the machine has a cycle at the beginning to heat the water or liquid, you will never have to wonder if your liquid is the right temperature (all ingredients are put in at room temperature). If the machine does not have this feature, my bread specialist suggests you never go wrong using warm (100°F to 110°F) for liquids.
This is an effective mixer for our heavy doughs. It has a good blade as well as a kneading rod.

An example of a less-effective blade and no kneading rod. This dough may need some hand stirring.

This model has a good blade but no kneading rod. The ridges in the pan aid in mixing dough.

This is an example of a good blade with kneading rod. There is no handle on the pan.
Baking Pans and Parts
Some automatic bread bakers have only two heats—light and dark. Others also have medium. Some call the levels by different names, such as sweet bread cycle (light) and white bread cycle (dark). After a little experience, the cook will become familiar with the cycles and learn to make his or her own judgment about what setting to use.
At least one machine can be programmed to different-length cycles—a great boon for those who need to have shorter rising times (in higher elevations, for example) and also good for experimenting with recipes.
My tester and I discovered no value in having a yeast dispenser, which doesn’t work well with our flours. If you own such a unit, simply ignore this feature and place the yeast on the bottom of the pan before putting in the flour mix.
The time-delay feature of some bread machines is almost worthless for us since most of our gluten-free breads require eggs, and they should not stand for hours before baking.
Other advertising blurbs claim you can cook rice—or bake cakes, or make jam—in your bread makers. Don’t let these come-ons tempt you. They do not make the best use of the machine.
Once I learned to push the buttons on my own bread maker, I started looking for the answers to my questions. Although every machine manufacturer provides a manual that answers some questions, there are still quirky things that happen with our flours.
Bread rises over or to top of pan and then falls. The reason could be too much yeast or water (or both). For automatic bread baking, I decrease the amounts of yeast and water.
You may use a different rice flour from Ener-G-Foods’ fine white rice flour, which I used in testing all the recipes. Some flour sold as oriental rice flour is extra fine and needs less liquid. Try cutting down the amount of liquid 1 tablespoon each time you make a loaf until the desired result is achieved.
Using jumbo or extra-large eggs might cause the dough to be too thin. All my recipes were tested with large eggs. If you don’t have this size, break them into a cup and use  cup eggs to equal 3 eggs.
Bread is very dry. Again, your flour can be to blame. Perhaps you have a coarser grind and need to add a little liquid, 1 tablespoon at a time, or you may have used more milk powder than the recipe calls for.
Center comes out doughy. Again, the problem can be too much liquid. Other possibilities are your machine was programmed to bake at too light a setting or for too short a cycle, or the circulation of air around the machine has affected the oven, or the bread dough didn’t mix thoroughly before baking. If you have one of the machines with a large glass-domed top, try making an aluminum foil “hat” (shiny side facing in) to cover the top and enhance its insulation for better baking.
Dough doesn’t mix thoroughly. Do you have one of the machines that doesn’t have a strong paddle? Maybe you will have to assist the paddle by mixing with a rubber spatula in the first few minutes.
Another problem could be that the paddle is stuck. To avoid this, after every cleansing, rub a little vegetable oil in the hole where the paddle is placed over the rotor. If you haven’t used the machine for a while, check that the paddle moves easily before placing ingredients in the pan.
Loaf doesn’t round up like the picture in the manual shows. Don’t be surprised at that. Mine doesn’t either. My best-textured gluten-free loaf will be flat across the top. When I do achieve a rounded top, the texture tends to be dry and not springy.
Some bread recipes turn out a smaller loaf than others. If the texture is good, don’t worry about the size. Some of the recipes, especially those using water or juice instead of milk or milk substitutes, do not contain as much protein, so don’t rise as high.
Bread without eggs? I found we can make great-tasting bread using Egg Replacer, such as Egg Replacer Bread on page 56.
One of my testers has found an important breakthrough that will help you make a perfect loaf: one teaspoon unflavored gelatin dissolved in the liquids will greatly improve the texture of any bread made in a bread machine.
Probably the most important point is that my bread machine turns out delicious bread for myself, the family, and guests and I always bake gluten free. In fact, my husband prefers my breads to any he can purchase in the bakery or supermarket, and he never has regretted my dragging “that monster” into the house.
NOTE: I created nine specialty breads on pages 60 to 68 and the three sourdough breads on pages 70 to 72 especially for these marvelous new machines. Try them and see how they change your life.