Chapter 1. The Organizer
managing photos using the organizer

I know what you’re probably thinking: “Scott, I thought that it was your tradition to name your chapter titles after a song, movie title, or TV show, yet this is named exactly what the chapter is about—the Organizer. I’m a bit disappointed.” Okay, while I do name my chapters after one of those (a song, TV show, or movie title), I do try to choose a name that is still at least somewhat relevant to the content of the chapter, and believe it or not, when I typed “Organizer” into the iTunes Store search field, not only did I find a song named “Organizer” (by rapper Chubb Rock), but I actually found a song named “The Organizer” (by Chris Murray). Chubb’s "Organizer" has an old-school feel to it, so I totally dug it (ain’t no school like the old school), and while it would make a solid title for this chapter, it’s just not as perfect a title as “The Organizer,” so I went with that. I will tell you that I made the mistake of listening to the free iTunes preview of “The Organizer,” and I have to say, it was startlingly bad. I feel terrible saying this, but it sounds like a sound track from a silent movie performed on someone’s home organ and recorded on a 1970s cassette recorder designed strictly for spoken-word recordings. Again, I feel bad about this harsh critique, because I’m sure Mr. Murray is a nice man, and judging strictly by the style of music being played, Mr. Murray was probably a war hero, maybe defending us from the Brits at the Battle of Fort Ticonderoga, because he has to be at least a couple of hundred years old. It’s music your great grandparents would listen to and complain that it’s too “old-fashioned” for them. It’s music to churn butter by and would be a welcome distraction as background music while driving that wagon train out West over the Allegheny Mountains and along the Santa Fe Trail, until the wagon master would finally bring the wagons to a halt and yell, “Would someone please turn off that awful organ music?!” At which point, one of the pioneers would yell back, “What’s an organ?” Ah, it was a simpler time then.
Importing Your Photos
One of the major goals of Adobe Photoshop Elements is simply to make your life easier and the Photo Downloader is there to help do just that. Adobe has not only made the process of getting your photos from your digital camera into the Elements Organizer much easier, they also included some automation to make the task faster. Why? So you can get back to shooting faster. Here’s how to import your photos and take advantage of this automation:
Step One:
When you attach a memory card reader to your computer (or attach your camera directly using a USB cable), the Elements Organizer – Photo Downloader standard dialog appears onscreen (if you have it set that way; by the way, it will also download photos from your mobile phone). The first thing it does is it searches the card for photos, and then it tells you how many photos it has found, and how much memory (hard disk space) those photos represent.

TIP: Import in Bulk
If you have a lot of images on your computer that you’d like to import into the Organizer, there’s a feature in Elements that lets you easily import a large number of images at once. Just go under the File menu, under Get Photos and Videos, and choose In Bulk.
Step Two:
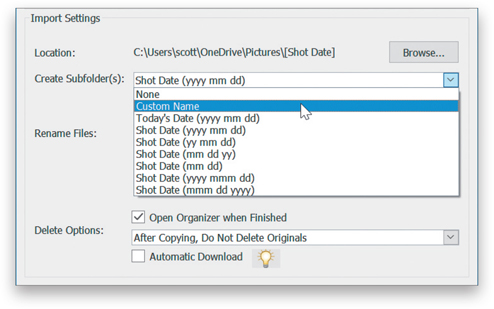
The Import Settings section is where you decide how the photos are imported. You get to choose where (on your hard disk) they’ll be saved to, and you can choose to create subfolders with photos sorted by a custom name, today’s date, when they were shot, and a host of attributes you can choose from the Create Subfolder(s) pop-up menu (as shown here).
Step Three:
If you want to rename files as they’re imported, you can do that in the next field down. You can use the built-in naming conventions, but I recommend choosing Custom Name from the Rename Files pop-up menu, so you can enter a name that makes sense to you. You can also choose to have the date the photo was shot appear before your custom name. Choosing Custom Name reveals a text field under the Rename Files pop-up menu where you can type your new name (you get a preview of how it will look). By the way, it automatically appends a four-digit number starting with 0001 at the end of your filename to keep each photo from having the same name.

TIP: Storing the Original Name
If you’re fanatical (or required by your job) and want to store the original filename, turn on the Preserve Current Filename in XMP checkbox and your original filename will be stored in the photo’s metadata.
Step Four:
The last setting here is Delete Options. Basically, it’s this: do you want the photos deleted off your memory card after import, or do you want to leave the originals on the card? What’s the right choice? There is no right choice—it’s up to you. If you have only one memory card, and it’s full, and you want to keep shooting, well…the decision is pretty much made for you. You’ll need to delete the photos to keep shooting. If you’ve got other cards, you might want to leave the originals on the card until you can make a secure backup of your photos, then erase the card later.

Step Five:
Beneath the Delete Options pop-up menu is the Automatic Download checkbox (this feature is currently only available in the PC version of Elements 2020) and this lets you skip the Photo Downloader. When you plug in a memory card reader, or camera, it downloads your photos using your default preferences, with no input from you (well, except it asks whether you want to erase the original photos on the card or not). To set up these preferences, go under the Organizer’s Edit menu, under Preferences, and choose Camera or Card Reader to bring up the dialog you see here.

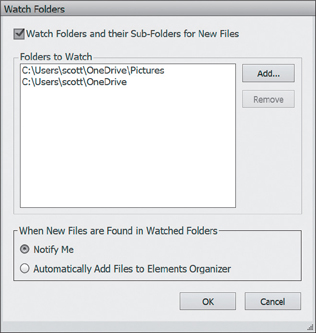
TIP: Auto-Import with Watched Folders
You can set up folders for Elements to “watch” (choose Watch Folders, under the File menu), and any images you save in these folders will automatically be imported. You can now even set up Cloud folders, like Dropbox, Google Drive, iCloud (for iPhone users) and OneDrive for auto-import.
Step Six:
Here is where you decide what happens when you turn on the Automatic Download checkbox in the Photo Downloader. You get to choose a default location to save your photos (like your Pictures folder), and whether you want it to automatically fix any photos that it detects have red eye. You can also choose to have it automatically suggest photo stacks (it groups photos it thinks belong together), or automatically stack images shot in both RAW and JPEG. You can have settings for specific cameras or card readers (if you want separate settings for your mobile phone, or a particular camera). At the bottom, you’ve got some other options (when to begin the downloading, if you’re going to have subfolders, and your delete options). Click OK when the preferences are set the way you want them.

Step Seven:
Okay, back to the Photo Downloader. Now, at this point, all the photos on the card will be imported, but if you want to import just a few selected photos, then you’ll need to click on the Advanced Dialog button at the bottom-left corner of the dialog (shown at the top). That expands the dialog and displays thumbnails of all the photos on the card. By default, every photo has a checkbox turned on below it, indicating that every photo will be imported. If you just want some of these photos imported, then you’ll need to click the UnCheck All button at the bottom left of your thumbnails. This turns off all the photos’ checkboxes, which enables you to then go and turn on the checkboxes below only the photos you actually want imported.

Step Eight:
When you look at the right side of the dialog, you’ll see some familiar Save Options (the subfolder choice, renaming files), and in the Advanced Options section, you’ll see choices to automatically fix red eyes, suggest photo stacks, stack images shot in both RAW and JPEG, import into an album, and delete options. Another nice feature is the ability to embed metadata (like your name and your copyright info) directly into the digital file, just like your camera embeds information into your digital camera images. So, just type in your name and your copyright info, and these are embedded into each photo automatically as they’re imported. This is a good thing. When you click Get Media, your photos are imported (well, at least the photos with a checkmark under them). If you want to ignore these advanced features and just use the standard dialog, click on the Standard Dialog button.

Backing Up Your Photos to a Hard Drive
When you think about backing up, I’d like you to consider this: it’s not a matter of if your hard drive will crash, it’s a matter of when. I’ve personally had new and old computers crash. So many times that now I’m totally paranoid about it. Sorry, but it’s a harsh fact of computer life. You can protect yourself, though, by backing up your entire catalog to an external hard drive, and/or using an online backup, so your photos are protected in an off-site location. So even if your hard drive dies or your computer is lost, stolen, damaged in a fire, flood, or hurricane, you can retrieve your images.
Step One:
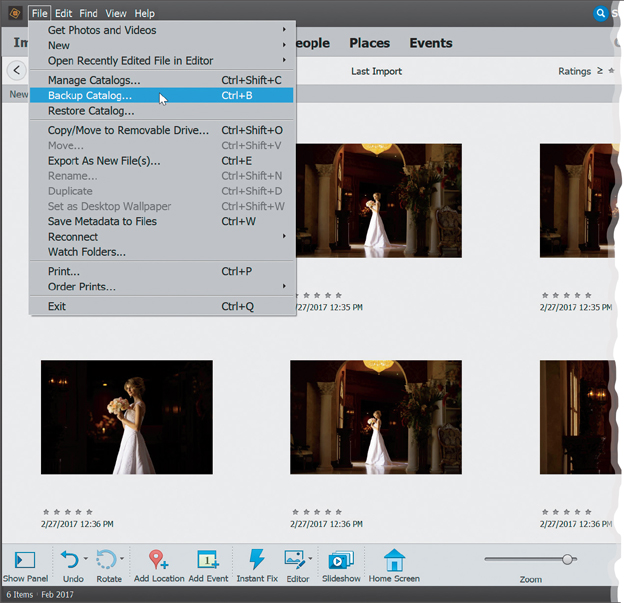
To back up your catalog to an external hard drive, you simply go under the Organizer’s File menu and choose Backup Catalog (as shown here).
Step Two:
This brings up a dialog where you decide whether to do a Full Backup (you choose this the first time you back up your catalog), or an Incremental Backup (which is what you’ll choose after your first backup, as it only backs up the files that have changed since your last backup, which is a big time saver). In this case, since this is your first time, choose Full Backup (as shown here), then click the Next button.

Step Three:
When you click Next, the Destination Settings screen appears, which is basically where you tell Elements to back up your stuff to—just choose your external hard drive from the list and click the Save Backup button.

Importing Photos from Your Scanner
If you’re reading this and thinking: “But this is supposed to be a book for digital photographers. Why is he talking about scanning?” Then ask yourself this: “Do I have any older photos lying around that I wish were on my computer?” If the answer is “Yes,” then this tutorial is for you. We’ll take a quick look at importing scanned images into the Organizer.
Step One:
In the Elements Organizer, go under the File menu, under Get Photos and Videos, and choose From Scanner. By the way, in the Organizer, you can also use the shortcut Ctrl-U to import photos from your scanner or click on Import just below the menu bar and choose From Scanner. (Note: This feature is currently only available in the PC version of Elements 2020.)

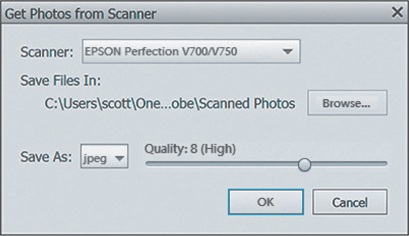
Step Two:
Once the Get Photos from Scanner dialog is open, choose your scanner from the Scanner pop-up menu. Choose a high Quality setting (I generally choose the highest quality, unless the photo is for an email to my insurance company for a claim—then I’m not as concerned), then click OK to bring in the scanned photo. See? Pretty straightforward stuff.
Changing the Size of Your Photo Thumbnails
We all have our personal preferences. Some people like to cram as many photos onscreen at once as they can, while others like to see the photos in the Organizer’s Media Browser at the largest view possible. Luckily, you have total control over the size they’re displayed at.
Step One:
The size of your thumbnails is controlled by a slider below the right side of the Media Browser. Click-and-drag the Zoom slider to the right to make them bigger and to the left to make them smaller.

TIP: Jumping Up a Size
To jump up one size at a time, click on a thumbnail, then press-and-hold the Ctrl (Mac: Command) key and press the + (plus sign) key. To go down in size, press Ctrl-– (minus sign; Mac: Command-–).
Step Two:
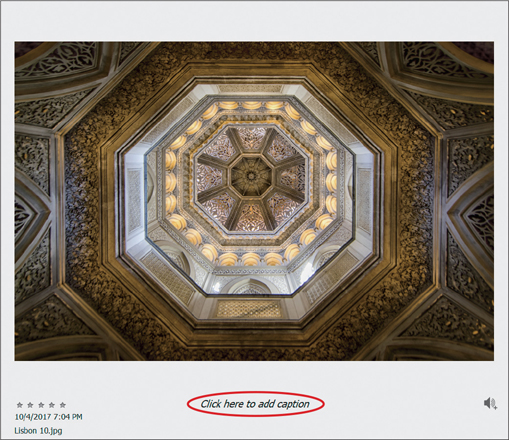
To jump to the largest possible view, just double-click on your thumbnail. At this large view, you can enter a caption directly below the photo by clicking on the placeholder text (which reads “Click here to add caption”) and typing in your caption. (Note: If you don’t see this text, go under the View menu and choose Details.) Press Esc to return to the grid view, or click on the Grid button in the top left of the Media Browser.
Seeing Full-Screen Previews
If you like seeing a super-big view of your photos, then use Elements’ Full Screen view. It shows you a huge preview of a selected thumbnail without having to leave the Organizer. Here’s how:
Step One:
To see a full-screen preview of your currently selected photo(s), go under the View menu, and choose Full Screen (or press F11 [Mac: Command-F11]).

Step Two:
This brings you into Full Screen view, and your photo should appear large onscreen with everything else black around it. This is really a way to launch into a slide show, but if you don’t do anything here, you’re simply just viewing your photos in a larger view. If you want to return to the Media Browser, press the Esc key on your keyboard. But wait, there’s more.

Step Three:
Once your photo(s) appears full screen, there’s a control palette at the bottom of the screen where you can control your viewing options—click the Play button to start moving through your photos and click the Pause button to stop. You can also click the Right Arrow and Left Arrow buttons to view the next or previous photo.

Step Four:
One more thing: Try clicking the Toggle Film Strip button on the control palette (or just press Ctrl-F [Mac: Command-F]). This opens a filmstrip view of your photos on the bottom of the screen. So you don’t necessarily have to click the Right Arrow button or press the Right Arrow key a bunch of times to get to a photo that’s 25 photos into your list. You can just scroll the filmstrip until you see it and click on it. Nifty, huh?

Sorting Photos by Date and Viewing Filenames
When photos are imported into the Organizer, the Organizer automatically sorts them by date. How does it know on which dates the photos were taken? The time and date are embedded into the photo by your digital camera at the moment the photo is taken (this info is called EXIF data). The Organizer reads this info and then sorts your photos automatically by date, putting the newest ones on top. You can change that, though, and you can choose whether or not to view your filenames.
Step One:
By default, the newest photos are displayed first, so basically, your last photo shoot will be the first photos in the Organizer. You can see the exact date and time each photograph was taken by going under the View menu, and choosing Details. If you want to see the filenames, then under the View menu, choose File Names, as well.

Step Two:
If you’d prefer to see your photos in reverse order (the oldest photos up top), then choose Oldest from the Sort By pop-up menu above the top left of the Media Browser. There you have it!

Change the Time & Date of Your Photos (Great, If You Travel)
Let’s say you travel between time zones and you import a bunch of photos. Well, they’re all going to show up with the date and time that was set in your camera from your home location, not where you traveled. No sweat, though. If you ever want to change them to account for the time zone changes (or any other date/time you’d like), Elements has a way.
Step One:
First, select all the photos you want to set the time and date for by Ctrl-clicking (Mac: Command-clicking) on each image (or Shift-clicking on the first and last images if they are contiguous) in the Media Browser. Then, go under the Organizer’s Edit menu and choose Adjust Date and Time of Selected Items (or press Ctrl-J [Mac: Command-J]).

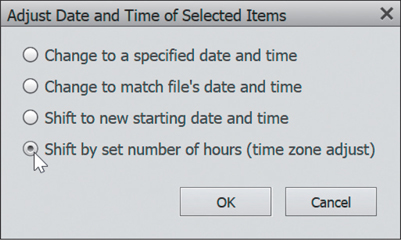
Step Two:
This brings up a dialog asking how you want to handle the date and time for these photos. For this example, select Shift by Set Number of Hours (Time Zone Adjust) and click OK.
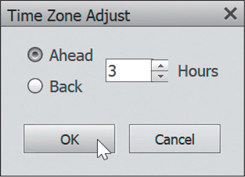
Step Three:
This brings up the Time Zone Adjust dialog, where you just choose whether you want to move the time ahead or back, and by how many hours. When you’re done, click OK and the date/time for the photos will be changed.
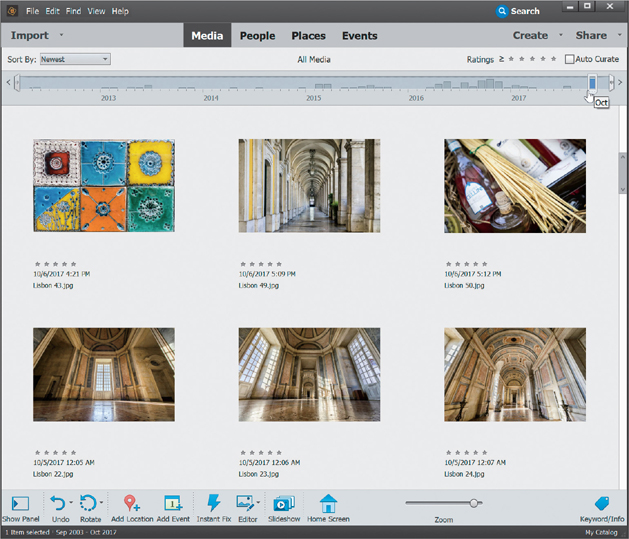
Finding Photos Fast by Their Month & Year
By default, the Organizer sorts your photos by date and time, with the most recent photos appearing at the top. You know and I know that it’s hard to always remember when you took some of your favorite photos, though. With the Timeline, you can at least get pretty close. Let’s say you’re trying to find photos you took in Lisbon in fall 2017. You may not remember exactly whether it was October or November, but by moving a slider you can find them really fast.
Step One:
First things first: You need to display the Timeline to use it. Go under the View menu and choose Timeline (or just press Ctrl-L [Mac: Command-L]). It’ll appear right above the Media Browser. We’re going to assume you’re trying to find photos you took in Lisbon in fall 2017 (as mentioned above). You see those bars along the Timeline that look like the little bar charts from Microsoft Excel? Well, the higher the bar, the more photos that appear in that month. So click on any month in 2017 and the photos taken in that month will appear in the Media Browser. As you slide your cursor to the left (or right), you’ll see each month’s name appear. When you move to October, photos taken in October 2017 will appear. Take a quick look to see if any of those photos are the ones from that trip. If they’re not in October, scroll on the Timeline to November, and those photos will be visible.
Smart Tags and Enhanced Searching
The way we search through a huge library of photos and videos and have a chance of actually finding the ones we’re looking for is by applying keywords (search terms) to each photo, and now video (new in Elements 2020). The downside of all this is the time it takes to keyword thousands of photos and videos. Luckily, that whole process is a lot easier thanks to Smart Tags, where Elements does the keywording for you automatically, and Enhanced Search, which takes the power of those tags and helps you find the images or videos you’re looking for fast.
Step One:
In the top-right corner of the Organizer, click on Search. This brings up a Search window, and you’ll see icons on the left representing things you can search for. The first icon at the top is the Smart Tags icon. Click on it and the Smart Tags panel pops out (as seen here), where you’ll see thumbnails with the names of each Smart Tag that Elements automatically applied to your images and videos (you don’t have to do anything to start this automatic smart tagging, it’s turned on by default), along with how many images and videos are tagged with each Smart Tag.

Step Two:
To see the images that have a particular Smart Tag applied to them, just click on the thumbnail and they appear in the Search window (behind the side panel). For example, here, I clicked on the Smart Tag “mountain,” and instantly all the images that Elements automatically tagged with the keyword mountain now appear. Now, let’s expand our search: if you tap on the thumbnail for “waterfall,” it shows you all the images with “waterfall” and “mountain” applied as keywords. If you look at the search field at the top of the screen, you’ll see “mountain / waterfall” (that’s your current search string). The cool (and powerful) thing is that you can keep adding more (or fewer) search terms (Smart Tags) just by clicking on those thumbnails, or click on the “x” to the right of a Smart Tag in the search field to remove it from your search.

Step Three:
Now, if there’s a particular image or video that has a Smart Tag that either you don’t want applied, or it’s just wrong, you can remove it by clicking on it, then clicking the Back arrow button in the top left to go back to the Media Browser. Then, Right-click on the photo and, under Remove Smart Tag, you’ll see a list of Smart Tags applied to the image. Choose the one you want to remove, and it’s gone. If you want to turn off this automatic Smart Tagging altogether, go to the Organizer’s Preferences (Ctrl-K [Mac: Command-K]), click on Media-Analysis on the left, and turn off the Images and/or Videos checkboxes under Automatically Analyze Media. That turns off the automatic tagging. (By the way, any tags it applied before you turned this off will still be there. This just turns off the feature going forward.)

Step Four:
So, the first icon at the top left is for seeing the Smart Tags that Elements added, but you can also see some other preset categories by moving your cursor over the other icons. When you do, it displays photos tagged with those categories, and you can add them to your search, just like you would with Smart Tags. There are icons for People, Places, Date, Folders, Keywords (ones you assigned to photos yourself), Albums, Events, star ratings, and even different types of media (photos, audio files, videos, and projects. Whew!). Here, I moved my cursor over the Places icon and you can see the places that I added photos to (we’ll look at Places, as well as some of these other categories, later in this chapter). (Note: If you want to go “old school,” you can type in search terms in the search field up top—just put a + [plus sign; for “and”] or / [forward slash; for “or”] between each search term.)
Tagging Your Photos (with Keyword Tags)
The real power of the Organizer appears when you assign tags (keywords) to your photos. This simple step makes finding the exact photos you want very fast and very easy. We just looked at the new Smart Tags feature, but you can also add keyword tags to your images manually. The first step is to decide whether you can use the pre-made tags that Adobe puts there for you or whether you need to create your own. In this situation, you’re going to create your own custom tags.
Step One:
Start by finding the Tags palette in the Organizer (it’s on the right side of the window). Adobe’s default set of keyword tag categories will appear in a vertical list. Now, there are a few different ways to tag photos, so let’s take a look at them all. In the end, they all do the same thing, just in a different way.

Step Two: The Really Easy Way
Let’s start by tagging the really easy way. Type a tag name in the Add Custom Keywords text field at the top of the Image Tags palette (right below the Tags palette). Then in the Media Browser, click on the photo (Ctrl-click [Mac: Command-click] to select multiple photos) you want to assign this tag to and click the Add button to the right of the text field. The tag will automatically be created and applied to the selected photo(s).

TIP: Use an Existing Keyword Tag
Since the Image Tags text field dynamically displays existing keyword tags (in a pop-up menu) based on the letters you type, you can use it to assign an existing keyword tag to your photos instead of creating a brand new one.
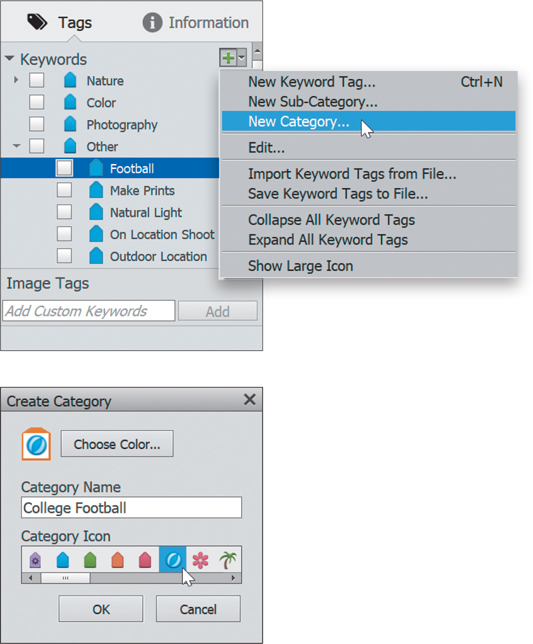
Step Three: The More Customized and Visual Way
The thing about Step Two is that it automatically creates your tag in the Other category. As you start tagging, you may want to categorize your tags and even create your own categories. So, let’s start by creating a custom category (in this case, we’re going to create a category for college football shots). Click on the Create New Keyword Tag button (the little green plus sign) at the top right of the Tags palette and choose New Category from the pop-up menu. This brings up the Create Category dialog. Type in a name for your category (I typed “College Football”). Now choose an icon from the Category Icon list and then click OK. (The icon choices are all pretty lame, so we’ll just choose the icon that looks like a ball here.)
Step Four:
To create your own custom tag within your new category, click on the Create New Keyword Tag button again and choose New Keyword Tag. This brings up the Create Keyword Tag dialog. Choose College Football from the Category pop-up menu (if it’s not already chosen), then in the Name field, type in a name for your new tag (here I entered “National Championship”). If you want to add additional notes about the photos, you can add them in the Note field, and you can choose a photo as an icon by clicking the Edit Icon button. Now click OK to create your tag.

Step Five:
Next, you’ll assign this tag to all the photos from this shoot. In the Media Browser, scroll to the photos from that shoot. We’ll start by tagging just one photo, so click on your new tag that appears in your Keywords list in the Tags palette and drag-and-drop that tag onto any one of the photos. That photo is now “tagged” and you’ll see a small tag icon appear below the right side of the photo’s thumbnail.

Step Six:
So at this point, we’ve only tagged one photo from this shoot. Drag-and-drop that same tag onto three more photos from the shoot, so a total of four photos are tagged. Now, in the Tags palette, click in the box to the left of the tag, and just those photos with that tag appear in the Media Browser. To see all your photos again, click in the box again.

TIP: Using Your Touchscreen
Back in Elements 15, they gave us touchscreen capabilities. So, if you have a touchscreen computer, you can just tap on your screen to do lots of things in the Organizer, like editing, sorting, and tagging.
Tagging Multiple Photos
Okay, if you had to tag any more than a few photos, you’ve probably realized that dragging-and-dropping the tag onto each photo is a pain in the neck. If you had a whole photo shoot, that process would take forever and you’d probably be getting ready to send Adobe (or me for even showing you this feature) a nasty email. You’ll be happy to know there are faster ways than this one-tag-at-a-time method. For example…
Step One:
To tag all the photos from your shoot at the same time, try this: First, click on any photo from the shoot. Then press-and-hold the Ctrl (Mac: Command) key and click on other photos from that particular shoot. As you click on them, they’ll become selected (each selected photo will have a blue stroke around it). Or, if all the photos are contiguous, click on the first image in the series, press-and-hold the Shift key, and then click on the last image in the series to select them all.
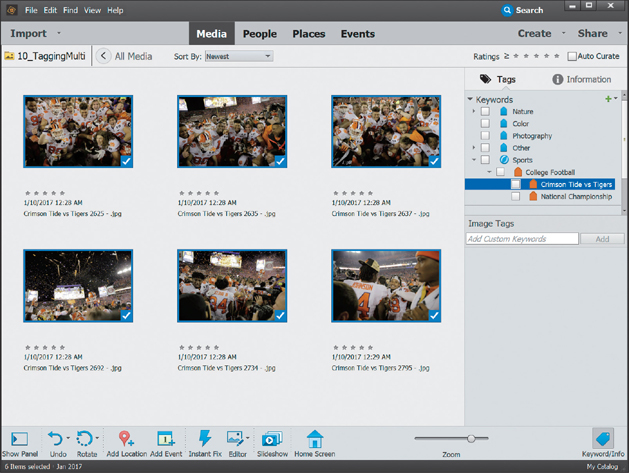
Step Two:
Now, drag-and-drop your chosen tag onto any one of those selected photos, and all of the selected photos will have that tag (here, I created a new Sports category, then made College Football a sub-category within it, and then added a Crimson Tide vs Tigers keyword tag). If you want to see just the photos from that shoot, click in the box to the left of that tag in the Tags palette and only photos with that tag will appear. By the way, if you decide you want to remove a tag from a photo, just Right-click on the tag icon below the photo and from the pop-up menu that appears, choose Remove Keyword Tag. If you have more than one tag applied, you can choose which tag you want removed by Right-clicking on its icon.

Assigning Multiple Tags to One Photo
Okay, what if you want to assign a keyword tag to a photo, but you also want to assign other keyword tags (perhaps an “Upload to Website” tag and a “Make Prints” tag) to that photo, as well? Here’s how:
Step One:
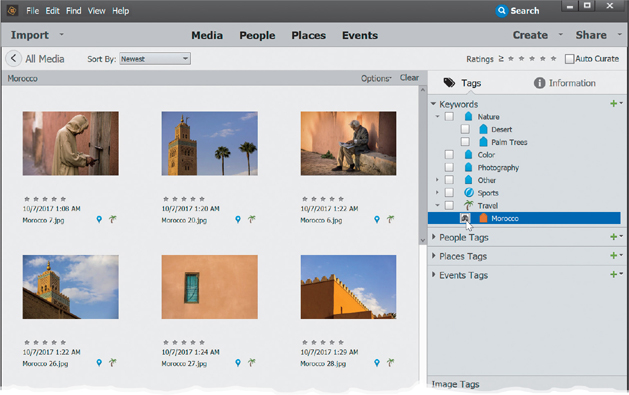
To assign multiple tags at once, first, of course, you have to create the tags you need, so go ahead and create your new tags by clicking on the Create New Keyword Tag button and choosing New Keyword Tag from the pop-up menu. Name them “Upload to Website,” “Make Prints,” and two others specific to this shoot. Now you have four tags you can assign. To assign all four tags at once, just press-and-hold the Ctrl (Mac: Command) key, then in the Tags palette, click on each tag you want to assign (Palm Trees, Make Prints, Upload to Website, and Morocco).

Step Two:
Then, click-and-drag those selected tags, and as you drag, you’ll see you’re dragging four tag icons as one group. Drop them onto a photo, and all four tags will be applied at once. If you want to apply the tags to more than one photo at a time, first press-and-hold the Ctrl (Mac: Command) key and click on all the photos you want to have all four tags. Then, go to the Tags palette, press-and-hold the Ctrl key again, and click on all the tags you want to apply. Drag those tags onto any one of the selected photos, and all the tags will be applied at once. Cool.

Tagging People in Photos and Videos
You’re either going to think this is the coolest, most advanced technology in all of Elements, or you’re going to think it’s creepy and very Big Brother-ish (from the book by George Orwell, not the TV show). Either way, it’s here to help you tag people easier because the Organizer can automatically find photos, and now videos, of people for you—as it has some sort of weird science, facial-recognition software built in (that at one point was developed for the CIA, which is all the more reason it belongs in Elements).
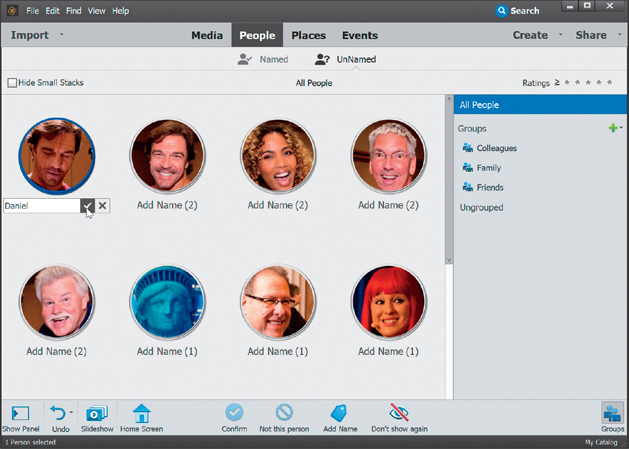
Step One:
Let’s say you want to quickly find all the photos of your sister. In the Organizer, at the top, click on People. By default, this shows all the people in your catalog that you haven’t tagged with a name, and that are in at least four photos. To see all unnamed people, turn off the Hide Small Stacks checkbox at the top left.

Step Two:
Just click on Add Name beneath one of the image thumbnails, type in a name to tag the photo(s) with, and press Enter (Mac: Return) or click the checkmark. If the keyword doesn’t already exist, this will create a new one. If Elements found something that isn’t a person in a photo (like the Statue of Liberty at the bottom) or is someone you don’t know (like from a travel photo or football game), click on the thumbnail and click the Don’t Show Again button in the taskbar at the bottom. The thumbnail will be removed from People view. If multiple images contain the same people, they’ll be stacked beneath the thumbnail, and the name you add to the thumbnail will be added to them, as well.
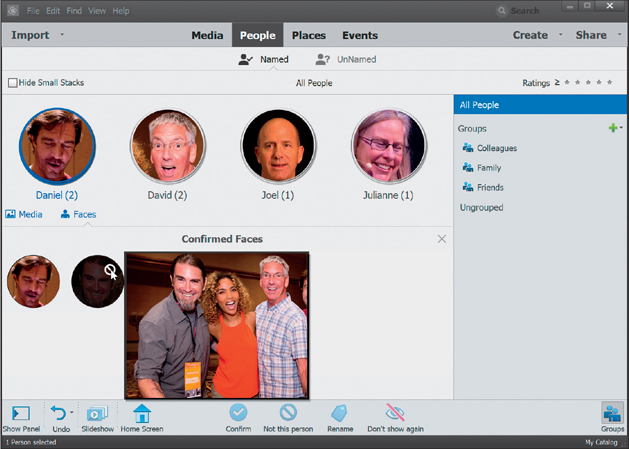
Step Three:
When you hover your cursor over a thumbnail, Media and Faces buttons appear below it. Click on Media to see all the photos that person is in. Click on Faces to see a close-up of the face in each. If you hover your cursor over one of these close-ups, a preview of the entire image appears. If this isn’t the right person, you have two options: The first is to click the international symbol for “No!” that appears in the top right of the close-up and it will be removed from the stack. The second is to click on that close-up to select it, click the Add Name button in the taskbar, then add that person’s name in the dialog that appears, and they will be removed from the stack. Once you’re done removing people that don’t match from a stack, add the remaining person’s name as we did in Step Two. That will move the entire stack under the Named header.

Step Four:
When you finish adding names to your people photos, they will all be stacked by name under the Named header (seen here). If you move your cursor over a stack from left to right (or right to left), it will scroll through the images in the stack, so you don’t have to open it to see the rest of the photos in it. If Elements thinks there might be untagged photos of the same person, you’ll see an exclamation point in a blue triangle to the left of their name. Click on that triangle to see the faces tagged as that person and the faces Elements thinks could be that person. If it’s the same person, click on the checkmark at the top left of the close-up when you move your cursor over it. If it’s not, click on the No! symbol. The Groups palette on the right works much like the Tags palette. You can add new groups or use the default ones for Friends and Family. Just drag-and-drop the group name onto the photo stack to add those photos to the group.
Step Five:
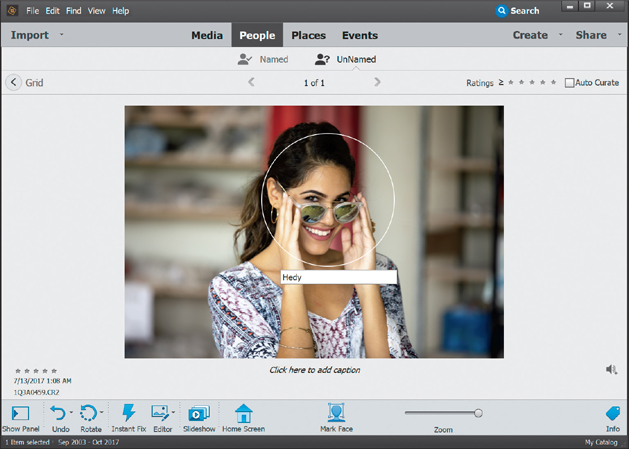
If Elements didn’t recognize a face, you can always add it manually. In the Media Browser, double-click on the image with the person you want to tag, then click the Mark Face icon in the bottom taskbar. Click-and-drag the rectangle over the person’s face, resize it by dragging any of the corner handles, and then give ‘em a name and click the green checkmark.
TIP: Train Elements to Find Faces
The more you tag and the more you use this face tagging technology, the better you train Elements to find faces. Each time you tag faces, it gets more and more accurate.
Step Six:
Tagging people in your videos (added in Elements 2020) works the same as tagging them in your photos. Elements searches through your video clips, identifies faces in them, and then puts these videos under the Unnamed header in People view for you. All you have to do is tag those videos with the name of the person it found (after all, it recognizes that there’s a face in the video, but it doesn’t know if the face is that of Aunt Martha or David Lee Roth—that part you have to help it with). Once you tag those vidoes, they’ll appear under the Named header, just like a still image. What’s pretty cool about this is that if you click on one of those named thumbnails, a preview pops up (just like with a photo and shown here) and it plays the video from the exact spot where that tagged person appears in the video. How awesome (creepy?) is that!

Albums: It’s How You Put Photos in Order One by One
Once you’ve tagged all your photos, you may want to create a collection of just the best photos (the ones you’ll show to your friends, family, or clients). You do that by creating an “album” (which used to be called a collection in earlier versions of Elements). An advantage of albums is that once photos are in an album, you can put the photos in the order you want them to appear (you can’t do that with tags). This is especially important when you start creating your own slide shows and web galleries.
Step One:
To create an album, go to My Albums in the Albums palette on the top-left side of the Organizer (it’s below the Import button). You create a new album by clicking on the Create New Album button (the green plus sign), and from the pop-up menu, choosing New Album. When the New Album pane appears on the right, enter a name for your album. You can then drag-and-drop images onto the New Album pane to add them to that album, or just click OK and add them after.

Step Two:
Now that your album has been created, you can either (a) drag the album icon onto the photos you want in your album, or (b) Ctrl-click (Mac: Command-click) on the photos to select them and then drag-and-drop them onto your album icon under My Albums. Either way, the photos will be added to your album. To see just those photos, click on your album name. Now, to put the photos in the order you want, set the Sort By pop-up menu at the top to Album Order, then just click on any photo and drag it into position. The Organizer automatically numbers the photos for you in each thumbnail’s top-left corner, so it’s easy to see what’s going on as you click-and-drag. To return to all of your images, click on the All Media button in the top-left corner of the Media Browser.

Choosing Your Own Icons for Keyword Tags
By default, a keyword tag uses the first photo you add to that tag as its icon. Most of the time, these icons are so small that you probably can’t tell what the icon represents. That’s why you’ll probably want to choose your own photo icons instead.
Step One:
It’s easier to choose an icon once you’ve created a keyword tag and tagged a few photos. Once you’ve done that, Right-click on your tag, and choose Edit from the pop-up menu. This brings up the Edit Keyword Tag dialog. In this dialog, click on the Edit Icon button to launch the dialog you see here on the right.
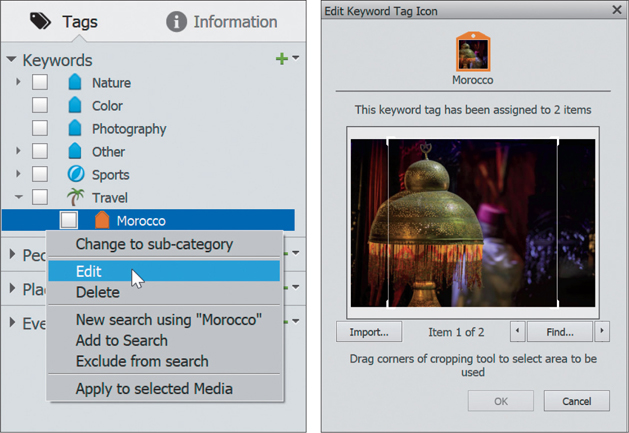
Step Two:
You’ll see the first photo you tagged with this keyword in the preview window (this is why it’s best to edit the icon after you’ve added tags to the photos). If you don’t want to use this first photo, click the arrow buttons under the bottom-right corner of the preview window to scroll through your photos. Once you find the photo you want to use, click-and-drag the little cropping border around (in the preview window) or make it smaller to isolate a part of it. This gives you a better close-up photo that’s easier to see as an icon. Then click OK in the open dialogs and that cropped image becomes your icon.

Deleting Keyword Tags or Albums
There will be plenty of times when you create a keyword tag or an album and later decide you don’t want it anymore. Here’s how to get rid of them:
Step One:
To delete a keyword tag or album, Right-click on the keyword tag or album you want to delete in the Tags palette on the right side of the Organizer or under My Albums in the Albums palette on the left, and choose Delete from the pop-up menu.

Step Two:
If you’re deleting a tag, it brings up a warning dialog letting you know that deleting the tag will remove it from all your photos and Saved Searches. If you want to remove that tag, click OK. If you’re deleting an album, it asks if you’re sure you want to delete the album. Click OK and it’s gone. However, it does not delete these photos from your main catalog— it just deletes that album.

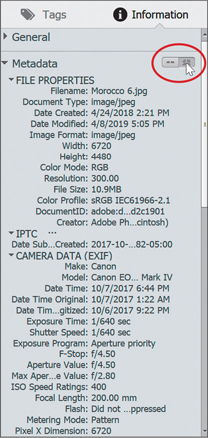
Seeing Your Photo’s Metadata (EXIF Info)
When you take a photo with a digital camera, a host of information about that photo is embedded into the photo by the camera itself. It contains just about everything, including the make and model of the camera that took the photo, the exact time the photo was taken, what the f-stop setting was, what the focal length of the lens was, and whether or not the flash fired when you took the shot. You can view all this info (called Exchangeable Image File [EXIF] data—also known as metadata) from right within the Organizer. Here’s how:
Step One:
To view a photo’s EXIF data, click on the image in the Media Browser and then click on Information in the top right of the Organizer (if you don’t see it, click on the Keyword/Info icon on the right side of the taskbar at the bottom of the window) to open the palette.

TIP: Information Palette Shortcut
You can also press Alt-Enter (Mac: Option- Return) to open/close the palette.
Step Two:
When the Information palette appears, you’ll see a General section, a Metadata section, and a History section. Click on Metadata to expand the section. This shows an abbreviated version of the photo’s EXIF data (basically, the make, model, ISO, exposure, shutter speed, f-stop, aperture, focal length of the lens, and the status of the flash). Of course, the camera embeds much more info than this. To see the full EXIF data, click on the Complete button (the right of the two buttons) to the right of the word “Metadata,” and you’ll get more information on this file than you’d probably ever want to know.
Adding Your Own Info to Photos
As soon as you press the shutter button, your digital camera automatically embeds information into your photos. But you can also add your own info if you want. This includes simple things like a photo caption (that can appear onscreen when you display your photos in a slide show), or notes for your personal use, either of which can be used to help you search for photos later, or you can add copyright and contact info.
Step One:
First, click on the photo in the Media Browser that you want to add your own info to, and then click on Information in the top right of the Organizer (or you can use the keyboard shortcut Alt-Enter [Mac: Option-Return]).

Step Two:
In the Information palette, you’ll see General, Metadata, and History sections. By default, the General section is selected. In this section, the first field is for adding a caption (I know, that’s pretty self-explanatory), and then the photo’s filename appears below that. It’s the third field down—Notes—where you add your own personal notes about the photo.

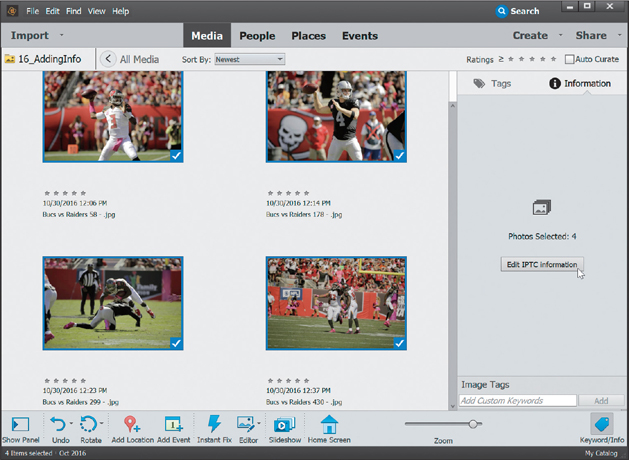
Step Three:
To add your copyright and contact info to your photos, you’ll have to select multiple photos, so Ctrl-click (Mac: Command-click) on the photos you want to add this info to, and then click on Information on the right. In the palette, you’ll see the number of photos you’ve selected, as well as an Edit IPTC Information button. Click that button.
Step Four:
This brings up the Edit IPTC Information dialog (shown here). You’ll see several IPTC metadata categories on the left-hand side. In the fields below each category, simply type in the information that you’d like to add to your photos (in the example shown here, I just added my basic copyright info in the IPTC Status section). Click Save, and that info will be added to all your selected photos.
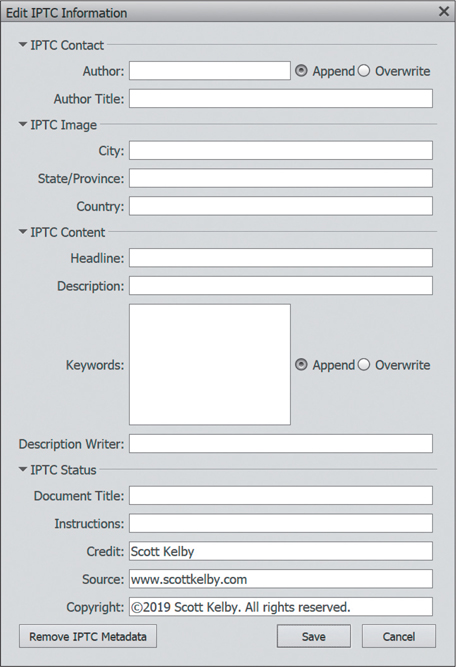
TIP: Remove Metadata
There’s a Remove IPTC Metadata button at the bottom left of the dialog that lets you delete your metadata. This can be useful if you don’t want those metadata-creepers looking at your camera settings like aperture, shutter speed, or even the make/model of your camera.
Finding Photos
Aside from actually doing things to fix your photos, finding them will be the most common task you do in Elements. If you’ve tagged them, then it’s easy to find groups of photos. But finding just one photo can be a little harder (not really too hard, though). You first have to narrow the number of photos to a small group. Then you’ll look through that group until you find the one you want. I know, it sounds complicated but it’s really not. Here are the most popular searching methods:
From the Timeline:
We saw this one earlier. The Timeline (from the View menu, choose Timeline to see it), which is a horizontal bar across the top of the Media Browser, shows you all the photos in your catalog. Months and years are represented along the Timeline. The years are visible below the Timeline; the small bars above the Timeline are individual months. If there is no bar visible, there are no photos stored in that month. A short bar means just a few photos were taken that month; a tall bar means lots of photos. If you hover your cursor over a bar, the month it represents will appear. To see the photos taken in that month, click on the bar and only those photos will be displayed in the Media Browser. Once you’ve clicked on a month, you can click-and-drag the locator bar to the right or left to display different months.
Using Keyword Tags:
If there’s a particular shot you’re looking for, and you’ve tagged all your shots with custom tags, then just go to the Tags palette and click in the box to the left of that tag. Now only shots with that tag will appear in the Media Browser.
By Details (Metadata):
If you want to do a search with more options to really narrow down the results, then go under the Organizer’s Find menu and choose By Details (Metadata). In the resulting dialog, you pick your search criteria from pop-up menus, and you can add as many different lines of criteria as you’d like by clicking on the + (plus sign) button on the far-right side of each criteria line. Here, I started by clicking the Any One of the Following Search Criteria [OR] radio button. Then, I searched for the keyword Morocco, but added more criteria, so it only searches for my 5-star images taken with my Canon Mark IV. You can also save this search by turning on the Save this Search Criteria as Saved Search checkbox at the bottom and giving the search a name. To use a saved search again, go under the Find menu, choose By Saved Searches, and then choose your saved criteria from the Saved Searches dialog.

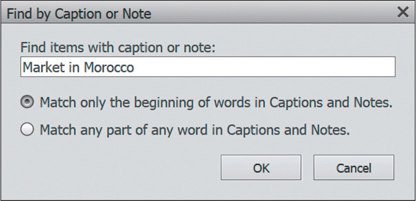
By Caption or Note:
If you’ve added personal notes within tags or you’ve added captions to individual photos, you can search those fields to help you narrow your search. Just go under the Organizer’s Find menu and choose By Caption or Note. Then, in the resulting dialog, enter the word(s) that you think may appear in the photo’s caption or note, and click OK. Only photos that have that word in a caption or note will appear in the Media Browser.
By History:
The Organizer keeps track of when you imported each photo and when you last shared it (via email, print, webpage, etc.), so if you can remember any of those dates, you’re in luck. Just go under the Organizer’s Find menu, under By History, and choose which attribute you want to search under in the submenu. (Note: Some of the options shown here are currently not available in the Elements 2020 version for the Mac.) A dialog with a list of names or locations and dates will appear. Click on a date or name, click OK, and only photos that fit that criterion will appear in the Media Browser.

Using the Search Feature:
Elements also has an enhanced Search feature that lets you search for photos by keyword tags, albums, folders, etc. (we looked at this earlier). In fact, it’s probably one of the most powerful and easiest ways to search, since you don’t have to worry as much about what you’re looking for and where to look for it. Just click on Search in the top right of the Organizer window and a bunch of search icons appear on the left. Here, I clicked on the Keywords icon, then clicked on Morocco to find the photos with that keyword. You can click on as many options as you’d like to add them to the search field up top to help narrow down your search (as shown here, where I also clicked on the Travel keyword).

Finding Duplicate Photos
If you’re like most photographers out there, when you take a photo of someone (or something), you don’t just take one. You take 18 or more. It’s totally normal. We figure the more photos we take, the better chance we have that at least one photo will be exactly what we want. The problem comes when we’re trying to organize our photos. We tend to build up huge libraries of photos that include a bunch of duplicates. I’m not talking exact filename duplicates (as if we imported the same photo twice), but duplicates in that one photo looks just like another. Well, Elements can help you find them.
Step One:
Let’s say you took some vacation photos, and you wanted to quickly sort through them to find the best ones. Chances are you probably shot a bunch of each place you visited to make sure you had at least one good one of each. You only really need one keeper, right? In the Organizer, select the group of photos you want to search through (you can press Ctrl-A [Mac: Command-A] to Select All, click on an album, or just Ctrl-click [Mac: Command-click] on as many images as you want to sort through). Then, go under the Find menu, under By Visual Searches, and choose Duplicate Photos. Depending on how many photos you’re looking through, it can take anywhere from a few seconds for 50 photos to a few minutes for a few thousand.

Step Two:
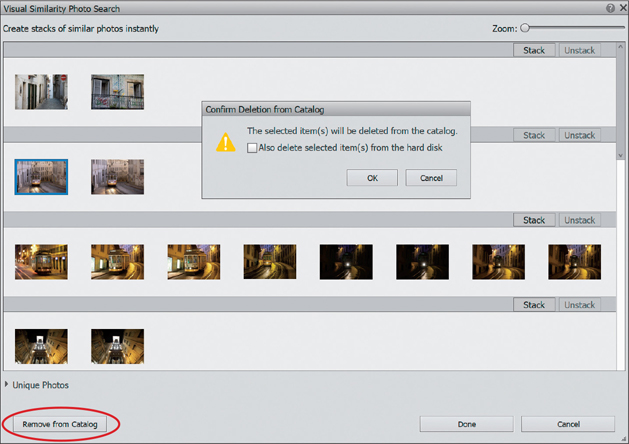
When Elements is done, you’ll see the Visual Similarity Photo Search dialog open. Elements will put each series of photos that it finds similar into suggested groups. For me, it was kinda hard to really see what was in each group, because the thumbnails are so small. Since we’re going to actually do things with the photos in these series, you may want to increase the size of the thumbnails of the photos using the slider at the top right (circled here).

Step Three:
At this point, you’ve got two choices for what you can do with these suggested duplicate photos: First, you can look through the photos to find the best one from the series (which is why increasing the thumbnail size is helpful here), and then delete the rest, since you’ll probably never use them. To do that, simply click on one of the photos (or Ctrl-click to select multiple ones) and click the Remove From Catalog button at the bottom left of the dialog (circled here). If you do that, Elements will give you the option to simply remove the photos from the catalog or remove them from the hard disk, as well. I also remove them from the hard disk altogether, since I don’t need them anymore.
Step Four:
Your other option is to group the series of photos together in a stack. That way, when you’re looking at them in the Organizer, you’ll have fewer photos to look through since the entire series will be stacked. To stack the photos together, just click the Stack button above the right side of each group. Or, if you only want to stack certain photos from the group together, then select them first, and click the Stack button. When you’re done stacking (or removing the photos from the catalog), just click the Done button in the lower-right corner to return to the Organizer.

Creating a Slide Show
If you’ve ever wanted a quick and easy way to show your photos off on your computer or laptop, then slide shows are one of the best. Add some music, a couple of transitions, and you’ve got a really nice way to let people sit back and enjoy your work.
Step One:
In the Organizer, Ctrl-click (Mac: Command-click) on the photos you want to display in a slide show, then click on Create in the top right of the window, and choose Slideshow.

TIP: Try Some of the Other Organizer Creations
You’ll notice that you can create lots of other cools things right from the Organizer’s Create menu (like photo books, greeting cards, and even an instant movie). Each option walks you through the process, and it couldn’t be easier to create some really fun things with your images.
Step Two:
A preview of your slide show will automatically begin generating, and then it will play a preview. Your first choice should be the overall theme you want for the slide show. So, click on the Themes icon on the left side of the window (it’s the little palette) to see your choices. Here, I chose Pan & Zoom, but there are a few others you can choose from here.

Step Three:
Once you make your choice, click Apply and it will launch you right back into the slide show with the theme you chose. If everything is good and you like the music (I doubt you will), then you could always be done with it and click Save or Export at the top right. But, if you want to customize it a little, then start by clicking on the Audio icon on the left (the music note).

Step Four:
This brings up some options for music that Elements includes. Just click on the play button for each song to hear a preview. If you find one you like, click on the plus sign icon to the right of the song’s title to add it to your Selected Tracks list. Once you have a couple songs in your list, you can click-and-drag them in the order you want them to play (if you have a long slide show and want multiple songs to play). To remove a song from the Selected Tracks list, just click on the minus sign icon to the right of the song’s name.

Step Five:
To see a few other options, click on the Media icon on the left (the one with the image and filmstrip). If you’ve added captions to your photos, turn on the Add Captions checkbox. You can also add text here, if you want to put your name on the slide at the beginning of the slide show or add one to the end, by clicking on the Add Text Slide icon at the top right of the Media options (the second one from the right; be sure to click on the last image in the grid of images first to add an ending slide). A dialog will appear where you can enter a title and subtitle for your slide show, as well as choose a beginning or ending slide (there are different slide options available here for each theme). If you want to add any other images or videos to your slide show, click on the Add Photos and Videos icon at the top right. And, if you want to remove a slide or image from your slide show, just Right-click on it in the grid and choose Remove.

Step Six:
Finally, you’ll want to save the slide show, so you can get back to it again. To save it in the Organizer, click Save in the top right. If you want to export it to Vimeo or YouTube or just save it as a file on your hard drive that you could send to someone else to view, click on Export.

Reducing Clutter by Stacking Your Photos
I love stacks, because as much as I try to compare my photos and get rid of the ones that I have duplicates of, I inevitably wind up with several photos that look the same. Well, there’s a feature called stacking and it works just like its real-world counterpart does—it stacks several photos on top of each other and you’ll just see the top one. So if you have 20 shots of the same scene, you don’t have to have all 20 cluttering up your Media Browser. Instead, you can have just one that represents all of them with the other 19 underneath it.
Step One:
With the Organizer open, press-and-hold the Ctrl (Mac: Command) key on your keyboard and click on all the photos you want to add to your stack (or if the images are contiguous, simply click on the first image in the series, press-and-hold the Shift key, and click on the last image in the series). Once they’re all selected, go under the Organizer’s Edit menu, under Stack, and choose Stack Selected Photos, or press Ctrl-Alt-S (Mac: Command-Alt-S).

Step Two:
No dialog appears, it just happens— your other photos now are stacked behind the first photo you selected (think of it as multiple layers, and on each layer is a photo, stacked one on top of another). You’ll know a photo thumbnail contains a stack because a Stack icon (which looks like a little stack of paper) will appear in the upper-right corner of your photo. You’ll also see a right-facing arrow to the right of the image thumbnail.

Step Three:
Once your photos are stacked, you can view these photos at any time by clicking on the photo with the Stack icon, and then going under the Edit menu, under Stack, and choosing Expand Photos in Stack, or just clicking on the right-facing arrow to the right of the image thumbnail. This is like doing a Find, where all the photos in your stack will appear in the Media Browser within a gray shaded area so you can see them without unstacking them. Then, to collapse the stack, just click on the left-facing arrow that appears to the right of the last image thumbnail in the stack.

Step Four:
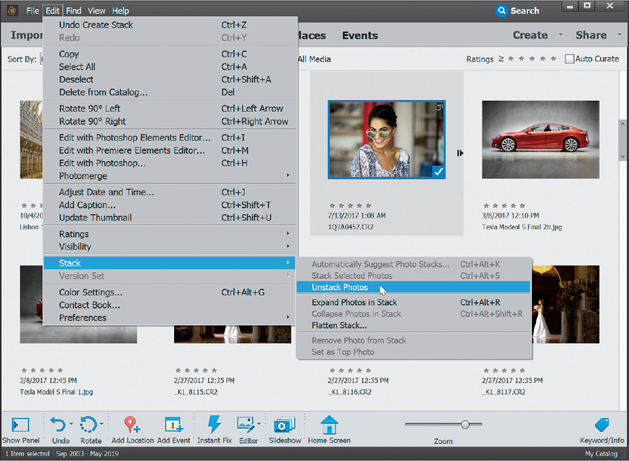
If you do want to unstack the photos, select the photo with the Stack icon in the Media Browser, then go under the Edit menu, under Stack, and choose Unstack Photos. If you decide you don’t want to keep any of the photos in your stack, select the photo with the Stack icon in the Media Browser, go back under the Edit menu, under Stack, and choose Flatten Stack. It’s like flattening your layers—all that’s left is that first photo. However, when you choose to flatten, you will have the choice of deleting the photos from your hard disk or not.
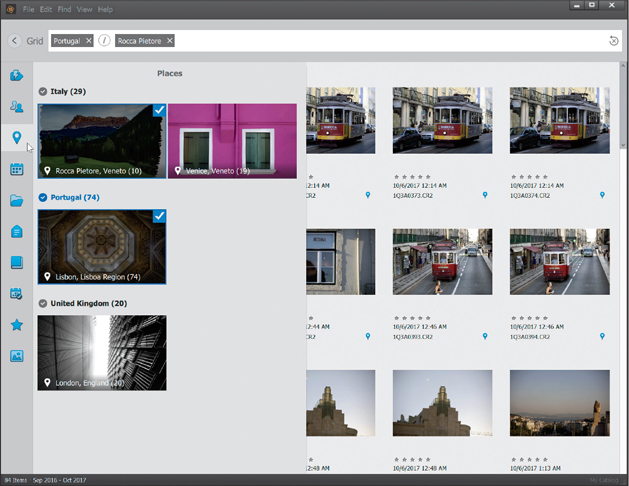
Places: Viewing Your Photos on a Map
Places in the Organizer is a way to view your photos based on where they were taken. It works great if you use your cell phone to take a lot of photos (which many people do nowadays), because your phone typically embeds location info right into the photo. But it doesn’t stop there. If you have a photo that doesn’t have the location info in it, it’s really simple to add it after the fact, so you can see all your photos on a map.
Step One:
In the Organizer, click on Places at the top of the window to switch to the Map view of your photos. In this example, I already have photos with location info in them, so if I click on Pinned at the top of the window, Elements shows where they were taken on the map.
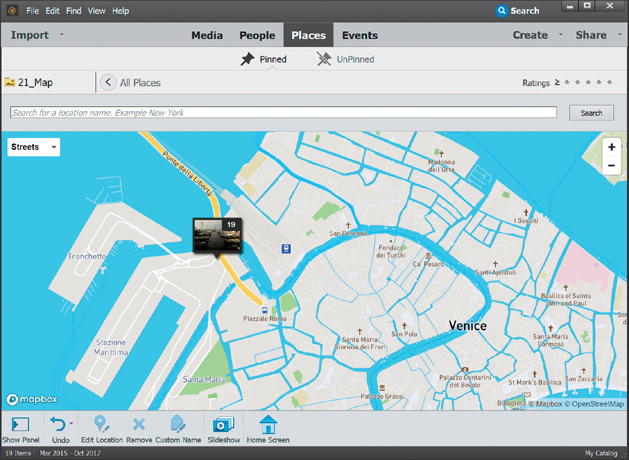
Step Two:
As you look at the map, you’ll see exactly how many photos were taken in each location. If you double-click on one of the locations on the map, Elements will automatically show those photos in the Media Browser.

Step Three:
This is a really good way to create an album based on places you’ve visited, because Elements does a lot of the work for you. Just click on a location on the map and all of the photos will appear. Then, click on the Create New Album button (the green plus sign) at the top left of the window (if you don’t see My Albums, click on the Show Panel icon at the bottom left of the window), choose New Album, give it a descriptive name, and you’re ready to go.

Step Four:
But what happens if you have photos without location or GPS info in them? Just click on Unpinned at the top of the window. That opens the panel on the left, where you’ll see all your photos with no GPS info associated with them grouped by date range. Click on the last image within a group to see the images in that group.

Step Five:
To associate a photo with a place, you can do one of two things: First, you could just drag-and-drop the photo from the panel onto the map to add it to a location (or Ctrl-click [Mac: Command-click] on several photos to select them, then drag-and-drop all of them onto the map at once). When it appears on the map, just click the little green checkmark to confirm that that is indeed where you want it to go.

Step Six:
If you can’t find the exact location on the map, then try searching for it. Select the photos you’re going to add to that location, then type in the location in the Search for a Location field above the map, and click the Search button. Depending on how specific you are in your location, you may get one or more suggestions that pop down from the search field. If so, just click on the correct one, and the location will show up on the map, with Elements asking if you want to place those photos in that location. Just click that little green checkmark to associate your selected photos with that location. You gotta love this stuff, huh?

TIP: Locations Stay with Your Images
What’s really cool is that if you have GPS info associated with your photos, any time you share them on places like Flickr (or any other photo sharing service that supports GPS info), your locations will automatically travel along with your images, so you won’t have to add the locations again on each site.
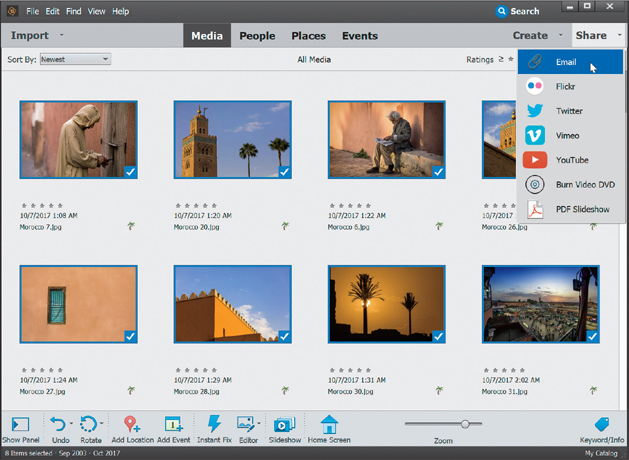
Sharing Your Photos
Elements gives you a number of ways to easily share your photos to places like Flickr and Twitter—you can even upload a video to YouTube right from the Organizer. Here, we’ll look at how to email your photos.
Step One:
Before you do anything, you have to set up Elements to work with your email. So, first go under the Edit (Mac: Elements) menu, under Preferences, and choose Email. In the Email preferences, click on the New button, give this email profile a descriptive name, and then choose whichever email provider you use from the Service Provider pop-up menu. Click OK.

Step Two:
From there, add your email address, your name, and the password for that email account, and then click the Validate button to confirm that Elements will work with your email account. When you’re done, you can click OK at the bottom right to close the Preferences dialog.

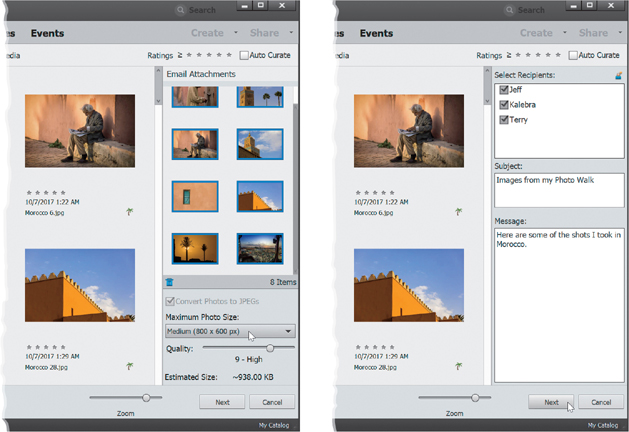
Step Three:
Now, just select the photos in the Organizer that you want to email, then click on Share (in the top right of the window), and choose Email (you’ll use this Share menu to share your images to places like Flickr, Twitter, etc., as well, and it’ll walk you through the process just like it does with Email).
Step Four:
In the Email Attachments palette, choose a preset for the size you want the photos resized to (I usually go with Medium). Click Next, select the recipients (click on the little person icon to the right to add them), and then enter a subject line and any message you want included. Finally, click Next and your photos will automatically be resized (not the originals, though) and emailed off to your friends and family.